Deprecated
-
This product is deprecated in this release. This functionality is now available using block-level backup.
-
New installations for this product are not supported in this release. Upgrade is supported to perform restores only. For instructions on transitioning from Image Level to block-level backups, see Transitioning from Image Level to Block-Level Backups.
See Deprecated Features, Products, and Platforms for information on deprecated products.
Performing a Restore
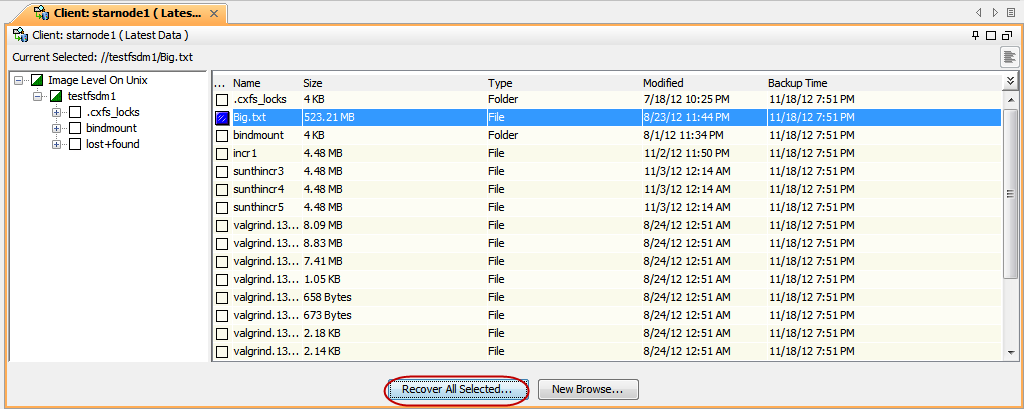
It is recommended that you perform a restore operation immediately after your first full backup to understand the process. The following section explains how to restore Big.txt file to a new location.
-
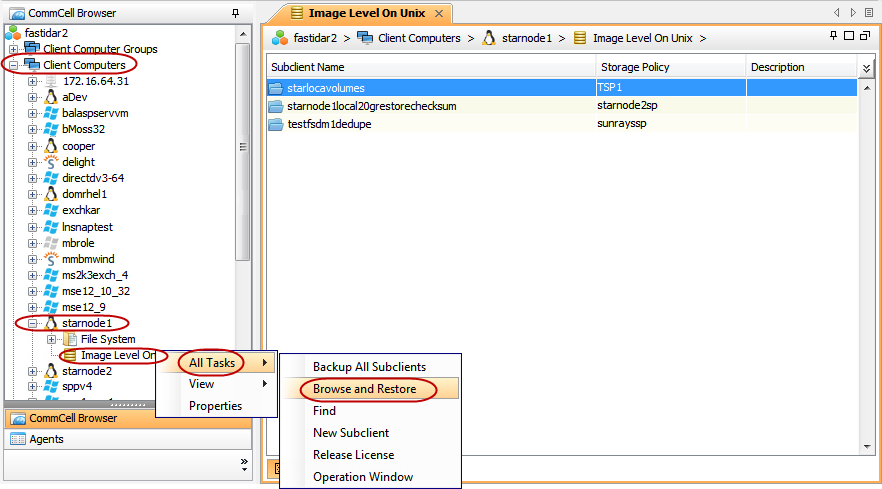
From the CommCell Browser, navigate to Client Computers | <Client>.
Right-click <Image Level>, and then click All Tasks | Browse and Restore.
-
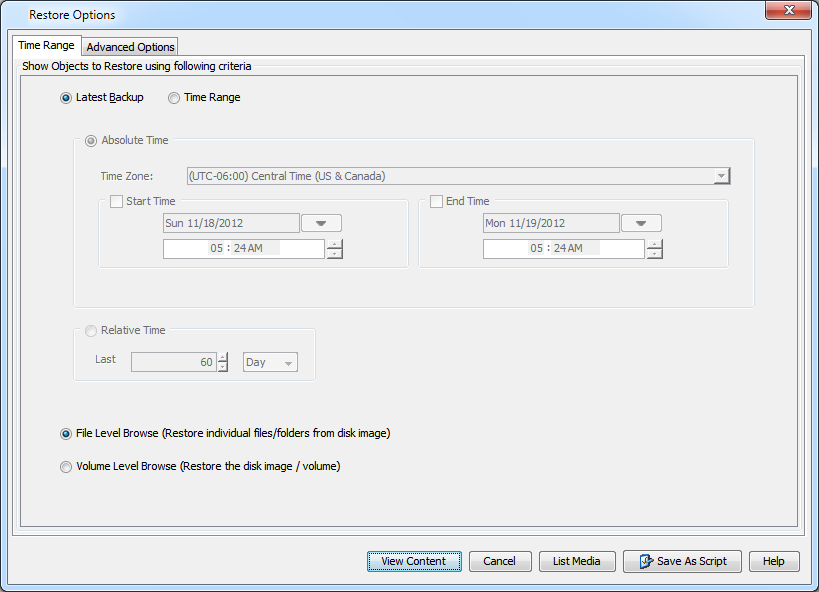
Click View Content.
-
Navigate to and select the Big.txt file.
Click Recover All Selected.
-
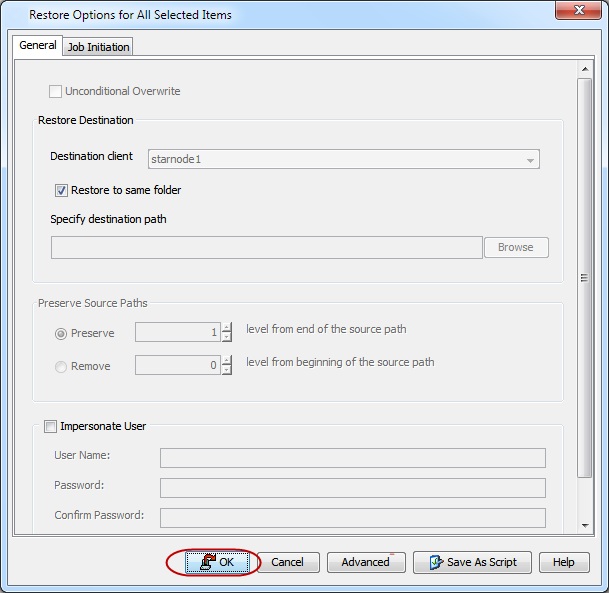
Click OK.
-
You can monitor the progress of the restore job in the Job Controller window of the CommCell Console.

-
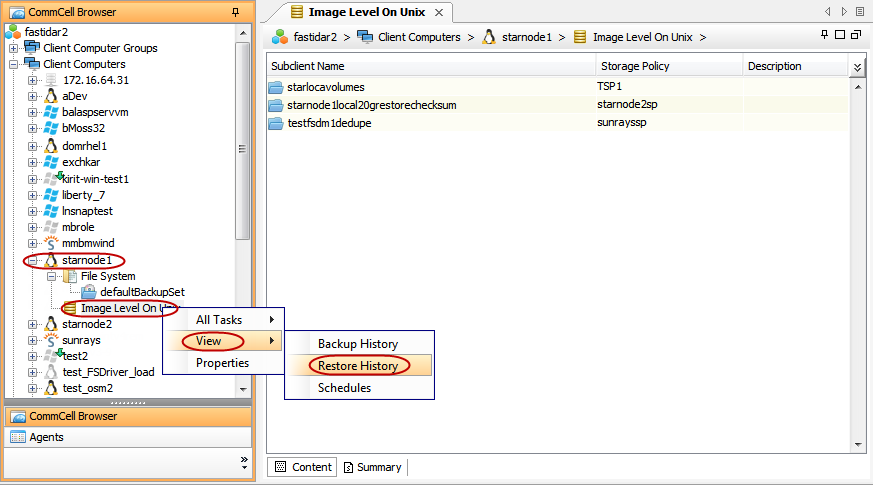
Once the restore job has completed, right-click Image Level, point to View and then click Restore History.
-
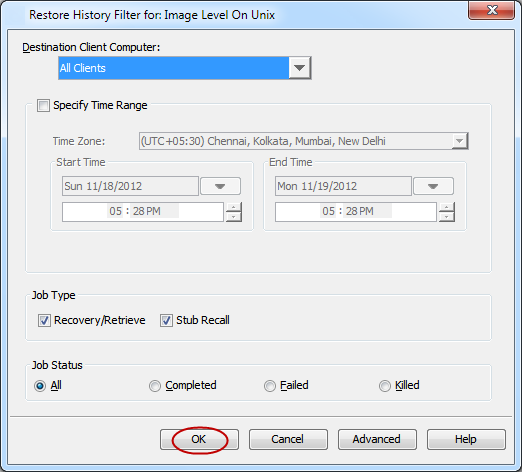
Click OK.
-
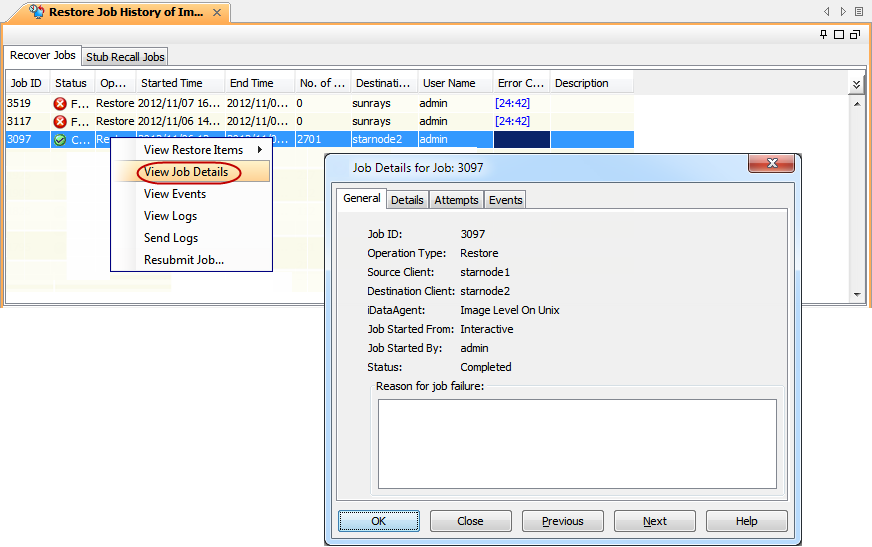
You can right-click the job and view the following details:
-
View Restore Items
You can view them as Successful, Failed, Skipped or All.
-
View Job Details
-
View Events of the restore job
-
View Log files of the restore job
-
-
Once the restore job completes successfully, verify that the file is restored to the original location.
[starnode1] # ls /testfsdm1
 Big.txt
Congratulations - You have successfully completed your first backup and restore.
If you want to further explore this Agent's features read the Advanced sections of this documentation.
Restoring Files (File Level Restore)
File Level Restores are possible only when metadata is collected during image level backups. This can be done by deselecting the Skip Metafile Creation check box in the Media tab of Advanced Backup Options dialog box. By default, this option is not selected. In addition, you need to select the File Level Browse option in the Browse Options dialog box for File Level Restores. By default, this option is selected.
It is recommended that file-level restores from disk or volume-level backups be performed only with small files. For example, restoring a 2GB file from a disk-level backup is not recommended.
Note
The Client and the MediaAgent must be running the same operating system when performing file level restores.
Restoring to a UNC Path and NFS-Mounted File System
For File Level Restores, besides restoring data to a client computer’s local drive, you can also restore data to a UNC path (Windows) or an NFS-Mounted File System (Unix).
Follow the steps given below to restore data to a UNC path (Windows) or NFS-mounted file system (Unix).
-
From the CommCell Browser, navigate to Client Computers | <Client>.
-
Right-click <Image Level>, and then click All Tasks |Browse and Restore.
-
Click View Content.
-
In the Client Browse tab, select the data to be restored and click Recover All Selected.
-
In the Destination Client list, click the client computer that hosts the mounted file system.
-
Clear the Restore to same folder check box.
-
In the Specify Destination Path, enter the network share or click Browse.
-
In the Browsing for destination folder on <client> dialog box, select the destination folder and click OK.
For example: /cont1/Log_Files
-
Click OK.

Restoring from an Auxiliary Backup Copy
To perform file level restores, the operating systems of the client and the MediaAgent computers should be the same. Follow the steps given below to restore files and folders:
-
From the CommCell Browser, navigate to Client Computers | <Client>.
-
Right-click <Image Level>, and then click All Tasks | Browse and Restore.
-
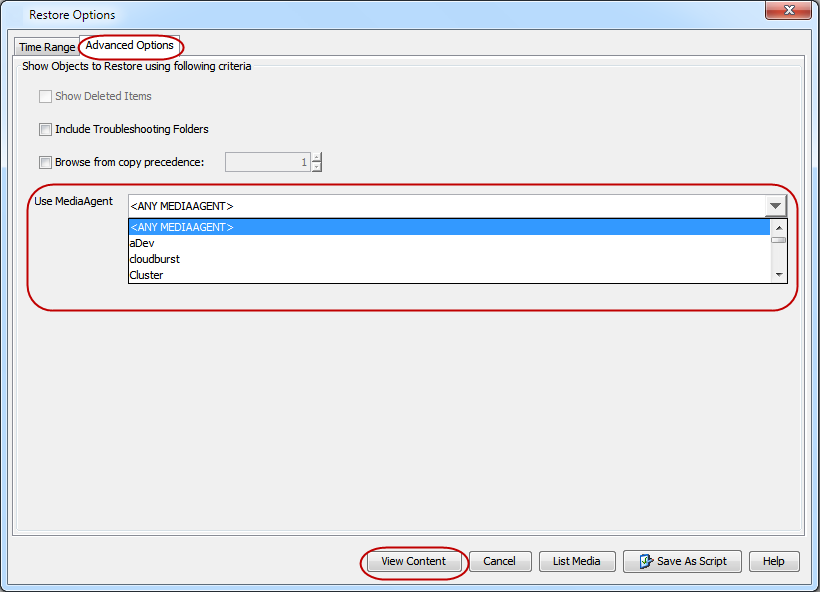
In the Restore Options dialog box, click Advanced Options tab.
-
Select the MediaAgent from the Use MediaAgent list, on which the primary copy of data is backed up.
-
Click View Content.
-
In the Client Browse tab, select the data that you want to restore and click Recover All Selected.
-
Clear the Restore to same folder check box.
-
In the Destination Client list, select the client with the same operating system as the MediaAgent.
-
Click OK.
File level restores can also be run using auxiliary backup copies. Follow the steps given below to restore files and folders if the operating systems of the client and the MediaAgent computers are not the same:
-
From the CommCell Browser, navigate to Client Computers | <Client>.
-
Right-click <Image Level>, and then click All Tasks | Browse and Restore.
-
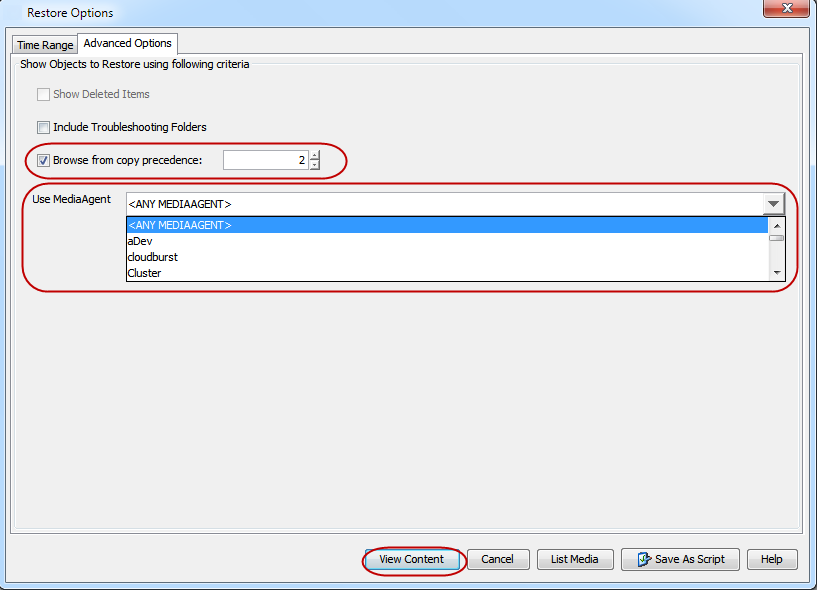
In the Restore Options dialog box, click Advanced Options tab.
-
Select the Browse from copy precedence check box, and then in the Copy Precedence box, type or select 2 as the copy precedence number.
-
Select the MediaAgent from the Use MediaAgent list, on which the primary copy of data is backed up.
-
Click View Content.
-
In the Client Browse tab, select the data that you want to restore and click Recover All Selected.
-
In the Destination Client list, select the client with the same operating system as the MediaAgent.
-
Click OK.
Restoring Volumes (Volume Level Restore)
For Volume Level restores, the destination volume must be at least as large as the volume from which the data was backed up. This is true regardless of the amount of data that is actually restored. For example, if you back up a 10 GB volume that contains 100 MB of data, you can only restore that data to a volume that is 10 GB or larger. The restore operation will fail if the destination volume is smaller than the source volume. We recommend that you restore data to a volume that is at least 1 MB larger than the source volume. Also, ensure that the sector size on the destination disk and the source disk match.
You must select the Volume Level Browse option in the Browse Options dialog box before starting the restore. By default, this option is not selected.
Note
-
Do not run Volume Level restore if the destination volume contains OS files.
-
You must present the volumes of a clustered shared disk as local disks to perform restores.
-
Make sure that the destination volume is not busy as it must be unmounted to perform restores.
Restoring as Physical Volumes
-
From the CommCell Browser, navigate to Client Computers | <Client>.
-
Right-click <Image Level>, and then click All Tasks | Browse and Restore.
-
In the Restore Options dialog box, select the Volume Level Browse (Restore the disk image/volume) check box.
-
Click View Content.
-
In the Client Browse tab, select the volume to be restored and click Recover All Selected.
-
Click OK.
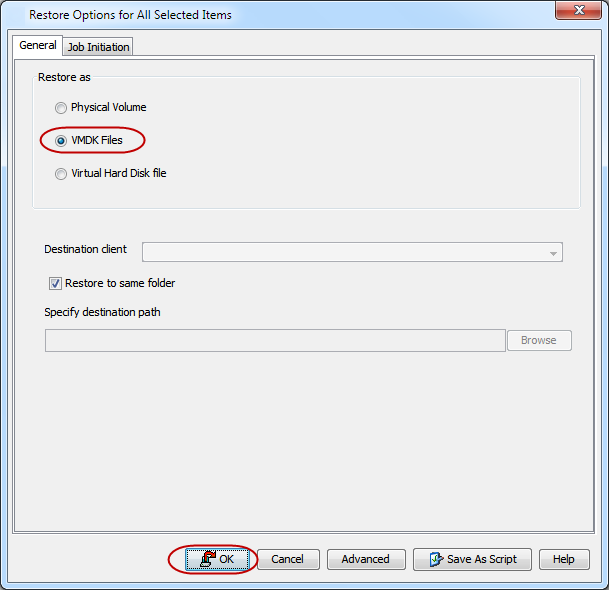
Restoring as Virtual Machine File
-
From the CommCell Browser, navigate to Client Computers | <Client>.
-
Right-click <Image Level>, and then click All Tasks | Browse and Restore.
-
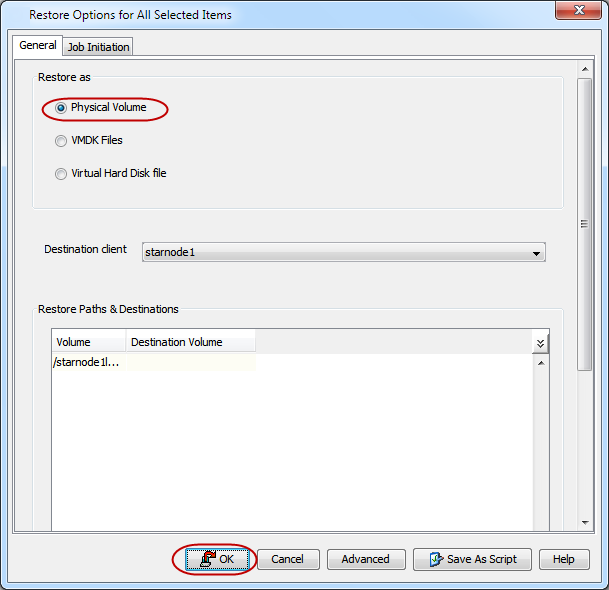
In the Restore Options dialog box, select the Volume Level Browse (Restore the disk image/volume) check box.
-
Click View Content.
-
In the Client Browse tab, select the volume to be restored and click Recover All Selected.
-
Click VMDK Files.
-
Click OK.
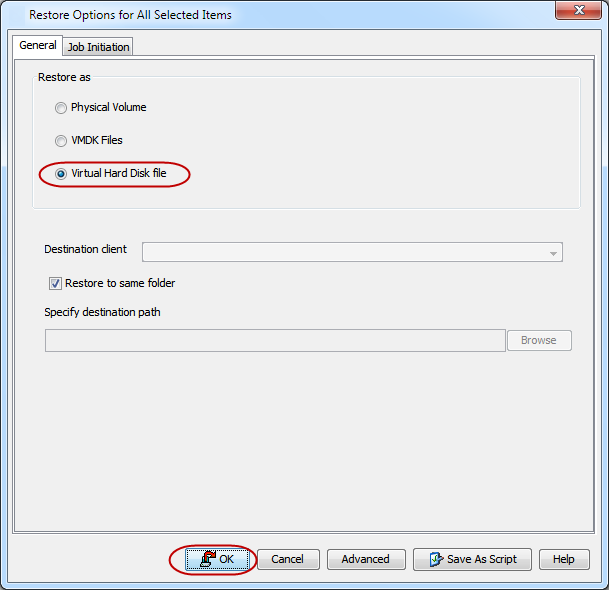
Restoring as Virtual Hard Disk File
-
From the CommCell Browser, navigate to Client Computers | <Client>.
-
Right-click <Image Level>, and then click All Tasks | Browse and Restore.
-
In the Restore Options dialog box, select the Volume Level Browse (Restore the disk image/volume) check box.
-
Click View Content.
-
In the Client Browse tab, select the volume to be restored and click Recover All Selected.
-
Click Virtual Hard Disk File.
-
Click OK.
Disabling Automatic Mounting of a Restored Disk
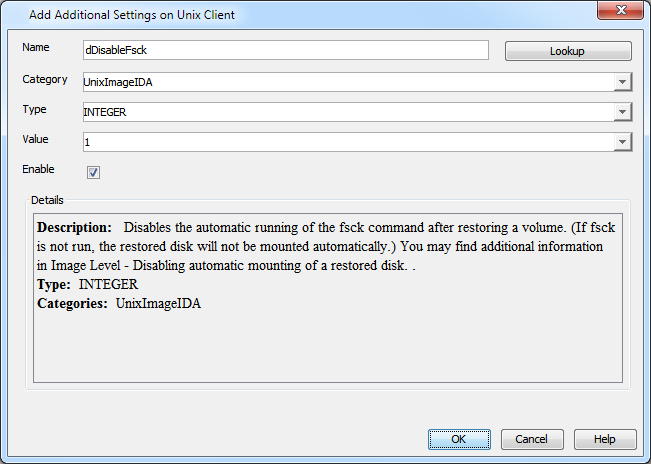
By default, the operating system level command, fsck, is run automatically after a volume restore to mount the restored disk. However, you can disable automatic running of this command using the following steps:
-
From the CommCell Console, navigate to Client Computers.
-
Right-click the <Client>, and then click Properties.
-
Click Advanced and then click Additional Settings tab.
-
Click Add.
-
In the Name box, type dDisableFsck.
The Category and Type fields are populated automatically.
-
In the Value field, type 1.
-
Click OK.
Performing an Out-of-Place Restore
You can restore volume level data to the following locations:
-
Different volume on the same computer from which the data was backed up
-
Different computer
Keep in mind that the destination computer must reside in the same CommCell as the client whose volume was backed up.
Note
If no destination volume is specified, the system attempts to restore to a volume on the destination client with the same name as the one being restored. If no such volume exists, the restore operation fails.
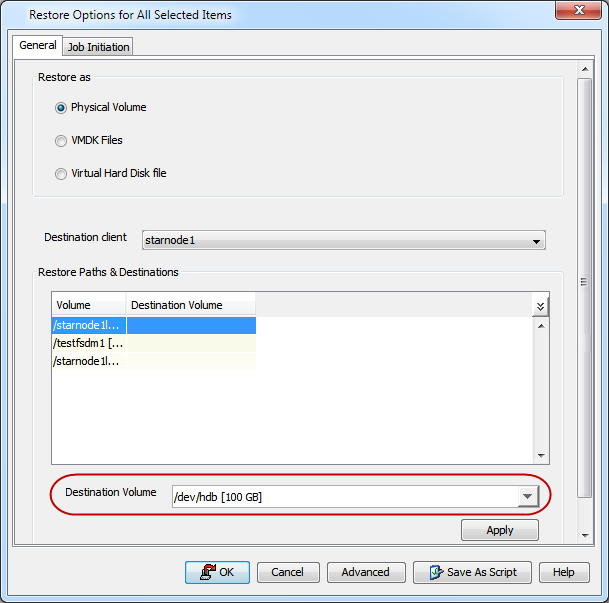
Restoring to a Different Location on the Same Client
Volume Level
Follow the steps given below to restore a volume to a different volume on the same client from which data is backed up:
-
From the CommCell Browser, navigate to Client Computers | <Client>.
-
Right-click <Image Level>, and then click All Tasks | Browse and Restore.
-
In the Restore Options dialog box, select the Volume Level Browse (Restore the disk image/volume) check box.
-
Click View Content.
-
In the Client Browse tab, select the volume to be restored and click Recover All Selected.
-
Click in the Destination Volume column under Restore Paths & Destinations.
-
Select the desired volume from the Destination Volume list.
-
Click Apply.
-
Click OK.
File Level
If the Image Level backup contains metadata information, you can perform a File Level restore operation on the Image Level Backup. By default, files are restored to the same folder. However, while restoring the files related to system state, it is recommended to perform an Out-of-Place restore. This will ensure that the existing files are not overwritten.
You can restore the file level data to the following locations:
-
Different folder on the same computer from which the data was backed up
-
Different computer
Keep in mind that the destination computer must reside in the same CommCell as the client whose data was backed up.
Follow the steps given below to restore file level data to a different folder on the same client from which data is backed up:
-
From the CommCell Browser, navigate to Client Computers | <Client>.
-
Right-click <Image Level>, and then click All Tasks | Browse and Restore.
-
Click View Content.
-
In the Client Browse tab, select the data to be restored and click Recover All Selected.
-
Clear the Restore to same folder check box.
-
Click Browse to specify the destination path.
-
Click OK.

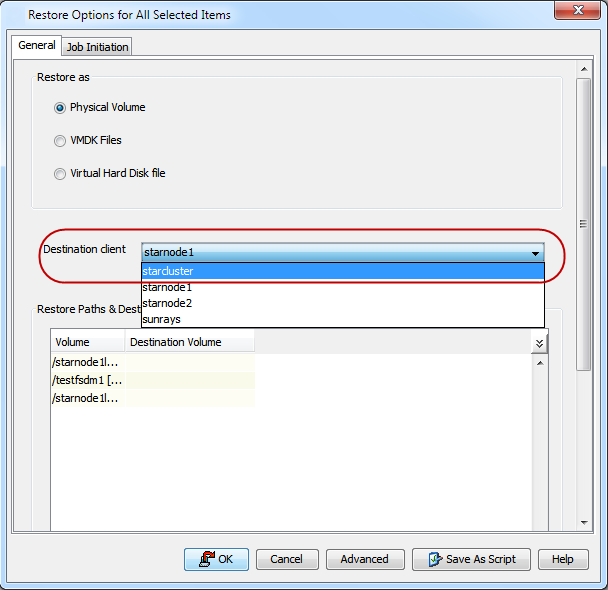
Restoring Data to a Different Client
Follow the steps given below to restore volume level data to a different client:
-
From the CommCell Browser, navigate to Client Computers | <Client>.
-
Right-click <Image Level>, and then click All Tasks | Browse and Restore.
-
In the Restore Options dialog box, select the Volume Level Browse (Restore the disk image/volume) check box.
-
Click View Content.
-
In the Client Browse tab, select the volume to be restored and click Recover All Selected.
-
Select the desired client from the Destination client list.
-
Click OK.
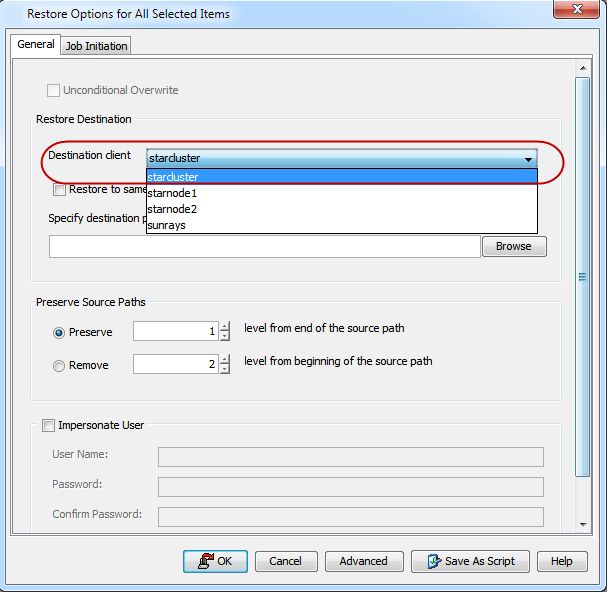
Follow the steps given below to restore file level data to a different client:
-
From the CommCell Browser, navigate to Client Computers | <Client>.
-
Right-click <Image Level>, and then click All Tasks | Browse and Restore.
-
Click View Content.
-
In the Client Browse tab, select the data to be restored and click Recover All Selected.
-
Clear the Restore to same folder check box.
-
In the Destination Client list, select the client. You can select any client that is in the same CommCell as that of the client from which the data was backed up.
-
Click OK.
Performing a Cross-Platform Restore
Volume Level
You can perform the following cross-platform restores :
- Restores across all the supported versions of Unix.
Follow the steps given below to perform a volume level cross-platform restore:
-
From the CommCell Browser, navigate to Client Computers | <Client>.
-
Right-click <Image Level>, and then click All Tasks | Browse and Restore.
-
In the Restore Options dialog box, select the Volume Level Browse (Restore the disk image/volume) check box.
-
Click View Content.
-
In the Client Browse tab, select the volume to be restored and click Recover All Selected.
-
In the Destination Client list, select the client. You can select any client that is in the same CommCell as that of the client from which the data was backed up.
-
Click OK.
File Level
File level cross platform restores are supported from Windows to Windows and from Unix to Unix.
Follow the steps given below to perform a file level cross-platform restore:
-
From the CommCell Browser, navigate to Client Computers | <Client>.
-
Right-click <Image Level>, and then click All Tasks | Browse and Restore.
-
Click View Content.
-
In the Client Browse tab, select the data to be restored and click Recover All Selected.
-
Clear the Restore to same folder check box.
-
In the Destination Client list, select the client. You can select any client that is in the same CommCell as that of the client from which the data was backed up.
-
Click Browse to specify the destination path.
-
Click OK.
Restore an Oracle Instance
Use the following steps to restore an Oracle instance:
-
Shut down the Oracle database:
SQL> shutdown immediate -
From the CommCell Browser, navigate to Client Computers | <Client>.
-
Right-click <Image Level>, and then click All Tasks | Browse and Restore.
-
In the Restore Options dialog box, select the Volume Level Browse (Restore the disk image/volume) check box.
-
Click View Content.
-
In the Client Browse tab, select the volume to be restored and click Recover All Selected.
-
In the Destination Client list, select the desired client.
-
Click OK.
-
In the restored Oracle archive log directory, locate the following two files:
-
CTRLFILELOCATIONS - This file contains the location of all the control files.
-
CTRLFILEBACKUP.CTL - This is the backup control file.
-
-
Use CTRLFILEBACKUP.CTL to overwrite all the control files mentioned in the CTRLFILELOCATIONS.
Example for Windows:
If your restored Oracle archive log volume is g:, then type the following commands:
copy g:\oracleDB\CtrlFileBackup.ctl c:\oracledata\control01.ctlcopy g:\oracleDB\CtrlFileBackup.ctl c:\oracledata\control02.ctlcopy g:\oracleDB\CtrlFileBackup.ctl c:\oracledata\control03.ctl -
Log in to SQL with sysdba privileges, and type the command:
startup mount; -
After the database is mounted, type the command to recover the database:
recover database until cancel using backup controlfile; -
After the prompt, type auto or enter the archive log directory location to apply the archived logs.
-
Type the command:
alter database open resetlogs; -
Now the database should be in open mode; the production server is now fully restored and ready for use.
Restore an Oracle Instance Out-of-Place
Use the following steps to restore an Oracle instance out-of-place.
-
From the CommCell Browser, navigate to Client Computers | <Client>.
-
Right-click <Image Level>, and then click All Tasks | Browse and Restore.
-
In the Restore Options dialog box, select the Volume Level Browse (Restore the disk image/volume) check box.
-
Click View Content.
-
In the Client Browse tab, select the volume to be restored and click Recover All Selected.
-
In the Destination Client list, select the desired client.
-
Click OK.
-
After the restore job has completed, shut down the Oracle database:
SQL> shutdown immediate -
Change the drive letter or mount point of the restored Oracle data file volume and Oracle archive file volume, to match the original drive letter or mount point of the Oracle volumes.
-
In the restored Oracle archive log directory, locate the following two files:
-
CTRLFILELOCATIONS - This file contains the location of all the control files.
-
CTRLFILEBACKUP.CTL - This is the backup control file.
-
-
Use CTRLFILEBACKUP.CTL to overwrite all the control files mentioned in the CTRLFILELOCATIONS.
Example for Windows:
If your restored Oracle archive log volume is g:, then type the following commands:
copy g:\oracleDB\CtrlFileBackup.ctl c:\oracledata\control01.ctlcopy g:\oracleDB\CtrlFileBackup.ctl c:\oracledata\control02.ctlcopy g:\oracleDB\CtrlFileBackup.ctl c:\oracledata\control03.ctl -
Log in to SQL with sysdba privileges, and type the command:
startup mount; -
After the database is mounted, type the command to recover the database:
recover database until cancel using backup controlfile; -
After the prompt, type:
auto -
Type the command:
alter database open resetlogs; -
Now the database should be in open mode; the production server is now fully restored and ready for use.
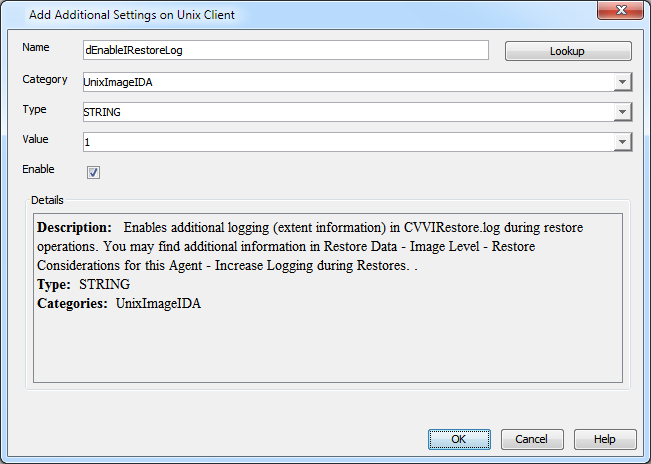
Increase Logging during Restores
By default, restore operations are logged in the CVVIRestore.log file. You can include additional logging, such as extent information in the CVVIRestore.log file. Extent size specifies the number of bytes represented by a single bit in the bitmap used to identify the changed data on a disk volume.
Use the following steps to add additional logging:
-
From the CommCell Console, navigate to Client Computers.
-
Right-click the <Client>, and then click Properties.
-
Click Advanced and then click Additional Settings tab.
-
Click Add.
-
In the Name field, type dEnableIRestoreLog.
The Category and Type fields are populated automatically.
-
In the Value field, type 1.
-
Click OK.
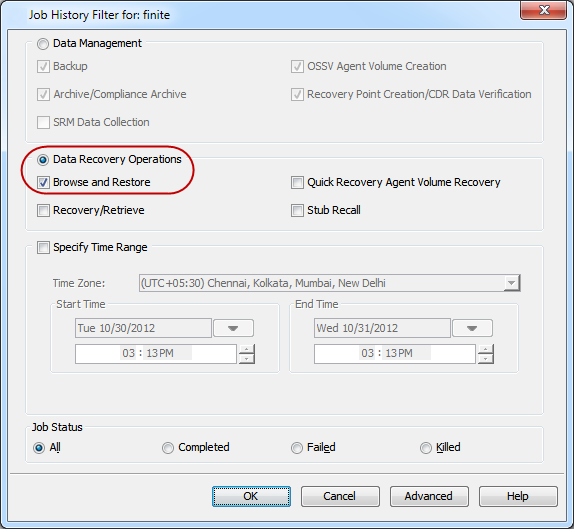
Resubmitting a Restore Job
You can rerun a failed or completed restore job. This is useful when you want to use all the options and settings configured for the original job.
Follow the steps given below to rerun a restore job:
-
From the CommCell Browser, navigate to Client Computers.
-
Right-click the <Client> and click View | Job History.
-
Select Data Recovery Operations.
-
Select the Browse and Restore check box and clear all other check boxes.
-
Click OK.
-
Right-click the restore job that you want to resubmit from the Data Recovery Job History tab and click Resubmit Job.
-
Click OK to start the restore.
Restoring Deleted Files
Use the following steps to restore deleted items:
-
Right-click <Image Level>, and then click All Tasks | Browse and Restore.
-
In the Restore Options dialog box, select the Volume Level Browse (Restore the disk image/volume) check box.
-
Click View Content.
-
In the Client Browse tab, select the volume to be restored and click Recover All Selected.
-
Click Advanced.
-
Select the Browse Options tab.
-
Select the Restore deleted items check box and then select the Specify Time Range check box.
-
Select the time range to restore the files, deleted in that period of time.
-
In the Advanced Restore Options dialog box, click OK.
-
In the Restore Options for All Selected Items dialog box,click OK.

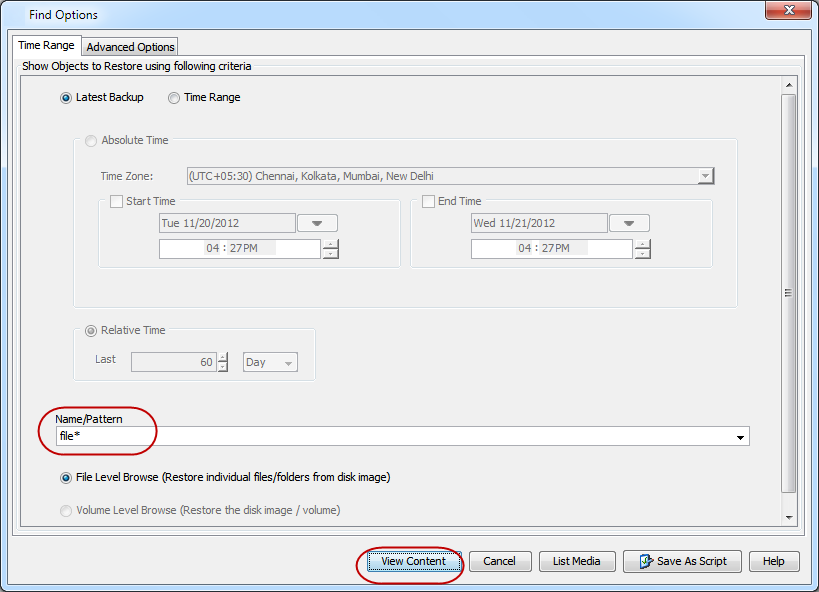
Find a File or Directory
The Find option allows you to search for a given file, directory name, or a name pattern. You can perform a Find operation from the agent, subclient, or backup job history level.
Find has the capability to browse multiple indexes which allows you to find beyond the last full backup (or new index) as long as the data resides on an index that exists within the retention period.
-
From the CommCell Browser, navigate to Client Computers | <Client>.
-
Right-click <Image Level>, and then click All Tasks |Find.
-
In the Find Options dialog box, enter the file or directory name pattern to be searched in the Name/Pattern box.
-
Click View Content.
Find and Restore
Use the following steps to find and restore a given file from the search results:
-
From the CommCell Browser, navigate to Client Computers | <Client>.
-
Right-click <Image Level>, and then click All Tasks | Find.
-
In the Find Options dialog box, enter the file or directory name pattern to be searched in the Name/Pattern box.
-
Click View Content. The latest data matching the file or directory name pattern backed up by all the subclients is displayed in the Search Results tab.
-
From the search results list, right-click the desired file/ folder name and click Restore.

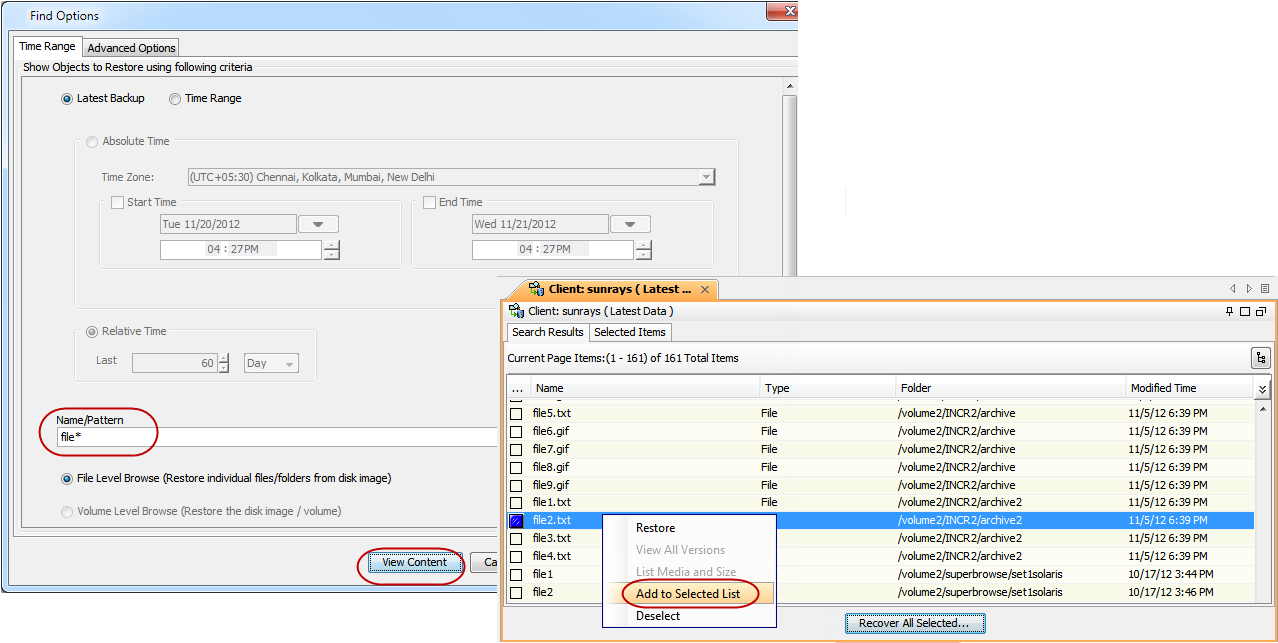
Add Items to a Selected List
Use the following steps to add the desired file or files from the search results to the selected items list and then to restore the respective file or files:
-
From the CommCell Browser, navigate to Client Computers | <Client>.
-
Right-click <Image Level>, and then click All Tasks | Find.
-
In the Find Options dialog box, enter the file or directory name pattern to be searched in the Name/Pattern box.
-
Click View Content. The latest data matching the file or directory name pattern backed up by all the subclients is displayed in the Search Results tab.
-
From the search results list, right-click the desired file name and click Add to Selected List.
-
Click Selected Items tab and right-click the desired file or files.
-
Click Restore.
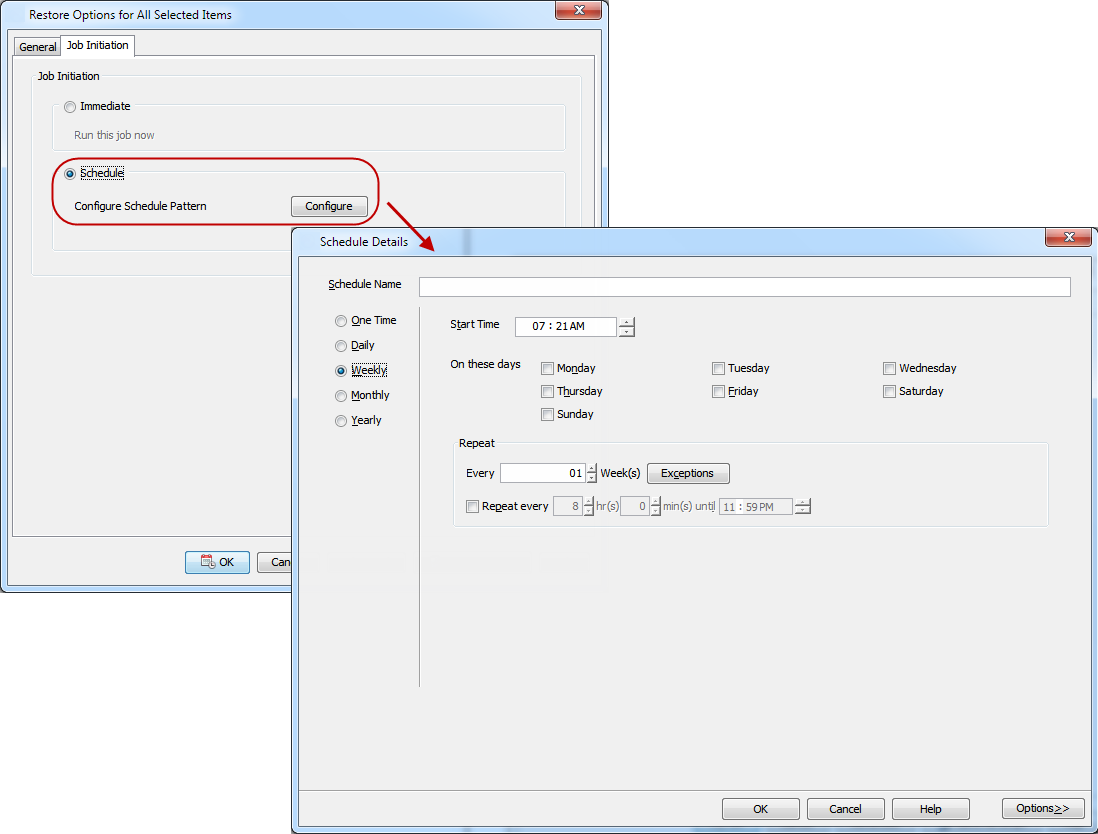
Scheduling a Restore
-
From the CommCell Console, navigate to Client Computers | <Client>.
-
Right-click <Image Level>, and then click All Tasks | Browse and Restore.
-
Click View Content.
-
Select the data to restore and click Recover All Selected.
-
Click the Job Initiation tab and click Schedule.
-
Click Configure.
-
Select the appropriate scheduling options. For example:
-
Click Weekly.
-
Check the days you want the run the restore job.
-
Change the Start Time to 9:00 PM
-
Click OK to close the Schedule Details dialog
-
Click OK to close the Restore Options dialog
The restore job will execute as per the schedule.
-
Managing Restore Jobs
Once you initiate the restore operation, a restore job is generated in the Job Controller. Jobs can be managed in a number of ways. The following sections provide information on the different job management options available:
Controlling Jobs
The following controls are available for running jobs in the Job Controller window:
|
Suspend |
Temporarily stops a job. A suspended job is not terminated; it can be restarted at a later time. |
|
Resume |
Resumes a job and returns the status to Waiting, Pending, Queued, or Running. The status depends on the availability of resources, the state of the Operation Windows, or the Activity Control setting. |
|
Kill |
Terminates a job. |
Suspending a Job
-
From the Job Controller of the CommCell Console, right-click the job and select Suspend.
-
The job status may change to Suspend Pending for a few moments while the operation completes. The job status then changes to Suspended.
Resuming a Job
-
From the Job Controller of the CommCell Console, right-click the job and select Resume.
-
As the Job Manager attempts to restart the job, the job status changes to Waiting, Pending, or Running.
Killing a Job
-
From the Job Controller of the CommCell Console, right-click the job and select Kill.
-
Click Yes when the confirmation prompt appears if you are sure you want to kill the job. The job status may change to Kill Pending for a few moments while the operation completes. Once completed, the job status will change to Killed and it will be removed from the Job Controller window after five minutes.
Additional Restore Options
Several additional options are available to further refine your restore operations. The following table describes these options, as well as the steps to implement them.
Be sure to read the overview material referenced for each feature prior to using them.
|
Option |
Description |
Related Topic |
|
Skip Errors and Continue |
This option allows a restore job to continue regardless of media errors and outputs a file that lists the full path names of the files that failed to get restored.
|
|
|
Startup Options |
The Startup Options are used by the Job Manager to set priority for resource allocation. This is useful to give higher priority to certain jobs. You can set the priority as follows:
|
Refer to Job Priority and Priority Precedence. |
|
Copy Precedence |
By default, the system retrieves data from the storage policy copy with the lowest copy precedence. If the data was pruned from the primary copy, the system automatically retrieves data from the other copies of the storage policy in the lowest copy precedence to highest copy precedence order. Once the data is found, it is retrieved, and no further copies are checked. You can retrieve data from a specific storage policy copy (Synchronous Copy or Selective Copy). If data does not exist in the specified copy, the data retrieve operation fails even if the data exists in another copy of the same storage policy. Follow the steps given below to retrieve the data from a specific storage policy copy:
|
Refer to Recovering Data From Copies. |
|
Data Path Options |
The data recovery operations use a default Library, MediaAgent, Drive Pool, and Drive as the Data Path. You can use this option to change the data path if the default data path is not available. Follow the steps given below to change the default data path:
|
Refer to Change Data Path. |
|
Encryption |
If the client's data is encrypted with a pass phrase, you must enter the pass-phrase to start the data recovery operation. Follow the steps given below to enter the pass-phrase:
|
Refer to Data Encryption. |
|
Alerts |
This option enables users or user groups to get automatic notification on the status of the data recovery job. Follow the steps given below to set up the criteria to raise notifications/alerts:
|
Refer to Alerts and Notifications. |
|
CommCell Readiness Report |
The CommCell Readiness Report provides you with vital information such as connectivity and readiness of the Client, MediaAgent, and CommServe. It is useful to run this report before performing a backup or a recovery operation. Follow the steps given below to generate the report:
|
|
|
Restore Job Summary Report |
The Restore Job Summary Report provides you with information about all the data recovery jobs that are run in last 24 hours for a specific client and agent. You can get information such as failure reason, failed objects, job options, and so on. It is useful to run this report after performing the restore. Follow the steps given below to generate the report:
|
Refer to Restore Job Summary Report. |