Enable IntelliSnap
IntelliSnap protection is enabled through Advanced configuration on the virtualization client properties and the IntelliSnap Operations tab on each subclient's properties. The Enable IntelliSnap option on the client provides the ability to configure IntelliSnap operations for any subclient; the subclient properties configuration identifies the Snap engine and the Hyper-V proxy host that can be used to mount snapshots.
Storage policy configuration enables you to create a Snapshot Copy and enable Backup Copy operations for snapshots.
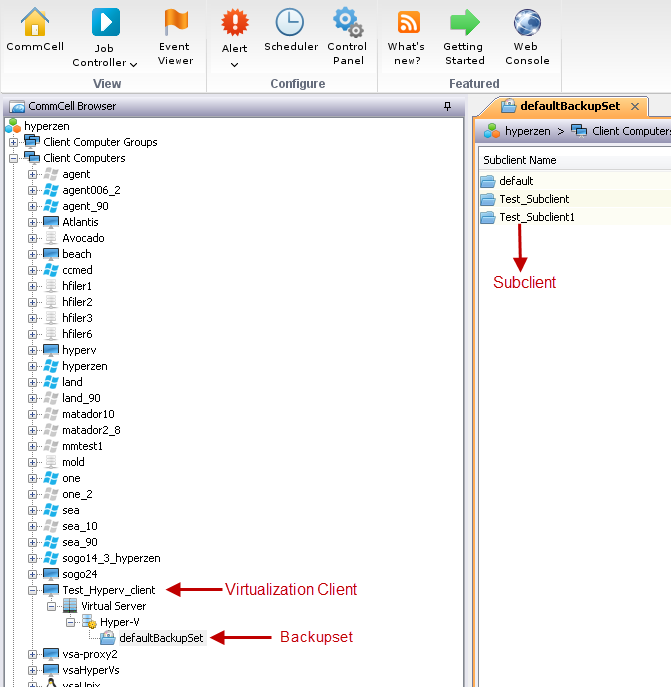
Understanding the CommCell Console
The Virtual Server Agent uses three main components to perform backup and restore operations from the CommCell Console.
-
Virtualization Client - A logical entity that provides a single point of administration for Hyper-V servers hosting virtual machines to be backed up.
-
Subclient - A logical entity that identifies a set of virtual machines to be backed up.
-
Backup Set - A group of subclients defining data to be backed up by the agent.
Protecting Migrated Virtual Machines
The backups for a Hyper-V cluster can be configured so that the data in the cluster is seamlessly backed up, and incremental backup cycles are maintained, even if virtual machines migrate from one host to another (live migration). For example, if the next scheduled backup after a live migration is an incremental backup, the incremental backup is performed for the migrated virtual machine, not a full backup.
Create a Virtualization Client
You must install the Virtual Server Agent on all Hyper-V servers in a cluster.
To create a client for a cluster:
-
From the CommCell Console, right-click Client Computers and click New Client > Virtualization > Microsoft Hyper-V.
-
Enter the Client Name.
You can enter the Hyper-V cluster name or any other name to identify the group of Hyper-V nodes. Do not use the host name of an existing client.
-
Enter the credentials required to access the Hyper-V cluster. These credentials must be valid for all nodes in the cluster.
-
Click Add to identify the nodes of the Hyper-V client.
-
From the Exclude list, select all Hyper-V hosts as the nodes of the Hyper-V client.
The list displays all computers that have the Virtual Server Agent installed.
When you select all hosts in the failover cluster as nodes in the Hyper-V client, a virtual machine can be migrated to any host in the failover cluster and will still be included automatically in the next backup job. All virtual machines on all nodes will be protected, regardless of the hosts that they are actively running on.
-
Click Include and click OK.
-
Review the Client /Client Groups list.
-
Hyper-V nodes are selected to perform backup operations based on their sequence in the Client /Client Groups list (nodes are selected from the top of the list first).
-
You can change the position of a node by selecting the node and clicking the up or down arrow.
-
The first node serves as a coordinator proxy.
-
You can specify up to 16 proxies for each Hyper-V instance.
-
-
Click OK.
Add or Remove Hosts for an Existing Client
To add or remove hosts from the cluster:
-
From the CommCell Console, navigate to Client Computers > virtualization_client > Virtual Server > Hyper-V.
-
Right-click Hyper-V, and select Properties.
-
Click the Nodes tab.
-
To add hosts:
-
Click Add.
-
Select a node from the Exclude list, and then click Include.
You can also select more than one node from the Exclude list. This list displays all Hyper-V servers that have the Virtual Server Agent installed.
-
Click OK.
-
-
Review the Client /Client Groups list.
-
To remove any node from the list, select the client name for the node, and then click Remove.
Note
When you remove a node from the Microsoft Hyper-V client, any virtual machines from that Hyper-V server will not be included in the backup. If you have set up the Microsoft Hyper-V client for a failover cluster, do not remove any hosts from the list of nodes.
-
Click OK.
Configuring a Client for a Standalone Hyper-V Server
When you want to backup the virtual machines on a standalone Hyper-V server, you must install Virtual Server iDataAgent on the Hyper-V server. When you install the Virtual Server iDataAgent on any Hyper-V server, it appears as a client in the CommCell console. However, you can not use it to perform the backups. You must configure the client to perform backups for the standalone Hyper-V server. Follow the steps given below to set up a client for a standalone Hyper-V server:
Procedure
The Virtual Server Agent must be installed on the Hyper-V server.
-
From the CommCell Console, right-click the Client Computers node and click New Client > Virtualization > Hyper-V.
-
Enter the client name of the Hyper-V server in the Client Name box.
A client name is the Communication Interface Name, selected during the Virtual Server iDataAgent deployment. By default, the client name is same as network interface name.
-
Enter credentials required to access the Hyper-V server.
-
From the Storage Policy list, select a storage policy to associate with the virtualization client.
The storage policy you select is also associated with the default subclient that is created automatically for the virtualization client.
-
Click Add.
-
From the Exclude list select the Hyper-V server.
-
Click Include and click OK.
-
Click OK.
A Hyper-V instance and a defaultBackupSet is automatically created on the client. The default subclient in the defaultBackupSet is automatically configured to back up all the virtual machines on the standalone Hyper-V server.
Automatically Adding Unprotected Virtual Machines to the Default Subclient
By default, all the virtual machines from a Hyper-V Cluster are automatically included in the default subclient of any backupset. This behavior is designed to ensure all virtual machines are backed up. However, following virtual machines will be excluded from the default subclient:
-
Virtual machines which are included in a user defined subclient. This will avoid the duplicate backup of any virtual machine.
-
Virtual machines on the Hyper-V server where Virtual Server iDataAgent is not installed.
-
Virtual machines excluded by filters defined for the default subclient.
We recommend that in a Hyper-V instance, do not modify these settings for all default subclients. At least one default subclient must have the capability to serve as a catch-all entity for Hyper-V data. If you disable this feature for all the default subclients, some data in the Hyper-V Cluster may not get backed up.
If you do not want all virtual machines to automatically be included in the default subclient, you can do so as described in the following sections.
-
From the CommCell Browser, navigate to Client Computers > virtualization_client > Virtual Server > Hyper-V > backup_set.
-
Right-click the default subclient and then select Properties.
-
Click the Content tab. The Contents of subclient list displays All unprotected VMs as the content Type.
That entry indicates that all virtual machines from the Hyper-V cluster, if they are not included in any other subclient in the given backup set, will be added automatically to the default subclient.
-
Use the Add or Browse button to add one or more entries to back up specific VMs or sets of VMs. You can select specific virtual machines or add rules to identify virtual machines by categories such as virtual machine, host, or volume.
-
To remove the default coverage for all virtual machines not covered by other subclients, select All unprotected VMs from the list and click Delete.
-
Click OK.
If you remove all the entries from the Contents of subclient list, the All unprotected VMs will appear again in the list.
NOTE: If all virtual machines are backed up by other subclients, a backup job for the default subclient fails.
-
To enable backup jobs for the default subclient to complete successfully when no virtual machines are discovered for the default subclient, configure the AllowEmptyDefaultSubclient additional setting on the Virtual Server Agent proxy.
To the VSA proxy computer, add the AllowEmptyDefaultSubclient additional setting as shown in the following table.
For instructions about adding additional settings from the CommCell Console, see Add or Modify an Additional Setting.
Property
Value
Name
Category
VirtualServer
Type
BOOLEAN
Value
TRUE
-
To enable backup jobs for non-default subclients to complete successfully when no virtual machines are discovered for non-default subclients, configure the AllowEmptySubclient additional setting on the Virtual Server Agent proxy.
To the VSA proxy computer, add the AllowEmptySubclient additional setting as shown in the following table.
For instructions about adding additional settings from the CommCell Console, see Add or Modify an Additional Setting.
Property
Value
Name
Category
VirtualServer
Type
BOOLEAN
Value
TRUE
Selecting Virtual Machines for Backup
You can browse and manually select virtual machines or any other Hyper-V objects for backup. You can easily navigate to the required object using the Browse option and select it as a content of a subclient. You can select objects, such as hosts, virtual machines, volumes, and cluster shared volumes. When you select a Hyper-V object, all its child objects are automatically selected for backup. For example: If you select a host, all the virtual machines on the host are automatically selected for backup.
Note
You can include Unicode characters for virtual machine path names.
The Browse dialog box provide following views for an Hyper-V cluster:
|
View |
Description |
|
This view will be useful when you want to select hosts and clusters for backup. This is the default view. |
|
|
This view will be useful in the following scenario:
|
|
|
This view will be useful when you want to backup all the virtual machines from a cluster shared volume or a local volume. |
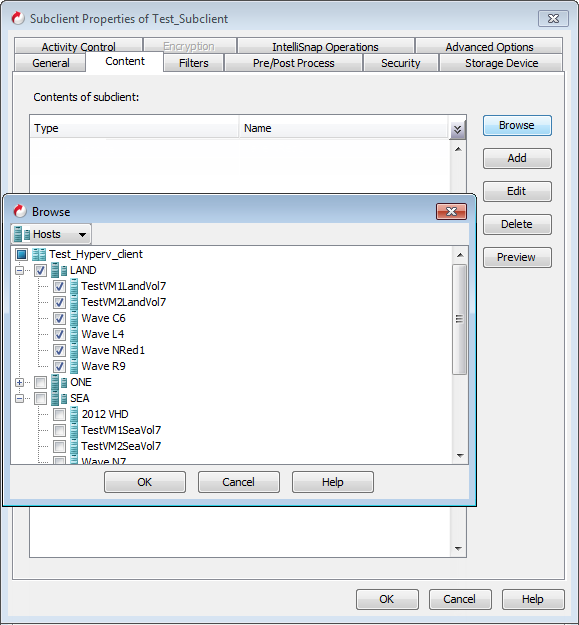
Hosts View
Follow the steps give below to browse the Hosts, Clusters and their child objects and then select the required objects.
-
From the CommCell Browser, navigate to Client Computers > virtualization_client > Virtual Server > Hyper-V > defaultBackupSet.
-
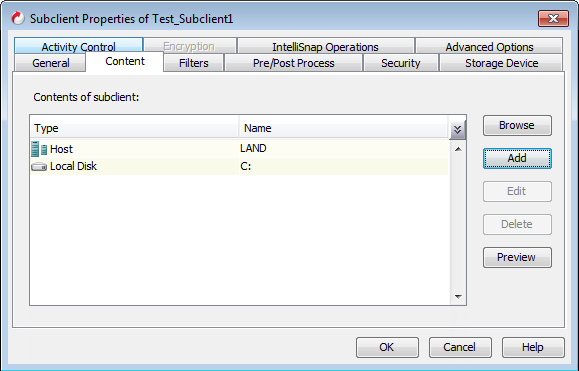
Right-click the subclient and select Properties.
-
Click the Content tab.
-
Click Browse. The Hosts view is displayed by default.
-
Expand any object to view the child objects.
-
Select any object to include the object and its child objects are automatically included into the subclient.
For example: If you select the "LAND", all the virtual machines on the "LAND" server are automatically selected.
-
Click OK.
The selected object appears in the Content of the subclient list. The Type column displays the object type, e.g. Host, Virtual Machine etc.
VMs View
You can view all virtual machines in the Hyper-V Cluster and then select the required machines.
-
From the CommCell Browser, navigate to Client Computers > virtualization_client > Virtual Server > Hyper-V > defaultBackupSet.
-
Right-click the subclient and select Properties.
-
Click the Content tab.
-
Click Browse.
-
Select VMs. The list of all virtual machines on the Hyper-v cluster is displayed.
-
Select a virtual machine to include it in the subclient.
For example: You can select a virtual machine "Wave P6" to include it in the subclient.
-
Click OK.
The selected virtual machine appears in the Content of the subclient list.
When you select a virtual machine as a content of the subclient and change its display name later, the virtual machine will be included in the subclient as long as its GUID remains the same.
For example, if select a virtual machine with display name "Wave P6" as a content of a "Test_Subclient" and after performing few backups, you change the display name of the virtual machine to "Wave U2" then the next backup of the "Test_Subclient" will backup the virtual machine "Wave U2 " because the GUID of the virtual machine hasn't changed.

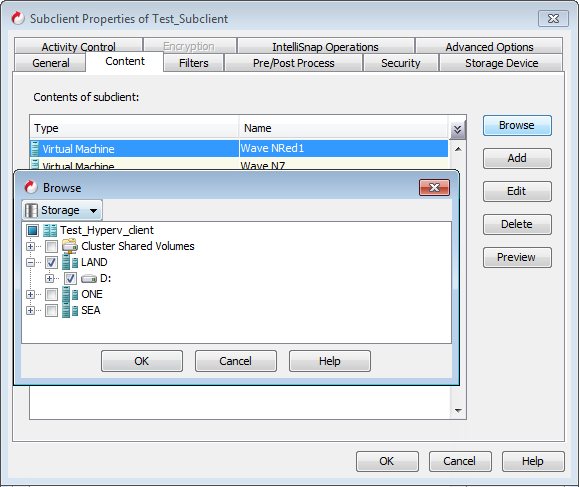
Storage View
You can view all cluster shared volumes (CSVs) and local disks in the Hyper-V server and then select a datastore.
-
From the CommCell Browser, navigate to Client Computers > virtualization_client > Virtual Server > Hyper-V > defaultBackupSet.
-
Right-click the subclient and select Properties.
-
Click the Content tab.
-
Click Browse.
-
Select Storage from the available list.
-
Expand any Hyper-V Server node to view all the local volumes on the server or expand the Cluster Shared Volume node.
-
Select any server, volume or cluster shared volume and all its child objects are automatically added into the subclient content.
For example: When you select a Hyper-V Server "LAND", all the local volumes are automatically selected. All the virtual machines in the local volumes are added as a content.
-
Click OK.
If a CSV does not have any virtual machines defined, the CSV is not displayed in storage view.
Wildcards
You can use wildcards to define patterns for content and filters for a subclient or backupset. You can use wildcards when defining a rule for a VM Name Pattern, Guest OS, Guest DNS Hostname, Host, or when defining disk filters.
The following table describes how to use wildcards when defining the subclient content or filters:
NOTES
If a subclient's content consists of wildcard characters and no eligible virtual machines are found for backup, the backup operation completes successfully even though no VMs are backed up.
Letters used in wildcard expressions are matched regardless of case; for example, 'a' matches both 'a' and 'A'.
|
Wildcards |
Description |
Examples |
|
* |
Any number of characters This wildcard is used to match all objects where the object name contains a specific pattern. |
For a VM name pattern, *test* matches any virtual machine whose name contains the string 'test' (at the beginning, end, or middle of the name). |
|
? |
Any one character This wildcard is used to match any object for which a single character in the object name is variable. |
DC? matches any object that starts with DC followed by a single additional character (such as DC1, DC2, DCa. or DCX). |
|
[ ] |
Set or range of characters Not supported for host names. |
[a-m]* matches any object whose name begins with the letters 'a' through 'm'. |
|
[ ! ] |
The negation of a set or range of characters This wildcard matches objects for which the name does not include the specified set or range of characters. Not supported for host names. |
For example, [!AEIOU]* would match all object names that start with a letter other than A, E, I, O, or U. [!A-C]* would match all names that do not start with the letters 'A' through 'C'. |
Automatic Discovery of Virtual Machines for Backup
The Automatic Discovery feature enables you to discover virtual machines based on the specified criteria. This is feature is useful in environments where virtual machines are added, removed, or relocated on a frequent basis. You can set criteria to automatically include virtual machines into a subclient.
Notes
If an automatic discovery rule for a subclient identifies an entity that cannot be found, a backup job for the subclient fails. For example, if a rule points to a host that has been retired, that is treated as a failure during discovery, and the backup job fails.
To enable backup jobs to continue when an entity is not found, add the bAllowMissedContent additional setting on the Virtual Server Agent proxy and set the value to true.
To generate a warning message when a content entity or rule does not return any results, add the bWarnEmptyContentRule additional setting on the Virtual Server Agent proxy and set the value to true.
For steps to add an additional setting, see Adding or Modifying Additional Settings from the CommCell Console.
The following sections explain how to define rules for automatic selection of virtual machines:
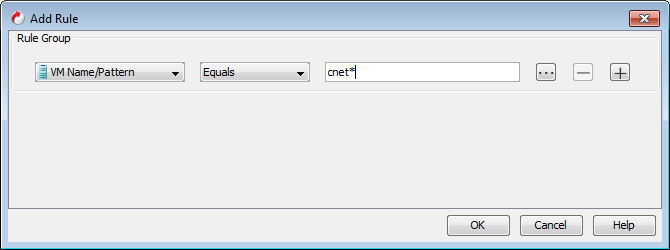
Based on a VM Name Pattern
You can define a rule to select virtual machines based on their display name pattern.
-
From the CommCell Browser, navigate to Client Computers > virtualization_client > Virtual Server > Hyper-V > defaultBackupSet.
-
Right-click the subclient and select Properties.
-
Click the Content tab.
-
Click Add.
-
Select VM Name/Pattern from the available list.
-
Enter the initial few characters in the name of virtual machines which you want to backup.
For example: If you want to backup all the virtual machines which has the word "cnet" in their names, enter "*cnet*".
-
Click OK.
The Content of subclient list displays the specified VM Name/Pattern.
-
Click Preview to view the list of discovered virtual machines. These virtual machines will get backed up when you perform the backup of the subclient.
Virtual Machines from a Specific Host
You can define a rule to include all the machines from a host into a subclient.
-
From the CommCell Browser, navigate to Client Computers > virtualization_client > Virtual Server > Hyper-V > defaultBackupSet.
-
Right-click the subclient and select Properties.
-
Click the Content tab.
-
Click Add.
-
Select Host from the available list.
-
Enter the name of the host.
You can also click ... to open the Browse dialog box and select the required host.
For example: You want to backup all the virtual machines from the host "SEA", select the "SEA" host.
-
Click OK.
The Content of subclient list displays the name of the selected Host.
-
Click Preview to view the list of discovered virtual machines. These virtual machines will get backed up when you perform the backup of the subclient.
Virtual Machines from a Specific Volume
You can define a rule to include all the machines from a volume into a subclient.
-
From the CommCell Browser, navigate to Client Computers > virtualization_client > Virtual Server > Hyper-V > defaultBackupSet.
-
Right-click the subclient and select Properties.
-
Click the Content tab.
-
Click Add.
-
Select Browse from the rules list and select Storage in the Browse dialog box.
-
Select the required volume in the Browse dialog box and click OK.
For example: To back up all virtual machines from volume D, select volume D:.
-
Click OK.
The Content of subclient list displays the name of the selected Host.
-
Click Preview to view the list of discovered virtual machines. These virtual machines will get backed up when you perform the backup of the subclient.
Virtual Machines from a Cluster Shared Volume
You can define a rule to include all machines from a cluster shared volume into a subclient.
-
From the CommCell Browser, navigate to Client Computers > virtualization_client > Virtual Server > Hyper-V > defaultBackupSet.
-
Right-click the subclient and select Properties.
-
Click the Content tab.
-
Click Add.
-
Select Browse from the rules list and select Storage in the Browse dialog box.
-
Select the required volume from the cluster shared volumes in the Browse dialog box and click OK.
For example: To back up all virtual machines from Volume1, select Volume1.
-
Click OK.
The Content of subclient list displays the name of the selected Host.
-
Click Preview to view the list of discovered virtual machines. These virtual machines will get backed up when you perform the backup of the subclient.
Virtual Machines with a Specific Operating System Group
If the Hyper-V cluster has virtual machines with different operating systems, you can define a rule to back up all machines that have an operating system (OS) from a specific OS group. Before defining the rule, ensure that the following prerequisites are satisfied:
-
The virtual machine must be powered on at the time of the backup.
-
The Hyper-V integration services must be installed and updated on the virtual machine.
Follow the steps given below to define a rule:
-
From the CommCell Browser, navigate to Client Computers > virtualization_client > Virtual Server > Hyper-V > defaultBackupSet.
-
Right-click the subclient and select Properties.
-
Click the Content tab.
-
Click Add.
-
Select Guest OS from the rules list.
-
Enter the name of the exact name of the operating system or use wildcards to define the OS group.
For example: "Microsoft*" for all Microsoft Windows operating systems.
-
Click OK.
The Content of subclient list displays the Guest OS as the content Type.
-
Click Preview to view the list of discovered virtual machines. These virtual machines will get backed up when you perform the backup of the subclient.

Virtual Machines with a Specific DNS Hostname
You can define a rule to back up all machines that have a specific DNS hostname. Before defining the rule, ensure that the following prerequisites are satisfied:
-
The virtual machine must be powered on at the time of the backup.
-
The Hyper-V integration services must be installed and updated on the virtual machine.
Follow the steps given below to define a rule:
-
From the CommCell Browser, navigate to Client Computers > virtualization_client > Virtual Server > Hyper-V > defaultBackupSet.
-
Right-click the subclient and select Properties.
-
Click the Content tab.
-
Click Add.
-
Select Guest DNS Hostname from the rules list.
-
Select Equal to include virtual machines with a DNS hostname into the subclient.
-
Enter the hostname. If you do not know the exact hostname, you can specify the pattern of hostnames using wildcard characters.
For example: If you want to backup all the virtual machine from "testlab" domain, you can enter *test*.
-
Click OK.
The Content of subclient list displays Guest DNS Hostname as the content Type.
-
Click Preview to view the list of discovered virtual machines. These virtual machines will get backed up when you perform the backup of the subclient.
Combining Rules to Select Virtual Machines
You can combine multiple rules to define a Rule Group. You can use the following options to combine the rules into a rule group:
Match All of the Following Rules
This option is selected by default when you are defining a Rule Group. The AND condition is applied to the rules.
For example: The Rule Group contains following two rules:
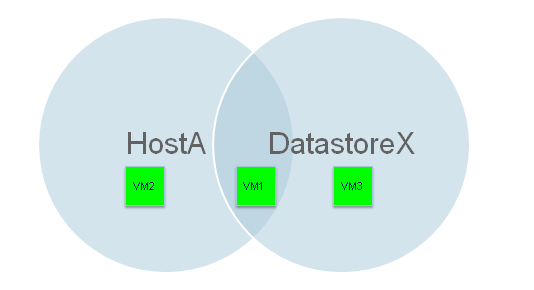
Rule 1- Include all the virtual machines from Host A into the subclient.
Rule 2- Include all the virtual machines from Volume C into the subclient.
In this case, only those virtual machines will be included in the subclient, which are on Host A AND which exist on Volume C.
You can select this option to define a Rule Group as follows:
-
From the CommCell Browser, navigate to Client Computers > virtualization_client > Virtual Server > Hyper-V > defaultBackupSet.
-
Right-click the subclient and select Properties.
-
Click the Content tab.
-
Click Add.
-
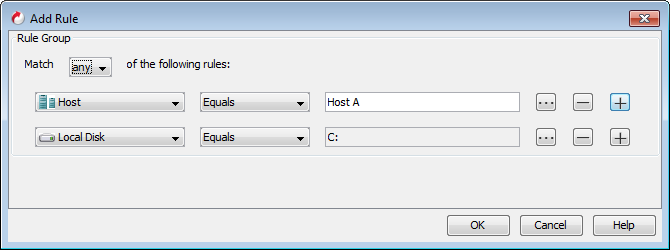
Select Host from the rules list and enter "Host A".
-
Click + to add one more rule.
-
Select Browse from the rules list and select Storage in the Browse dialog box.
-
Select Volume C in the in the Browse dialog box and click OK.
-
Ensure that Match all of the following rules option is selected.
-
Click OK.
The rule appears as Custom Rule in the Content of subclient list. If you move the pointer over the rule from the list, the description of the rule will appear.
-
Click Preview to view the list of discovered virtual machines. These virtual machines will get backed up when you perform the backup of the subclient.
Only those virtual machines will be included in the subclient, which are on Host A AND which exist on Volume C.

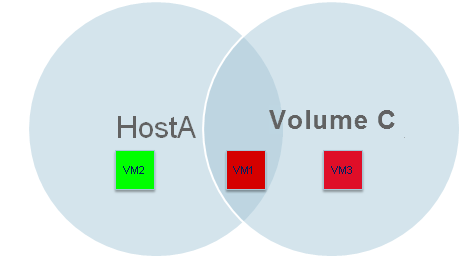
Match Any of the Following Rules:
When you select this option, the OR condition is applied to the rules.
For example: The Rule Group contains following two rules:
Rule 1- Include all the virtual machines from Host A into the subclient.
Rule 2- Include all the virtual machines from Volume C into the subclient.
In this case, only those virtual machines will be included in the subclient, which are on Host A or which exist on Volume C.

You can select this option to define a Rule Group as follows:
-
From the CommCell Browser, navigate to Client Computers > virtualization_client > Virtual Server > Hyper-V > defaultBackupSet.
-
Right-click the subclient and select Properties.
-
Click the Content tab.
-
Click Add.
-
Select Host from the rules list and enter "Host A".
-
Click + to add one more rule.
-
Select Browse from the rules list and select Storage in the Browse dialog box.
-
Select Volume C in the in the Browse dialog box and click OK.
-
Select Match any of the following rules option.
-
Click OK.
The rule appears as Custom Rule in the Content of subclient list. If you move the pointer over the rule from the list, the description of the rule will appear.
-
Click Preview to view the list of discovered virtual machines. These virtual machines will get backed up when you perform the backup of the subclient.
Only those virtual machines will be included in the subclient, which are on Host A OR which exist on Volume C.
Does Not Equal
You can use this operator only when you are defining more than one rule. Use this option to EXCLUDE any object from the subclient.
For example: The Rule Group contains following two rules:
Rule 1- Include all the virtual machines from Host A into the subclient.
Rule 2- Do not include all the virtual machines from Volume C into the subclient.
You can use this option to define a Rule Group as follows:
-
From the CommCell Browser, navigate to Client Computers | <Microsoft Hyper-V Client> | Virtual Server | Hyper-V | defaultBackupSet.
-
Right-click the subclient and select Properties.
-
Click the Content tab.
-
Click Add.
-
Select Host from the rules list and enter "Host A".
-
Click + to add one more rule.
-
Select Browse from the rules list and select Storage in the Browse dialog box.
-
Select Volume C in the in the Browse dialog box and click OK.
-
Select Does Not Equal in the second rule.
-
Ensure that Match all of the following rules option is selected.
You cannot select Match any of the following rules option when you have defined a rule with Does Not Equal operator.
The rule appears as Custom Rule in the Content of subclient list. If you move the pointer over the rule from the list, the description of the rule will appear.
-
Click Preview to view the list of discovered virtual machines. These virtual machines will get backed up when you perform the backup of the subclient.
The virtual machines on Host A will be included in the subclient. The virtual machines which are on Volume C will be excluded from the subclient.

Combining Contents in a Subclient
By default, the OR condition is applied to all content types in the Contents of subclient list. For example, A subclient has following two rules as the Contents of subclient. Each content type is selected independently.
Rule 1- Include all the virtual machines from "LAND" into the subclient.
Rule 2- Include all the virtual machines from the "Volume C" into the subclient.
In this case, all the virtual machines which are on LAND, or which exist in the Volume C, will be included in the subclient.
Follow the steps give below to independently select multiple types of content:
You can use this option to define a Rule Group as follows:
-
From the CommCell Browser, navigate to Client Computers > virtualization client > Virtual Server > Hyper-V > defaultBackupSet.
-
Right-click the subclient and select Properties.
-
Click the Content tab.
-
Click Add.
-
Select Host from the rules list and enter "LAND".
-
Click + to add one more rule.
-
Select Browse from the rules list and select Storage in the Browse dialog box.
-
Select Volume C in the in the Browse dialog box and click OK.
-
Click OK.
The Contents of subclient displays two Custom Rules. If you move the pointer over the rules from the list, the description of each rule will appear.
-
Click Preview to view the list of discovered virtual machines. These virtual machines will get backed up when you perform the backup of the subclient.
All virtual machines that are on host LAND or exist in Volume C will be included in the subclient.
Backup Set Filtering
Filters can be configured in backup set properties to exclude virtual machines or virtual machine disks from backups for all subclients under the backup set. The same types of filtering that are available for subclients are also available for backup sets.
For each subclient under a backup set, the filtering specified for the backup set is combined with the filtering for the subclient to determine which content is excluded from backups. Any filtering defined in a backup set is also visible in the subclients under the backup set.
If a virtual machine is explicitly added to the content of a subclient, the virtual machine will be discovered by its GUID. If the display name changes later, the machine is still included in the subclient as long as its GUID remains the same. Any virtual machines identified in a subclient and discovered by their GUIDs will not be filtered from backups.
For subclients that are upgraded from Commvault Version 9 and have virtual machines or disks marked using the Do Not Backup option, those items are automatically added to the filters for subclients and backup sets.
You can use wildcard characters when adding a pattern to define a rule for a VM Name Pattern, Guest OS, Guest DNS Hostname, Host, Datastore, or virtual machine disk.
You can create the following types of filters:
-
Virtual Machine Filters:
-
With a Specific Display Name
-
From a Specific Host
-
Based on a Name Pattern
-
With a Specific Operating System Group
-
From a Specific DNS Hostname
-
-
Disk Filters:
-
With a Specific Device Node
-
Based on a Disk Name Pattern
-
Defining Filters for a Backup Set
-
From the CommCell Browser, navigate to Client Computers > virtualization_client > Virtual Server > Hyper-V.
-
Right-click the backup set and select Properties.
-
Click the Filters tab.
-
Add filters for virtual machines:
-
In the VM Filters area, you can browse to exclude a specific virtual machine, or virtual machines from a host, disk, volume, or cluster:
-
Specific VM - Click Browse,select Hosts from the drop-down list on the Browse dialog, expand the browse tree, and select a VM.
-
Host - Click Browse,select Hosts from the drop-down list on the Browse dialog, and select a host. (You can also click Add and create a filter using the Host option.)
-
Disk or Volume - Click Browse,select Storage from the drop-down list on the Browse dialog, and select a disk or volume.
-
-
Click OK to add the filter.
-
In the VM Filters area, click Add to add other types of filters. On the Add VM Filter dialog, select the filter type from the drop-down list and enter the appropriate information in the box on the right:
-
Host - Enter the host name as it appears in Hyper-V Manager. When you filter a host, all child objects for the host (such as datastores and resource pools) are automatically excluded from backups.
-
VM Name/Pattern - Enter a pattern (for example, Test* to exclude VMs for which the VM name begins with "Test").
-
Guest OS - Enter the exact name of the operating system or a pattern to identify an operating system group (for example, Microsoft* to filter any virtual machine that has a version of the Windows operating system).
Note
The virtual machine must be powered on at the time of the backup.
Hyper-V integration services must be installed and updated on the virtual machine.
-
Guest DNS Hostname - Enter a pattern to identify a hostname or domain (for example, myhost.mycompany.com to exclude a specific host or *mycompany.com to exclude all hosts on that domain).
Note
The virtual machine must be powered on at the time of the backup.
Hyper-V integration services must be installed and updated on the virtual machine.
-
-
Click OK to add the filter.
-
-
Add filters for virtual machine disks:
-
In the VM Disk Filters area, click Add.
-
On the Add Disk Filter dialog, select an option and provide a value:
-
Virtual Device Node - Select a device node from the drop-down list.
-
Virtual Disk Name Pattern - Enter a pattern for the names of disks to filter (for example, VMName.vhd or VMName.vhdx).
-
-
Click OK to add the filter.
Note: For IntelliSnap backups, disk filters are only applied when performing backup copy operations, and are not performed for Snap copies.
-
-
Click OK to save the backup set properties.
To verify the list of virtual machines that are selected for backup, you can use the Preview button on the subclient properties Content tab. The Preview display includes an Add to Filters button that you can use to add specific virtual machines to filters.
Filtering Virtual Machines from a Backup
You can filter specific virtual machines from a backup of by defining filters. You can set following criteria:
Virtual Machines with a Specific Display Name
You can set criteria to exclude the virtual machine with a specific display name. For example, if you have a subclient to backup all the VMs from a Hyper-V server, but you do not want to backup virtual machines with name "vm", then you can define filter to exclude the virtual machine.
Follow the steps given below to define the filter:
-
From the CommCell Browser, navigate to Client Computers > virtualization_client > Virtual Server > Hyper-V > defaultBackupSet.
-
Right-click the subclient and select Properties.
-
Click the Filters tab.
-
In the VM Filters area, click Browse and select a the virtual machine. For example: "Wave C6".
Click OK on the Browse dialog box.
The VM Filters area displays the name of the filtered Virtual Machine.
-
Click OK.
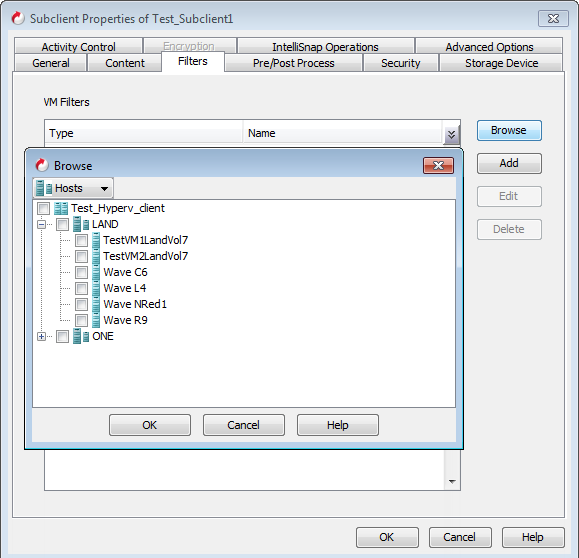
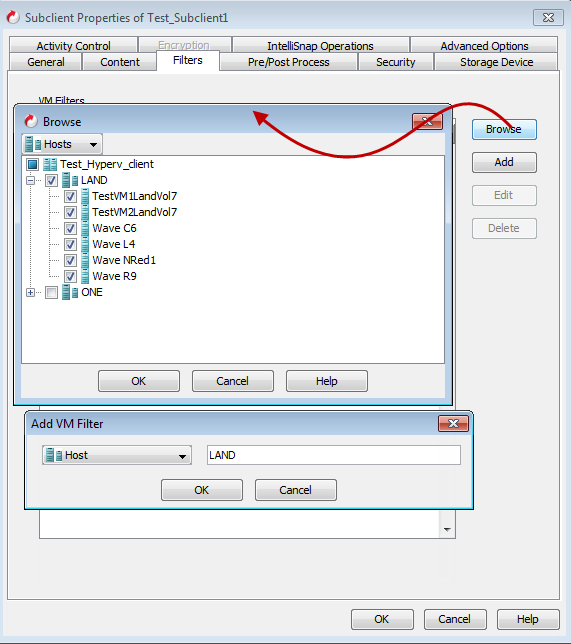
Virtual Machines from a Specific Host
You can set criteria to exclude all the virtual machines from a specific host. For example, if you have a subclient to backup all the virtual machines from a Hyper-V cluster, but you do not want to backup virtual machines from Host "LAND", then you can define filter to exclude virtual machines from the Host "LAND".
Follow the steps given below to define the filter:
-
From the CommCell Browser, navigate to Client Computers > virtualization_client > Virtual Server > Hyper-V > defaultBackupSet.
-
Right-click the subclient and select Properties.
-
Click the Filters tab.
-
In the VM Filters area, click Browse and select a host.
Click OK on the Browse dialog box.
OR
In the VM Filters area, click Add. In the available list, select Host and enter the exact host name as displayed in the Hyper-V Manager.
Click OK on the Add Filter dialog box.
The VM Filters area displays the host name of the filtered Host.
-
Click OK.
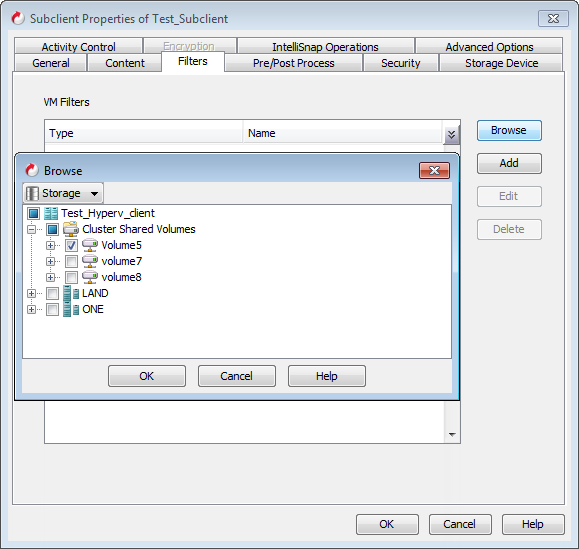
Virtual Machines from a Specific Volume
You can set criteria to exclude all the virtual machines from a specific disk or volume. For example, if you have a subclient to backup all the virtual machines from a cluster, but you do not want to backup virtual machines which has disks on the volume 1, then you can define filter to exclude volume 1.
Follow the steps given below to define the filter:
-
From the CommCell Browser, navigate to Client Computers > virtualization_client > Virtual Server > Hyper-V > defaultBackupSet.
-
Right-click the subclient and select Properties.
-
Click the Filters tab.
-
In the VM Filters area, click Browse.
-
Select Storage from the available drop down list in the Browse dialog box. The dialog box will display all the disks and cluster shared volumes in the Hyper-V cluster.
-
Select a disk or a volume.
-
Click OK on the Browse dialog box.
-
Click OK.
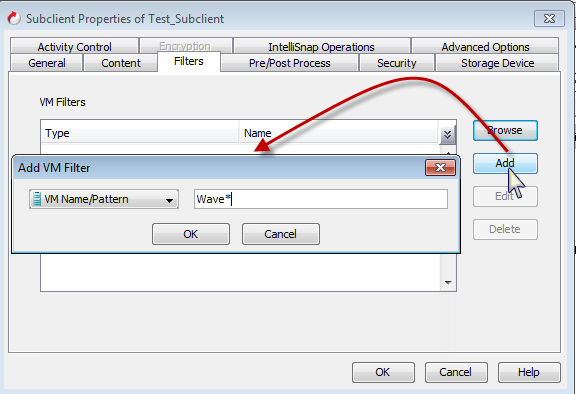
Based on a Virtual Machine Name Pattern
You can set criteria to exclude all the virtual machines based on a virtual machine name pattern. For example, if you have a subclient to backup all the virtual machines from a host, but you do not want to backup all virtual machines which has name starting with "Wave". In this scenario you can define filter to exclude all the virtual machines which has name starting with "Wave".
Follow the steps given below to define the filter:
-
From the CommCell Browser, navigate to Client Computers > virtualization_client > Virtual Server > Hyper-V > defaultBackupSet.
-
Right-click the subclient and select Properties.
-
Click the Filters tab.
-
In the VM Filters area, click Add.
-
Enter the few characters in the name of the virtual machines which you want to exclude. For example: Wave*
-
Click OK on the Add Filter dialog box.
The VM Filters area displays the VM Name/Pattern.
-
Click OK.
Virtual Machines with a Specific Operating System Group
You can set criteria to exclude all virtual machines that have operating system from a specific OS Group. For example, if you do not want to backup virtual machines which has any version of Windows operating system, you can define filter to exclude all the virtual machines with Windows operating system.
Before defining the filtering criteria, ensure that following prerequisites are satisfied:
-
The virtual machine must be powered on at the time of the backup.
-
The Hyper-V integration services must be installed and updated on the virtual machine.
Follow the steps given below to define the filter:
-
From the CommCell Browser, navigate to Client Computers > virtualization_client > Virtual Server > Hyper-V > defaultBackupSet.
-
Right-click the subclient and select Properties.
-
Click the Filters tab.
-
In the VM Filters area, click Add.
-
In the available list, select Guest OS and enter the exact name of the operating system or use wildcards to specify the OS group. For example, If you want to filter all the virtual machines which has any version of Windows operating system, enter Microsoft*.
-
Click OK on the Add Filter dialog box.
The VM Filters area displays name of the filtered Guest OS.
-
Click OK.
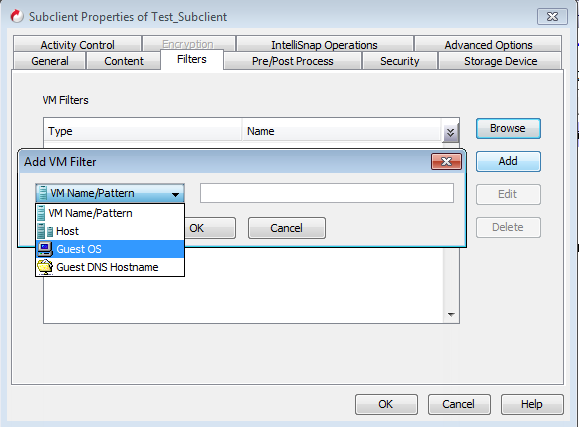
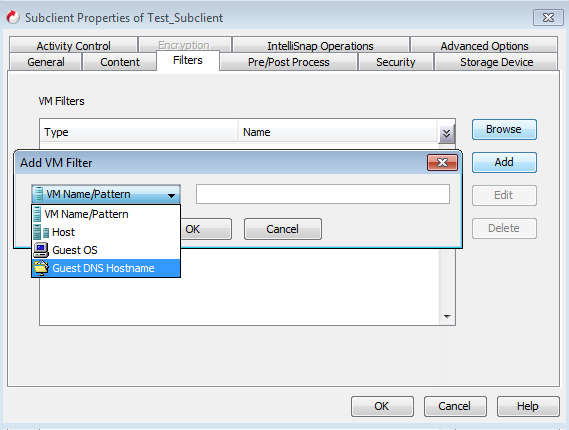
Virtual Machines with a Specific DNS Hostname
You can set criteria to exclude all the virtual machines with a specific hostname. For example, you can define a filter to exclude all virtual machines that have hostnames ending with mycompany.com.
Before defining the filtering criteria, ensure that following prerequisites are satisfied:
-
The virtual machine must be powered on at the time of the backup.
-
The Hyper-V integration services must be installed and updated on the virtual machine.
Follow the steps given below to define the filter:
-
From the CommCell Browser, navigate to Client Computers > virtualization_client > Virtual Server > Hyper-V > defaultBackupSet.
-
Right-click the subclient and select Properties.
-
Click the Filters tab.
-
In the VM Filters area, click Add.
-
In the available list, select Guest DNS Hostname and enter a hostname. For example: mycompany.com.
-
Click OK on the Add Filter dialog box.
The VM Filters area displays name of the filtered Guest DNS Hostname.
-
Click OK.
Filtering Virtual Machine Disks from a Backup
You can filter Hyper-V virtual machine disks to exclude the disks during streaming backups and IntelliSnap backup copy operations.
Note: For IntelliSnap backups, disk filters are only applied when performing backup copy operations, and are not performed for Snap copies.
Filtering can be performed in the following ways:
-
Using disk pattern names, including wildcard characters
-
Based on a virtual device node that consists of the controller number followed by the hard disk device number (only supported for IDE disks).
To add disk filtering to an existing subclient:
-
From the CommCell Browser, navigate to Client Computers > virtualization_client > Virtual Server > Hyper-V > defaultBackupSet.
-
Right-click the subclient and select Properties.
-
Click the Filters tab.
-
Under VM Disk Filters, click Add.
-
On the Add Disk Filter dialog, select one of the following options:
-
VM Disk Name/Pattern - Enter a pattern using wildcard characters. For example, to select virtual machine disks that begin with the characters "vm", enter vm*.
-
Virtual Device Node - Select an IDE disk from the drop-down list.
-
-
Click OK.
The VM Disk Filters area displays the pattern or virtual device nodes that were entered for the disk filter.
Displaying Backed Up Virtual Machines in the CommCell Console
Prerequisites
-
The virtual machine must be powered on at the time of the backup.
-
The Hyper-V integration services must be installed and updated on the virtual machine.
If these prerequisites are not satisfied, the virtual machine will appear as a client computer. However, the hostname and DNS will not appear in the Client Computer Properties dialog box.
Note
If you remotely install any software on a virtual machine and any required information such as the host name is missing from the database, the installation fails. If you interactively install any software on the virtual machine and any information such as the client name or host name is different, the virtual machine is treated as a new client and a duplicate client is created. To avoid duplicate client entries caused by different client or host names, use the install software option for the client level in the CommCell Console rather than interactively installing software to the virtual machine guest operating system.
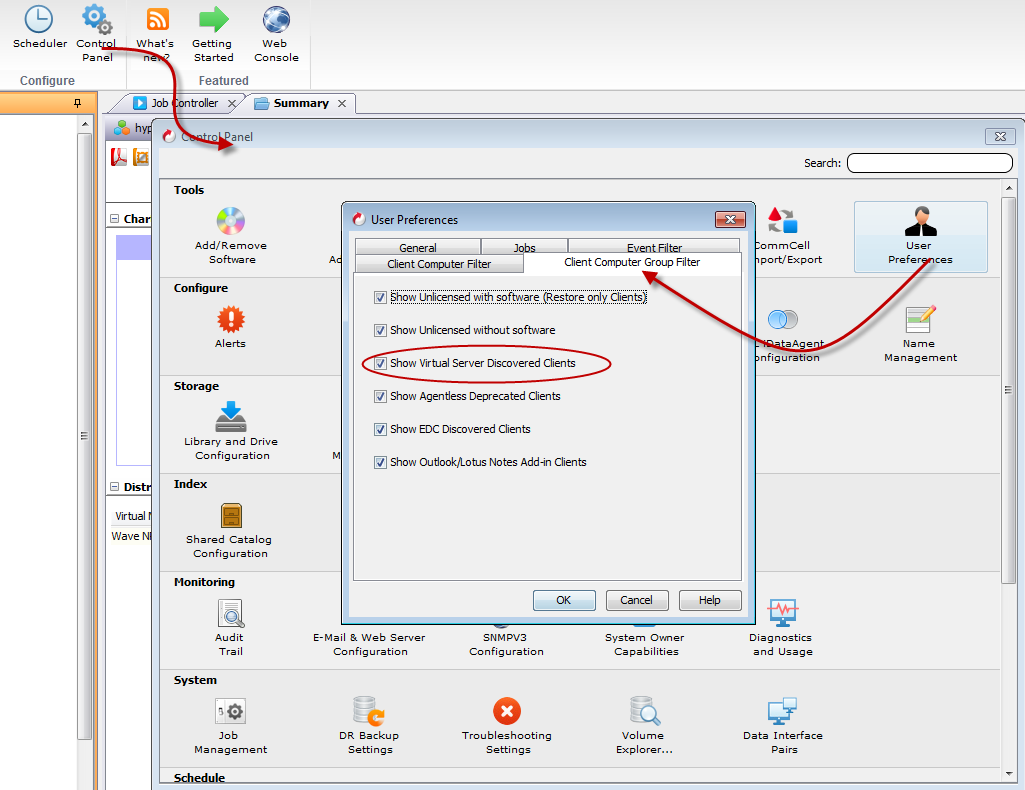
Show Virtual Machines in Client Computers list
Follow the steps given below to display virtual machines in all the subclients as client computers:
-
From the Tools menu in the CommCell console, click Control Panel.
-
From the Control Panel, click User > User Preferences.
-
Click the Client Computer Filter tab.
-
Select the Show Virtual Server Discovered Clients check box.
-
Click OK.
All the virtual machines, backed up by any subclient, will appear in CommCell Browser.
Expand the Client Computers node to view the virtual machines.
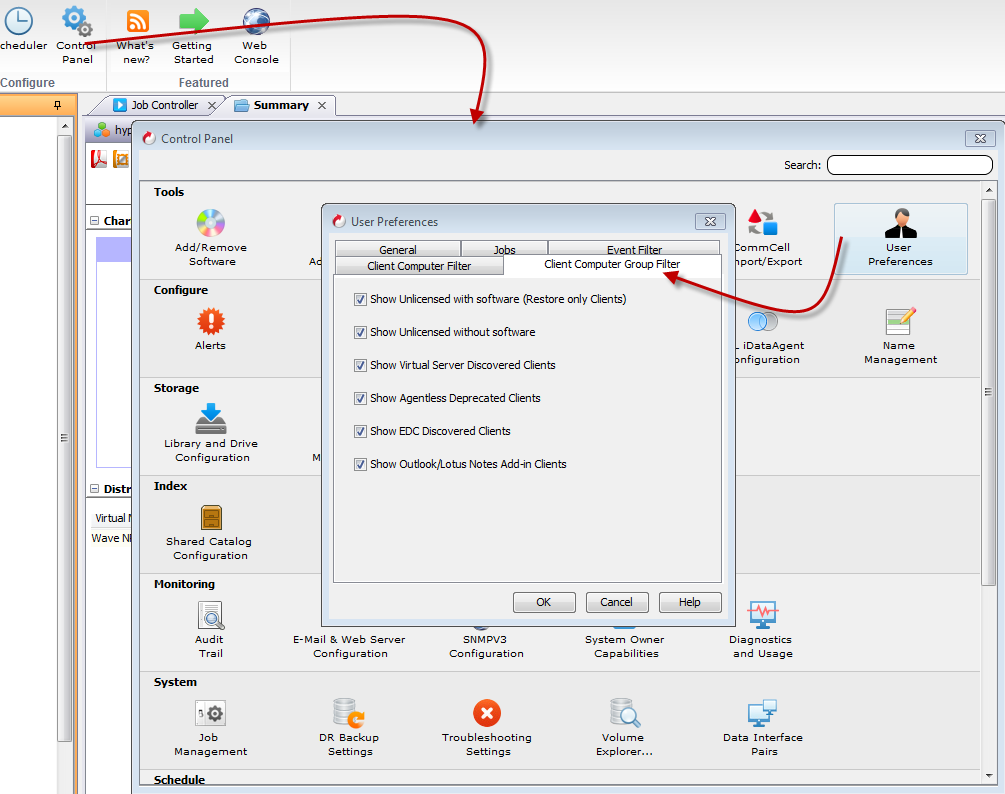
Show Virtual Machines in the Client Computer Groups List
A new client group will be created for each host. All the virtual machines from the host will added to the client group. Follow the steps given below to display virtual machines in Client Groups list in the CommCell Console:
-
From the Tools menu in the CommCell console, click Control Panel.
-
From the Control Panel, click User > User Preferences.
-
Click the Client Computer Group Filter tab.
-
Select the Show Virtual Server Discovered Clients check box.
-
Click OK.
All the virtual machines, backed up by any subclient, will appear in CommCell Browser.
Expand the Client Computer Groups node to view the virtual machines. A new client group is created for each host.
Expand the node for each group to view the virtual machines on that host.
Configuring Backups for Virtual Machines Hosted on SMB Shares
You can back up and restore virtual machines residing on Server Message Block (SMB) 3.0 shares.
Note
The VSA Proxy for Cluster Shared Volumes feature does not support backup of virtual machines hosted on SMB.
Prerequisites
The following requirements must be met before backing up any virtual machine from the SMB shares. If there are multiple nodes, fulfill these requirements for every node of the scale-out file cluster.
-
The Application server and file server must be running on Windows Server 2012 or later.
-
The File Server VSS Agent Service server role must be enabled on the file servers.
-
Application servers and file servers must be connected to an Active Directory domain residing in the same Active Directory forest.
-
The user account for the virtualization client must be part of the following administrator groups on the Hyper-V host:
-
Local Administrators group
-
Hyper-V Administrators group
For a Hyper-V cluster, the user account must have full Cluster Permissions (Read and Full Control).
-
IntelliSnap requirements:
-
IntelliSnap backups of virtual machines on SMB shares are only supported for SMB 3.0 and the following storage arrays:
-
NetApp version 8.2 or later
-
Nutanix 4.6 or 4.7
-
-
For IntelliSnap, the MediaAgent must be running on Windows Server 2012 R2 or later.
-
The NetApp Vserver where the virtual machine resides must be added on the storage array. For more information on configuring NetApp Vserver, see Getting Started for NetApp.
For instructions on configuring the virtual machines on NetApp Array, see Configuring Storage Virtual Machines on NetApp Arrays.
-
To reduce the number of snapshots of the SMB share during backup operations, configure the bForceSingleProxyBackup additional setting.
To the VSA proxy that acts as the coordinator node for backups, add the bForceSingleProxyBackup additional setting as shown in the following table.
For instructions about adding additional settings from the CommCell Console, see Adding or Modifying an Additional Setting.
Property
Value
Name
Category
VirtualServer
Type
Integer
Value
1
Granting Permissions for the SMB Share
The Hyper-V server machine account and the virtualization user name must be granted full permissions to the SMB share by performing the following steps:
-
Right-click the SMB share folder and point to Properties.
-
On the Sharing tab, click Advanced Sharing.
-
In the Advanced Sharing dialog box:
-
Select Share this folder.
-
If necessary, click Add to add a new share.
-
Click Permissions.
-
-
In the Permissions dialog box, select the user account for the virtualization client, and then click OK.
-
Click OK to save the advanced sharing properties.
-
On the Security tab, select the user account for the virtualization client and give that account full permissions.
-
Click OK.
Selecting Virtual Machines on the SMB Share for Backup
You can view all cluster shared volumes and file server hosting the share
-
From the CommCell Browser, navigate to Client Computers > virtualization_client > Virtual Server > Hyper-V > defaultBackupSet.
-
Right-click the subclient and select Properties.
-
Click the Content tab.
-
Click Browse.
-
In the Browse dialog box, select the Storage view from the list at the top left.
-
Expand any Hyper-V Server node to view all of the local volumes on that server, or expand the Cluster Shared Volume node.
-
Select any file server, volume, or cluster shared volume; all child objects of the selected object are automatically added into the subclient content.
-
Click OK.
Crash Consistent Backups for IntelliSnap
By default, IntelliSnap backups on Cluster Shared Volume storage are application-consistent. You can configure your subclient to run an application-consistent or a crash-consistent IntelliSnap backup.
For instructions, see Enabling Crash-Consistent Backups.
Notes:
-
For Hyper-V virtual machines residing on SMB shares, IntelliSnap backups are always crash-consistent, irrespective of the subclient configuration.
-
For a Cluster Shared Volume that resides on SMB shares, IntelliSnap backups are application-consistent.
Changed Block Tracking for IntelliSnap
Enable Changed Block Tracking (CBT) to optimize incremental backups of virtual machines by reading only the allocated and modified portions of virtual disks. Incremental backups can use Commvault CBT, native Microsoft CBT, or Cyclic Redundancy Check (CRC):
-
For Hyper-V virtual machines running on Windows Server 2012 R2 editions, Commvault CBT enhances backup performance of VHDX-format disks.
The Commvault CBT mechanism is provided as a CVCBT driver along with the Virtual Server Agent (VSA) software. If CBT is enabled and if both the VSA proxy and the virtual machine proxy are running on a Windows Server 2012 R2 node, Commvault changed block tracking is used. The driver is supported on all editions of Windows Server 2012 R2 (Hyper-V Core, Standard and Datacenter editions). The VHDX files can reside on local volumes, cluster shared volumes, or SMB shares. CBT is not supported for backups on remote SMB (Server Message Block Protocol) shares.
When you run IntelliSnap backups, the CBT driver monitors the virtual disks and maintains a bitmap (.cvf) file of the blocks that have changed. During subsequent backup copy operations, these bitmap files are read and only the changed data blocks are copied.
-
Backups of VHD-format disks and virtual machines running on Windows Server 2008 R2 or Windows Server 2012 continue to use the Cyclic Redundancy Check (CRC) mechanism to back up the parts of virtual disks that have changed since the last full backup. With CRC, the amount of data that is transferred to the MediaAgent is less, but the backup operation must read and compute the CRC checksum against all disk blocks. The time required for the disk I/O operations increases the total time of incremental backups to nearly as long as full backups.
Windows Server 2016
-
For Windows Server 2016 or later, Commvault CBT uses Microsoft's Resilient Change Tracking (RCT) feature to track changed blocks on the virtual disks.
-
Changed Block Tracking is supported only for backup copy jobs. Though the checkpoint is taken and the reference point is then saved during the IntelliSnap backup operation, changed block tracking is applied only when a backup copy job is run.
-
For virtual machines running in a Windows Server 2016 Hyper-V cluster, the use of checkpoints for backups simplifies the backup process. For each virtual machine, the backup takes a checkpoint that includes only that virtual machine. Once the backup is completed, the checkpoint is converted to a reference point with a unique ID and saved with the backup. Changed block tracking uses the reference point to identify changes since the last backup. The reference point is retained until the next backup is completed and a new checkpoint is generated.
-
In a mixed mode cluster where some nodes have not yet been upgraded from Windows Server 2012 R2 to Windows Server 2016, Windows Server 2016 operations are not supported until all nodes in the cluster are upgraded to 2016 and the functional level of the cluster is switched to Windows Server 2016 mode. Backups and restores use the same processes as Windows Server 2012 R2. With this, the behavior of changed block tracking varies:
-
If both the VSA proxy and the virtual machine proxy are running on a Windows Server 2012 R2 node, Commvault changed block tracking is used. Otherwise, incremental backups use the VSS backup method with CRC for changed block tracking.
-
If a virtual machine fails over from a Windows Server 2012 R2 node to a Windows Server 2016 node, incremental backups use the VSS backup method with CRC for changed block tracking. If the virtual machine fails back to a Windows Server 2012 R2 node, CBT resets and the next incremental backup includes all of the virtual machine data (equivalent to a full backup).
-
-
In a new Windows Server 2016 cluster, virtual machines are version 8 or later. In a cluster that has been upgraded to Windows Server 2016, virtual machines using older versions can still run, but cannot use all Windows Server 2016 host features. For example, all virtual machines running on a Windows Server 2016 node must be upgraded to version 8 or later before they can use Windows Server 2016 changed block tracking. In a Windows Server 2016 node that includes older version VMs, incremental backups include all of the virtual machine data (equivalent to a full backup).
Limitation
For Native Microsoft Changed Block Tracking to be validated successfully, you must specify a Windows 2016 host as the backup copy host. Older operating systems can be used to perform backup copy operations; however, traditional CRC backups will be performed during incremental backup jobs.
For more information about Changed Block Tracking for Hyper-V, see Changed Blocked Tracking.
For instructions on enabling or disabling CBT, see Enabling or Disabling Changed Block Tracking.
Configuring Backups Using Hardware VSS Provider from Storage Vendor
You can perform backups using the hardware VSS Provider offered by the storage vendor. Using a hardware VSS Provider can improve the performance of backup operations; for Hyper-V clusters, it reduces the amount of time that cluster shared volumes are caught in redirected-access mode.
Perform the following steps to configure the VSSProvider additional setting to use the vendor's hardware VSS provider:
-
From the CommCell Browser, go to Client Computers.
-
Right-click a client computer, and then click Properties.
-
On the General tab of the Client Computer Properties dialog box, click Advanced.
-
Click the Additional Settings tab.
-
Click Add.
-
On the Add Additional Settings dialog box, provide the following information:
-
Name: Type VSSProvider.
-
Category: Select VirtualServer (the default value).
-
Type: Select STRING (the default value).
-
Value: Enter the hardware VSS Provider ID of the vendor.
To find the ID, run the following command on your client computer:
vssadmin list providersAn example of a provider ID (for NetApp) is ddd3d232-a96f-4ac5-8f7b-250fd91fd102.
-
Ensure that the Enable option is selected.
-
Click OK to add the additional setting.
-
-
Click OK twice to save the client properties.
Your backup operations will use the hardware VSS Provider instead of the software VSS Provider from Microsoft.
Configuring Pre-processing and Post-processing for Backups
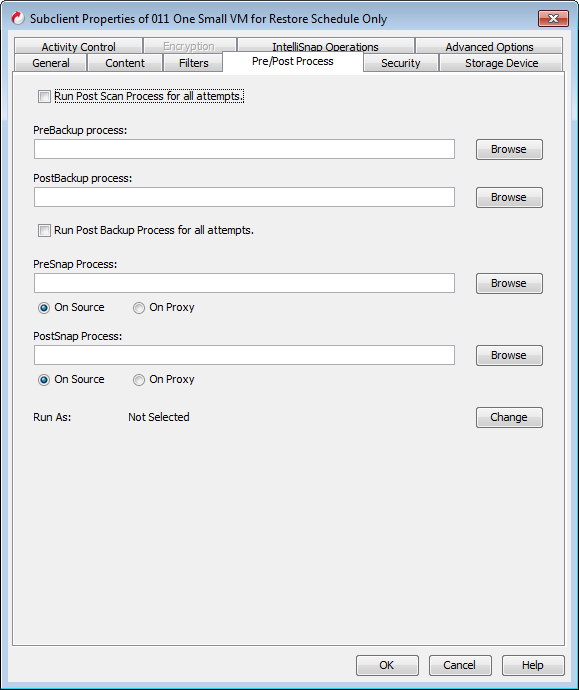
Setting Up Pre-processes and Post-processes
You can add and modify Pre-processes and Post-processes for a subclient. These are batch files or shell scripts that you can run before or after certain job phases. For example, you can use an echo command to check the level of a backup. Similarly, you can include a case statement within a script to run specific operations based on the level of the backup job.
A Save As Script file can also be run as a pre-process and post-process, if you include the absolute path of the associated input file in the script file.
See Pre-processes and Post-processes - Commands and Arguments for information on additional arguments that the CommServe sends to the Pre-processes and Post-processes.
The first line of the script must execute a command that is designed to call in the pre/post program. Ensure that you have included the appropriate command in the first line of the script.
The following is an example of a typical pre/post script:
#!/bin/bash base='basename $0' echo $0, 'date' > /extra/aah/RESULTS/$base.out exit 0
-
From the CommCell Browser, navigate to Client Computers | <Client> | File System | Backup Set.
-
Right-click the <Subclient> in the right pane, and then click Properties.
-
Click the Pre/Post Process tab.
-
Depending on the process you want to set up, click the corresponding Browse button.
-
Select the process and then click OK.
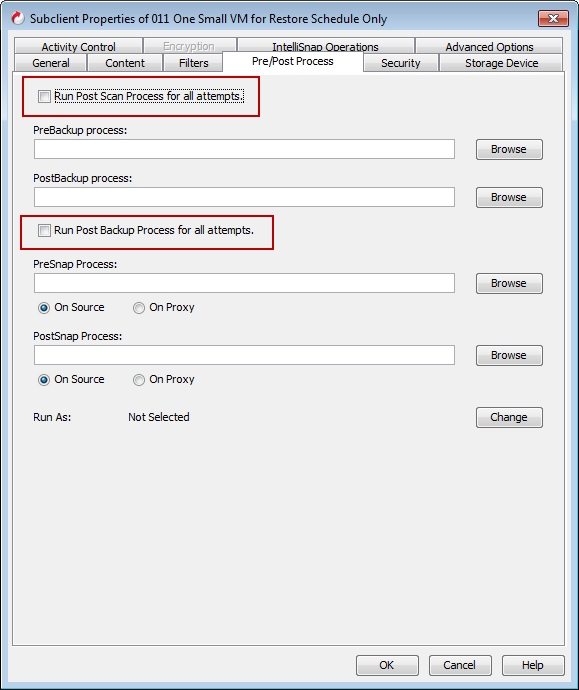
Setting Up Post-processes to Run during Failures
By default, a specified post-process command is executed only on successful completion of the scan or backup operation or if the job is killed.
Use the following steps to run a post-process even if the scan or backup operation did not complete successfully. For example, this may be useful to bring a database online or release a snapshot.
-
From the CommCell Browser, navigate to Client Computers | <Client> | File System | Backup Set.
-
Right-click the <Subclient> in the right pane, and then click Properties.
-
Click the Pre/Post Process tab.
-
Select the Run Post Scan Process for all attempts check box.
-
Select the Run Post Backup Process for all attempts check box.
-
Click OK.
Modifying an Agent, Instance, or Subclient
Certain properties of agents, instances, and subclients can be modified to accommodate changes to your configuration, data, or desired backup behavior.
The following table describes the properties that can be configured from these levels.
|
Option |
Description |
Related Topics |
|
Change Storage Policies |
You can modify the storage policies in any of the following situations:
You can change the storage policies from the subclient level.
|
Refer to Storage Policies. |
|
Rename a Backup Set or Subclient |
You can rename a subclient:
|
|
|
Data Transfer Options |
You can configure the available resources for transferring data secured by data protection operations from the subclient level. This includes the following:
You can configure the data transfer options.
|
Refer to Data Compression and Network Bandwidth Throttling. |
|
View Data Paths |
You can view the data paths associated with the primary storage policy copy of the selected storage policy or incremental storage policy. You can also modify the data paths including their priority from the subclient level.
|
|
|
Number of Data Readers |
Use this option to specify the number of simultaneous backup data streams allowed for this subclient.
|
Refer to Streams. |
|
Configure a Subclient for Pre and Post Processing of Data Protection |
You can add, modify or view Pre/Post processes for the subclient. These are batch files or shell scripts that you can run before or after certain job phases.
|
Refer to Pre-processes and Post-processes. |
|
Configure Activity Control |
You can enable backup and restore operations from the agent and subclient level. However, you can enable restore operations only from the agent level.
|
Refer to Activity Control. |
|
Configure User Security |
You can configure user security from the agent or subclient level. You can perform the following functions:
|
Refer to User Administration and Security. |
|
View Software Version and Installed Updates |
The Version tab, at the Agent level displays the software version and post-release service packs and updates installed for the component.
|
|
|
CommCell Configuration Report |
The CommCell Configuration Report provides the properties of the CommServe, MediaAgents, clients, agents, subclients, and storage policies within the CommCell based on the selected filter criteria.
|
Refer to CommCell Configuration. |
Deleting an Instance, Backup Set, or Subclient
The following sections describe the steps involved in deleting an instance, backup set, or subclient.
When you delete an instance or backupset, the associated data is logically deleted and you can no longer access the corresponding data from CommCell Console for recovery purposes.
Refer to Recovering data associated with deleted clients and storage policies for information on how to recover data if you accidentally delete an entity.
Deleting an Instance
Consider the following before deleting an instance:
-
When you delete a specific instance all job schedules and job histories that pertain to any of the levels within the deleted instance are deleted.
-
You cannot delete an instance if it is being backed up. Attempts to delete an instance under such conditions cause the deletion to fail. If a backup is in progress, either wait for the backup to complete or kill the backup job using the Job Controller. Once the backup is no longer in progress, you can delete the instance level.
-
You cannot delete an instance if there is only one instance present for an agent. To delete the final instance, you must remove the agent software from the client computer.
Procedure
-
From the CommCell Browser, right-click the instance that you want to delete, click All Tasks and then click Delete.
-
Click Yes to confirm the deletion. (Clicking No cancels the deletion and retains the node.)
-
Type the requested phrase in the Enter Confirmation Text dialog box and click OK. This should delete the instance.
Deleting a Backup Set
Consider the following before deleting a backup set:
-
You cannot delete a default backup set.
-
Schedules associated with the backup set are also automatically deleted.
-
From the CommCell Browser, right-click the user-defined backup set that you want to delete, and then click Delete from the shortcut menu.
A confirmation message is displayed, asking if you want to delete the backup set.
-
Click No to cancel the deletion and retain the backup set, or click Yes to continue the deletion.
Deleting a Subclient
Consider the following before deleting a subclient:
-
You cannot delete a default subclient.
-
Schedules associated with the subclient are also automatically deleted.
Procedure
-
From the CommCell Browser, navigate to Client Computers > virtualization_client > agent > backup_set.
-
Right-click the subclient that you want to delete, and then click Delete.
-
A confirmation message is displayed, asking if you want to delete the subclient.
Click No to cancel the deletion and retain the subclient, or click Yes to continue the deletion.
Configuring Data Protection Alerts for Virtual Machines
You can perform the steps provided in Creating an Alert from the Alert Wizard to configure a data protection alert for virtual machines. You can configure alerts to provide notification and details about specific virtual machines when jobs are started, suspended, resumed, killed, completed, or failed. The alert notification can include tokens for the virtual machine name, host, status, and protection failure reason.
The following alerts are available for the Virtual Server Agent:
|
Alerts |
Type |
Description |
|---|---|---|
|
Data Protection |
User-defined |
Sends notification on the status of running backup jobs. For more information, see Data Protection. |
|
Event Viewer Events |
User-defined |
Uses the vsbkp process to trigger backup job status in the Event Viewer. For more information, see Event Viewer Events. |
When adding the alert, use the following options for the Add Alert Wizard:
-
On the General Information page, select Job Management for the Category and Data Protection for the Type.
-
On the Entities Selection page, select the Virtual Server clients to be included for the alert or client groups that include those Virtual Server clients.
-
Select options as needed on the Threshold and Notification Criteria Selection page.
-
On the Notification Type(s) Selection page, you can customize the email notification message by selecting an insertion point in the email message form, selecting a token from the drop-down list, and clicking Add Token. To help monitor protections operations for virtual machines, you can include the following tokens:
-
<PROTECTED OBJECTS>
-
<VIRTUAL MACHINE NAME>
-
<VIRTUAL MACHINE HOST NAME>
-
<VM STATUS>
-
<VM FAILURE REASON>
-
-
On the User(s) and User Group(s) Selection page, add users to receive notifications for the alert.
The notifications generated for the alert include information about all discovered virtual machines for the selected virtualization clients.
Notes
- For any subclients that have backups disabled (on the Activity Control tab of the subclient properties), discovered VMs are not included in alerts.
You can choose to receive notifications in different ways. For more information, see Alert Notification Type Overview.
Creating Alerts for Specific Virtual Machines
-
To view and select discovered virtual machines, display virtual machines before creating the alert:
-
In the CommCell Browser, right-click the Client Computers node and select Customize View.
The User Preferences dialog box displays the Client Computer Filter tab.
-
Select Show Virtual Machines.
-
Click OK.
-
-
Add an alert as described in Creating an Alert from the Alert Wizard.
-
On the General Information page, select Job Management for the Category and Data Protection for the Type.
-
On the Entities Selection page, select the virtual machines under Association.
-
Select other options as required.