After the Commvault software is installed on all the physical nodes that host the cluster group, you must configure a cluster group client in the CommCell Console to protect cluster resources on the physical nodes.
Procedure
Step 1: Create the Cluster Group Client in the CommCell Console
-
From the CommCell Browser, right-click the Client Computers node and then click New Client > Clustered Server > WindowsCluster.
-
On the New Windows Cluster Client dialog box, specify the details of the cluster that you want to protect to create the cluster group client.
-
In the Client Name box, type a name for the cluster group.
-
In the Host Name box, type the fully qualified domain name of the cluster group.
Note: The host name of the cluster should not be used by any existing client in your CommCell environment.
-
Click Next.
-
Review the cluster group information and click Finish.
The Advanced Client Properties dialog box appears. If the dialog box does not automatically open, right-click the Cluster_Group_Client, and then click Properties. In the Client Computer Properties dialog box, click Advanced.
-
-
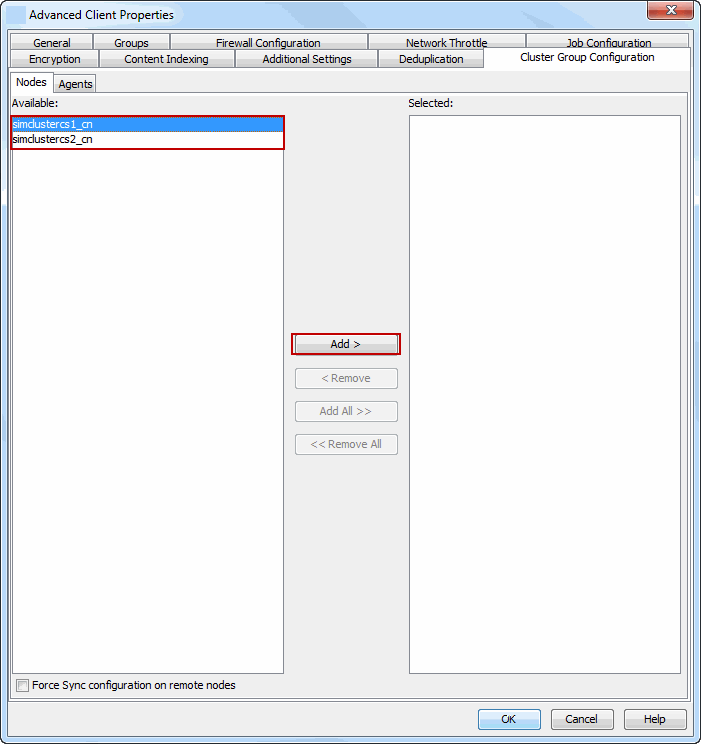
On the Advanced Client Properties dialog box, click the Cluster Group Configuration tab.
-
All the Windows clients that are available in the CommCell will be listed in the Available list. Select the physical computers (nodes) where you installed the necessary Agents from the Available list, and then click Add > to move the client to the Selected list.
-
Click the Agents tab.
Select the Agents you want to use in the cluster group client from the Available list and click Add > to move the Agent to the Selected list.
-
-
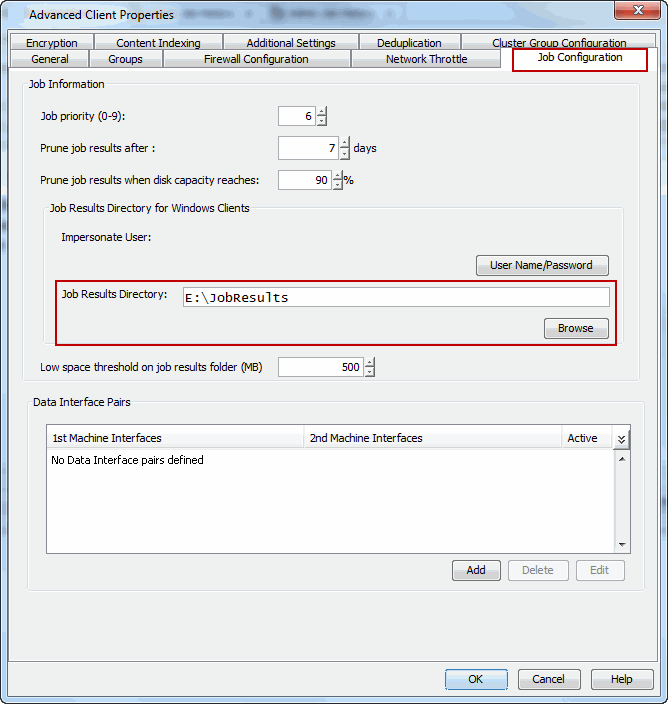
Click the Job Configuration tab.
In the Job Results Directory box, type the path for the job results directory. Ensure that the directory resides on a shared cluster drive.
Note
-
The Browse button does not work when you configure the cluster group client for the first time. After the initial configuration, you can use the button to update the directory (if required).
-
In the case of MediaAgent and ContinuousDataReplicator, the Job Result directory path will be used for both the Index Cache and CDR Log directories respectively unless another directory location is provided.
Click OK.
-
-
In the Information dialog box, click OK.
The cluster group client is successfully created. You can continue to configure failovers by configuring cluster resources and adding service dependencies.
Step 2: Configure Cluster Resources
-
Create and Use Scripts to Administer Virtual Machine Services
You should create and use three scripts to administer virtual machine services:
-
Probe script to reveal the state of the specified services
-
Start script to start services
-
Stop script to stop services
Create a probe script to have the status of both the Commvault Communications Service (GxCVD) and the Commvault Client Manager Service (GxClMgrS) checked.
In the probe script, include the GxSCMCmd.exe utility by name in the appropriate command. (This utility is available from the Commvault Store in the Cloud Services website) Create a folder (for example, m:\GxSCMCmd) on a shared disk that the virtual host you created has access to.
Copy the GxSCMCmd.exe utility and the script files you created (probe.bat, start.bat, stop.bat) to this folder. The utility will return the state of the specified services:
-
'0' if the services are running
-
'1' if services are stopped
-
'-1' is returned for an error condition.
Note that the service name includes the name of the client and the name of the instance. To avoid error in providing the vhost name and instance name in the path of scripts, copy the key name from here: HKEY_LOCAL_MACHINE\SYSTEM\CurrentControlSet\Services\GXClusPlugIn (vhostname) (Instance00x)
Note
These examples provide sample script names, locations and virtual host name as suggested names not requirements.
The command syntax is:
GxSCMCmd.exe -IsRunning <list of service name>For example, your probe script (for example, m:\GxSCMCmd\gxprobe.bat) may appear as follows:
@echo off
if'%MX_ACTIVE_STATE%'='INACTIVE' exit 0
m:\GxSCMCmd\GxSCMCmd.exe -IsRunning "GxClusPlugIn (virtualpolyserve) (Instance001)"
if ERRORLEVEL 0 exit 0
exit 1
Be sure to copy the GxSCMCmd.exe utility to the shared disk resource. Also, be sure to include the probe script on the shared disk.
The stop and start scripts must also contain the registry entry for the virtual machine service names. Your start script (for example, m:\GxSCMCmd\gxstart.bat) may appear as follows:
@echo offC:\WINDOWS\system32\net.exe start "GxClusPlugIn (virtualpolyserve) (Instance001)"exit 0Your stop script (for example, m:\GxSCMCmd\gxstart.bat) may appear as follows:
@echo offC:\WINDOWS\system32\net.exe stop GxClusPlugIn (virtualpolyserve) (Instance001)exit 0 -
-
Add the Customer Service Monitor
Add the custom service monitor to the virtual host configuration in the PolyServe Matrix Server console. Ensure that the virtual host name <virtualpolyserve> is online.
-
From the Services MMC snap-in, verify or manually start the cluster plugin service, Commvault Cluster Plugin (virtualpolyserve) (Instance00x), on the active primary node for the Vhost virtualpolyserve.
-
From the PolyServe Matrix Server, click the Virtual Hosts tab.
-
Right click Virtual Host <virtualpolyserve> and then Add Service Monitor.
-
For the Monitor Type field in the Add Service Monitor dialog box, click CUSTOM.
-
Assign a name to the service monitor by typing the name in the Name field.
-
In the User probe script field, type the path to the probe script that calls the GxSCMCmd.exe command (on the share disk).
-
Click Advanced.
-
From the Advanced Service Configuration dialog box, click the Scripts tab.
-
In the Script pathname: Start field, type the path to the start script (shared disk). In the corresponding Timeout (seconds) field, type a timeout value greater than 60 seconds.
-
In the Script pathname: Stop field, type the path to the stop script (shared disk). In the corresponding Timeout (seconds) field, type a timeout value greater than 60 seconds.
-
Click OK.
-
The monitor should now start, and the primary node should now be active. Failover will occur if services are disabled on the primary node, and services in such a case will move to a secondary node.
Step 3: Add Service Dependencies
By default, a failure of any Agent software (for example, Windows File System ) on the active node will not cause a failover to be initiated. To configure a cluster server to failover when the Agent software fails, you are required to perform the following steps on each of the physical computers configured to host the cluster group:
-
Add the list of Services that GxClusPlugin must monitor for failures
Configure the sServiceMonitorList additional setting with a list of services that GxClusPlugin will monitor for failure. For information about the services used by an Agent or MediaAgent, which can be listed in this additional setting, see Services.
-
From the CommCell Browser, right-click the <Cluster Group Client>and then click Properties.
-
On the Client Computer Properties dialog box, click Advanced.
-
On the Advanced Client Properties dialog box, click the Additional Settings tab, and then click Add.
-
In the Name box, type sServiceMonitorList.Once entered, the Category and Type details will be automatically populated. Alternatively, you can click Lookup and search for the additional setting by typing the additional setting name in the Find box or scrolling through the list. Once found, double-click the additional setting from the lookup window.
-
In the Value box, type the services that need to be monitored by the cluster plug-in.
Example: GxCVD(Instance001);GxClMgrS(Instance001)
-
Click OK.
-
-
Configure the Monitoring Frequency
Configure the sServiceMonitorFrequency additional setting for the frequency (in seconds) at which those services should be polled for failure. This value should be less than the service restart interval being monitored, if any.
-
From the CommCell Browser, right-click the <Cluster Group Client>and then click Properties.
-
On the Client Computer Properties dialog box, click Advanced.
-
On the Advanced Client Properties dialog box, click the Additional Settings tab, and then click Add.
-
In the Name box, type sServiceMonitorFrequency. Once entered, the Category and Type details will be automatically populated. Alternatively, you can click Lookup and search for the additional setting by typing the additional setting name in the Find box or scrolling through the list. Once found, double-click the additional setting from the lookup window.
-
In the Value box, type the time interval in seconds. This time interval will be the frequency at which the services will be pooled for status on the active node of a cluster.
Default Value: 30
-
Click OK.
-
-
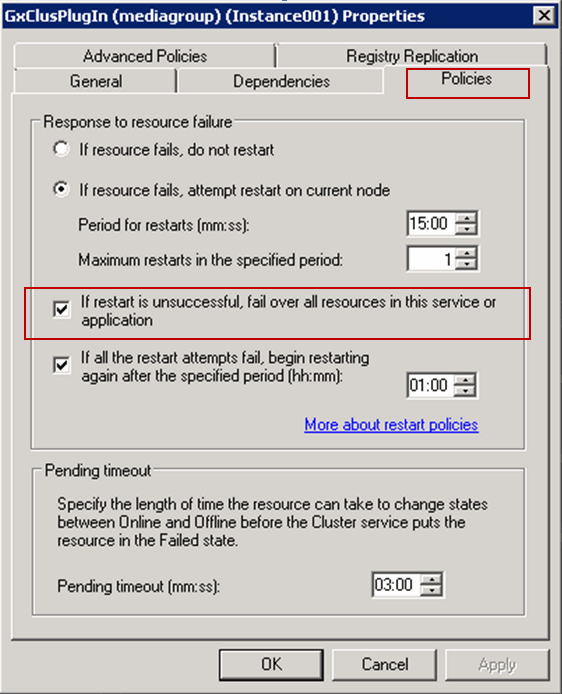
Configure GxClusPlugin Properties
Configure the properties of GxClusPlugin so that a failover will be triggered by a failure of any of the services listed in the sServiceMonitorList additional setting.
For Windows 2008 Server:
-
From the Failover Cluster Manager console, right-click GxClusPlugin listed under Cluster Core Resources > Other Resources, and then select Properties.
-
Click the Policies tab and select the If restart is unsuccessful, fail over all resources in this service or application check box.
-
Click OK.
For Windows 2003 Server:
-
From the Cluster Administrator, right-click GxClusPlugin listed under Other Resources, and then select Properties.
-
Click the Advanced tab and select Restart and Affect the Group, and click OK.
-