Can I create multiple subclients and backup sets to organize the data?
You can create different subclients to organize the data on a client computer. The data that is backed up by any default subclient is the complement of the data that is backed up by its sibling subclients. In effect, the data associated with a default subclient is implicitly determined by the user defined subclients within the same backup set.
For example: A client computer called onyx has the following folders under the root directory which you want to backup:
/international/forecasts
/international/hr
/domestic/hr
Using backupsets, you can establish different subclient groups, which will enable you to back up and restore all of the data relating only to international operations or all of the data relating only to human resource operations. You can organize the data as follows:
|
Backup Sets |
Subclient |
Subclient Content |
Storage Policy |
|
BK1 |
default |
/ |
Storage Policy A |
|
International |
/international |
Storage Policy B |
|
|
BK2 |
default |
/ |
Storage Policy C |
|
HR |
/domestic/hr |
Storage Policy D |
Note that while the default subclients in BK1 and BK2 have the same name (i.e., default), they back up different data subsets.
What permissions does the restored data acquire after the restores?
When performing restore operations (other than in-place restores), the restored data assumes the rights (i.e., permissions) of the parent directory.
Would I be able to restore data if the complete destination path does not exist on the target computer?
Yes. During restores, if the complete destination path specified does not exist on the target computer then the missing directories that are not selected for restore are created automatically with permission and ownership attributes of one of the top-most level directory/file selected for restore.
-
If the top-level item that is being restored is a file, then the parent directory that is created will have the ownership of the file. The parent directory's permissions will be the result of a logical OR operation between the file's permissions and 110 (--X -–X ---).
-
If the top-level item that is being restored is a directory, then the parent directory that is created will have both the ownership and permissions as that of the restored directory.
Can we back up only those files that have been recently modified or changed?
Yes. You can configure backups only for the data that has been modified or changed after a specified date. This option is useful if you need to filter out data that was modified before a certain date.
For more details, refer to Configuring Backups for Recently Modified or Changed Data.
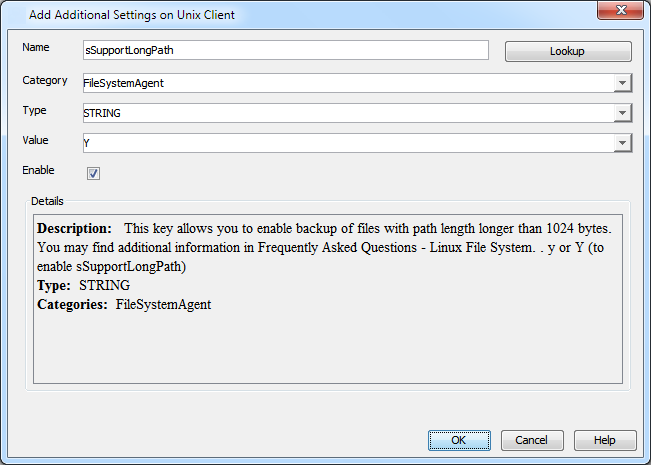
Can we back up files with path names longer than 1024 bytes?
Yes. Files with path length greater than 1024 bytes are backed up by default. However, on upgraded clients, we can enable backup of files with path length longer than 1024 bytes using the following steps:
-
From the CommCell Browser, navigate to Client Computers.
-
Right-click the <Client> and click Properties.
-
Click Advanced and then click Additional Settings tab.
-
Click Add.
-
In the Name field, type sSupportLongPath.
The Category and Type fields are populated automatically.
-
In the Value field, type Y.
-
Click OK.
-
Hard link backups are not optimized if the path length is greater than 1024 bytes; they will be backed up as regular files.
-
It is recommended to run restores by job when restoring files with long path names.
Why is the size of application displayed in the backup job details different from the total protected data size displayed during a browse operation for restores?
The Size of Application displayed in the backup job details might be different from the Total protected data size displayed during a browse operation for restores due to the following reasons:
|
Size of application |
Total protected data size |
|---|---|
|
The size of application is calculated using the data saved by the MediaAgent. |
The total protected data size is calculated from indexing, based on the file metadata saved on the index. |
|
Holes and zeros are not counted in the size of application; only data is counted. |
Only apparent size is present on index which is displayed by running the commands, ls -l or stat, which includes holes. |
|
ACLs are counted in the size of application because they are backed up to media. Any file or folder will have the bit mode permissions as ACLs, by default. |
ACL size is not included in the total protected data size. |
|
Files and folders are included in the size of application. Folders do not have data but contain ACLs. |
Folders are not counted in the total protected data size. |
|
With hard link optimization enabled, hard links in a group are backed up only once, and they are included only once in the size of application. |
All hard link files are counted in the total protected data size. |
|
Raw device files (mount points) are counted in the size of application. |
The size of raw device files (mount points) is zero on index. |
The size of application could be more than the total protected data size because of the following:
-
There are many folders.
-
Files have no holes, and files and folders have ACLs, by default. Any extended attributes also increase the size of application, especially with a large number of small files.
-
Backing up device files.
The total protected data size could be more than the size of application because of the following:
-
There are a large number of sparse files.
-
Optimized hard link backup is enabled, and there are multiple hard link groups.
How can we restore files which have long path?
It is recommended to perform Restore by Jobs to restore entire data backed up in a backup job including files with long path. Alternatively, you can navigate to the specific directory containing files with long path and do a restore.
-
From the CommCell Browser, navigate to Client Computers | <Client> | File System.
-
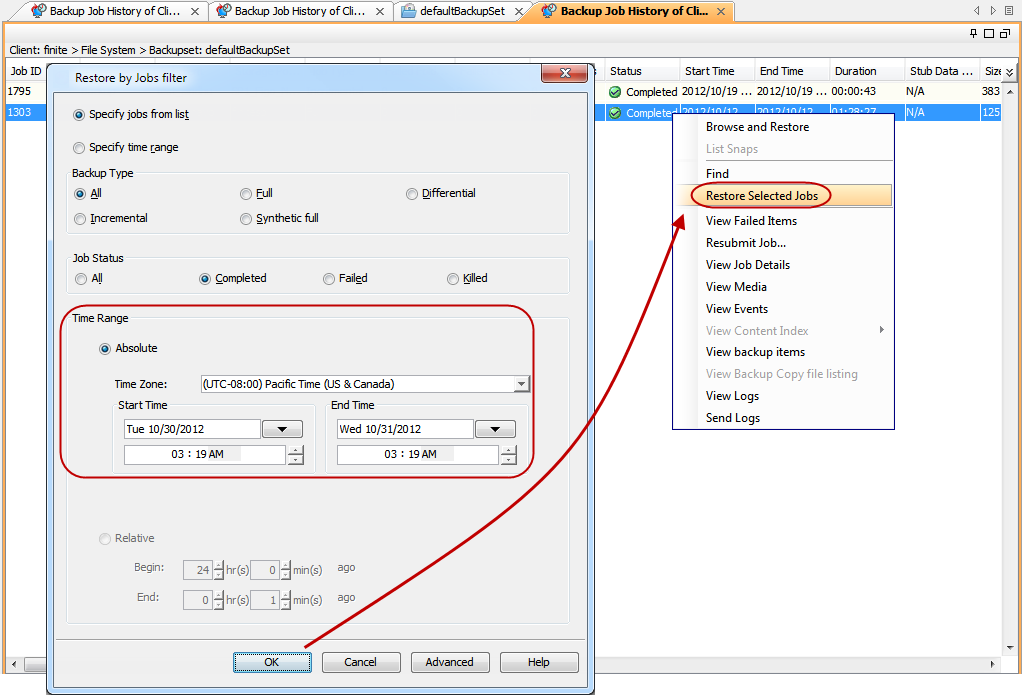
Right-click the <Backup Set> and select All Tasks | Restore by Jobs.
-
Enter the Start Time and End Time and click OK. The list of backup jobs, completed in the specified time period is displayed.
-
Right click the job you wish to restore and select Restore Selected Jobs.
-
Click OK.
Use the following steps to restore files with long path:
-
From the CommCell Browser, navigate to Client Computers | <Client> | File System.
-
Right-click the <Backup Set> and then click All Tasks|Browse and Restore.
-
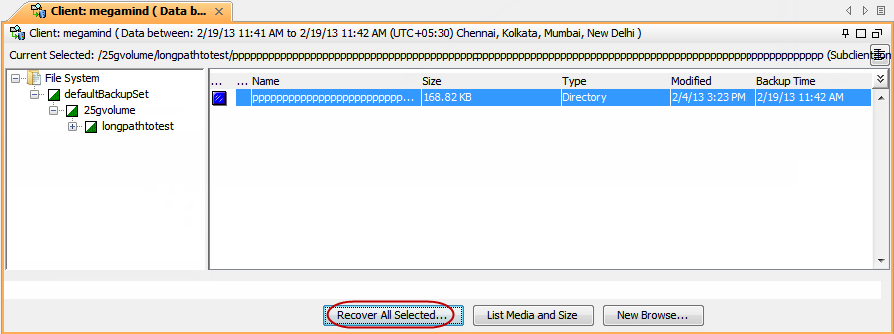
Click View Content.
-
Select the directory containing files with long path and click Recover All Selected.
-
Clear the Restore to same folder check box.
-
Select the destination client computer name from the Destination Client list.
-
Click Browse to navigate to the destination path.
-
Click OK.
Why am I not able to restore sub-directories under a directory with long path?
If you select the GUID (Globally Unique Identifier) directory during browse, only the directory corresponding to the GUID will be restored; the sub-directories are not restored recursively. To restore the complete path, select a directory that is one level above the GUID during browse.
How are case-sensitive files restored from UNIX to Windows clients?
Windows operating system does not maintain case-sensitivity of the file names. Hence, when you perform a cross-platform restore from a Unix client to a Window Client, if there are two case-sensitive files with same name, the case sensitivity of the files are ignored and the files are overwritten. For example, if you are trying to restore files named SAMPLE and sample from Unix to Windows, the file which is restored last will overwrite the first one that was restored.
How are file names with character handled when restoring from UNIX to Windows clients?
When you restore a file with a \ character in its name (for example, file\.dat) to a Windows client computer, Windows interprets the \ as a delimiter in the path name and creates a folder on the Windows computer named file, which will contain a file named .dat. However, the contents of the files file\.dat and .dat are identical.
When does a non-full backup automatically get converted to a full backup?
A non-full backup is automatically converted to a full backup in the following situations:
-
First backup of the subclient.
-
Promote a secondary storage policy copy that is not synchronized with a primary copy (for all the subclients of a storage policy).
-
If you switch from a IntelliSnap backup to a traditional backup or vice versa.
-
CommCell Migration operation.
How are the stale NFS mount points detected during the scan phase?
The stale NFS mount points are detected during the scan phase and an event notification is generated for the user to take necessary action. Stale mount points are detected by using the ls –d command. If the command takes more than 60 seconds to return output, then it is a stale mount point.
Stale NFS mount points are handled in the following ways:
-
If the scan content itself is a stale mount point, then an event notification is generated for the user to take necessary action. The scan phase does not proceed for that file or directory.
-
If a directory in the scan content is a stale mount point, then an event notification is generated for the user to take necessary action, but the scan phase proceeds with the rest of the scan content.
For example, /TestFolder is the scan content, and /TestFolder/nfs_mount is one of the directories under it which is a stale mount point. The scan phase proceeds with the rest of the files and directories, ignoring the /TestFolder/nfs_mount directory.
-
If the scan content is part of a parent directory that is a stale mount point, then an event notification is generated for the user to take necessary action. The scan phase does not proceed for that file or directory.
For example, the /TestFolder/abc directory is the scan content, and /TestFolder is a stale mount point, then an event notification is generated for the user to take necessary action. The scan phase does not proceed.
Why does the backup job complete after the Scan phase?
If no files from the subclient content are added or changed since the last backup, the backup job will complete after the scan phase. The backup and archive index phases will not be performed for such backup jobs. However, if you include the system state backup in a subclient content the backup operation will go through all the phases of scan, except when you select the Only with Full backup option along with it.
What are the two types of file locks and how are they backed up?
The Unix file system uses two types of file locks: Advisory locks and Mandatory locks. Files with an advisory locks are available to multiple users and applications. Files with mandatory locks cannot be used by any other user or application other than the current user.
Files with advisory locks are included in the backups by default. On the other hand, files with mandatory locks are skipped during the backup process and their file names and paths are logged to the Backup Job History log. You can use the CommCell Console to examine this log to determine if any files were skipped. The system automatically attempts to obtain any skipped files in the next backup.
You can backup mandatory locks when you install and enable QSnap. For comprehensive information on configuring backups for files with mandatory locks, see Configuring Backups for Locked Files for step-by-step instructions.
How do I find the file system types for excluding from backups?
Run the ifind_scan command from the command line:
#cd /opt/commvault/Base
 #../galaxy_vm
 #../iDataAgent/ifind_scan –getmnt -all
Number of Mount Points=33 SizeOfMap=33
Name=/testData/uxpermissions Device=/dev/sda4 Type=ext3 Size=10573598720
Name=/home Device=/dev/sda5 Type=391 Size=10573598720The file system types can be identified in the command output (for e.g., ext3 and 391). Exclude the required file system types using the ignoreFStype additional setting.
How do I identify and exclude file system types without a name from backups, using log files?
You can identify file system types without a name by their numeric value. The numeric value of such file systems is printed in the FileScan.log log file located in the /var/log/commvault/Log_Files/ directory.
Find::GetFsType() - add fstype '391' for '/home' to cache (st_dev:17)Find::GetFsType() - add fstype 'ext3' for '/testData/uxpermissions' to cache (st_dev:FC08)Use the numeric value of the file system type in conjunction with the ignoreFStype additional setting to skip the file system type from backups.
Example:
ignoreFStype :391:nfs:nfs3:nfs4:isofs:openpromfs:smbfs:devfs:procfs:nsspool:sysfs:floppy:lofs:tmpfs:proc:ctfs:Can I restore only those files that are owned by a specific user?
Yes. For out-of-place restores, the user must have the necessary privileges to write to the destination directory. For instructions see, Restoring Files Owned by a Specific User.
How do I enable core dump on UNIX/Linux clients in the event of an application process crash?
In general, core dumping is not enabled on most UNIX/Linux clients which makes it difficult to troubleshoot when an application process crashes. You can temporarily enable core dumps for a user session by running the ulimit command so that whenever an application process crashes, it dumps the core. Since this is a temporary setting, if another user logs on and restarts the application, or if the client reboots, or if updates are installed on the client, the core setting is lost.
ulimit -c unlimitedTo overcome this limitation, you can configure the following additional setting. It will add the ulimit command to the iDataAgent's startup script so that it is run automatically every time you start the application.
-
From the CommCell Browser, navigate to the <Client>.
-
Right-click the <Client>, and then click Properties.
-
On the Client Computer Properties for <Client> dialog box, click Advanced.
-
On the Advanced Client Properties dialog box, click the Additional Settings tab.
-
Click Add.
-
On the Add Additional Settings on Unix Client dialog box, perform the following:
-
In the Name box, type nEnableCoreDump. The Category and Type details are automatically populated.
Alternatively, you can click Lookup and search for the additional setting using the Find box.
-
In the Value box, select true. The default setting is false.
-
Click OK.
-
-
Click OK to close the Advanced Client Properties dialog box.
-
Click OK to close the Client Computer Properties for <Client> dialog box.
-
Restart Commvault services on the client.
Alternatively, you can configure this setting directly on the client by configuring nEnableCoreDump to true in the /etc/CommVaultRegistry/Galaxy/Instance001/.properties file.
What are the folders and files created and changes done during installation of this agent?
|
Platforms |
Folders Created |
Files Created |
Other Changes |
|
Linux |
/etc/CommVaultRegistry/Galaxy/InstanceXXX /opt/seed /opt/commvault /var/log/.gxsetup /var/log/commvault .gxupdate
|
/etc/CommVaultRegistry/.global.lock /etc/gxsetup_guid /etc/rc.d/init.d/Galaxy /usr/bin/cvpkgcheck /usr/bin/cvpkgchg /usr/bin/cvpkgrm /usr/bin/detect /usr/bin/commvault /var/lock/subsys/Galaxy commvault.InstanceXXX.service cvunlock.service Symbolic Links to /etc/rc.d/init.d/Galaxy: /etc/rc.d/rc0.d/K01Galaxy /etc/rc.d/rc1.d/K01Galaxy /etc/rc.d/rc2.d/K01Galaxy /etc/rc.d/rc3.d/K01Galaxy /etc/rc.d/rc4.d/K01Galaxy /etc/rc.d/rc5.d/K01Galaxy /etc/rc.d/rc6.d/K01Galaxy |
Startup Scripts: /etc/init.d/Galaxy ( Linux using insserv such as Suse) <dir>/K01Galaxy where <dir>=/etc/rc.d/rc0.d; /etc/rc0.d ; /sbin/rc.d/rc0.d ; sbin/rc0.d ; /etc/init.d/runlevels/%0 only if <dir> exists <dir>/K01Galaxy where <dir>=/etc/rc.d/rc6.d; /etc/rc6.d ; /sbin/rc.d/rc6.d ; sbin/rc6.d ; /etc/init.d/runlevels/%6 only if <dir> exists <dir>/S99Galaxy where <dir>=/etc/rc.d/rc2.d; /etc/rc2.d ; /sbin/rc.d/rc2.d ; sbin/rc2.d ; /etc/init.d/runlevels/%2 only if <dir> exists <dir>/S99Galaxy where <dir>=/etc/rc.d/rc4.d; /etc/rc4.d ; /sbin/rc.d/rc4.d ; sbin/rc4.d ; /etc/init.d/runlevels/%4 only if <dir> exists <dir>/S99Galaxy where <dir>=/etc/rc.d/rc3.d; /etc/rc3.d ; /sbin/rc.d/rc3.d ; sbin/rc3.d ; /etc/init.d/runlevels/%3 only if <dir> exists (Linux only except Ubuntu) <dir>/S99Galaxy where <dir>=/etc/rc.d/rc5.d; /etc/rc5.d ; /sbin/rc.d/rc5.d ; sbin/rc5.d ; /etc/init.d/runlevels/%5 only if <dir> exists (Linux only except Ubuntu) <dir>/K99Galaxy where <dir>=/etc/rc.d/rc3.d; /etc/rc3.d ; /sbin/rc.d/rc3.d ; sbin/rc3.d ; /etc/init.d/runlevels/%3 only if <dir> exists (Linux only except Ubuntu) <dir>/K99Galaxy where <dir>=/etc/rc.d/rc5.d; /etc/rc5.d ; /sbin/rc.d/rc5.d ; sbin/rc5.d ; /etc/init.d/runlevels/%5 only if <dir> exists (Linux only except Ubuntu) <dir>/S99Galaxy where <dir>=/etc/rc.d/rc<n>.d; /etc/rc<n>.d ; /sbin/rc.d/rc<n>.d ; sbin/rc<n>.d ; /etc/init.d/runlevels/%<n> only if <dir> exists, where <n> is the second field in line “id:2:initdefault:” of /etc/inittab <dir>/K99Galaxy where <dir>=/etc/rc.d/rc<n>.d; /etc/rc<n>.d ; /sbin/rc.d/rc<n>.d ; sbin/rc<n>.d ; /etc/init.d/runlevels/%<n> only if <dir> exists, where <n> is the second field in line “id:2:initdefault:” of /etc/inittab |
How do I collect the executable file and shared libraries from a core dump file?
You can collect the executable file and shared libraries from a core dump file using the cvsnapcore utility. The utility is supported on Linux, Solaris, AIX, and HP-UX operating systems.
The cvsnapcore output is a compressed package. If the core dump files are in the dCOREDIR default /opt/commvault directory, the SendLogFiles utility can call cvsnapcore to collect the executable file and shared libraries from the core dump file, and include the cvsnapcore output package in the SendLogFiles package. Within the SendLogFiles package, the cvsnapcore output package will be in the $HOMEDIR\Base\Temp\pkgsharedlib_timestamp directory.
Usage Syntax
cvsnapcore -c <path> [-e <path>] [-n <Instancennn>] [-d <path>] [-x <path>] [-i <path>] [-l] [-h]
Parameters
|
Parameter |
Description |
|---|---|
|
[-h] |
Shows help information. |
|
-c <path> |
Specifies the core file path |
|
[-e <path>] |
Specifies the executable file path |
|
[-n <Instancennn>] |
Specifies Commvault instance as Instancennn. For example, Instance002. The default directory is Instance001. |
|
[-d <path>] |
Specifies the directory for the output file. The default directory is /tmp/cvsnapcore/ |
|
[-x <path>] |
Excludes shared libraries, if any, under the specified path. Multiple paths can be separated using a : delimiter. |
|
[-i <path>] |
Includes shared libraries, if any, under the specified path. Multiple paths can be separated using a : delimiter. |
|
[-l] |
Lists all the information about the core and the files that will be copied. |
|
Example |
|