Add Pre-process Commands and Post-process Commands to Restore Jobs
Use the following steps to perform a pre-process and post-process after a restore operation:
-
From the CommCell Browser, navigate to Client Computers | <Client> | <Agent> | <BackupSet>.
-
Right-click the <Subclient> in the right pane, then click Browse and Restore.
-
Click View Content.
-
Select the data that you want to restore and click Recover All Selected.
-
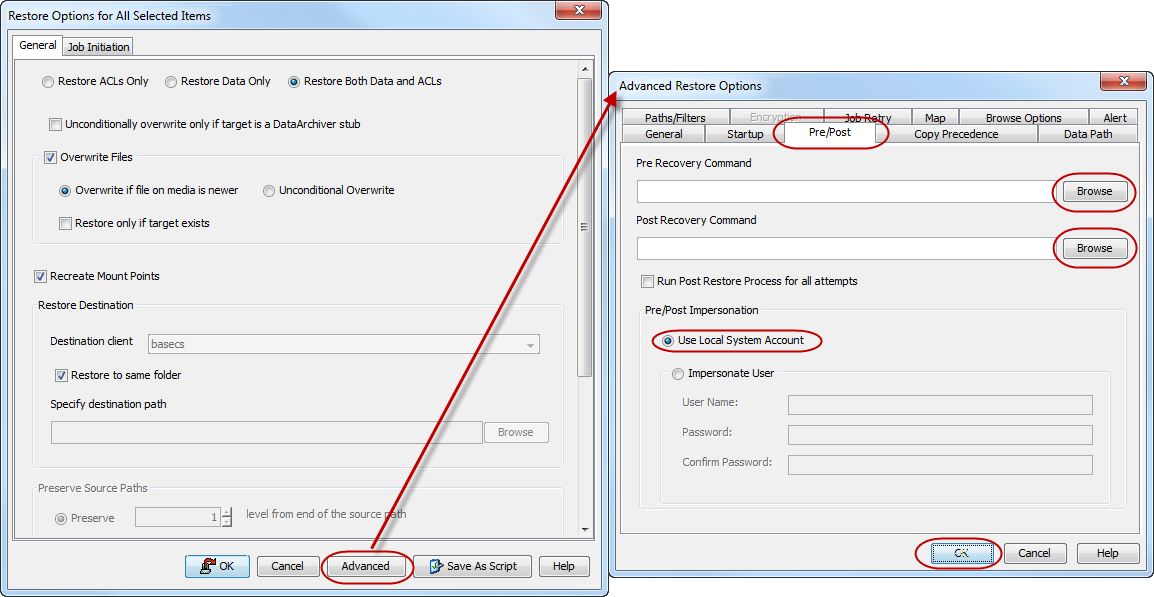
Click Advanced, then click the Pre/Post tab.
-
Enter the path for the batch file in the Pre Recovery Command box or click Browse to select the batch file.
-
Enter the path for the batch file in the Post Recovery Command box or click Browse to select the batch file. Select one of these options:
-
Use Local Accounts - Select if the local account has permissions to execute the processes on the destination client.
-
Impersonate User - Select, then enter the username and password that has the permissions to execute the processes on the destination client.
-
-
Click OK.
-
Click OK to start the restore.
Note
If a Job has been scheduled, pre-processing commands or post-processing commands cannot be added or removed from the restore operation. To change the pre-process or post-processing commands of a restore operation, the operation must be cancelled and rescheduled as described above.
Change Account for Executing Pre-process Commands and Post-process Commands (Data Protection)
You can configure to use a different account with permissions to execute pre-processes or post-processes on Destination clients for Data Protection Operations. Use these steps to change the account:
Note: The option to change the account to run the pre-processes or post-processes is available only on the Windows client.
-
From the CommCell Console, navigate to Client Computers | File System | <BackupSet>| <Subclient>.
-
Right-click the subclient and click Properties.
-
Click the Pre/Post Process tab and click Change and select one of the following options within the User Account dialog box:
-
Use Local System Account - Select this option if the local account has permissions to execute the processes on the destination client.
-
Impersonate User - Select this option and enter the username and password for an account that has the permissions required to execute the processes on the destination client.
-
-
Click OK to save the settings.

Change Account for Executing Pre-process Commands and Post-process Commands (Data Recovery)
You can configure to use a different account with permissions to execute the pre-processes or post-processes on Destination clients for Data Recovery Operations. Use the following steps to changes this account:
-
From the CommCell Browser, navigate to Client Computers | <Client> | <Agent> .
-
Right-click a Backup Set and click All Tasks | Browse and Restore.
-
Click View Content.
-
Select the data that you want to restore and click Recover All Selected.
-
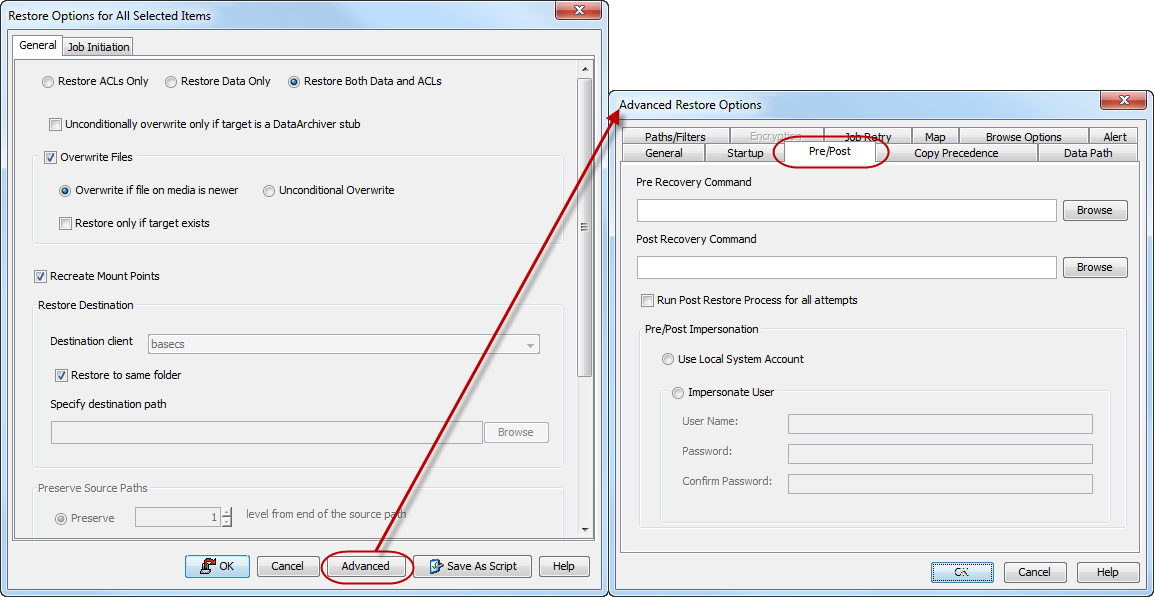
From the Restore Options dialog box, click Advanced.
-
From the Advanced Restore Options, click the Pre/Post tab.
-
From the Pre/Post tab select one of the following options:
-
Use Local Accounts - Select this option if the local account has permissions to execute the processes on the destination client.
-
Impersonate User - Select this option and enter the username and password, that has the permissions to execute the processes on the destination client.
-
-
Click OK to save the settings.
-
Click OK to start the restore.
Change Account for Executing Pre-process Commands and Post-process Commands (Recovery Points)
You can configure to use a different account with permissions to execute the pre-processes or post-processes on Destination clients for Replication Sets. Use the following steps to changes this account:
-
From the CommCell Browser, navigate to Client Computers | <Client> | ContinuousDataReplicator | ReplicationSet.
-
Right-click the Replication Set and select Properties.
-
In the Replication Set Properties dialog box, select the Pre/Post Process tab.
-
From the Pre/Post Process tab, click Change and select one of the following options:
-
Use Local Accounts - Select this option if the local account has permissions to execute the processes on the destination client.
-
Impersonate User - Select this option and enter the username and password, that has the permissions to execute the processes on the destination client.
-
-
Click OK to save the settings.
Configure a Replication Set for Pre-processes and Post-processes for Recovery Point Creation
Use the following steps to configure a replication set for pre-processes and post-processes for Recovery Points creation:
-
From the CommCell Browser, navigate to Client Computers | <Client> | ContinuousDataReplicator | ReplicationSet.
-
Right-click the Replication Set and select Properties.
-
In the Replication Set Properties dialog box, select the Pre/Post Process tab.
-
Click inside the space that corresponds to one of the following phases and type the full path of the process that you want executed during that phase. Alternatively, click Browse to locate the process (applicable only for paths that do not contain any spaces).
-
Pre-Recovery Point Command
-
Post-Recovery Point Command
-
-
Select one of the following options from the User Account dialog box:
-
Use Local Accounts - Select this option if the local account has permissions to execute the processes on the destination client.
-
Impersonate User - Select this option and enter the username and password, that has the permissions to execute the processes on the destination client.
-
-
Click OK to save your changes and close the Pre/Post tab of the Properties dialog box.
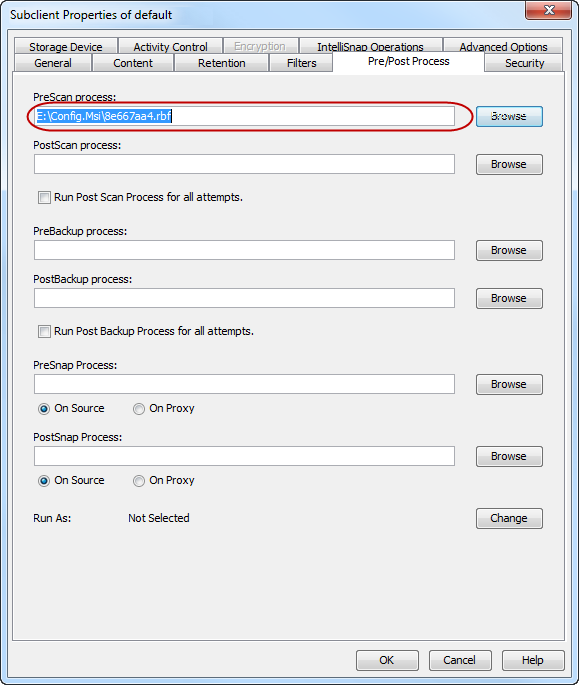
Configure a Subclient for Pre-processes and Post-processes for Data Protection or Archive Operations
You can add and modify pre-processes and post-processes for a subclient. These are batch files or shell scripts that you can run before or after certain job phases.
-
From the CommCell Console, navigate to Client Computers | File System | Backup Set| Subclient.
-
Right-click the subclient and click Properties.
-
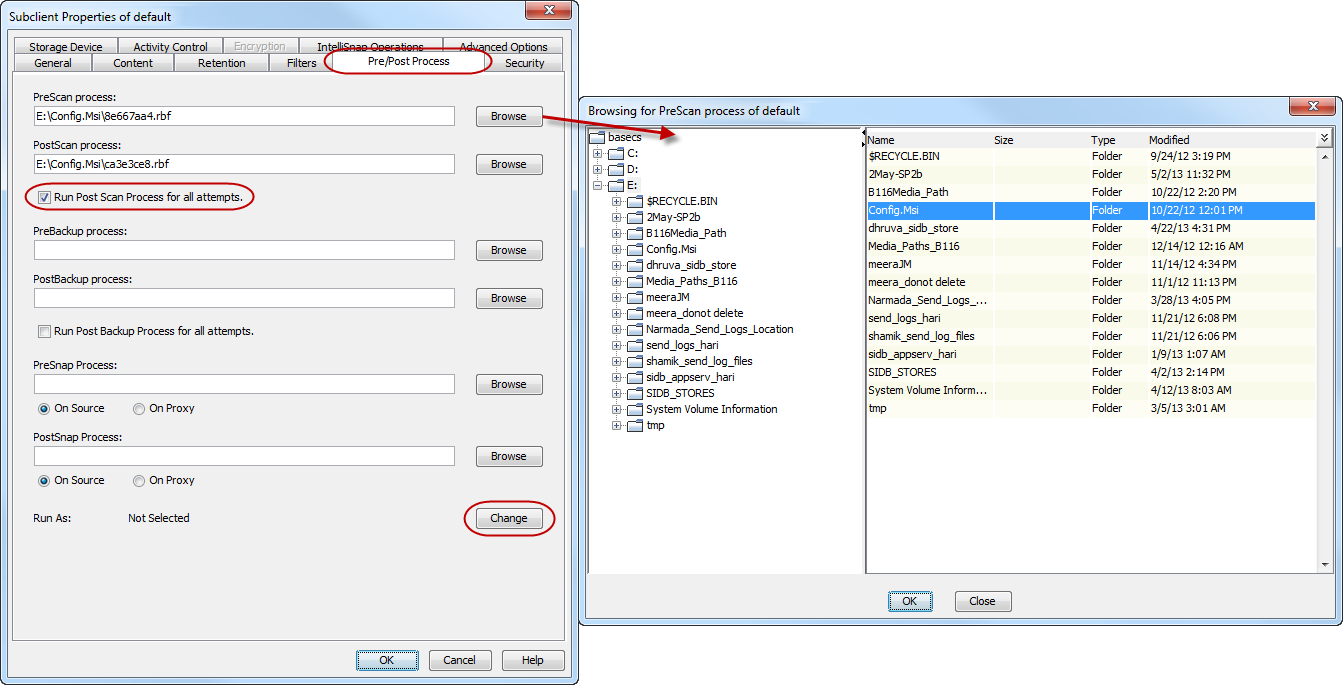
Click the Pre/Post tab of the Properties dialog box.
-
Click Browse to locate the process (applicable only for paths that do not contain any spaces).
Alternatively, you may click inside the space that corresponds to one of the phases and type the full path of the process that you want executed during that phase.
Note
If you want to run a Post-process for all attempts to run that job phase, then select the corresponding checkbox.
Click OK.
-
For subclients on Windows platforms, if Run As displays Not Selected, or if you want to change the account that has permission to run these commands, click Change and select one of the following.
-
Use Local Accounts - Select this option if the local account has permissions to execute the processes on the destination client.
-
Impersonate User - Select this option and enter the username and password, that has the permissions to execute the processes on the destination client.
-
-
Click OK to save your changes and close the Pre/Post tab of the Properties dialog box.
Configure Pre and Post Hardware Snapshot Scripts for the Windows File System Agent
Pre/post snap scripts can be added to a subclient using the Windows File System iDataAgent. A pre-snap script executes before the hardware snapshot and a post-snap script executes after the volume is snapped.
Add a pre-snap script
-
Create a script file containing the processes to complete before the hardware snapshot is taken.
-
Rename this script file SubclientName_presnap.bat.
For example, for the subclient sub1, rename the script file sub1_presnap.bat.
-
Copy this batch file into the ../software_installation_path/Base folder of the client.
Add a post-snap script
-
Create a script file containing the processes to complete after the hardware snapshot is taken.
-
Rename this script file SubclientName_postsnap.bat.
For example, for the subclient sub1, rename the script file sub1_postsnap.bat.
-
Copy this batch file into the ../software_installation_path/Base folder of the client.
Create Pre and Post Backup Process Scripts to Back Up Virtual Machines Using the Linux File System Agent
To create Pre/PostBackup process scripts to back up VMware virtual machines using the Linux File System iDataAgent:
-
In the PreBackup script, include for each virtual machine the appropriate /usr/bin/vmware-cmd addredo command provided by VMware. Each command will create the required REDO file. REDO files will allow the system to back up the virtual machine files.
The command syntax is:
/usr/bin/vmware-cmd <Path-to-vmx-config-file> addredo <disk_device>
where:
<Path-to-vmx-config-file> is the path to the virtual machine configuration fileaddredo – instructs VMware to create the REDO file
<disk_device> – is the virtual device node name.For example, PreBackup process script /root/scripts/Pre-VM-bkup.sh might include the following commands.
/usr/bin/vmware-cmd /root/vmware/winNetEnterprise/winNetEnterprise.vmx addredo scsi0:0/usr/bin/vmware-cmd /root/vmware/rhas3/linux.vmx addredo scsi0:0/usr/bin/vmware-cmd /root/vmware/netware6/netware6.vmx addredo scsi0:0
-
In the PostBackup script, include for each virtual machine the appropriate /usr/bin/vmware-cmd commit command provided by VMware. The commands in this script will post the data in the REDO files back to the virtual machine files, making the virtual machines active again. The REDO files will then be deleted.
The command syntax is:
/usr/bin/vmware-cmd <Path-to-vmx-config-file> commit <disk_device>
where:
<Path-to-vmx-config-file> is the path to the virtual machine configuration filecommit – instructs VMware to post the data in the REDO files back to the virtual machine file, making them active again
<disk_device> – is the virtual device node name.For example, PostBackup process script /root/scripts/Post-VM-bkup.sh might include the following commands.
/usr/bin/vmware-cmd /root/vmware/winNetEnterprise/winNetEnterprise.vmx commit scsi0:0/usr/bin/vmware-cmd /root/vmware/rhas3/linux.vmx commit scsi0:0/usr/bin/vmware-cmd /root/vmware/netware6/netware6.vmx commit scsi0:0
Remove a Process from Pre-processes and Post-processes for Data Protection or Archive Operations
-
From the CommCell Console, navigate to Client Computers | File System | Backup Set| Subclient.
-
Right-click the subclient and click Properties.
-
Click the Pre/Post tab of the Properties dialog box.
-
Remove the text inside the space that corresponds to one of the phases for which you want a pre-process or post-process removed.
-
Click OK.
Advanced - Setting Up Post-processes to Run for all Attempts
By default, a specified post-process command is executed only for a successful or failed scan and backup phase of a job, or for a killed job.
Perform the following steps to run a post-process for all attempts of a job phase whether it is successful, interrupted, suspended or when the job fails.
Procedure
-
From the CommCell Browser, navigate to Client Computers | <Client> | File System | Backup Set.
-
Right-click the <Subclient> in the right pane, and then click Properties.
-
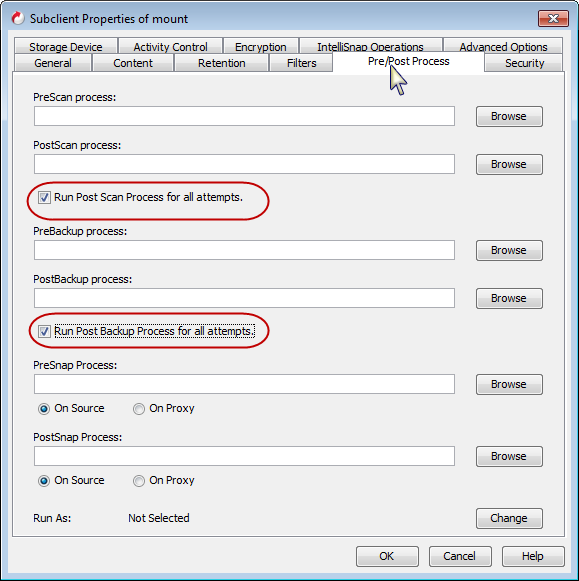
Click the Pre/Post Process tab.
-
Select the Run Post Scan Process for all attempts check box.
-
Select the Run Post Backup Process for all attempts check box.
-
Click OK.