You can enable users, customers, or tenants to use a shared vCenter while ensuring that each user can only view and manage their own virtual machines. For this solution, each user uses a unique vCenter client instance, providing user credentials that are associated with a specific vCenter user with limited scope.
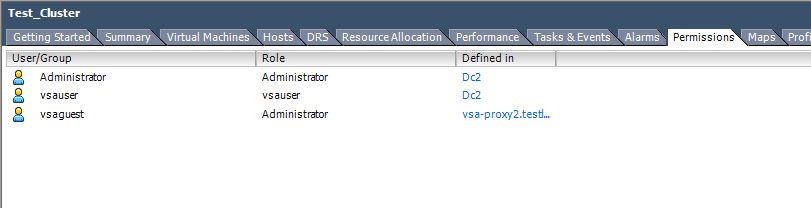
The vCenter user account must have permissions on the vCenter, datacenter, ESX server, resource pool, VM folder, and virtual machine levels for any virtual machines to be backed up and restored. The backup for a virtual machine fails if the user does not have permission on the vCenter, datacenter, and ESX server where the virtual machine resides. When you assign a user and role for a specific entity, select the option to propagate permissions to child objects, so that operations for virtual machines that use those entities are successful.
To ensure that backups and restores are successful, use the vSphere Client or Web Client to assign user permissions on each required entity.
To hide resources from a user, you can assign a "No access" user role to the entity.
vCenter Server Appliance Setup
To create a user account in the vCenter Server Appliance, first create a role with the required permissions as described in step 2 of the procedure in this topic.
After you create the role, add the user account and associate it with the role you defined as described in the VMware article Create a Local User Account in the vCenter Server Appliance.
Procedure
To add a user with permissions to back up and restore virtual machines in a specific entity, perform the following steps:
-
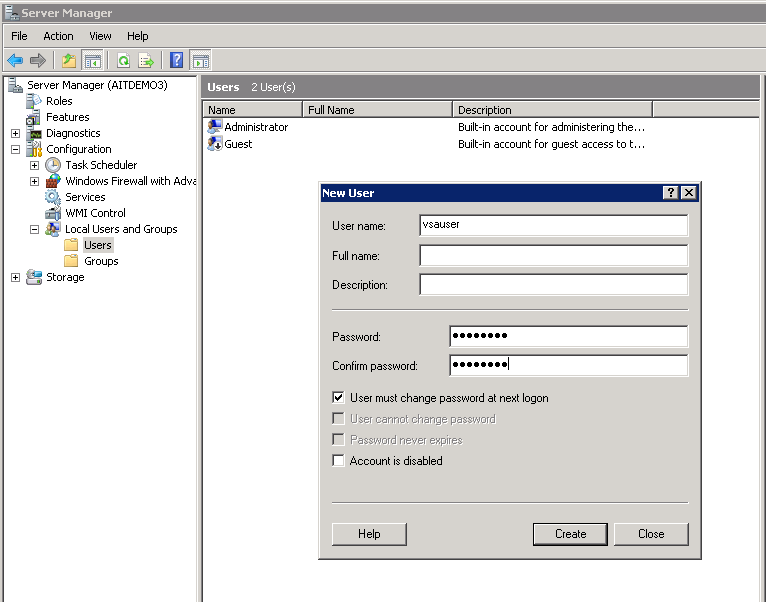
On the vCenter server, add a local user:
-
Use Remote Desktop to log in to the vCenter server and start Server Manager.
-
Navigate to Configuration > Local Users and Groups > Users.
-
Right-click Users and then select New User.
-
Enter the user name and password, then re-renter the password.
-
Click Create.
-
-
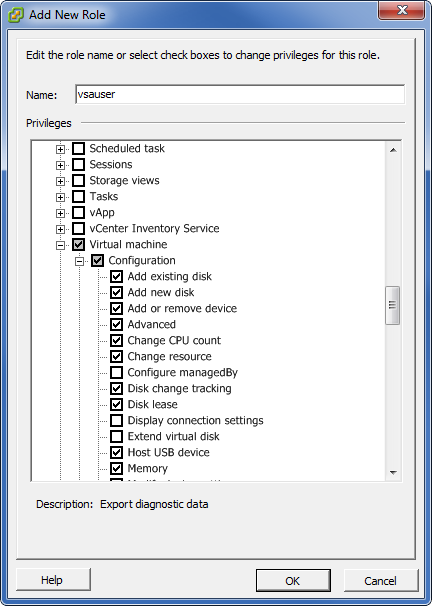
In the vSphere Client, add a role:
-
Go to Home > Administration > Roles, and then click the menu options Administration > Role > Add.
-
Enter the name of the role (for example, cvAdmin).
-
Select backup, restore, and VM File Recovery Plug-In privileges as described in Permissions for Custom User Accounts.
-
Click OK.
-
-
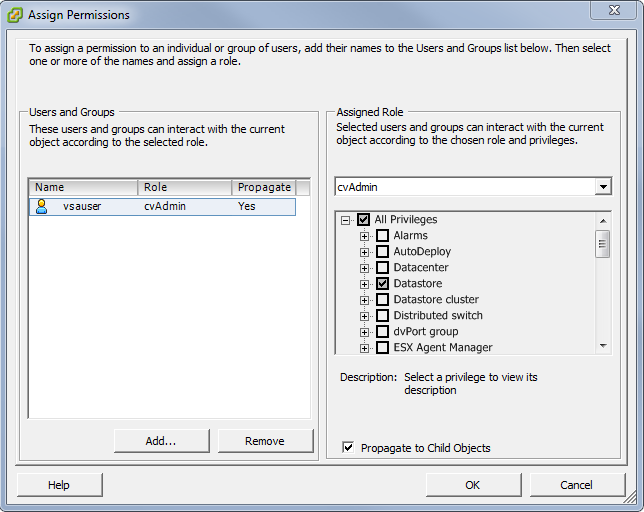
In the vSphere Client, add permissions for a user and role at the appropriate level.
-
Select the entity for which you are adding permissions (for example, a datacenter, host, resource pool, or virtual machine).
-
Click the Permissions tab.
-
Right-click in the tab and select Add Permission.
-
Under Users and Groups, click Add, select the local VSA user on the Select Users and Groups dialog, click Add, and then click OK.
-
Under Assigned Role, select the role from the drop-down list.
-
Click OK.
-
-
If necessary, create a new virtualization client for the vCenter:
-
From the CommCell Browser, navigate to Client Computers.
-
Right-click Client Computers and then select New Client > Virtualization > VMware vCenter.
-
Enter a descriptive name for the virtualization client in the vCenter Host Name box.
-
Enter the username and password of the custom vCenter user.
-
Click Add to select a proxy for backup. On the resulting dialog, select one or more proxies from the Exclude list, click Include or Include All, and then click OK to save the proxy selections.
-
Click OK to create the virtualization client.
-
-
Enter the correct vCenter host name for the Virtual Server instance:
-
From the CommCell Browser, navigate to Client Computers > virtualization_client > Virtual Server.
-
Right-click the VMware virtual server instance and select Properties.
-
Under VMware, enter the actual vCenter host name in the vCenter host name box.
If necessary, you can also click Change to modify user account information.
-
Click OK to save instance properties.
-