Configuring a Library with Mixed Drive Types
Use this procedure to configure a direct-attached library that has mixed drive types.
The following functions are not supported by libraries with mixed drive types:
-
Exhaustive Detection
-
Verify Media
Libraries with mixed drive types cannot be configured as Blind Libraries.
-
On the ribbon in the CommCell Console, click the Storage tab, and then click Expert Storage Configuration.
-
Under Available MediaAgents, select the MediaAgents that are attached to the library and on which the library needs to be configured and then click Add >>.
Click OK.
Note
-
To configure any shared library, make sure that you select all of the MediaAgents that share the library.
-
If a device has already been configured for the MediaAgent, the device appears in the Expert Storage Configuration dialog box.
-
For cluster, select the cluster server as the MediaAgent.
-
-
Click OK to continue.
-
Right-click Libraries, and then click Detect/Configure Devices.
The Detect Library dialog box appears.
-
Select the appropriate options.
-
SCSI Devices - If your library is attached to the SCSI or Fibre Channel (FC) Adapter.
-
Detect on Selected MediaAgents in Parallel - If you are performing the detection for multiple MediaAgents.
-
Automatically create DDS Drivepools - If your library is attached to multiple MediaAgents in a SAN environment.
-
NDMP Devices - If your library is attached to a NAS filer.
-
Exhaustive Detection - Only for libraries without Drive IDs support (do not use for mixed drive types).
Click OK.
-
-
Optionally, from the Processing dialog box you can perform the following operations:
-
Click Abort to stop the exhaustive detection operation and then unmount any mounted media from the drives.
-
Click View Log to display the Log dialog box that reports the status of each task that is performed during the exhaustive detection operation.
-
-
When the detection process is completed, the log file appears. Note the log file contents, and then click Close.
-
A message appears that tells you to right-click the device that you want to configure.
Click OK.
-
Locate the library that you want to configure.
If the library was never configured, the library status is Not configured.
-
Right-click the library, and then click Properties.
The Library Properties dialog box appears.
-
If you do not want to create a storage policy that is associated with this library, make sure that the Automatically create storage policy for new data paths check box is cleared.
-
In the Alias box, enter a descriptive name for the library.
This name appears for the library in the CommCell Browser. We recommend that you give each library a descriptive name to make system administration easier.
-
Click OK.
-
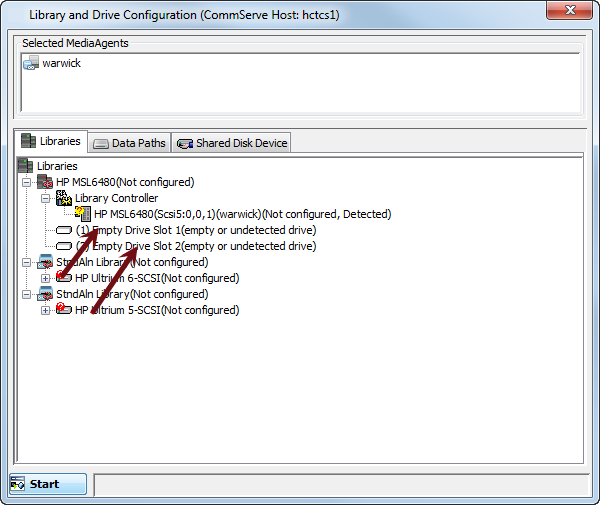
If SCSI 3 drive identification is not supported, the drives appear as standalone drives. Map the drives to the appropriate drive slots.
-
Physically verify the drives and the appropriate drive slot numbers.
-
Drag and drop the standalone drives onto the appropriate drives.
-
-
Configure the library.
-
From the Expert Storage Configuration dialog box, right-click the library that you want to configure, and then click Configure.
-
In the Configuration dialog box that appears, select Library and all drives.
-
A message appears that asks you if your library has a barcode reader.
-
Click Yes, if the library has a barcode reader (sighted library).
-
Click No, if the library does not have a barcode reader (blind library).
-
The status of the library changes to Configured in the Expert Storage Configuration dialog box.
The Libraries tab provides the physical view of the devices (library and drives).
The Data Paths tab provides a logical view of the data path used to access the devices (library, master drive pool, drive pool, and drive).
-
-
We recommend that you rename the Master Pools and Drive Pools with appropriate names based on the drive type. This helps you to identify them later.
-
To rename a Master Pool, right-click the MasterPool from the Data Paths tab, and then click Properties.
-
Type the new name, and then click OK.
-
To rename a Drive Pool, right-click the DrivePool on the Data Path tab, and then click Properties.
-
Type the new name, and then click OK.
The changed names appear in the Expert Storage Configuration dialog box.
-
-
To close the Expert Storage Configuration dialog box, click Start, and then click Exit.
-
From the CommCell Console, define the barcode patterns that are associated with the storage and cleaning media for each drive type.
We recommend that you use a specific barcode pattern for the media that is associated with each of the drive types in the library. This helps you to manage and administer the media in the library.
To define barcode patterns, select the Storage tab on the ribbon, click Media Management, and then select the BarCode Patterns tab on the dialog box that appears.
-
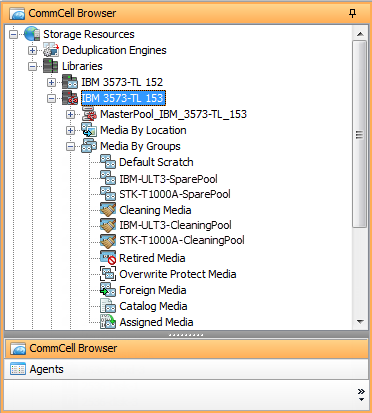
Create new scratch media pools for the media that are associated with the various drive types.
-
In the CommCell Console, go to Storage Resources | Libraries | <library>.
-
Right-click Media By Groups, and then click New Media Group | Spare Media Group.
-
-
In the New Media Group dialog box, enter a name into the Group Name box.
We recommend that you use appropriate names based on the drive type for each of the scratch media pools.
-
Select the appropriate media type from the Default Media Type list.
-
Associate the appropriate barcode pattern in each of these scratch media pools.
-
Create new cleaning media pools for the cleaning media associated with the various drive types.
We recommend that you use appropriate names based on the drive type for each of the cleaning media pools.
Select the appropriate media type from the Default Media Type list.
-
Associate the appropriate barcode pattern in each of these cleaning media pools.
The sample image shows the scratch and cleaning media pools with appropriate names associated with drives used in this example.
-
Right-click the library, and then click Properties.
-
In the Library Properties dialog box, click the Media Usage tab, and then select the Enable Auto-Discovery of Media into default scratch pool check box.
-
Select any one of the media as the Default Media Type.
-
If media is already available in the library, the media is moved into the appropriate scratch pools automatically. If the media is not moved, perform a Full Scan or a Discover Media operation.
-
If media is not available in the library, the media is moved into appropriate scratch pools automatically when you Import Media.
If you import media that does not match the specified barcode patterns that are defined for the scratch pools, or if it is not the media type that is associated with the defined scratch pools, the media is moved to the default scratch pool. If necessary, move media manually to the appropriate scratch pools.
-
-
Create new Storage Policies and use the appropriate naming convention to give the policies meaningful names.
-
Associate the Storage Policy Copies with the appropriate drive pools and scratch pools.
-
If you have existing storage policies, make sure that they are associated with the appropriate drive pools and scratch pools.
-
If you are configuring libraries with mixed drive types in a SAN, do not enable the options to configure the data paths in the Storage Policy Copy automatically.
Related Topics
Provides information about Device Detection, Exhaustive Device Detection, and SCSI 3 drive identification.
Describes the various library operations that can be performed from the CommCell Console.
Describes the various media-related operations that can be performed in a tape library.