Overview
Important: If you did not create a legal hold prior to Service Pack 9, then you will not be able to create a new legal hold. Instead, use the Case Manager feature to hold data for compliance purposes. For more information, see Overview of Case Manager for Compliance Officers.
Legal Hold is the process used by an organization to identify and segregate relevant data found during a data discovery operation and preserve them for a long term for legal purposes. For example, you can use Legal Hold to preserve relevant information of any pending or anticipated litigation or of any routine investigation for a long retention time.
The Legal Hold feature uses a highly accurate policy based approach to search and restore legal information from backups/archives or any electronically found data (such as, emails and files) and retain a subset of the data for long term retention. This feature is especially useful, when you have to search legal data from multiple retention policies and archive them to a Legal Hold with a specific retention policy.
Legal Hold operations are performed by a compliance user.
Setting Up Legal Hold
Important: If you did not create a legal hold prior to Service Pack 9, then you will not be able to create a new legal hold. Instead, use the Case Manager feature to hold data for compliance purposes. For more information, see Overview of Case Manager for Compliance Officers.
Prerequisites
The following section describes the prerequisites to deploy Legal Hold:
-
Check with your software provider and obtain the following:
-
Download Manager to download the latest software components. For instructions, see Downloading Software for Windows Computers Using the Download Manager.
-
Valid Legal Hold License
-
-
Ensure that Windows File System iDataAgent is installed in the CommServe. This is because, all Legal Hold operations will be associated with the File System iDataAgent in the CommServe. For more information on installing Windows File System iDataAgent, see Deployment - Windows File System iDataAgent.
-
Apply the Legal Hold and Windows File System licenses. See Applying a License in the CommCell Console for step-by-step instructions.
Enabling Legal Hold for a Storage Policy
In order to perform a legal hold, you need to create a storage policy with Legal Hold enabled.
Note the following on Legal Hold storage policies:
-
Once you enable Legal hold for a storage policy, it cannot be disabled later.
-
When you define a storage policy for legal hold, if the storage policy has multiple copies with varying retention time, the highest retention time among the copies will be displayed as the default retention period for the Legal Hold. However, you can also extend the default retention period during Legal Hold creation.
-
You can create multiple Legal Hold storage policies.
-
From the CommCell Console, navigate to Policies | Storage Policies.
-
Right-click the <Storage_Policy> and click Properties.
-
Select the Enable this Storage Policy for Legal Holds checkbox.
-
Click OK.
Enabling Deduplication for a Legal Hold
You can enable deduplication on a legal hold storage policy. See Modifying a Storage Policy Copy Deduplication Settings.
Enabling Encryption for a Legal Hold
You can enable encryption on a legal hold storage policy. See Storage Policy Copy Encryption.
Assigning Permissions and Associating Entities to the User Group
Users must have specific permissions to execute Legal Hold operations. Add the following permissions to the role for Compliance Search users. See Editing a Role.
|
To... |
User must have the following... |
|---|---|
|
Create a legal hold and use a retention policy |
|
|
Create a storage policy for Legal Hold |
|
|
Modify or restore Legal Hold sets |
|
|
Delete Legal Hold sets |
|
Creating a Legal Hold
Important: If you did not create a legal hold prior to Service Pack 9, then you will not be able to create a new legal hold. Instead, use the Case Manager feature to hold data for compliance purposes. For more information, see Overview of Case Manager for Compliance Officers.
When you create a Legal Hold, note the following:
-
The Legal Hold data is an unaltered copy of the original data. On creating a Legal Hold, the selected search items are restored to the Compliance Search and archived as a Legal Hold. If the search items are already available in the Compliance Search (i.e., viewable in the Compliance Search), when you move them to a Legal Hold, they are restored once again to the Compliance Search and archived into the Legal Hold.
-
Whenever a new Legal Hold is created, a corresponding Legal Hold Set is automatically created under the CommServe's File System iDataAgent in the CommCell Console.
A Legal Hold Set is a special type of On Demand Backup Set that is generated for each Legal Hold. For more information, see On-Demand Data Protection Operations. The Legal Hold Set holds all the items added to the Legal Hold. The items in the Legal Hold Set are retained for a period either specified by the retention policy or by the extended retention time selected by the user while creating the new legal hold.
All the files moved to the Legal Hold are assigned to the Legal Hold Set and is archived as a Legal Hold archive operation. During this process, the Job Controller window in the CommCell Console displays an information management job. For more information on jobs, see Job Controller.
-
All application types supported by the Content Indexing platform are supported by Legal Hold.
-
To create a Legal Hold, users must have Storage Management capabilities.
Once you perform a search operation and move the discovered items to a review set, you can select specific search items from the review set and move them to a new or an existing Legal Hold to retain them for a selected retention time.
-
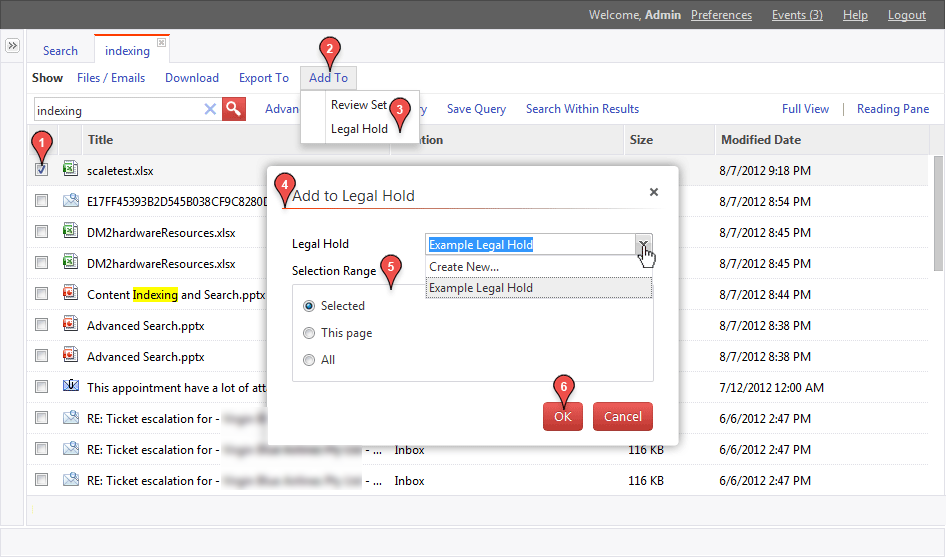
In the right pane of the Compliance Search, select the files/emails.
-
Click the Add to tab.
-
Select Legal Hold.
-
In the Select Set dialog box, select Create New from the Legal Hold drop-down box to create a new Legal Hold.
-
In the Legal Hold Creation dialog box:
-
Type the Legal Hold name in the text box
-
Description of the Legal Hold in the text box
-
Select the Retention policy from the Retention Policy list. On selecting the Storage policy, the Default Retention will be set to the retention time of the selected storage policy.
-
-
If you need to extend the retention time for the Legal Hold:
-
Select Extended Retention checkbox
-
Type or select the Retention Date.
-
To provide infinite extended retention time, select Infinite Retention checkbox.
-
-
Click OK.
Managing the Data in a Legal Hold
Add Files and Emails to a Legal Hold
After performing a search operation, you can add all the items from the searched results to an existing Legal Hold Set.
Use the following steps to add all items from search results to an existing Legal Hold Set.
-
In the right pane of the Compliance Search, select the files/emails.
-
Click the Add to tab.
-
Select Legal Hold.
-
In the Select Set dialog box, select an existing Legal Hold from the Legal Hold list.
-
In the Selection Range, click :
-
Selected - To add the selected files/emails in the current page to the Legal Hold.
-
This Page - To add all the files/emails in the current page to the Legal Hold.
-
All - To add all the files/emails in the search result to the Legal Hold.
-
-
Click OK.
View Legal Hold Data
To view data in a Legal Hold perform the following steps:
-
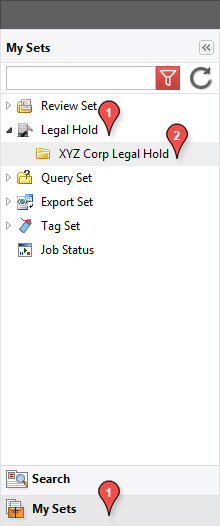
From the Compliance Search, navigate to My Sets | Legal Hold.
-
Select the <Legal_Hold>.
The list of files in the Legal Hold will be displayed.
Group Data
Data in a Legal Hold Set is not grouped by default. Data can be manually grouped in a Legal Hold Set by sender or folder path.
Grouping Emails by Sender
Emails can be grouped and viewed by sender's name. Follow the steps given below to group emails from a specific sender.
-
From the Compliance Search, navigate to My Sets | Legal Hold.
-
Select the <Legal Hold>.
-
On the Group By menu, click Sender.
Emails will be grouped by according to sender.
Grouping Files by Folder Path
Files can be grouped and viewed by folder path. Follow the steps given below to group the files existing in a specific folder.
-
From the Compliance Search, navigate to My Sets | Legal Hold.
-
Select the <Legal Hold>.
-
On the Group By menu, click Folder Path.
Files will be grouped by according to their location.
Filter Data
Data in a Legal Hold Set is not filtered by default. You can manually filter data in a Review Set/Legal Hold Set by sender or folder path.
Filtering Emails by Sender
Emails in a Legal Hold Set can be filtered by sender’s name.
-
From the Compliance Search, navigate to My Sets | Legal Hold.
-
Select the <Legal Hold>.
-
On the Filter menu, click Sender.
-
Select the name of the sender in the right pane.
-
Click Apply.
You can click the Clear button on the right pane to clear all the selected senders. To clear a specific selected sender, click the cross-mark symbol corresponding to the selected sender on the right pane.
Filtering Files by Folder Path
Files in a Legal Hold Set can be filtered by folder path.
-
From the Compliance Search, navigate to My Sets | Legal Hold.
-
Select the <Legal Hold>.
-
On the Filter menu, click Folder Path.
-
Select the folder path in the right pane.
-
Click Apply.
You can click the Clear button on the right pane to clear all the selected folder paths. To clear a specific selected folder path, click the cross-mark symbol corresponding to the selected folder path on the right pane.
Share a Legal Hold with Other Users
Data can be shared between multiple Users/User Groups in a Legal Hold .
You can assign different capabilities to the Users/User Groups.
Use the following steps to share a legal hold:
-
From the Compliance Search, navigate to My Sets | Legal Hold.
-
Select the <Legal Hold>
-
Click Share.
-
In the Security dialog box that is displayed click Add.
-
From the Select User or Group dialog box, select CommCell Users/User Groups with whom the Legal Hold is to be shared.
-
Click OK.
-
On the Security dialog box select the new User and assign desired Capability.
-
Click OK.
View the Legal Hold Summary and Refresh a Legal Hold
Details about a Legal Hold can be viewed from Summary and legal hold can be refreshed using the following steps:
-
From the Compliance Search, navigate to My Sets | Legal Hold and select the <Legal Hold>.
-
Click on the Summary menu. The summary of Legal Hold will be displayed.
-
Click on the Refresh menu. The Legal Hold items will be refreshed.
Export Legal Hold Data for Download
To download multiple files, you can export the files/emails in the Legal Hold to a CAB file format and then download them to your computer. Use the following steps to export the items in a Legal Hold to Compressed File Format (CAB).
Note: When exporting data from a Legal Hold to CAB, all of the items in the Legal Hold will be included in the export set.
-
From the Compliance Search, navigate to My Sets | Legal Hold.
-
Select the <Legal Hold>.
-
Click Export To CAB.
-
In the Select Set dialog box, type the download name in the Download name box and then select Export Set from the Select Export Set drop-down list.
-
Click OK.
Change the Legal Hold Retention
Retention time of the Legal Hold can be modified after creating the Legal Hold. When you modify the description and retention time of the Legal Hold, all the existing items in the Legal Hold and the new items that will be added to the Legal Hold will reflect the modified retention time.
Note that, the Legal Hold name and storage policy association cannot be modified.
-
From the Compliance Search, navigate to My Sets | Legal Hold.
-
Select the <Legal Hold>.
-
Click Edit.
-
In the Legal Hold Edit dialog box, modify the extended retention time as desired.
-
Click OK.
Delete a Legal Hold
Only users in the Master user group that are assigned roles with the Compliance Search, Administrative Management, and Browse and In Place Recovery/Browse and Out of Place Recovery capabilities can delete Legal Holds. Refer to Associating Entities and Roles to a User Group for more detailed information.
When a Legal Hold is deleted, all the data associated with the Legal Hold will become non-restorable and will get pruned during the next data aging operation on the CommServe.
-
From the Compliance Search, navigate to My Sets | Legal Hold.
-
Select the <Legal Hold>
-
Click Delete Legal Hold.
-
On the Confirm Remove dialog box, type "confirm delete".
-
Click Yes.
Note
When a legal hold is deleted, then the corresponding On Demand Backup Set is also deleted.
Retrieving a Legal Hold
After creating a Legal hold, you can restore information from the Legal Hold using the following ways:
From the CommCell Console
The CommCell Console provides you the facility to restore all the items or selected items from the Legal Hold to the desired location. You can restore the Legal Hold data from the Legal Hold set in any of the following methods:
When you browse for Legal Hold data, you will notice that the Browse window does not display the actual path to the files. This is because, for a Legal Hold, the backup files are restored from the client to a web server and then archived as a Legal Hold operation in the CommServe. As a result, all the Legal Hold operations will be associated only with the CommServe and hence the actual path to the files is not available. Therefore, to resolve this issue, the Browse window displays a system generated path in the following order:
-
Legal Hold Set name
-
Legal Hold
-
Legal Hold name
-
CommCell Number (This is CommCell ID of the CommCell from which the files were initially backed up to the media.)
-
Client name (This reflects the name of the client when the files were backed up initially.)
-
iDataAgent name (The iDataAgent for the file type during original backup.)
-
Files
Restore All Data Backed Up during a Job
-
From the CommCell Console, navigate to Content Director| Legal Hold.
-
Right-click the <Legal Hold> and click All Tasks | Restore by Jobs
-
In the Restore Options dialog box , enter the Start Time and End Time
-
Click OK.
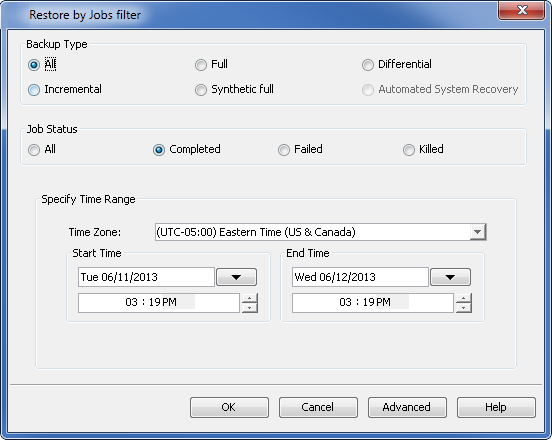
The list of backup jobs, completed in the specified time period is displayed
-
Right click the job you wish to restore and select Restore Selected Jobs.
-
Click OK.
All the back up data will be recovered.
Restore Specific Data Backed Up during a Job
-
From the CommCell Console, navigate to Content Director| Legal Hold.
-
Right-click the <Legal Hold> and click All Tasks | Restore by Jobs
-
In the Restore Options dialog box , enter the Start Time and End Time
-
Click OK.
The list of backup jobs, completed in the specified time period is displayed
-
Click OK in the Browse Options dialog box.
-
Select data that you want to restore and click Recover All Selected.
Click OK.
The selected data will be recovered.
From the Compliance Search
You can restore data in a Legal Hold to a new or existing review set from the Compliance Search console. After you restore the Legal Hold data to a review set, you can view, search, and perform other actions on the Legal Hold data from the review set. If the restored data in the review set is ever pruned, you can always restore it again from the Legal Hold to another review set.
Note: Data restored from a Legal Hold to a review set can only be exported to the CAB format.
-
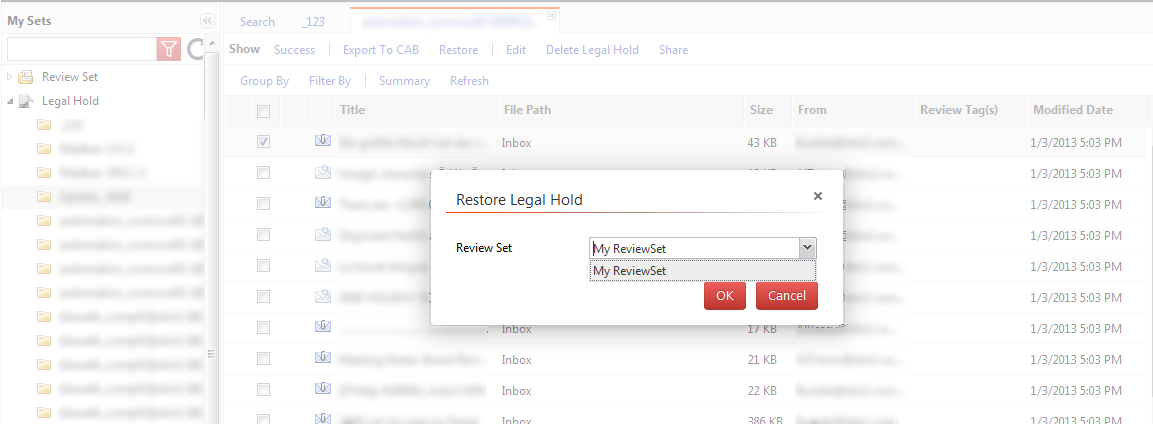
From the Compliance Search, navigate to My Sets | Legal Hold | <Legal Hold>.
-
Click the Restore tab.
-
In the Select Set dialog box, do the following:
-
Select Create New from the Review Set drop-down box to create a new review set and in the New Review Set dialog box type the Review Set name in the text box to restore to a new Review Set.
-
Select a Review Set name from the Review Set drop-down box to restore the Legal Hold items to an existing Review Set.
-
-
Click OK.
Reports
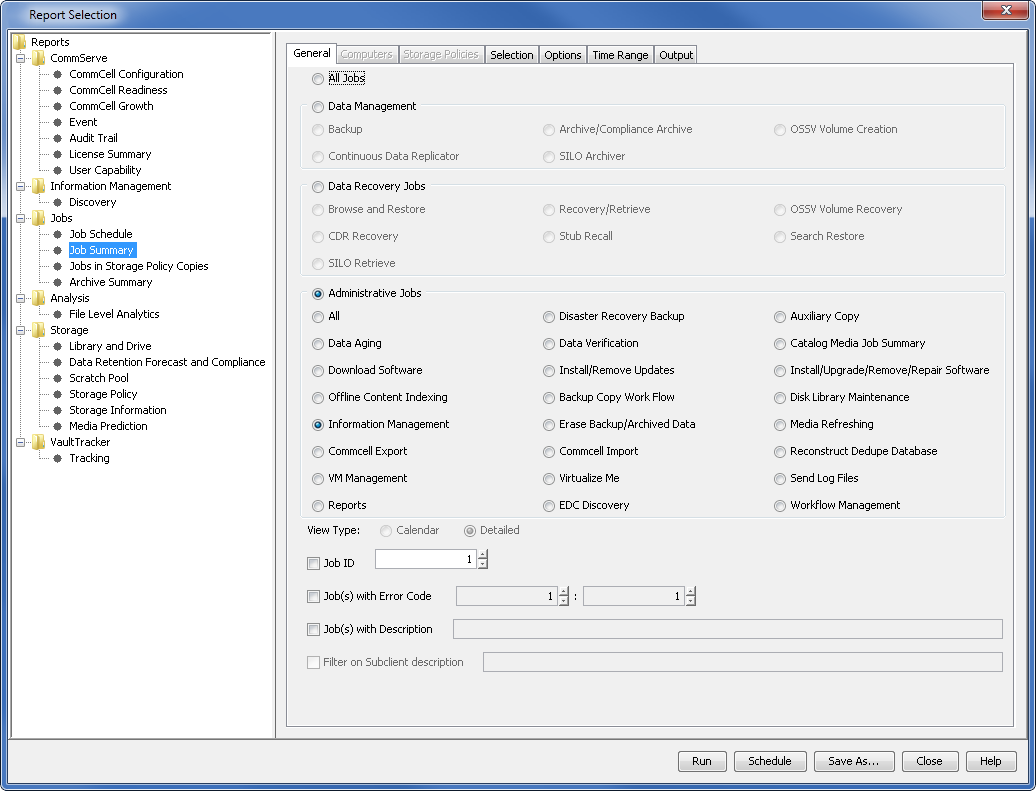
Information Management Job Summary Report
The Information Management Job Summary Report provides the list of backup jobs for each client. In order to view the Legal Hold operations, select Protected Objects in the Report Selection dialog box.
The following procedure provides the steps necessary to run an Information Management Job Summary report:
-
From the CommCell Browser, click the Reports tab.
-
Click the Information button. The Report Selection dialog box appears.
-
From the Jobs directory in the left pane, click Job Summary.
-
In the General tab, click Administrative Jobs. The Administrative Jobs options are made available.
-
Click Information Management.
-
Click the Selection Tab.
-
Select the Protected Objects check box.
-
Click Run.
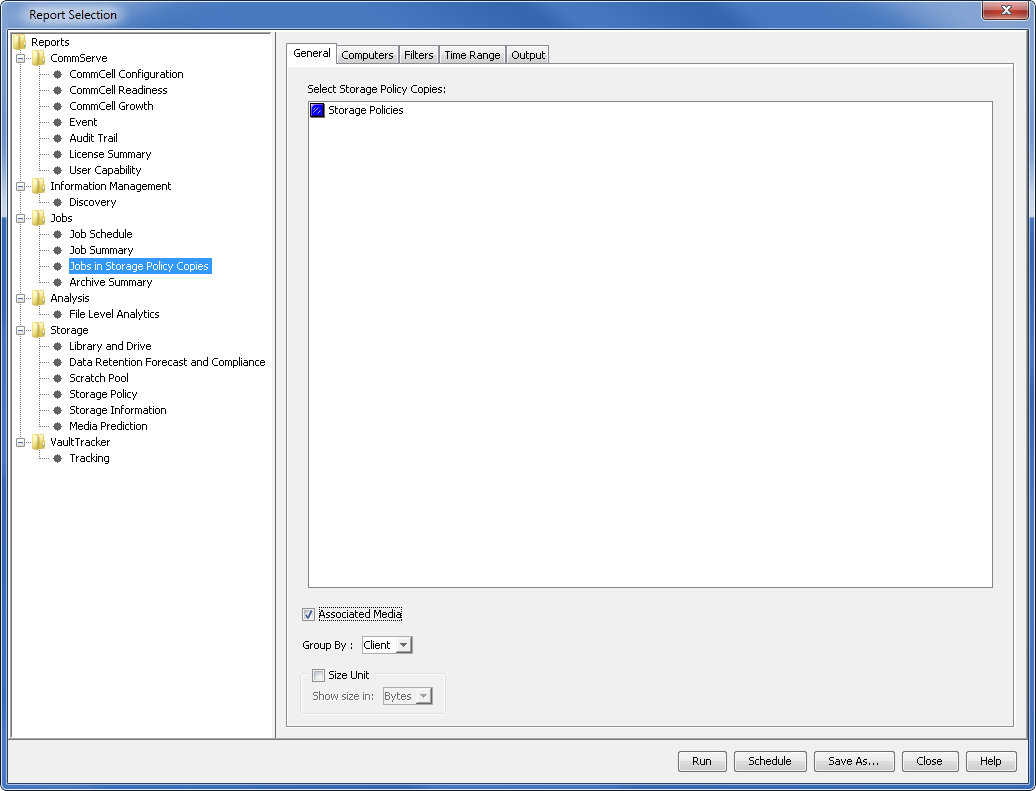
Jobs in Storage Policy Copies Report
The Jobs in Storage Policy Copies Report includes a list of data protection jobs (including Legal Hold) associated with the storage policy copies. You can also select filter options for more focused reports..
-
From the CommCell Browser, click the Reports tab.
-
Click the Information button. The Report Selection dialog box appears.
-
From the Jobs directory in the left pane, click Jobs in Storage Policy Copies.
-
In the General tab, select the storage policies you want to include in the report..
-
Select the Associated Media checkbox.
-
Click the Filter tab, and then select the filters you want to include in the report.
-
Click Run.
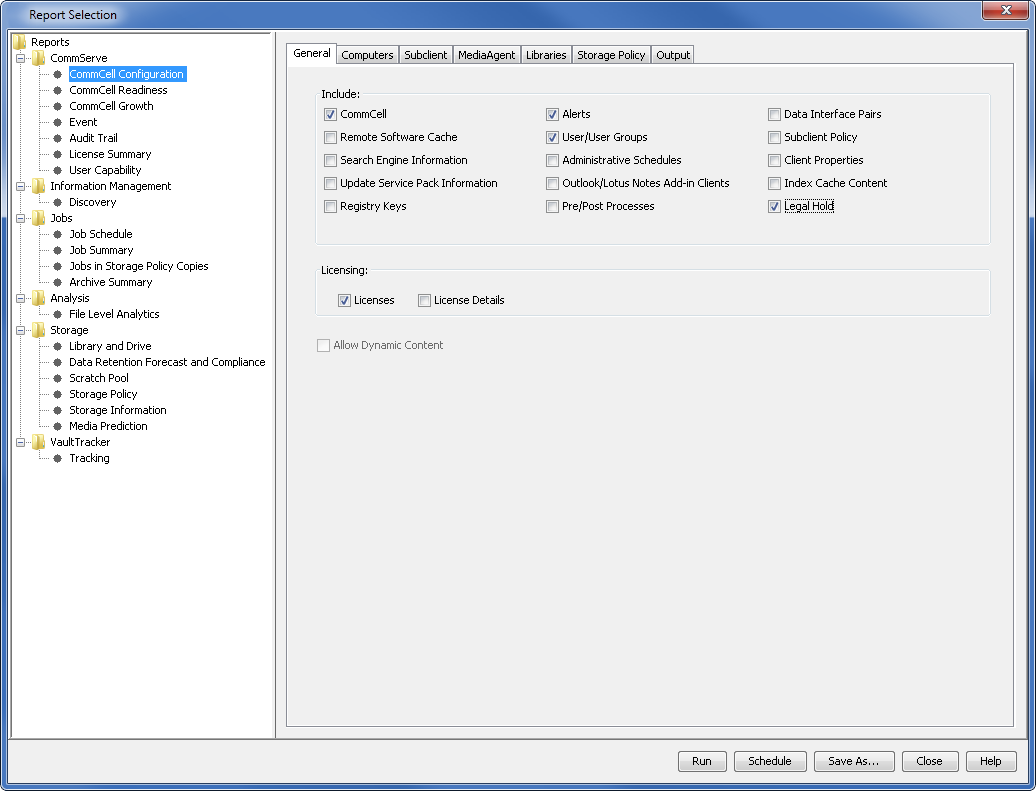
CommCell Configuration Report
The CommCell Configuration Report Provides a high-level view of the settings that are configured for the CommCell, including:
-
Properties
-
Alerts
-
Users and User Groups
-
Agents
-
Index Caches
-
Storage Policies
The CommCell Configuration Report includes information on the Legal Holds created in the CommServe.
-
From the CommCell Browser, click the Reports tab.
-
Click the Information button. The Report Selection dialog box appears.
-
From the CommServe directory in the left pane, click CommCell Configuration.
-
In the General tab, select the Legal Hold check box.
-
Click Run.
License Requirements
For information about licensing, see Commvault Licensing Program Guide.