Creating a Calendar with a Different Start Month and Number of Days
By default, the standard Gregorian calendar starts on the first day of January and each month have a defined set of days.
Use the following steps to define a custom calendar with a different starting month and different number of days for each month:
-
From the CommCell Console toolbar, click Control Panel.
-
Under the Schedule section, click Custom Calendars.
-
From the Custom Calendars dialog box, click Add.
-
Specify the following calendar details:
-
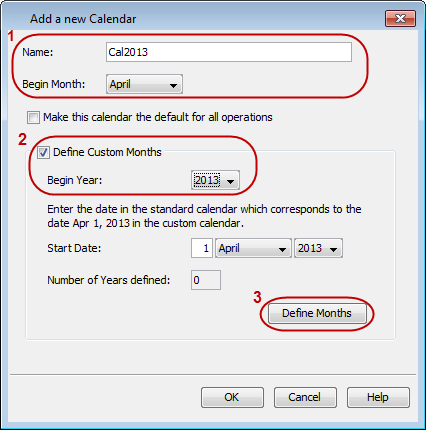
In the Name box, type a name for the calendar.
-
In the Begin Month drop-down list, select the desired starting month of the year.
-
Click the Define Custom Months check box and select the year in which the calendar has to begin from the Begin Year drop-down list.
-
Click Define Months.
See the image below for an example:
-
-
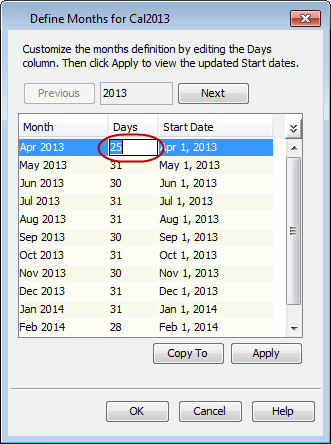
For each month that you want to customize, double-click the days in the Days column and specify the new number of days for that particular month.
Note that the number of days should not be less than 15 or greater than 45 for a month.
-
Click Apply and then click OK.
-
From the Add a new Calendar dialog box, click OK.
Renaming a Custom Calendar
If needed, you can always change the name of your custom calendar. Use the following steps to rename a custom calendar:
-
From the CommCell Console toolbar, click Control Panel.
-
Under the Schedule section, click Custom Calendars.
-
From the Custom Calendars dialog box, select the calendar to be made as default and click Edit.
-
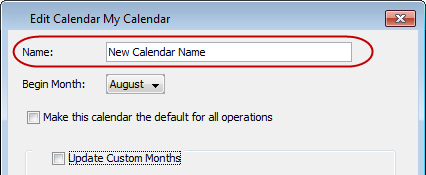
In the Name box, type the new name for the calendar.
-
Click OK.
Setting a Calendar as the Default
Initially, the standard calendar is set as the default calendar for the CommCell. Use the following steps to set an existing custom calendar as the default calendar for the CommCell:
-
From the CommCell Console toolbar, click Control Panel.
-
Under the Schedule section, click Custom Calendars.
-
From the Custom Calendars dialog box, select the calendar to be made as default and click Edit.
-
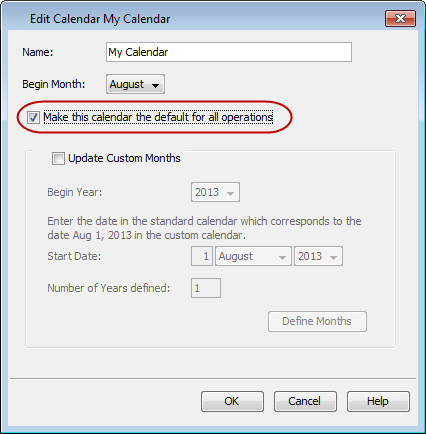
Select the Make this calendar the default for all operations check box.
-
Click OK.
Changing the Start Date of a Month
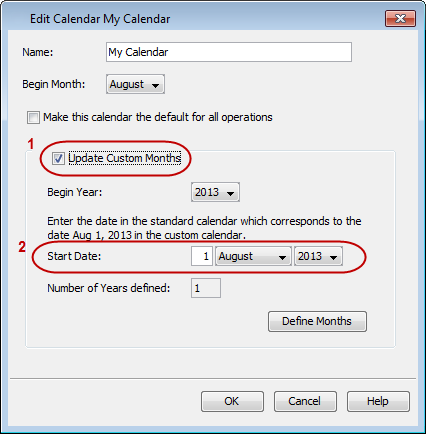
Once you create a custom calendar with a different start month, you can always change the starting date for the month at a later point in time.
The start date of a custom calendar must be within 15 days prior to or after day 1 of the selected Begin Month. For example, if you select January (2012) as the beginning month, then the start date of the custom calendar can be defined as any date from December 15th (2011) through January 15th (2012).
-
From the CommCell Console toolbar, click Control Panel.
-
Under the Schedule section, click Custom Calendars.
-
From the Custom Calendars dialog box, select the calendar to be made as default and click Edit.
-
Click Update Custom Months.
-
Select the starting date for the month from the Start Date option.
-
Click OK.
Defining Customized Months
You can customize the months for the selected year in the calendar by changing the number of days in a month. However, note that the number of days should not be less than 15 or greater than 45 for a month.
-
From the CommCell Console toolbar, click Control Panel.
-
Under the Schedule section, click Custom Calendars.
-
From the Custom Calendars dialog box, select the calendar to be modified and click Edit.
-
Click Update Custom Months.
Setting the Number of Days for a Month
-
Click Define Months.
-
For each month that you want to customize, double-click the days in the Days column and specify the new number of days for that particular month. The Start Date of each month adjusts accordingly based on the number of days specified on each month.

-
Click Apply.
Applying the Custom Month Definitions to Multiple Years
-
Click Next to scroll to the appropriate year to copy the custom months and then click Apply.
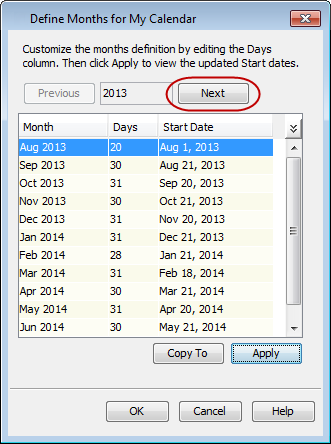
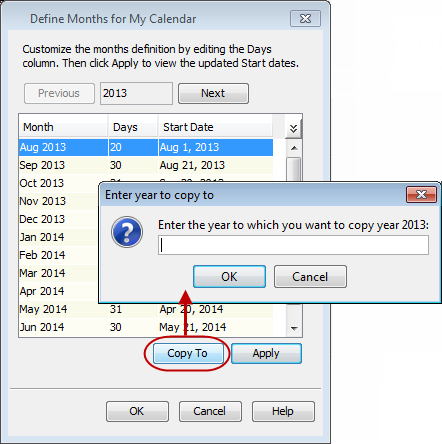
Alternatively, you can also click Copy To and enter the year to which you want the custom months to be copied. Click OK and then click Apply.
Note
If there are some years with no custom month definitions in between the currently displayed year and the year specified in the Enter year to copy to window, the last defined year’s custom month definitions will be applied to those years without definitions. For example; the last defined year is 2007, but the currently displayed year is 2006. If 2010 is entered in the Enter year to copy to window, the 2007 custom month definitions will be copied to years 2008 - 2009, while the 2006 custom month definitions will be copied to year 2010.
-
Click OK twice.
Associating a Custom Calendar to a Storage Policy Copy
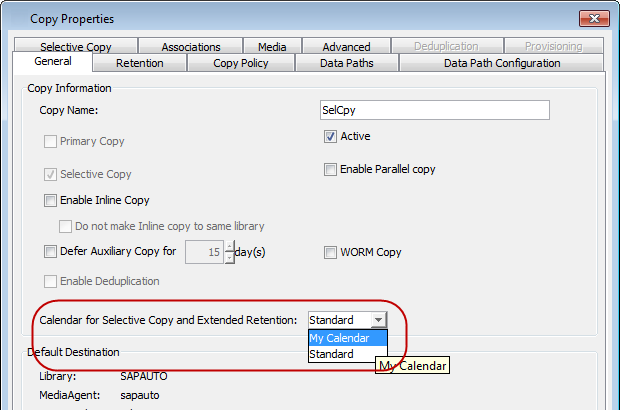
Associating a custom calendar to a storage policy copy changes the time intervals by which data is copied to and aged from this copy. Selective storage policy copies associated with custom calendars will have data copied during auxiliary copy operations either monthly, quarterly, half yearly, or yearly based on the days defined in the calendar.
If a storage policy copy is re-associated with a different calendar, the auxiliary copy operation re-calculates the dates in which data is copied based on the time definitions set in the custom calendar.
Use the following steps to associate a custom calendar to a storage policy copy:
-
Ensure that you have created a custom calendar using the Custom Calendars option in the Control Panel.
-
From the CommCell Browser, navigate to Policies | Storage Policies | <Storage_Policy>.
-
Right-click the <Storage Policy Copy> and click Properties.
-
Select a custom calendar name from the Calendar for Selective Copy and Extended Retention list.
-
Click OK.
Associating a Custom Calendar to a Job Schedule
Custom calendars can be used to create monthly and yearly schedules. For example:
-
A monthly schedule for a custom calendar that defines months that are 32 days long runs every 32 days, starting on the starting day of the month as defined in the custom calendar.
-
A yearly schedule runs based on the yearly number of days defined in the custom calendar.
The following sections describe how to create schedules using a custom calendar.
Before You Begin
Procedure
As an example, use the following steps to schedule a File System backup that uses a custom calendar. You can associate the custom calendar to any other operation that you can schedule.
-
Right-click the File System subclient and click Backup.
The Backup Options dialog box appears.
-
Click Schedule and then click Configure.
The Schedule Details dialog box appears.
-
In the Schedule Name box, type a name for the schedule.
-
In the left pane, click Monthly or Yearly and enter the details for the schedule.
For information on the schedule options, see Schedule Pattern or Schedule Details.
-
From the Calendar list, select the customized calendar.
-
Click OK.
Related Reports
The following reports provide information on custom calendars:
-
CommCell Configuration Report
This report identifies the schedules and/or storage policy copies that are using custom calendars.
For more information on this report, see CommCell Configuration Report.
-
Job Schedule Report
This report identifies the schedules that are using custom calendars.
For more information on this report, see Job Schedule Report.
-
Storage Policy Report
This report identifies the storage policy copies that are using custom calendars.
For more information on this report, see Storage Policy Report.