Use the following steps to configure the NetApp C-mode file server and archive your data.
Step 1: Required Users, Login Accounts, and Port Numbers
Obtain the following users or roles from the NetApp Administrator:
Impersonate NT User on the Proxy Server
You must have an account that is a Local Administrator on each proxy server. This account must also be part of the domain as that of the NetApp file server whose data is to be archived.
The login credentials that you provide must be added to the:
-
Local administrators group on the proxy computer.
-
Use the same credentials for all subclients created on your CommCell Console. For C-mode, if you plan to use different credentials, the user must have privileged access permissions on the vserver.
Use the following command to verify if the user has privileged access:
vserver_name::> fpolicy policy show -vserver <vserver_name> -instanceExample
nacluster1::> fpolicy policy show -vserver nac1vs4 -instanceVserver name: nac1vs4Policy: CVNSDMEvents to Monitor: CVNSDMEvent, CVNSDMEVENT_NFS_V3,CVNSDMEVENT_NFS_V4FPolicy Engine: CVNSDMEXTERNALENGINEIs Mandatory Screening Required: trueAllow Privileged Access: yesUser Name for Privileged Access: testlab\adminIs Passthrough Read Enabled: false -
Make sure that the impersonate user credentials has read and write permissions to the data residing on the CIFS share.
For C-mode, make sure that there are no mapped network drives on the proxy computer to the vserver or CIFS share. You can use the "net use" command to confirm if the service accounts has mounts to other vservers. If there are any other mounts to this vserver, they must be disconnected.
VSADMIN Role User
You must have a user account with VSAdmin role and ONTAPi/ssh application.
nacluster1::> security login create -vserver <vserver_name> -user-or-group-name abc -application ontapi -authmethod password
Please enter a password for user '<username>':
Please enter it again:
nacluster1::> security login create -vserver <vserver_name> -user-or-group-name abc -application ssh -authmethod password
NDMP User
Contact the NetApp administrator to determine the appropriate password on the vserver where NDMP credentials are required.
-
Run the following command to enable NDMP on the file server.
vserver services ndmp on -vserver <vservername> -
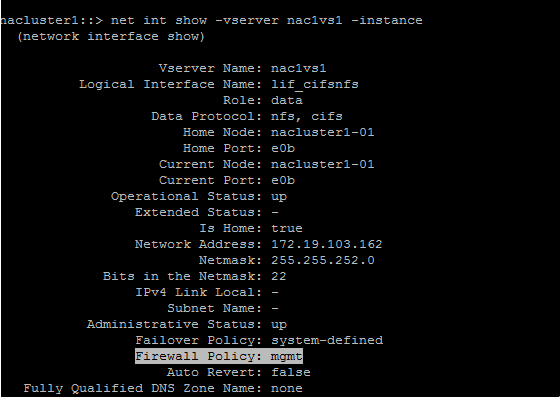
Run the following command to verify if the vserver interface has management access:
net int show –vserver vservername –lif -logical_interface_name
Outgoing Tunnel, Routes, and Firewall Configuration
If firewall is configured between the proxy computer and the NetApp file server, then the required ports must be open such that you must be able to ping the vserver.
In order to maintain the connections for recall operations, the Commvault administrator must make sure that the media servers have outgoing tunnels and routes to each of the Windows Proxy Servers else the recall operation may hang and the connection is dropped. To verify if the tunnels and outgoing routes are configured correctly, right click each Windows Proxy Server and check Properties > Network > Summary.
Step 2: Verify the File Server Registration
-
Run the following command on the file server to verify the proxy computers registered to the vserver:
nacluster2::security login> fpolicy show-engine -vserver $[vserver_name]