You can compare file system recovery point objectives to identify file changes caused by potential admin errors or ransomware attacks. You can compare two file system recovery point objectives and identify and view the files that have been added, modified, or deleted. Additionally, you can restore files, and you can export a list of added, modified, or deleted files to a CSV file.
Before You Begin
- Run at least two successful backups for a file system subclient.
Show Existing Comparisons
-
From the Command Center navigation pane, go to Protect > Files.
The Overview page appears.
-
On the Files tab, click a file server.
The file server page appears.
-
On the Subclients tab, in the Actions column for the subclient, click the action button
 , and then click Comparisons.
 The Comparisons page appears, showing a table of existing comparisons for that subclient.
Note
-
Comparisons older than 60 days are deleted by the system.
-
Comparisons are not supported for Archiver, Onepass, Laptops, Snap, Block level, and NAS subclients.
-
Add New Comparison
-
Click Add comparison.
The New Comparison wizard appears.
-
On the General page, in the Comparison name field, enter a name for the new comparison.
-
Click Next.
-
On the Configuration page, enter the two recovery point objectives to compare in the Source backup to compare and Compare with fields by clicking the calendar icons and selecting the desired dates and times.
-
Click Next.
The Summary page appears, showing the details of the comparison that will be created.
-
Click Submit.
A new "File System Comparison" job will be triggered and wait for that job to complete. Once the job is completed successfully, Comparison status will be changed to "Ready" under the column "Status" in the comparisons page.
/// note | Note
We can view the results of a comparison only if it's status is "Ready".
///
View the results of a comparison
-
Refresh the Comparisons page.
The new comparison will appear in the table.
-
In the Name column, click the name of the new comparison, or click the action button
and then click View result. -
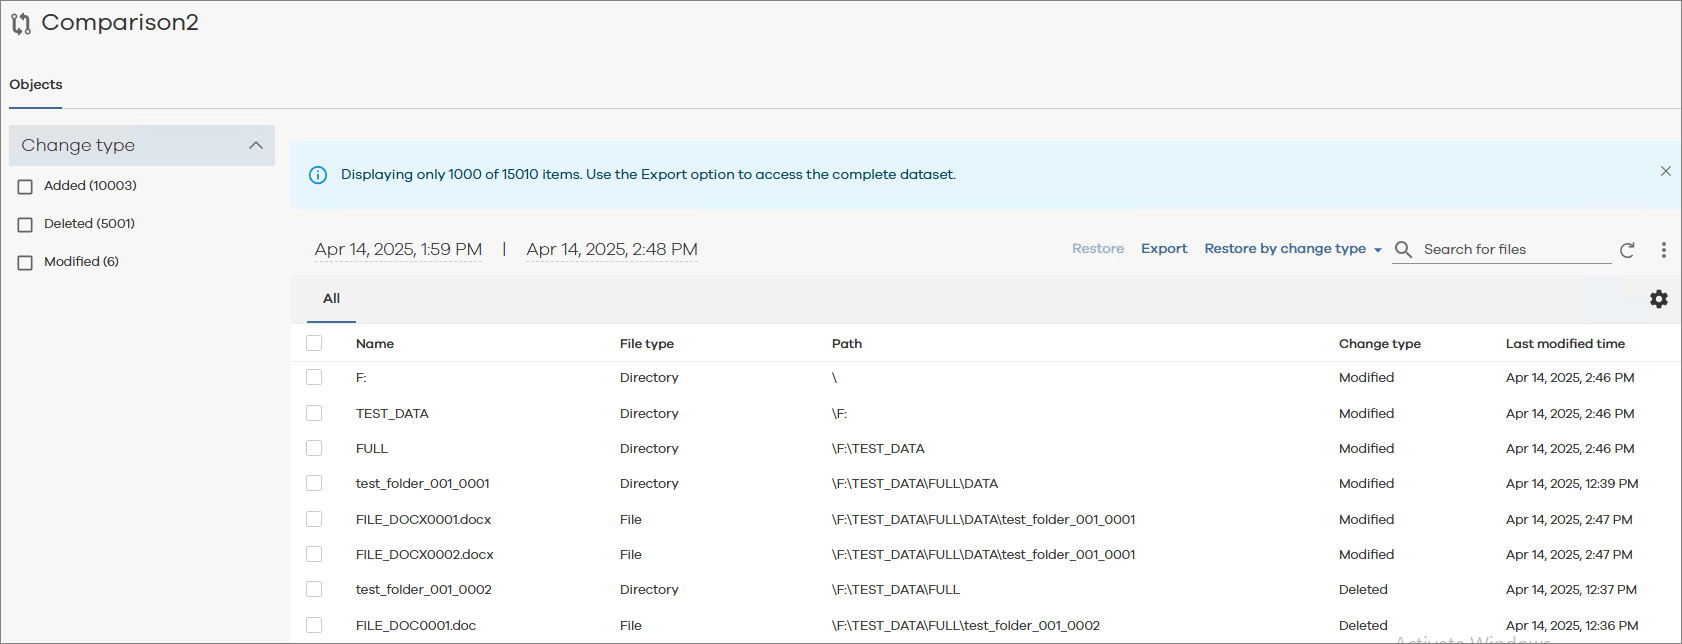
The comparison results page appears (image shown below).
Note
Only the first 1000 files that were added, deleted, or modified between the two compared recovery point objectives are shown. If you want to view more than 1000 files, you must export the list of files to a CSV file (see "Export List of Changed Files to CSV File", below).
-
Use the Search for files field (wildcards are accepted) to search for individual files.
Restore Files
Note
You can restore files as follows:
-
If you restore Modified or Deleted files, the system will restore the files that exist on the recovery point objective that you selected in the Source backup to compare field, above.
-
If you restore Added files, the system will restore the files that exist on the recovery point objective that you selected in the Compare with field, above.
-
Do one of the following:
-
Select the files you want to restore and then click Restore.
-
Click Restore by change type and then click one of the following to restore by change type:
-
Restore all added: All added items will be restored.
-
Restore all modified: All modified items will be restored.
-
Restore all deleted: All deleted items will be restored.
-
The Restore options dialog box appears.
-
-
To restore to the original backup location, select Restore to original folder.
-
To restore to a new location, deselect Restore to original folder, and then do one of the following:
-
Enter the full path to the destination folder in Destination Path.
For AIX and Linux file servers, to restore to an NFS export path that is currently not mounted, enter path in the format file_server_name:/export_path.
Optional: If the destination client does not have access to the UNC path provided in Destination path, then enable the Impersonate user toggle, and then enter the user name and password required to access the UNC path.
-
Click the browse icon
 and then select a destination folder.
-
-
To overwrite the existing data, select Unconditionally overwrite if it already exists.
Export List of Changed Files to CSV File
-
Click Export.
All files that were added, deleted, or modified between the two compared recovery point objectives will be exported to a CSV file.
-
Click Recent downloads at the top of the page to view the file.