You can configure a workflow for the Vault Tracker policies, which will allow you to import the exported media into predefined shelves. The shelf to which the media is moved to is decided by the storage policy associated with the media. You configure the storage policy to shelf pairing while running the workflow.
Additionally, you can customize the workflow to perform the following tasks as well:
-
Updating the media’s export location
-
Marking the container onsite
-
Disassociating the media from the container
-
Generating reports in html format as a file/email
Before You Begin
- The barcodes of the media to be imported are scanned and recorded in a .txt file.
Procedure
-
Download the Vault Tracker - Move Media to Shelf workflow from cloud.commvault.com.
-
Import the VaultTracker_MoveMediatoshelf.xml.
For more information on importing a workflow, see Workflow Operations - Import a Workflow.
-
Deploy the workflow from the CommCell Browser.
For more information, see Deploying a Workflow.
-
From the CommCell Browser, go to Workflows.
The Workflows window appears in the pane on the right.
-
Right-click the Vault Tracker - Move Media to Shelf workflow and click All Tasks > Execute.
-
From the Run workflow on list, select the CommServe that you want to use to execute the workflow, and then click OK.
-
In the Enter Input File Location dialog box, enter the Location on the CommServe computer where the .txt file is saved, type the File Name and click OK.
-
In the Select the Inputs dialog box, select a Storage Policy from the list and the name of the corresponding shelf from the Shelf list.
Note: You can create multiple such shelf and storage policy combinations depending on your data protection requirements.
For example: You have 3 Storage policies SP1, SP2 and Sp3, wherein you run full backups on SP1, Incremental backups on SP2 and differential on Sp3.
Then you may associate Shelf a1 with SP1, a2 with Sp2 and A3 with sp3. This way the media in a1 will be used for full backups and so on.
-
In the Additional Settings dialog box, from the Update export location to list, select the export location you want to set for the media.
You can retain the current location or specify a new location, or set it to Not available.
-
Optionally you may configure the following:
-
Select the Mark Container Onsite check box to ensure that the container is marked onsite as soon as the import is completed.
-
Select the Remove Media to Container Association check box to disassociate the container from the media as soon as it is imported and reset the container value.
-
Type an Email address to receive an email containing a report that provides additional details of the import.
-
Type the HTML output folder location to save the report that provides additional details of the import, in HTML format.
-
Click OK.
-
Notes:
-
In case you want to modify the workflow configuration, you will have to manually kill the workflow, modify it and then run the workflow again.
-
In case you want to process a new media list, you can replace the .txt file with an new .txt list. The workflow keeps monitoring the file for any changes and starts processing the list if it detects any change.
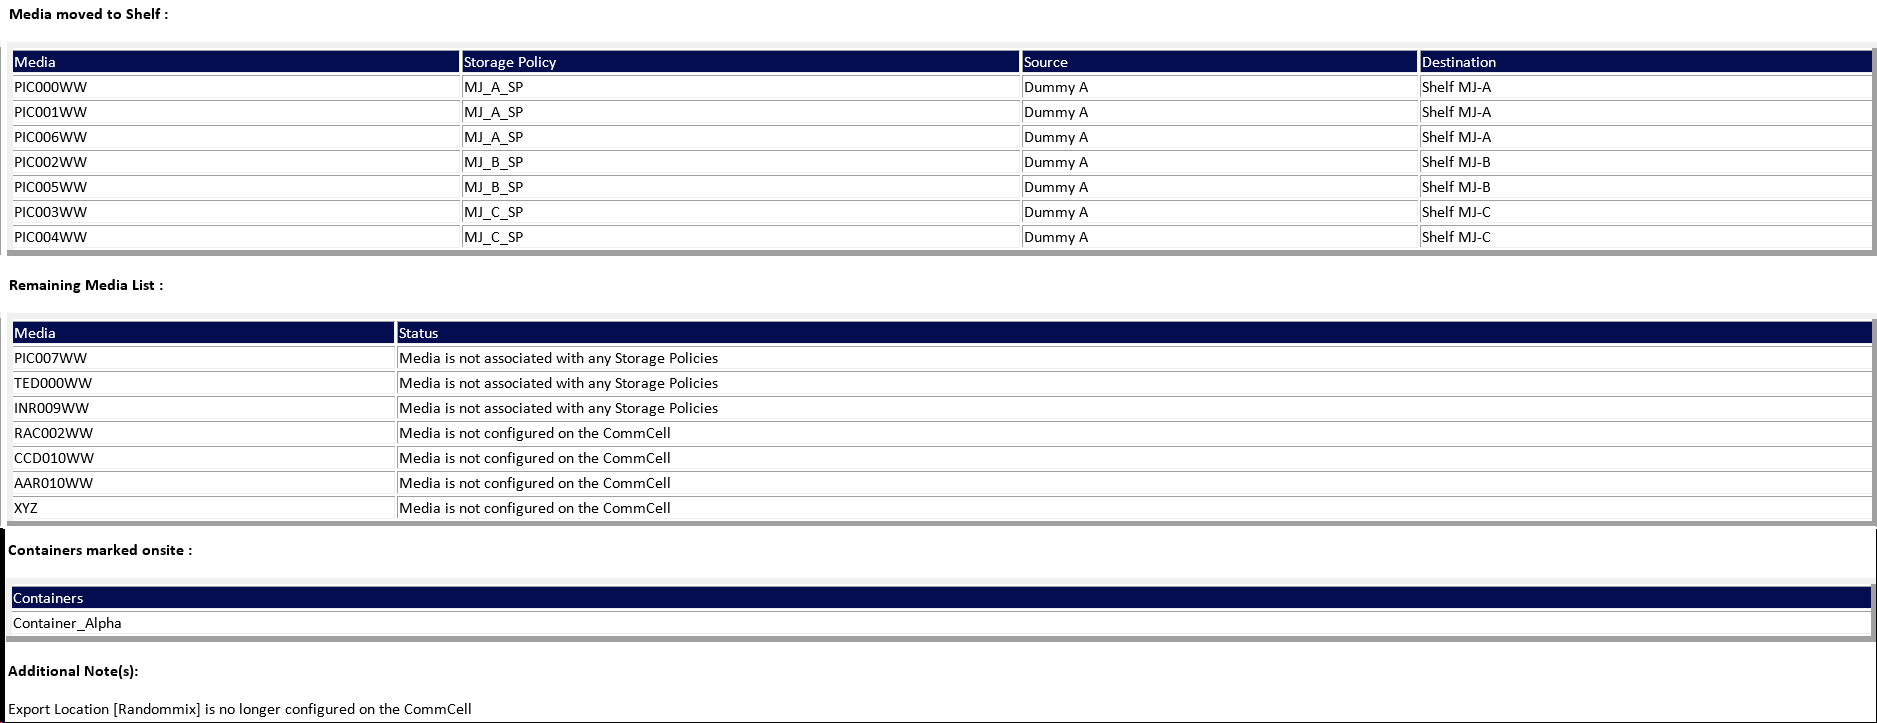
Result
Whenever the Vault Tracker Policies associated in the Alert are successfully executed and completed, if an email address is configured, an email will be generated or else the HTML report will be available in the specified folder.
Example: