The virtual machine (VM) containing the Hosted Engine (or the oVirt engine) can be upgraded from version 4.1 to 4.3.
The upgrade is a 3 step process as follows:
-
First, the hosted engine must be upgraded to the latest 4.1 minor version.
-
Next, the hosted engine must be upgraded to 4.2.
-
Finally, the hosted engine must be upgraded to 4.3.
Before You Begin
-
Ensure that the MediaAgent nodes are upgraded to the latest kernel.
-
For more information about upgrading the operating system, refer to Installing Operating System Updates, if the MediaAgent is upgraded to Service Pack version 15 (or above).
-
If the MediaAgent is in Service Pack version 14 (or below), manually upgrade the repositories to the latest kernel.
-
-
Obtain the oVirt admin login and password. You will need the credentials to perform the upgrade.
Procedure
Pre-Upgrade TasksMediaAgent
-
Contact Commvault customer support and obtain an USB drive containing the RPMs (Red Hat Package Manager) needed for the upgrade.
-
Copy the contents of the USB drive to
/ws/ddb/rpms. -
Make
/ws/ddb/rpmsas a NFS share, so that it can be accessed from the hosted-engine VM. -
From the MediaAgent node set the hosted engine in the maintenance mode.
hosted-engine --set-maintenance --mode=global -
Login to the hosted engine VM as root.
-
Create a directory
/reposand mount the directory:For example:
mount MA_1:/ws/ddb/rpms /repos -
Unpack the CVAppliance_Oct2019.repo.tar and copy CVAppliance_Oct2019.repo to
/etc/yum.repos.don the Hosted Engine. -
Unpack the CVAppliance_Oct2019.tar and copy the contents of the
HyperVHost/CVAppliance/Unix/rhel-7.7folder to/ws/ddb/rpmson the MediaAgent from which RHV upgrade is planned.
Upgrade to the Latest 4.1 Minor Version
-
Update your manager (or RHEL host hypervisor) so that ansible is at version 2.9.13. You can do this by disabling the package that is too new by adding the following line to /etc/yum.conf file.
Raw exclude=ansible-2.9.1[4-9] ansible-2.9.[2-9][0-9]* -
Upgrade to the latest 4.1 minor version using the following commands:
yum-config-manager --disable rhel-7-server-rhv-4.2-manager-rpms
yum-config-manager --disable rhel-7-server-rhv-4.3-manager-rpms
engine-upgrade-check
Make sure that the result of the above command comes out successfully with “upgrade is available” message.
engine-upgrade-check
yum update ovirt\*setup\*
engine-setup
yum update
The following prompts will be displayed:
-
Would you like to proceed? (Yes, No) [Yes]:Press <Enter> to continue.
-
PACKAGE: [update] vdsm-jsonrpc-java-1.3.16-1.el7ev.noarch``do you wish to update them now? (Yes, No) [Yes]:Press <Enter> to continue.
-
Setup can automatically configure the firewall on this system.``Note: automatic configuration of the firewall may overwrite current settings.``Do you want Setup to configure the firewall? (Yes, No) [Yes]:Type No and then press <Enter> to continue.
-
Would you like to backup the existing database before upgrading it? (Yes, No) [Yes]:Press <Enter> to continue.
-
Perform full vacuum on the engine database engine@localhost?``This operation may take a while depending on this setup health and the configuration of the db vacuum process.``See https://www.postgresql.org/docs/9.0/static/sql-vacuum.html``(Yes, No) [No]:Press <Enter> to continue.
-
Please confirm installation settings (OK, Cancel) [OK]:Press <Enter> to continue.
Continue the upgrade (to the latest 4.1 minor version) using the following command:
yum updateYou may see transaction check errors similar to the following:
file /opt/rh/eap7/root/usr/share/java/weld-spi-sources.jar from install of eap7-jboss-weld-3.0-api-weld-spi-0:3.0.0-7.SP4_redhat_00001.1.el7eap.noarch conflicts with file from package eap7-jboss-weld-2.2-api-0:2.3.0-7.SP1_redhat_1.1.ep7.el7.noarch file /opt/rh/eap7/root/usr/share/java/weld-spi.jar from install of eap7-jboss-weld-3.0-api-weld-spi-0:3.0.0-7.SP4_redhat_00001.1.el7eap.noarch conflicts with file from package eap7-jboss-weld-2.2-api-0:2.3.0-7.SP1_redhat_1.1.ep7.el7.noarch file /opt/rh/eap7/root/usr/share/java/weld-api-sources.jar from install of eap7-jboss-weld-3.0-api-weld-api-0:3.0.0-7.SP4_redhat_00001.1.el7eap.noarch conflicts with file from package eap7-jboss-weld-2.2-api-0:2.3.0-7.SP1_redhat_1.1.ep7.el7.noarch file /opt/rh/eap7/root/usr/share/java/weld-api.jar from install of eap7-jboss-weld-3.0-api-weld-api-0:3.0.0-7.SP4_redhat_00001.1.el7eap.noarch conflicts with file from package eap7-jboss-weld-2.2-api-0:2.3.0-7.SP1_redhat_1.1.ep7.el7.noarch -
-
If you see these errors, run the following commands to resolve these errors. (Replace the file names with the file names displayed as errors when you run the command.)
rpm -Uvh --force /repos/jb-eap-7-for-rhel-7-server-rpms/Packages/e/eap7-jboss-weld-3.0-api-weld-spi-3.0.0-7.SP4_redhat_00001.1.el7eap.noarch.rpm
rpm --force -Uvh /repos/jb-eap-7-for-rhel-7-server-rpms/Packages/e/eap7-jboss-weld-3.0-api-weld-api-3.0.0-7.SP4_redhat_00001.1.el7eap.noarch.rpm
Re-run the following command:
yum update -
Login to one of the MediaAgent nodes and determine the node in which the hosted engine is running using the following command:
hosted-engine –vm-status -
Login to node in which the hosted engine VM is running and restart the VM using the following commands:
hosted-engine --vm-shutdown
hosted-engine --vm-poweroff
hosted-engine --vm-start
The hosted engine VM kernel will be upgraded to the latest kernel version available in the payload. (The hosted engine will continue to be in the maintenance mode.) Use the following command to verify the kernel version:
uname –a -
Login to the hosted engine VM as root.
-
Mount the directory/repository containing the packages.
For example:
mount MA_1:/ws/ddb/rpms /repos
Upgrade to Version 4.2
-
Upgrade to version 4.2 using the following commands:
yum-config-manager --enable rhel-7-server-rhv-4.2-manager-rpms
engine-upgrade-check
Make sure that the result of the above command comes out successfully with “upgrade is available” message.
engine-upgrade-check
yum update ovirt\*setup\*
engine-setup
The following prompts will be displayed:
-
Would you like to proceed? (Yes, No) [Yes]:Press <Enter> to continue.
-
--== PRODUCT OPTIONS ==-``Configure ovirt-provider-ovn (Yes, No) [Yes]:Press <Enter> to continue.
-
--== PACKAGES ==--``Replying "No" will abort Setup. You can pass the option "--offline" to prevent installing or updating packages.``Do you wish to update them now? (Yes, No) [Yes]:Press <Enter> to continue.
-
--== NETWORK CONFIGURATION ==--``Setup can automatically configure the firewall on this system.``Note: automatic configuration of the firewall may overwrite current settings.``NOTICE: iptables is deprecated and will be removed in future releases``Do you want Setup to configure the firewall? (Yes, No) [Yes]:Type No and then press <Enter> to continue.
-
--== DATABASE CONFIGURATION ==--``postgresql.conf is usually in /var/lib/pgsql/data, /var/opt/rh/rh-postgresql95/lib/pgsql/data, or somewhere under /etc/postgresql* . You have to restart PostgreSQL after making these changes.``The database requires these configurations values to be changed. Setup can fix them for you or abort. Fix automatically? (Yes, No) [Yes]:Press <Enter> to continue.
-
[WARNING] This release requires PostgreSQL server 9.5.14 but the engine database is currently hosted on PostgreSQL server 9.2.24.``[ INFO ] Verifying PostgreSQL SELinux file context rules``This tool can automatically upgrade PostgreSQL. Automatically upgrade? (Yes, No) [Yes]:Press <Enter> to continue.
-
PostgreSQL will be upgraded by copying its data to a new directory.``Do you want to automatically clean up the old data directory on success to reclaim its space (141 MB)? (Yes, No) [Yes]:Press <Enter> to continue.
-
[ INFO ] Any further action on the DB will be performed only after PostgreSQL has been successfully upgraded to 9.5.``[ INFO ] Engine DB and DWH one shares the same PostgreSQL instance that is going to be upgraded``Perform full vacuum on the oVirt engine history database ovirt_engine_history@localhost?``This operation may take a while depending on this setup health and the configuration of the db vacuum process.``See https://www.postgresql.org/docs/9.0/static/sql-vacuum.html``(Yes, No) [No]:Press <Enter> to continue.
-
--== OVIRT ENGINE CONFIGURATION ==--``Perform full vacuum on the engine database engine@localhost?``This operation may take a while depending on this setup health and the configuration of the db vacuum process.``See https://www.postgresql.org/docs/9.0/static/sql-vacuum.html``(Yes, No) [No]:Press <Enter> to continue.
-
oVirt OVN provider user[admin@internal]:Type the oVirt admin name and press <Enter> to continue.
-
oVirt OVN provider password:Type the password and press <Enter> to continue.
-
[ INFO ] Stage: Setup validation``During execution engine service will be stopped (OK, Cancel) [OK]:Press <Enter> to continue.
-
Please confirm installation settings (OK, Cancel) [OK]:Press <Enter> to continue.
The following message should be displayed in the end:
[ INFO ] Stage: Clean up``Log file is located at /var/log/ovirt-engine/setup/ovirt-engine-setup-20181214145558-0fsnjh.log``[ INFO ] Generating answer file '/var/lib/ovirt-engine/setup/answers/20181214150451-setup.conf'``[ INFO ] Stage: Pre-termination``[ INFO ] Stage: Termination``[ INFO ] Execution of setup completed successfully
-
-
Continue the upgrade (to 4.2 version) using the following commands:
yum-config-manager --disable rhel-7-server-rhv-4.1-rpms
yum-config-manager --disable rhel-7-server-rhv-4.1-manager-rpms
yum-config-manager --disable rhel-7-server-rhv-4-tools-rpms
yum-config-manager --disable jb-eap-7.1-for-rhel-7-server-rpms
yum-config-manager --disable rhel-7-server-rhv-4.0-manager-rpms
rpm -e --nodeps ovirt-imageio-common-1.5.1-0.el7ev.x86_64
yum update
Upgrade to Version 4.3
-
Upgrade to version 4.3 using the following commands:
yum-config-manager  --enable rhel-7-server-rhv-4.3-manager-rpms
yum-config-manager  --enable jb-eap-7.2-for-rhel-7-server-rpms
Make sure that the result of the above command comes out successfully with
upgrade is availablemessage.engine-upgrade-check yum update ovirt\*setup\* engine-setupThe following prompts will be displayed:
-
Would you like to proceed? (Yes, No) [Yes]:Press <Enter> to continue.
-
Set up Cinderlib integration(Currently in tech preview)(Yes, No) [No]:Press <Enter> to continue.
-
Replying "No" will abort Setup. You can pass the option "--offline" to prevent installing or updating packages.``Do you wish to update them now? (Yes, No) [Yes]:Press <Enter> to continue.
-
NOTICE: iptables is deprecated and will be removed in future releases``Do you want Setup to configure the firewall? (Yes, No) [Yes]:Type No and then press <Enter> to continue.
-
Verifying PostgreSQL SELinux file context rules``This tool can automatically upgrade PostgreSQL. Automatically upgrade? (Yes, No) [Yes]:Press <Enter> to continue.
-
PostgreSQL will be upgraded by copying its data to a new directory.Do you want to automatically clean up the old data directory on success to reclaim its space (147 MB)? (Yes, No) [Yes]:Press <Enter> to continue.
-
Configuration of the db vacuum process.``See https://www.postgresql.org/docs/10/sql-vacuum.html``(Yes, No) [No]:Press <Enter> to continue.
-
PostgreSQL will be upgraded by copying its data to a new directory.``Do you want to automatically clean up the old data directory on success to reclaim its space (141 MB)? (Yes, No) [Yes]:Press <Enter> to continue.
-
--== OVIRT ENGINE CONFIGURATION ==--``Perform full vacuum on the engine database engine@localhost?``This operation may take a while depending on this setup health and the configuration of the db vacuum process.``See https://www.postgresql.org/docs/9.0/static/sql-vacuum.html``(Yes, No) [No]:Press <Enter> to continue.
-
Setup validation``During execution engine service will be stopped (OK, Cancel) [OK]:Press <Enter> to continue.
-
Configure VMConsole Proxy : True``Please confirm installation settings (OK, Cancel) [OK]:Press <Enter> to continue.
This starts the upgrade and should complete with the following
Execution of setup completed successfully.
-
-
Continue the upgrade (to 4.3 version) using the following commands:
yum-config-manager --disable rhel-7-server-rhv-4.2-manager-rpms``yum-config-manager --disable jb-eap-7-for-rhel-7-server-rpms``yum update
Post-Upgrade Tasks
-
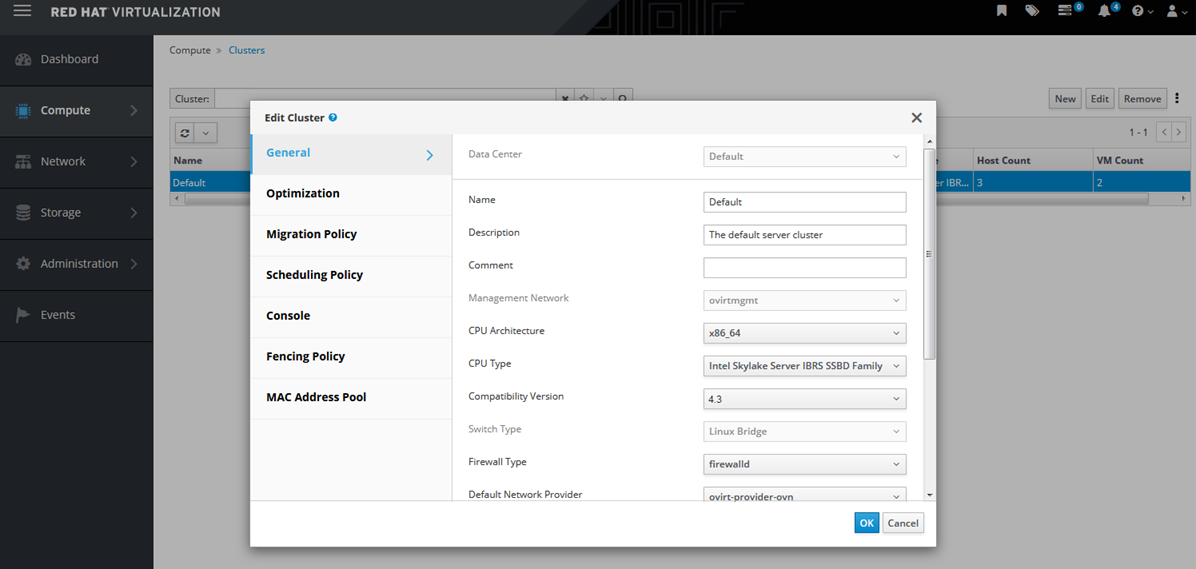
Change the compatibility version from 4.1 to 4.3 in the Administration Portal.
Note
A power cycle of the VM’s is needed for this to take effect. Hence this may require a scheduled down time for the VM hosting the CommServe.
-
From the Administration Portal, click Compute > Clusters.
-
Select the cluster to change and then click Edit.
-
Change the Compatibility Version to the 4.3.
-
Click OK twice to confirm the change.
-
-
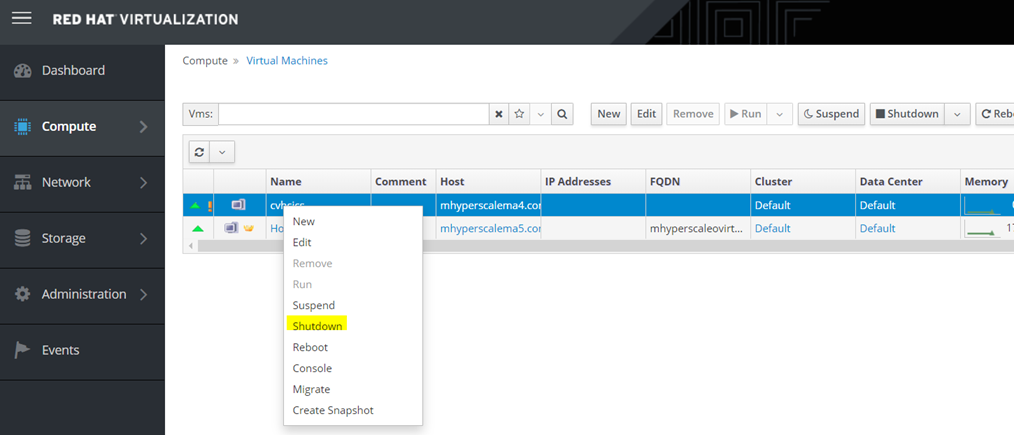
Stop the VM hosting the CommServe.
-
From the Administration Portal, click Compute > Virtual Machine.
-
Right click the CommServe VM then click Shutdown.
-
-
Restart the VM hosting the CommServe.
-
From the Administration Portal, click Compute > Virtual Machine.
-
Right click the CommServe VM then click Run.
-
-
Remove the VM Lease.
-
From the Administration Portal, click Compute > Virtual Machine.
-
Right click the CommServe VM then click Edit.
-
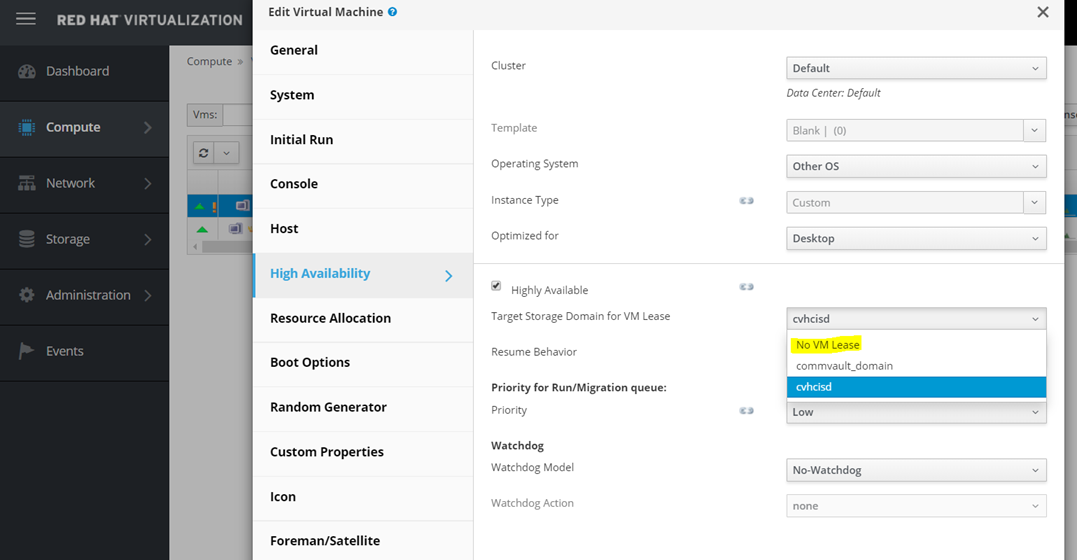
Change the Target Storage Domain for VM Lease to No VM Lease.
-
Wait for completion pop-up on upper right corner.
-
-
Re-add the VM Lease.
-
From the Administration Portal, click Compute > Virtual Machine.
-
Right click the CommServe VM then click Edit.
-
Change the Target Storage Domain for VM Lease to <VM_Name>. (For example, cvhcisd in the above image.)
-
Wait for completion pop-up on upper right corner.
-
-
Stop the VM hosting the CommServe.
-
From the Administration Portal, click Compute > Virtual Machine.
-
Right click the CommServe VM then click Shutdown.
-
-
Restart the VM hosting the CommServe.
-
From the Administration Portal, click Compute > Virtual Machine.
-
Right click the CommServe VM then click Run.
-
-
Login to the MediaAgent node and remove the maintenance mode on the hosted engine.
hosted- engine --set-maintenance --mode=none -
Once the upgrade is completed, remove the
repofolder and thetarfiles created in step (2) above from the DDB drive. -
Run a DDB backup and make sure that it completes successfully.
If it fails to create a snapshot, then edit
/etc/lvm/lvm.confto increase the value of thin_pool_autoextend_threshold to 80.