Understanding the CommCell Console
The File System iDataAgent uses the following entities to manage backup and restore operations from the CommCell Console.
Proxy Client - A physical computer separate from the host computer on which the iDataAgent is installed. In this case, the Linux computer on which the File System iDataAgent is installed. This will act as a proxy to communicate with the OpenVMS client and facilitates data movement from the OpenVMS client to the backup media.
Client - The OpenVMS computer which contains the data to be secured.
Subclient - A logical entity that uniquely defines a unit of data on a client computer.
Backup Set - A group of subclients which includes all the data backed up by the iDataAgent.
Configuring User Defined Backup Sets
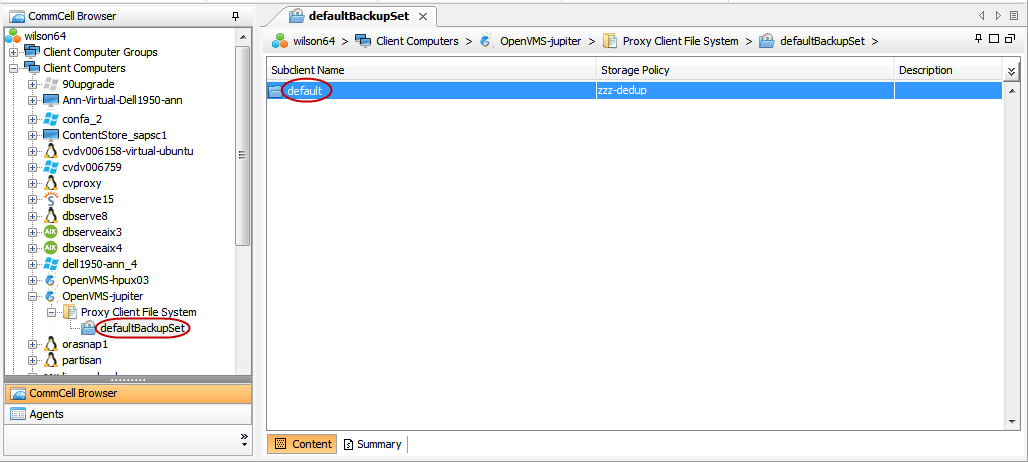
A default backup set is created as soon as the OpenVMS client is created. The default backup set includes a default subclient which will backup all the devices and data in the OpenVMS client.
You can create user defined backup sets to group a set of selected data. A user defined backup set will contain its own default subclient.
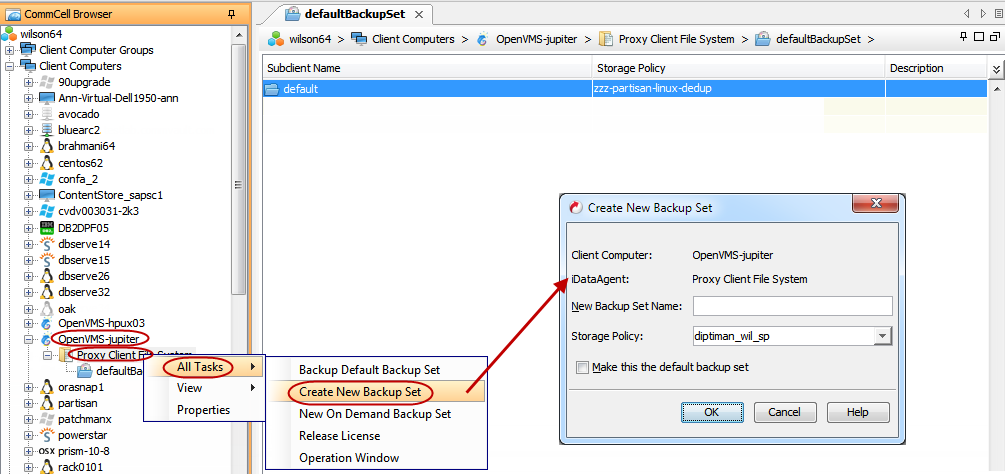
Creating a User Defined Backup Set
-
From the CommCell Browser, navigate to Client Computers | <Client>.
-
Right-click Proxy Client File System and select All Tasks | Create New Backup Set.
-
In the New Backup Set Name box, type a name.
-
Click OK.
Configuring User Defined Subclients
By default, a default subclient is created when the iDataAgent is installed. This default subclient contains all the devices along with supported file system types.
You can create user-defined subclients to protect specific portions of the client data. For example, you may need to frequently backup a specific directory or a set of directories. You can create a subclient for such directories and schedule frequent backups for that subclient.
Note
When you create a user-defined Subclient, the contents of the user-defined Subclient will be excluded from the Default Subclient.
Creating a Subclient to Back Up Specific Files
Use the following steps to create a user-defined subclient to backup specific files:
-
From the CommCell Browser, navigate to Client Computers | <Client> | Proxy Client File System | <Backup Set>.
-
Right-click the <Backup Set>, point to All Tasks and then click New Subclient.
-
In the Subclient name box, type a name.
-
Click the Storage Device tab.
-
In the Storage Policy list, click a storage policy name.
-
Click the Content tab.
-
Click Add Paths.
-
Type the file or directory to be backed up and click OK.
For example, /SCS1$DKA800/files/restore.
Repeat this step to include all the files and directories to be backed up. You can either browse and select or type the content path, but make sure the path is in the UNIX File System format.
-
Click OK.
Creating a Subclient to Back Up Specific Files Using Wildcards
You can use the following wildcards to specify the files to be backed up.
|
Wildcards |
Description |
Examples |
|
* |
Any number of characters. This wildcard is used in the following scenarios:
|
*.doc will backup all files with the extension .doc (e.g., STATUS.doc, MISSION.doc). /SCS1$DK00/TEST/*.doc;1 will backup all .doc files only in the /TEST directory A*.so will backup all files with the extension .so (e.g., ALVSC.so, ADVDCC.so) on the client computer which have the name beginning with "A". /SCS1$DK00/FINANCE/TEST/* will backup all the files and directories in the "TEST" directory under the "FINANCE" directory. Any sub-directories under the TEST directory will not get backed up. |
|
? |
Any one character. This wildcard can be used in the following scenario: All files (or directories) for which any one character in the file name or the directory name is variable. |
/SCS1$DK00/ACCESS? will backup any directory or file for which the name begins with- "ACCESS" followed by any one character such as ACCESS1 or ACCESS5. However, ACCESS12 or ACCESS15 will not backup because the last two characters in the name are variable. /SCS1$DK00/CLASS/REPORT? will backup any directory or file under /CLASS directory for which the character in the place of ? is variable. For example: /CLASS/REPORT1 and /CLASS/REPORT2 will back up. However, /CLASS/REPORT15 will not get backed up. |
|
[] |
Set or range of characters. |
/SCS1$DK00/CLASS/[A-M]*.doc will back up any file with .doc extension for which the name begins with the letters "A" through "M”. /[AEIOU]*.doc will back up any file name that ends with .doc and begins with the letters A, E, I, O, or U. /SCS1$DK00/CLASS/FINANCE/REPORT[1-47-9] will backup files REPORT1, REPORT2, REPORT4, REPORT7, REPORT8, REPORT9 under FINANCE directory. /SCS1$DK00/DEPARTMENT-[A-CS] will backup files DEPARTMENT-A, DEPARTMENT-B, DEPARTMENT-C and DEPARTMENT-S. |
|
[!] |
The negation of a set or range of characters. You can use the wildcard in the following scenario: Back up all files in a directory except the files for which the name starts with any character from the specified set or range of characters. |
/SCS1$DK00/TEST/[!AEIOU]*.doc would backup all .doc files in the TEST directory that start with a letter other than A, E, I, O, or U. |
|
** |
Any number of characters across any number of path levels. |
/SCS1$DK00/**/MOVE.cpp - will backup the file named MOVE.cpp located at any directory level. (e.g., /TEST/NEWAPP/MOVE.cpp and /OPT/KDE3/SRC/MOVE.cpp) /SCS1$DK00/ETC/** - will backup all directories and files under /ETC. All the sub-directories under these directories will also be included. |
-
When you use wildcards to specify the subclient content, the content path appears in Italics.
-
If you want all the files with the file extension .doc to be backed up from any level, then specify the content as *.doc. If any subclient content doesn’t start with /, then /**/ will be prefixed to the content to match at any level. E.g., *.doc will be /**/*.doc.
-
If user wants to treat *, ?, [ ] as literals in the subclient content and not as wildcards, then the user can escape the wildcard by adding \ before the wildcard. E.g., /REPORT\[2011-2012\]/*.doc backups all the .doc files under /Report[2011-2012].
More than one type of wildcard can be used when specifying subclient content (e.g., /DCVOL?/ORCL[1-47]/**/*.log).
Use the following steps to backup specific files using wild cards:
-
From the CommCell Browser, navigate to Client Computers | <Client> | Proxy Client File System | <Backup Set>.
-
Right-click the <Backup Set>, point to All Tasks and then click New Subclient.
-
In the Subclient name box, type a name.
-
Click the Storage Device tab.
-
In the Storage Policy list, click a storage policy name.
-
Click the Content tab.
-
Click Add Paths, and type the path. Make sure the path is in the UNIX File System format.
For example, if the path is /SCS1$DKA800/document*, then specify the path as /SCS1$DKA800/document\*.
-
Click OK.
Creating a Subclient for On-Demand Backups
On-demand backups allow content to be specified as an external input when starting a backup. Traditional backups are performed by using subclients, which contain fixed content configured prior to performing the backup operation, whereas on-demand backups allow you to specify content each time you perform a backup.
Important: After you create an on-demand subclient, you cannot change it to a traditional user-defined subclient.
Before You Begin
You must create the following text files to specify the content for on-demand backups:
-
A content file, which is a text file that defines the location of the data that you want to back up. The path can be in either OpenVMS style or UNIX style.
Content file entries must be in the following format with no filters, wildcards, or regular expressions included:
DKA0:[USERDATA]TEXTFILE.TXT
DKA0:[USERDATA]DOCFILE.DOC
DKA0:[USERDATA.PDFFILES]
UNIX-style path format:
/DKA0/USERDATA/DATAFILE.DAT
/DKA0/USERDATA/TEXTFILE.TXT
/DKA0/USERDATA/DOCFILE.DOC
-
A directive file, which is a text file that defines where each content file is located. Only one directive file is needed for a single on-demand backup. The path can be in either OpenVMS style or UNIX style.
Directive file entries must be in the following format with no filters, wildcards, or regular expressions included:
DKA0:[USERDATA]CONTENT-FILE1.TXT
UNIX-style path format:
/DKA0/USERDATA/CONTENTFILE1.TXT
Prerequisites
-
Create one or more content files defining the content to be backed up.
-
Create a directive file defining the locations of each content file.
Procedure
-
From the CommCell Browser, expand Client Computers> client > Proxy Client File System.
-
Right-click the appropriate backup set, point to All Tasks, and then click New On Demand Subclient.
-
In the Subclient Properties dialog box, specify the basic settings for the subclient:
-
In the Subclient Name box, enter a name (up to 32 characters) for the subclient.
-
On the Content tab, select the directive file defining the locations of each content file.
-
On the Storage Device tab, in the Storage Policy list, click a storage policy name to associate with the subclient.
-
Click OK.
-
What to Do Next
You must perform a backup of the on-demand subclient. For instructions, see On-Demand Backups.
Modifying the Client Name or Host Name
You can modify the client configuration parameters such as the client name, host name, access node name and so on.
Procedure
-
From the CommCell Browser, navigate to Client Computers > client.
-
Right-click the client and then click Properties.
The Client Computer Properties dialog box appears.
-
Click Edit.
The Edit Client Name dialog box appears.
-
In the Client Name box, type the new client name.
-
In the Host Name box, type the new host name.
-
Click OK.
Changing the OpenVMS User Account
By default, the user account provided at the time of OpenVMS client creation is used for backups. You can change the OpenVMS user account at the client level.
Procedure
-
Log on to the OpenVMS client as SYSTEM user.
-
Go to the software installation folder and type the following command to stop the Commvault services:
@DKA0:[SIMPANA.BIN]CVOV_STOP.COM -
From the CommCell Console, expand Client Computers.
-
Right-click the appropriate client, and then click Properties.
The Client Computer Properties dialog box appears.
-
Click Edit.
The Edit OpenVMS Client Configuration dialog box appears.
-
In the OpenVMS User Credentials area, click Change.
The Enter User Name and Password dialog box appears.
-
In the User Name box, type the new OpenVMS user account.
Ensure that the new OpenVMS user account has access to the job results and log directories.
-
In the Password box, type the password for the new OpenVMS user account, and then reenter it in the Confirm Password box.
-
Click OK.
Result
The next backup job will use the new OpenVMS user account.
Configuring Backups for Locked Files and Disaster Recovery Operations
By default, files that the OpenVMS operating system locks, are not backed up. Files are usually locked because they are actively being updated by another process. The backed-up data from such a file might be incomplete and result in an inconsistent restore.
You can enable a locked file backup.
Procedure
-
Edit the CVOV_CONFIG.DAT file that is in the Commvault directory (for example, DKA0:[SIMPANA]), and add the following entries under the IDA section:
{backupLockedFile=1}/``{defaultToBlockIO=1}/``{stagingAreaForLockedFiles=DKA0:[STAGING]}/Notes:
-
Provide the full path to the staging area for locked files in either the OpenVMS style or UNIX style. The example staging directory is for illustrative purposes. Use values that pertain to your environment.
-
If your backup set includes files from an ODS-5 format disk, then the staging area for locked files must be set to a directory on an ODS-5 format disk.
-
If there is a space restriction, you can specify any accessible disk for the staging area. The directory name must be added in the CVOV_CONFIG.DAT file by the Administrator. Non-system disks must be mounted with the /SYSTEM option.
Sample CVOV_CONFIG.DAT file content:
[Base]
{listenQueue=20}/
[IDA]
{backupLockedFile=1}/
{defaultToBlockIO=1}/
{stagingAreaForLockedFiles=SYS$SYSDEVICE:[STAGING]}/
{backupOfflineContent=0}/
{enableHlinkRestore=1}/
{encodeAllSpecialSymbols=-1}/
{PerfCounter=0}/
{sortCollectFIle=1}/
[logger]
{CLIENTBACKUP_DEBUGLEVEL=0}/
{CLIENTBACKUP_MAXLOGFILEBACKUPS=1}/
{CLIENTBACKUP_MAXLOGFILESIZE=5}/
{CLIENTRESTORE_DEBUGLEVEL=0}/
{CLIENTRESTORE_MAXLOGFILEBACKUPS=1}/
{CLIENTRESTORE_MAXLOGFILESIZE=5}/
{CLIENTSCAN_DEBUGLEVEL=0}/
{CLIENTSCAN_MAXLOGFILEBACKUPS=1}/
{CLIENTSCAN_MAXLOGFILESIZE=5}/
{DubToConsole=0}/
{LaunchD_DEBUGLEVEL=0}/
{LaunchD_MAXLOGFILEBACKUPS=1}/
{LaunchD_MAXLOGFILESIZE=5}/
The sample file content shows the staging area on the current system device.
-
-
Save the CVOV_CONFIG.DAT file, and then exit the editor.
You do not need to restart the Commvault service .
Configuration - Configuring Backups for Hard Links and Disaster Recovery Operations
Hard links are not restored by default. Use the following steps to successfully restore hard links.
Procedure
-
Enable hard links on all volumes to be backed up.
-
Edit the CVOV_CONFIG.DAT file that is in the Commvault directory (for example, DKA0:[SIMPANA]), and add the registry under the IDA section:
{enableHlinkRestore=1}/
Hard links are automatically set on files or directories during the restore operation.
Configuring Backups for Automatically Skipped File Systems
By default, the following file systems are automatically skipped during backups:
-
nfs
-
cifs
However, you can include them in backups by adding the skipped file systems to a specific subclient using the following steps:
-
From the CommCell Browser, navigate to Client Computers | <Client> | Proxy Client File System | <Backup Set>.
-
Right-click the <Subclient> in the right pane, and then click Properties.
-
Click the Content tab.
-
Click Add Paths. Enter the NFS or CIFS path.
For example, /SCS1$DKA800/files/restore.
You can either browse and select or type the content path, but make sure the path is in the UNIX File System format.
-
Click OK.
Configuring Backups for Clients with MultiNet TCP/IP Software
OpenVMS clients run HP TCP/IP software for implementing the TCP/IP services by default. However, you can enable support for backing up clients running MultiNet TCP/IP software by configuring an additional setting on the Linux proxy computer.
Procedure
-
To the Linux proxy computer, add the TimeOut_ACCEPT additional setting as shown in the following table.
For instructions on adding the additional setting from the CommCell Console, see Add or Modify an Additional Setting.
Property
Value
Name
Category
FileSystemAgent
Type
INTEGER
Value
100
Configuring Backup Operations to Set Backup Time Attribute
By default, the Commvault software does not set the Backup Time attribute of a file unlike the OpenVMS native BACKUP command. You can configure subclients to set the Backup Time attribute for all files and folders in the subclient content.
Procedure
-
From the CommCell Browser, expand Client Computers > client > Proxy Client File System > BackupSet.
-
Right-click the subclient and click Properties.
-
On the Content tab, select the Set backup date attribute check box.
-
Click OK.
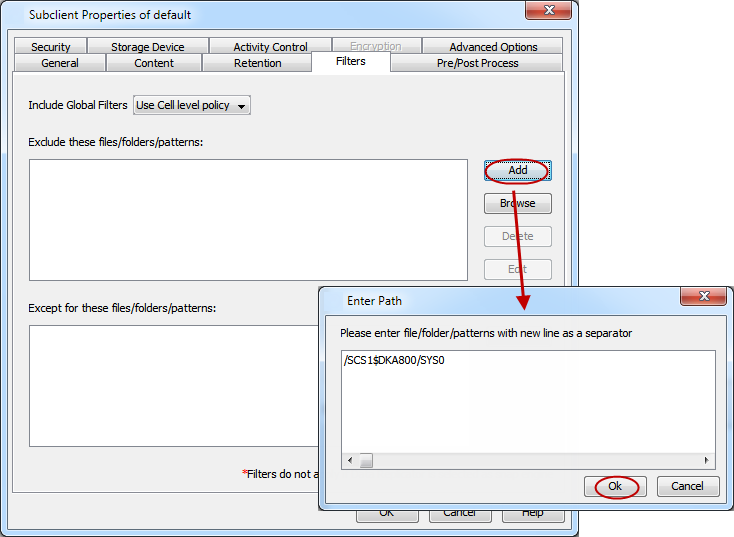
Configuring Filters for Backups
You can set filters to prevent specific data from being backed up. Typically, you can use filters to exclude certain system-related files and database application files which consistently fail during a backup operation.
Filtering Files from a Backup
Follow the steps given below to configure filters on a subclient:
-
From the CommCell Browser, navigate to Client Computers | <Client> | Proxy Client File System | <Backup Set>.
-
Right-click the <Subclient> in the right pane and then click Properties.
-
Click the Filters tab.
-
Click Add under Exclude these files/folders/patterns and type the path to files and folders that you want to exclude, and then click OK.
You can also enter patterns of files or folders using wild cards. You cannot enter Escape sequence to specify the path or file name.
-
Click OK.
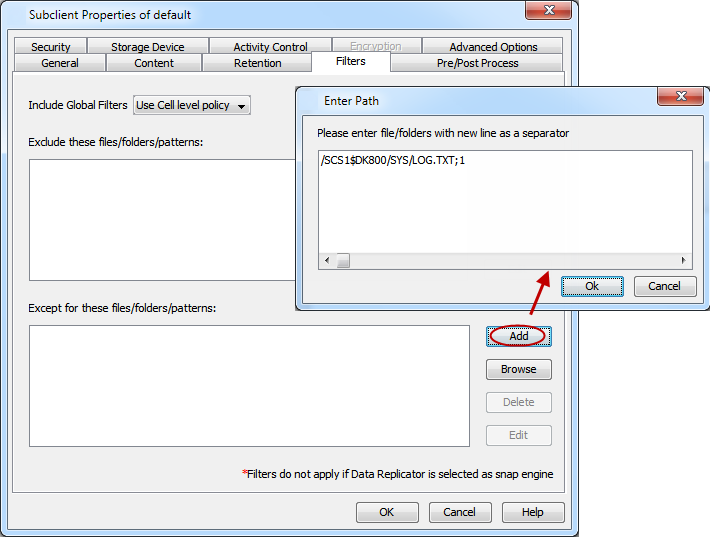
Configuring Exclusions to Filters
Once you set the filters, you can also provide exceptions for the filters. The files or folders added to the exception list will be included in the backup operations. For example, if you want to exclude from your backup operation all the files in the /SYS0 directory except the LOG.TXT file. You can add a subclient filter to exclude the /SYS0 directory from being backed up and also provide an exception to allow the LOG.TXT file to be backed up.
-
From the CommCell Browser, navigate to Client Computers | <Client> | Proxy Client File System | <Backup Set>.
-
Right-click the <Subclient> in the right pane and click Properties.
-
Click the Filters tab.
-
Under Except for these files/folders/patterns, click Add.
-
Type the file, folder, or directory that you want to include in the backups and then click OK.
-
Click OK.
Deleting a Filter
You can remove a filter by deleting it from the exclusion list.
-
From the CommCell Browser, navigate to Client Computers | <Client> | Proxy Client File System | <Backup Set>.
-
Right-click the <Subclient> in the right pane, and then click Properties.
-
Click the Filters tab.
-
Under Exclude these files/folders/patterns, select the filter that you want to delete.
-
Click Delete.
-
Click OK.

Configuring Multiple Streams for Backups
File System Multi-Streaming employs multiple data streams per subclient for backup operations. This enables the subclient's contents to be distributed to all the streams, transmitting them in parallel to the storage media. Hence a subclient whose data is secured using three data streams, utilizes more of the available network resources, and can complete in as little as one third the time that the same data would require using a single stream.
Use the following steps to configure multi-streaming:
-
From the CommCell Browser, expand Client Computers > client> File System >backup_set.
-
Right-click the appropriate subclient and click Properties.
-
In the Subclient Properties dialog box, specify the basic settings for the subclient:
-
In the Subclient name box, type the name of the subclient.
-
On the Content tab, add the content to be backed up.
-
Click Advanced.
-
-
In the Advanced Subclient Properties dialog box, click the Performance tab.
-
On the Performance tab, specify the number of data streams:
-
Select the Allow multiple data readers within a drive or mount point check box
-
Enter the number of data streamsin the Number of Data Readers box.
Important: The number of streams configured in the storage policy must be equal to or greater than the value entered in the Number of Data Readers box.
-
Click OK.
-
-
On the Storage Device tab, in the Storage Policy list, click a storage policy name to associate with the subclient.
Tip: To create a new storage policy, click Create Storage Policy and follow the instructions in the storage policy creation wizard.
-
Click OK.
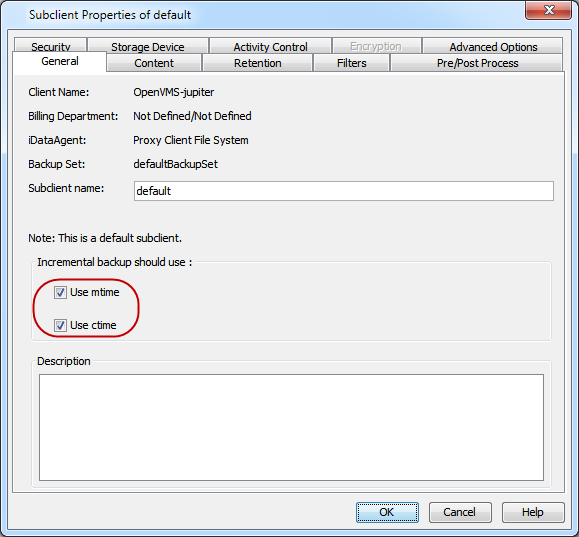
Configuring Incremental and Differential Backups Using Ctime and Mtime
Incremental and differential backups can be configured depending on the changed time. The changed time can include ctime (changes in the file properties) or mtime (changes to the data in the file). You can use ctime to include the files with their properties changed since last backup/last full backup. Similarly, you can use mtime to include the files with their data changed since last backup/last full backup.
The ctime and mtime will be applicable only for the volumes which are scanned by the Recursive Scan. When Optimized Scan is used for scanning the volumes, ctime and mtime will not be taken into account.
Follow the steps given below to configure an incremental backup using ctime and mtime options.
-
From the CommCell Browser, navigate to Client Computers| <Client> | Proxy Client File System | <Backup Set>.
-
Right-click the <Subclient> in the right pane, and then click Properties.
-
Under Incremental backups should use, select the change time (ctime or mtime).
-
Click OK.
Changing the Log Directory
By default, log files on the OpenVMS client are stored in the [.log] subdirectory of the Commvault installation directory (i.e., DKA0:[SIMPANA.log]). You can change the log directory.
Before You Begin
Note that any existing log files in the default log directory will not be migrated to the new log directory. The existing log files will be retained in the original directory. The log files in the new directory will only reflect activity since the Commvault services were restarted.
Procedure
-
Stop Commvault services on the OpenVMS client.
-
On the command line, type the following command:
SHOW SYSTEM/IMAGE/PROCESS=CVOV_LAUNCHDOutput:
OpenVMS V8.4 on node SCS21 22-JUN-2016 10:49:09.79 Uptime 29 02:27:56
Pid Process Name State Pri I/O CPU Page flts Pages
00011017 CVOV_LAUNCHD HIB 5 13052 0 00:00:01.47 1294 1542 M
SCS21$DKA0:[SIMPANA.bin]CVOV_LAUNCHD.EXE;1
Note the SIMPANA.bin directory path.
-
Using an @ character followed by the directory path displayed in the output, type the following command:
@SCS21$DKA0:[SIMPANA.bin]CVOV_STOP
-
-
Edit the CVOV_CONFIG.DAT file present in the Commvault directory, and add an entry for the new log directory ({logDirectory=DKA0:[SIMPANALOGS]}/) under the IDA section.
Note: Provide full path to the new log directory path in either OpenVMS style or UNIX style.
Sample CVOV_CONFIG.DAT file content:
[Base] {listenQueue=20}/ [IDA] {backupOfflineContent=0}/ {encodeAllSpecialSymbols=-1}/ {PerfCounter=0}/ {sortCollectFIle=1}/ {logDirectory=DKA0:[SIMPANALOGS]}/ [logger] {CLIENTBACKUP_DEBUGLEVEL=0}/ {CLIENTBACKUP_MAXLOGFILEBACKUPS=1}/ {CLIENTBACKUP_MAXLOGFILESIZE=5}/ {CLIENTRESTORE_DEBUGLEVEL=0}/ {CLIENTRESTORE_MAXLOGFILEBACKUPS=1}/ {CLIENTRESTORE_MAXLOGFILESIZE=5}/ {CLIENTSCAN_DEBUGLEVEL=0}/ {CLIENTSCAN_MAXLOGFILEBACKUPS=1}/ {CLIENTSCAN_MAXLOGFILESIZE=5}/ {DubToConsole=0}/ {LaunchD_DEBUGLEVEL=0}/ {LaunchD_MAXLOGFILEBACKUPS=1}/ {LaunchD_MAXLOGFILESIZE=5}/ -
Restart Commvault services on the OpenVMS client.
-
Using an @ character followed by the directory path displayed in the output in step 1, type the following command:
@SCS21$DKA0:[SIMPANA.bin]CVOV_START
-
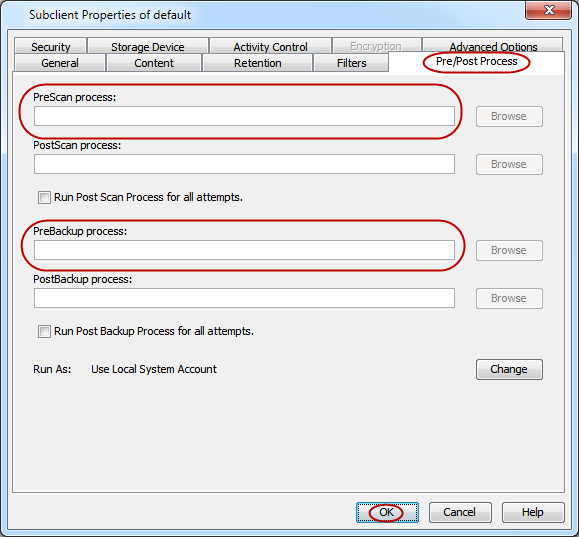
Configuring Pre and Post-processing for Backups
Setting Up Pre-processes and Post-processes
You can add and modify Pre-processes and Post-processes for a subclient. These are batch files or shell scripts that you can run before or after certain job phases. For example, you can use an echo command to check the level of a backup. Similarly, you can include a case statement within a script to run specific operations based on the level of the backup job.
A Save As Script file can also be run as a pre-process and post-process, if you include the absolute path of the associated input file in the script file.
-
The first line of the script must execute a command that is designed to call in the pre/post program. Ensure that you have included the appropriate command in the first line of the script.
-
To run a script, MYCOMMAND.COM, type the full path in the OpenVMS native format. Browse functionality is currently not available.
For example:
@DKA0:[MYDIR.MYSUBDIR]MYCOMMAND.COM;2 -
You must also configure the exit code in the pre/post script by setting the cvstatus variable value and displaying it before the script exits. The cvstatus value is the actual exit code. Any value other than all zeros will be interpreted as failure.
For example,
-
To return a PASS exit code:
. . $ cvstatus="%X00000000" $ show symb cvstatus $ EXIT 0 -
To return a FAIL exit code:
.
.
$ cvstatus="%X00000005"
$ show symb cvstatus
$ EXIT 0
Note
Avoid use of DEFINE SYS$OUTPUT <filename>' when running scripts on OpenVMS client as it may result in invalid return status to the access node.
-
-
From the CommCell Browser, navigate to Client Computers | <Client> | Proxy Client File System | <Backup Set>.
-
Right-click the <Subclient> in the right pane, and then click Properties.
-
In the Subclient Properties dialog box, click Advanced.
-
In the Advanced Subclient Properties dialog box, click the Pre/Post Process tab.
-
Depending on the process you want to set up, type the full path to the process and then click OK.
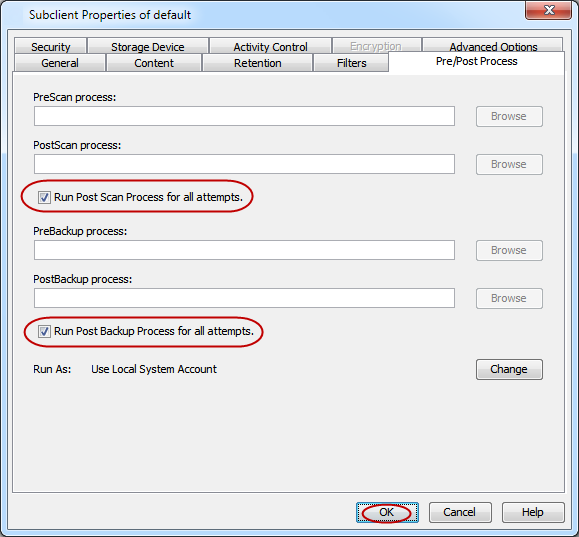
Setting Up Post-processes to Run during Failures
By default, a specified post-process command is executed only on successful completion of the scan or backup operation or if the job is killed.
Use the following steps to run a post-process even if the scan or backup operation did not complete successfully. For example, this may be useful to bring a database online or release a snapshot.
-
From the CommCell Browser, navigate to Client Computers | <Client> | Proxy Client File System | <Backup Set>.
-
Right-click the <Subclient> in the right pane, and then click Properties.
-
In the Subclient Properties dialog box, click Advanced.
-
In the Advanced Subclient Properties dialog box, click the Pre/Post Process tab.
-
Select the Run Post Scan Process for all attempts check box.
-
Select the Run Post Backup Process for all attempts check box.
-
Click OK.
Controlling the Ports for IBM i or OpenVMS File System Clients
Use this additional setting to control the range of ports that are assigned to the dynamically created network connection between a proxy server and an IBM i or OpenVMS client. You can use this additional setting when you want to limit the number of ports opened through the firewall for IBM i or OpenVMS clients.
Procedure
-
To the access node, add the additional setting as shown in the following table.
For instructions on how to add additional settings from the CommCell Console, see Add or Modify an Additional Setting.
Property
Value
Name
Category
ProxyClients
Type
String
Value
<start port>-<end port>
For example, 10000-101050.
Configuring Linux Proxies Running OpenSSH Version 7 or Higher
If your Linux proxy computer is running OpenSSH Version 7 or higher, an additional configuration step is required prior to setting up subclients for running backup operations.
Procedure
-
Check the version of OpenSSH running on your Linux proxy computer by running the following command:
ssh -VOutput:
OpenSSH_7.4p1, OpenSSL 1.0.2k-fips 26 Jan 2017 -
If the version number after "OpenSSH" is 7 or higher, then perform the following steps:
-
Go to the home directory of the logged-in user that is running the Commvault processes (typically "root"):
# ps -eaf | fgrep "Base/cvd" root 1079 1 0 Sep17 ? 00:01:27 /opt/commvault/Base/cvd # cd ~root -
Create a folder ".ssh" if it does not already exist, and go to that folder:
# mkdir .ssh # cd .ssh -
Edit the file "config", or create a file if it does not already exist, and add the following lines for each OpenVMS client that will be managed through this Linux access node computer:
 Host OpenVMS_client_hostname
          KexAlgorithms +diffie-hellman-group1-sha1
          HostkeyAlgorithms +ssh-dss
          Ciphers +3des-cbc
where OpenVMS_client_hostname is the host name of the OpenVMS client as configured on the CommCell Console or the Command Center.
-
Go to the home directory as in step 2a.
-
Create a folder named .putty if it does not already exist, and navigate to the location. On the command line, type the following command:
mkdir .puttycd .putty -
In the .putty folder, create a sub-folder named sessions if it does not already exist, and navigate to the location. On the command line, type the following command:
mkdir sessionscd sessions -
Create the file Default%20Settings if it does not already exist, and add the following text:
KEX=ecdh,dh-gex-sha1,dh-group14-sha1,dh-group1-sha1,rsa,dsa,WARNIf the file exists, find the line beginning with
KEX=and replace it with the above text.
-
Modifying an Agent, Backup Set or Subclient
The following table describes the properties that can be configured from the agent, backup set and subclient levels.
|
Option |
Description |
Related Topics |
|
Change Storage Policies |
You can modify the storage policies in any of the following situations.
You can change the storage policies from the subclient level.
|
Refer to Storage Policies. |
|
Rename a Backup Set or Subclient |
You can rename backup sets and subclients. Renaming BackupSet:
Renaming subclient:
|
|
|
Data Transfer Options |
You can efficiently configure the available resources for transferring data secured by data protection operations from the subclient level. This includes the following:
|
Refer to Data Compression and Network Bandwidth Throttling. |
|
View Data Paths |
|
|
|
Configure Activity Control |
You can enable backup and restore operations from the agent and subclient level. However, you can enable restore operations only from the agent level.
|
Refer to Activity Control. |
|
Configure User Security |
You can create a security association from the agent or subclient level. For instructions on creating a security association at the agent or subclient level, see Administering the Security Associations of an Entity. |
Refer to User Administration and Security. |
|
Enable and Disable Data Encryption |
You can enable data encryption from the subclient level. Encryption must be enabled at the client level prior to configuring any instances residing on that client.
|
Refer to Data Encryption. |
|
CommCell Configuration Report |
The CommCell Configuration Report provides the properties of the CommServe, MediaAgents, clients, agents, subclients, and storage policies within the CommCell based on the selected filter criteria.
|
Refer to CommCell Configuration. |
Deleting an Agent, Backup Set or Subclient
Caution
When you delete an instance or backupset, the associated data is logically deleted and you can no longer access the corresponding data from CommCell Console for recovery purposes.
Refer to Recovering Data Associated with Deleted Clients and Storage Policies for information on how to recover data if you accidentally delete an entity.
Deleting an Agent
You must uninstall or deconfigure the agent software from the client computer before deleting it from CommCell Browser. After you delete the client software, you can either leave the corresponding data intact for an appropriate action or you can remove the data immediately. If you choose to remove the data immediately, you must delete the agent from the CommCell Browser. If you delete the agent, all of the agent's data is irretrievably lost.
-
You cannot delete an agent while operations for that agent are running.
-
From the CommCell Browser, navigate to Client Computers > client**.
-
Right-click the agent**, and then click Delete.
-
A confirmation message appears with the following message:
This operation will permanently delete the data backed up from this level and it cannot be restored. -
Click OK to continue with the deletion operation or click No to cancel the deletion.
Deleting a Backup Set
Consider the following before deleting a Backup Set:
-
You cannot delete a default Backup Set.
-
Schedules associated with the Backup Set are also automatically deleted.
-
From the CommCell Browser, expand Client Computers > client > agent.
-
Right-click the backup_set, and then click Delete.
-
A confirmation message is displayed, asking if you want to delete the Backup Set.
Click No to cancel the deletion and retain the Backupset, or click Yes to continue the deletion.
Deleting a Subclient
Consider the following before deleting a subclient:
-
You cannot delete a default subclient.
-
Schedules associated with the subclient are also automatically deleted.
-
From the CommCell Browser, expand to Client Computers > client > agent > backup_set
-
Right-click the subclient that you want to delete, and then click Delete.
-
A confirmation message appears that asks if you want to delete the subclient.
Click No to cancel the deletion and retain the subclient, or click Yes to continue the deletion.