Once the new MS SQL Server instance name is set, pre-install the MS SQL Server instance before installing the CommServe component.
Prepare for the Installation
-
Obtain the installation package for the appropriate version of Microsoft SQL Server:
-
Microsoft SQL Server 2019 Standard: Create an installation package by using the Download Manager. The installation package must include the Microsoft SQL Server and the necessary Commvault server packages, such as the CommServe or Workflow Engine. For instructions about creating the package, see Downloading Software for Windows Computers Using the Download Manager.
-
Microsoft SQL Server 2014, 2016, and 2017 Enterprise, Standard, and Express editions or higher: Contact Microsoft.
-
Microsoft SQL Server 2012 Enterprise Edition or higher: Contact Microsoft.
-
Microsoft SQL Management Studio 2016: Contact Microsoft.
-
-
The computer on which you want to install the SQL Server must have the following properties:
-
The most recent Microsoft ODBC Driver for SQL Server must be installed.
-
The computer must have a static IP address.
-
Install the SQL Server and Create the Commvault Instance
-
Log on to the client computer as an Administrator or as a member of the Administrator group on that computer.
-
From the installation package, run Setup.exe.
For example, if you created the package from the Download Manager, run the following program: WinX64\ThirdParty\MSSQL\SQL_Standard_Edition\Setup.exe.
The SQL Server Installation Center wizard appears.
-
In the navigation area on the left, click Installation. Then, in the right pane, click New SQL Server stand-alone installation or add features to an existing installation.
-
On the Product Key page, click Next.
The product key is already provided.
-
On the License Terms page, select the I accept the license terms check box and then click Next.
-
On the Microsoft Update page, specify whether you want to use the Microsoft Update feature, and then click Next.
The Install Setup Files page appears, where the setup files are copied, and then the installation automatically starts.
-
On the Setup Role page, click Next to proceed with the SQL Server Feature Installation.
-
On the Feature Selection page, from the features to install, select Database Engine Services, and then click Next.
-
On the Instance Configuration page, click Named Instance, enter the custom SQL Instance Name provided in the szUserSQLInstanceName additional setting, and then click Next.
Note
To view the custom SQL Instance Name in the szUserSQLInstanceName registry key, see "Procedure" in Installing the CommServe Software using a Different SQL Instance Name.
-
On the Disk Space Requirements page, review the disk space summary, and then click Next.
-
On the Server Configuration page, complete the following steps:
-
Perform one of the following:
-
Preferred method: For each SQL Server service, in the Account Name and Password fields, enter the username and password of the domain account that you used to log on to the computer.
Or, for enhanced security, enter the username and password of the local administrator domain user account.
Note
The user account that you specify for the SQL Server service must have permissions on the drive or parent folder where you plan to install the CommServe software.
After the installation is complete, verify that the user account that you specify for the SQL Server service has permissions on the drive or parent folder (including Software_Installation_Directory\CommVault\ContentStore\Reports\MetricsUpload\Upload) where you plan to install the CommServe Server and the Private Metrics Server.
-
On the Services Accounts tab, click the Account Name cell that corresponds to the SQL Server Database Engine service, and then click the drop-down arrow to specify the local system account.
The account name for the service should display NT AUTHORITY\SYSTEM.
Keep the default account names for the SQL Server Agent and SQL Server Browser services.
-
-
On the Collation tab, verify that the collation of the TEMPDB is set to SQL_Latin1_General_CP1_CI_AS.
-
Click Next.
-
-
On the Database Engine Configuration page, complete the following steps in the Server Configuration tab:
-
Click Mixed Mode (SQL Server authentication and Windows authentication).
-
Enter and confirm the password for 'sa' SQL user in the Enter Password and Confirm password boxes.
-
Click the Add Current User button.
In the Data Directories and FILESTREAM tabs, accept the default values and then click Next.
-
-
On the Feature Configuration Rules page, verify that the rules ran successfully, and then click Next.
-
On the Ready to Install page, verify the features to be installed, and then click Install.
The Installation Progress page appears and indicates the installation process.
-
On the Complete page, click Close.
The SQL Server is successfully installed.
Apply the Most Recent SQL Server Updates
Install the most recent cumulative updates and service packs provided by Microsoft.
As a best practice, keep the SQL Server software up-to-date.
Tune the SQL Server Memory Usage
The maximum memory used by the SQL Server should be 50% of the physical memory available in the computer.
-
Tune the SQL Server memory usage for Commvault as follows:
-
On the CommServe computer, open the Microsoft SQL Server Management Studio.
-
Right-click the server instance, and then click Properties.
-
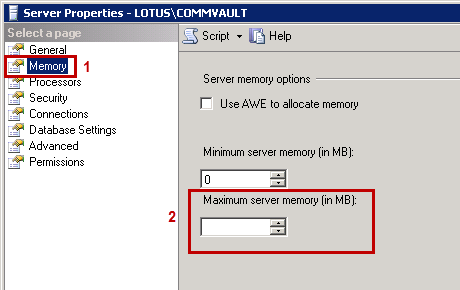
From the Server Properties dialog box, on the left pane, select the Memory page.
-
In the Maximum server memory (in MB) box, specify 50% of the physical memory available in the computer.
-
Click OK.
-
Install the Server Package
- Install the CommServe software or the appropriate server package on the computer where you installed the SQL Server software.
Change and Hide the SQL Server Instance Name
-
For security reasons, you can change and hide the SQL Server instance name.
-
For more information, see Changing and Hiding the Microsoft SQL Server Instance Name.