Export Media Using the Vault Tracker Feature
You can export media using the Vault Tracker feature:
-
Export Media Wizard using a criteria-based scheme or a list-based scheme
-
Vault Tracker policies
-
After backup and Auxiliary Copy operations
You can configure the number of times an export operation must retry before it is aborted, and the retry interval minutes using the Export Operation Retry Count and the Vault Tracker feature export retry interval in minutes options in the Media Management Configuration (Service Configuration) dialog box.
Export Media Using the Export Media Wizard
The Export Media Wizard provides the capability to export one or more media from a library. Use the wizard if you know which library contains the media that you want to export, as well as the media to be exported.
Note
The following procedures access The Export Media Wizard at the library level. However, you can also access the Export Media Wizard at the Media in Library level.
Exporting Media Based on Criteria
Exporting media based on criteria creates a standard Vault Tracker policy. This method offers fewer options than creating a Vault Tracker policy with the Vault Tracker Policy Wizard. However, you can modify the criteria-based policy in the Tracking Policy Details dialog box after you create the policy.
-
From the CommCell Browser, expand Storage Resources | Libraries.
-
Right-click the appropriate library, and then click Export Media.
The Export Media Wizard is displayed.
-
Select Yes, and click Next.
-
Select Criteria Based, and click Next.
-
Enter the Policy Name and click Next.
Select the Auto acknowledge option if you do not want to track and acknowledge the status of the media using pending actions, during transit.
-
Select the storage policies that should be associated with this policy and click Next.
Important: If you select a global secondary copy policy, all the media associated with the storage policy copies that are associated with the global secondary copy policy will be exported. However, you can select individual storage policy copies which are associated with a global secondary copy policy. In this case, the media associated with these individual storage copy policies will be exported during the execution of the Vault Tracker policy.
-
Choose the appropriate media that must be exported by this policy and click Next.
Important: Cleaning, Spare and Retired media are not associated with a Storage Policy Copy and hence are unavailable when a storage policy copy is selected in the previous screen.
-
Choose the appropriate criteria for export and click Next.
-
Backup Level options include criteria to include or exclude media based on backup types, such as Full, Incremental and/or Differential.
-
Time Selection options include criteria for selecting media to be exported, such as first write, read, and so on, either as a range or a specific time.
Note that the Due back for reuse option can be used to restrict the number of spare media and/or the number of days that the spare media is kept in an outside location.
For example:
If the time range is specified as “within 5 days”, all media that will become spare within 5 days will be selected.
If the time range is specified as “older than 5 days”, all media that will NOT become spare within 5 days will be selected.
-
Limit media count for export options specifies the maximum number of media that should be included in the policy.
Note that the free slots options could cause no media to be exported if there are sufficient free slots available in the respective source libraries.
-
Exclude media not copied option excludes media with jobs that need to be copied.
-
Exclude media with data not verified option excludes media without data verification jobs.
-
Exclude media in drive option prevents media that are currently in a drive from being exported.
-
Exclude media with non-encrypted data option prevents media containing data without encryption from being exported.
-
Exclude Appendable Media option prevents media with space available for write operations from being exported.
-
Filter Media By Retention options filters media based on whether the media has extended retention jobs or not.
-
-
Select the Destination and click Next.
Optionally, select Track Transit to specify the transit location.
Select the Library option, if the destination is a library.
Select the Export option if the destination is a stationary location. The Container option is available when the destination is a stationary location.
Select the Shelf option if the destination is a media repository.
-
Click No to run the policy immediately or click Yes to setup a Schedule.
If you clicked Yes, choose the appropriate scheduling options.
-
Click Finish.
-
From the CommCell Browser, navigate to Policies | Vault Tracker Policies.
The criteria-based policy that you created appears in the right pane.
Tip: If the policy is not displayed, click View and then click Refresh from the CommCell Console ribbon.
Exporting Media from a List
Media can be selected from a list of media and exported. This allows you to export individual or specific media.
-
In the CommCell Browser, expand to Storage Resources | Libraries.
-
Right-click the appropriate library, and then click Export Media.
The Export Media Wizard appears.
-
On the Export Media page, select Yes, and then click Next.
-
On the Scheme to Export Media page, select List Based, and then click Next.
-
On Select the media you want to export page, select the appropriate media, and then click Next.
To select more than one media, hold down the Ctrl key.
-
On the Select movement destination and tracking page, define the appropriate transit location and destination.
-
Click Finish.
The media is moved to the mail slot for removal.
You must record the movement action as described in the "Monitoring and Recording the Status of Media" section on this page.
Vault Tracker Policies
Note
You must have the Vault Tracker Enterprise license to use Vault Tracker Policies.
Use Vault Tracker policies to track regular media movements such as shipment of the media from a library to offsite storage or a media repository, or shipment of media between two locations, and so on.
Standard Policies: A standard policy tracks the movement of media between any source and any destination, including:
-
Library to location
-
Location to location
-
Location to library
-
Library to library
Due Back Policies: A Due Back policy tracks the movement of spare media that is stored in an offsite location. Typically due back policies can be created between an exported location to a library. You can also limit the media count in a due back policy if the number of due back media is too large. You can also track the transit for due back policies.
When you create a policy, you can:
-
Schedule the policy to run at a later time if you anticipate that changes will be made to the policy prior to media movement. Policies can be scheduled to run daily, weekly, and so on.
-
Delay the export of the media, which creates a time gap between when the policy is run and when the media movement actions actually start. This provides time for you to create and review a Vault Tracker Report and examine all of the policy's actions prior to any actions taking place. If any changes to the policy are required, you can make those changes without aborting an action or running an action again.
-
Temporarily stop an action by placing the export operation in a pending state for a specified amount of time. For example, you can suspend the process if you need to perform library maintenance or urgent backup and recovery operations, but do not want to abort or restart what has already been completed. When the library is available again, you can restart the policy manually from the point where it left off. Alternatively, you can set the policy to resume automatically at a specified time.
In addition, you can:
-
Run the policy if you want to run the policy immediately.
-
Clone the policy to create an exact duplicate that retains all of the properties of the original policy. Use the cloned policy as a basis for new policy instead of creating a new policy that is very similar.
-
Change the Properties of a policy while it is still in the pending state.
When you run a Vault Tracker policy, the following items appear in the CommCell Console:
-
An Event Message that indicates that the Vault Tracker policy has been run.
-
When the Auto acknowledge option is enabled in the Vault Tracker policy, all of the pending actions that are associated with the media movement are acknowledged automatically if both the source and the destination are a location. If the source is a library, the pending actions are acknowledged automatically when the media is removed from the library.
-
For jobs that must be acknowledged manually, the pending actions appear in the right pane of the CommCell Browser when you click Actions under Storage Resources | Vault Tracker.
You must record the movement action as described in the "Monitoring and Recording the Status of Media" section on this page.
Creating a Vault Tracker Policy
-
From the CommCell Browser, expand to Policies.
-
Right-click Vault Tracker Policies, and then click New Tracking Policy.
-
Use the Vault Tracker Policy Wizard to guide you through the process of creating a new Vault Tracker policy.
Important: If you select a global secondary copy policy, all the media associated with the storage policy copies that are associated with global secondary copy policy will be exported.
Note: Once you create a Vault Tracker policy, it must be run or scheduled.
Cloning a Vault Tracker Policy
-
From the CommCell Browser, expand to Policies | Vault Tracker Policies.
All of the available Vault Tracker policies appear in the right pane.
-
Right-click the policy that you want to clone, and then click Clone.
The Clone Vault Tracker Policy dialog box appears.
-
In the Enter Name box, type the name of the new policy.
-
Click OK.
The cloned Vault Tracker policy appears in the right pane.
-
Right-click the Vault Tracker policy, and then click Properties.
The Tracking Policy Details dialog box appears.
-
On the General tab, click the Enable check box.
-
Click OK.
The Vault Tracker policy is enabled and ready to use.
Note
note: We recommend that you change some of the options of the cloned Vault Tracker policy so that it is not an exact duplicate of the original policy.
Modifying a Vault Tracker Policy
-
From the CommCell Browser, expand to Policies | Vault Tracker Policies.
All of the available Vault Tracker policies appear in the right pane.
-
Right-click the appropriate Vault Tracker policy, and then click Properties.
The Tracking Policy Details dialog box appears.
-
Make the required changes, and then click OK.
Deleting a Vault Tracker Policy
Make sure that no pending actions are in progress for the Vault Tracker policy that you want to delete.
-
From the CommCell Browser, expand to Policies | Vault Tracker Policies.
All of the available Vault Tracker policies appear in the right pane.
-
Right-click the policy that you want to delete, and then click Delete.
A message appears that asks you to confirm the deletion.
-
Click Yes.
Viewing Media That Is Associated with a Vault Tracker Policy
-
From the CommCell Browser, expand to Policies | Vault Tracker Policies.
All of the available Vault Tracker policies appear in the right pane.
-
Right-click the appropriate Vault Tracker policy, and then click View Media.
The View Media dialog box lists media that meet the criteria defined in the Vault Tracker policy.
Running a Vault Tracker Policy
-
From the CommCell Browser, expand to Policies | Vault Tracker Policies.
All of the available Vault Tracker policies appear in the right pane.
-
Right-click the policy that you want to run, and then click Run.
A message appears that asks you to confirm that you want to run the policy now.
-
Click Yes.
You must record the movement action as described in the "Monitoring and Recording the Status of Media" section on this page.
Scheduling a Vault Tracker Policy
Note
Schedules for Vault Tracker policies honor holidays at the CommServe level.
-
From the CommCell Browser, expand to Policies | Vault Tracker Policies.
All of the available Tracking Policies appear in the right pane.
-
Right-click the appropriate Vault Tracker policy, and then click Create Schedule.
-
On the Schedule Details tab, create the required schedules for the Vault Tracker policy.
-
Click OK.
You can view, modify, delete, or disable schedules.
Exporting Media After a Backup Operation
Note
You must have the Vault Tracker Enterprise license to perform this task.
Backup operations can be started immediately or scheduled using the scheduling options.
-
From the CommCell Browser, right-click the appropriate subclient, and then click Backup.
-
In the Backup Options dialog box, select the required options.
-
Click Advanced.
-
In the Advanced Backup Options dialog box, click the Vault Tracking tab.
-
Click the Export Media After Job Finishes check box.
-
If necessary, select the option to Exclude Media Not Copied.
-
If necessary, select the appropriate Media Status.
-
Select the Export Location from the list.
-
Click the Track Transit check box, and then select the transit location from the list.
-
Click the Use Virtual Mail Slots check box to move the media automatically to a virtual mail slot in the library after the backup operation.
-
Click the Filter Media by Retention check box, and then select the appropriate option.
-
Click OK.
-
Click OK.
You must record the movement action as described in the "Monitoring and Recording the Status of Media" section on this page.
Exporting Media After an Auxiliary Copy Operation
Note
You must have the Vault Tracker Enterprise license to perform this task.
Auxiliary Copy operations can be started immediately or scheduled using either the scheduling options or a Schedule Policy.
-
From the CommCell Browser, expand to Policies | Storage Policies.
-
Right-click the appropriate storage policy, and then click All Tasks | Run Auxiliary Copy.
The Auxiliary Copy Jobs Options dialog box appears.
-
Select the required options.
-
Click Advanced.
The Advanced Auxiliary Copy Job Options dialog box appears.
-
Click the Vault Tracking tab.
-
Click the Export Media After Job Finishes check box.
-
If necessary, click the Exclude Media Not Copied checkbox.
-
If necessary, select the required Media Status.
-
Select the Export Location from the list.
-
Click the Track Transit check box, and then select the transit location from the list.
-
Click the Use Virtual Mail Slots check box to move the media automatically to a virtual mail slot in the library after the backup operation.
-
Click the Filter Media by Retention check box, and then select the appropriate option.
-
Click OK.
-
Click OK.
You must record the movement action as described in the "Monitoring and Recording the Status of Media" section on this page.
Pending Actions
Once media is removed from the library, all media movement outside of the library must be recorded to track the operation. Such outside media movements are referred to as pending actions. Once an action is initiated, the media appears in the reconciliation report.
Types of Media Movements and the Options for Recording Pending Actions
Media Movement Between Two Locations
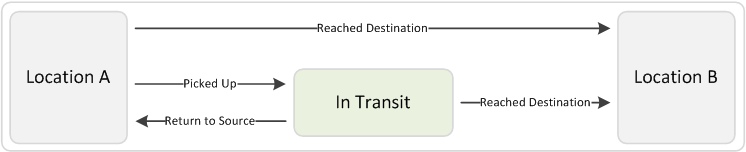
Vault Tracker Options
-
Picked Up
-
Return to Source
-
Reached Destination
Media Movement from a Library to Location
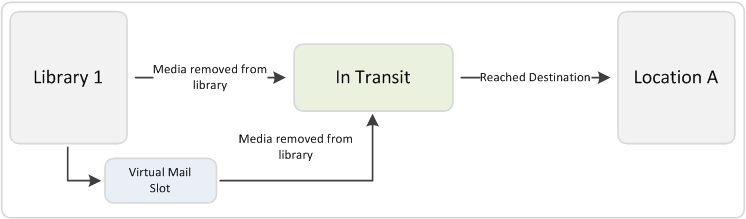
Vault Tracker Options
- Reached Destination
Media Movement from a Location to a Library
A Due Back policy can be used for this movement.

Vault Tracker Options
- Picked Up
Media Movement Between Two Libraries
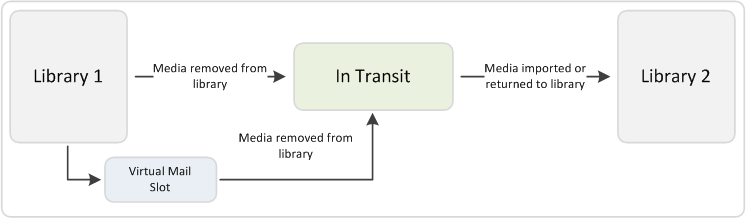
The following pending actions can be recorded:
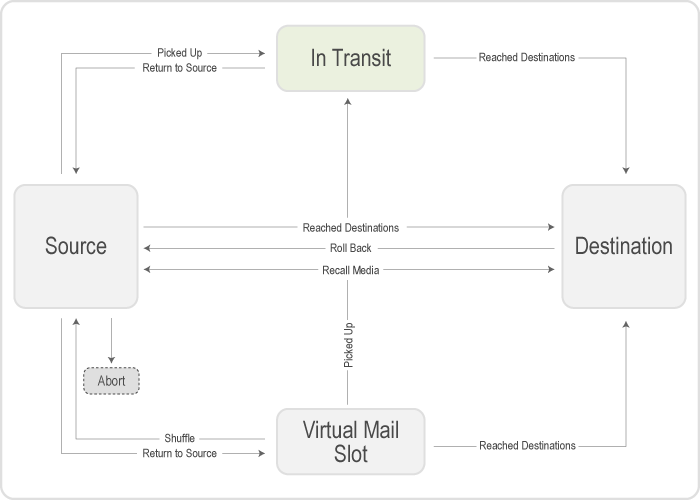
Picked Up: Sets the media location as In Transit, when the source is a location. In the case of a library, this action is performed automatically when the media is removed from the source library.
Reached Destination: Indicates that the media has reached its destination. The pending action is considered complete and appears in the Tracking History. If the final destination is a library, this action is performed automatically when the media is detected in the destination library.
Return to Source: Resets the media location to the source location. This option is valid only when:
-
The media is in the in-transit state.
-
When the source is a location (not a library).
Abort: Cancels the pending action.
Suspend: Temporarily discontinues all media movement for a specified amount of time. The media movement can be resumed manually or at a specified time.
Resume: Media movement continues when a suspension has been lifted by either resuming the action manually or when the specified Suspend time has expired.
Quit Time: Specifies the amount of time that can elapse for the action to abort. Quit Time can also be configured in the Media Management Configuration (Service Configuration) dialog box.
Summary of Pending Actions
Viewing Pending Actions
-
From the CommCell Browser, expand to Storage Resources | Vault Tracker.
-
Click Actions.
All pending actions appear in the right pane.
Acknowledging Pending Actions
Manual Acknowledgment
When you run a backup operation, Auxiliary Copy operation, Export Media operation, or Vault Tracker policy with the Auto acknowledge option disabled, you must acknowledge the media movement actions manually. You can record the pending action for all of the media that are associated with a specific movement, or for individual media that are associated with a specific movement.
You can acknowledge pending actions manually two ways:
Pre-acknowledge: All pending actions can be acknowledged assuming that the media will get to the destination.
Post-acknowledge: Generate the Tracking Report with the Reconciliation option enabled. All media that are in transit are listed. Once a confirmation from offsite is received, all pending actions can be acknowledged.
For more information, see the "Monitoring and Recording the Status of Media" section on this page.
Automatic Acknowledgment
When you create a Vault Tracker policy, you can enable the Auto acknowledge option within the policy. When the policy is run, all of the pending actions that are associated with the media movement are acknowledged automatically if both source and destination are a location. If the source is a library, the pending actions are acknowledged automatically when the media is removed from the library.
The Auto acknowledgement option can be enabled (or disabled) for Vault Tracker policies and Media Export operations. Automatic acknowledgement is not available for backup and Auxiliary Copy operations.
Setting Automatic Acknowledgment of Pending Actions in a Vault Tracker Policy
-
From the CommCell Browser, expand to Policies | Vault Tracker Policies.
All of the available Vault Tracker policies appear in the right pane.
-
Right-click the appropriate policy, and then click Properties.
-
On the General tab of the Tracking Policy Details dialog box, select the Auto acknowledge check box.
-
Click OK.
Note
You can also enable the Auto acknowledge option for Export Media operations.
Monitoring and Recording the Status of Media
-
From the CommCell Browser, expand to Storage Resources | Vault Tracker, and then click Actions.
All of the Vault Tracker jobs with a pending action appear in the right pane.
-
Right-click the appropriate action, and then click the appropriate movement action.
-
If you want to record the status for the individual media in the action, right-click the action, and then click Details.
The Media Action Details dialog box appears.
-
Click the List of Media tab.
-
Right-click the appropriate media, and then click the appropriate movement action.
Note
Available status:
-
When the media is at source:
-
If the current location of the media is inside of the library, that status cannot be recorded.
-
If current location of the media is outside of the library, you can record the Picked Up, Reached Destination status.
-
-
When the media is in the virtual mail slot, the status cannot be recorded.
-
When the media is in transit:
-
If the destination is an export location, you can record the Reached Destination status.
-
If the destination is a library, status cannot be recorded.
-
If the source and destination are an export location, you can record the Return to Source and Reached Destination status.
Note
The status options that are available for an action (as opposed to the status options that are available for a media in the Media Action Details dialog box) is the combination of all of the available commands for all of the media that are associated with the action.
-
-
Remove Media from the Library
Note
You must have the Vault Tracker Enterprise license to perform this task.
Once the export operation has been started, the media can then be removed from the library in the following ways:
-
Using virtual mail slots.
-
Ejecting the media through the library mail slots.
Setting Up Virtual Mail Slots
Virtual mail slots are a range of contiguous slots in the library that are used to store media that are to be moved out. Virtual mail slots allow you to open the library door and pick up the media to be moved from a predetermined range of slots.
Virtual mail slots in a library can be defined in the Library Properties dialog box. You must also specify whether the Vault Tracker feature must use the virtual mail slot in the Vault Tracker policy, backup, Auxiliary Copy, or Export Media operations. An option to use the media in virtual mail slots for backup operations is also provided in the LibraryProperties dialog box.
Media that is moved to the virtual mail slots are marked as Exportable.
To use the virtual mail slot, the Vault Tracker job must have the Use Virtual Mail Slot option enabled. Enable this option by:
-
Selecting the Use Virtual Mail Slots for export in source libraries option in the Vault Tracker policy in the Tracking Policy Details (Source)dialog box.
-
Selecting the Use Virtual Mail Slots option for a backup job from the Advanced Backup Options dialog box.
If you do not set up the virtual mail slots in the library, the media is exported using the library's mail slots.
Note
Virtual mail slots are not supported for blind libraries, nor for IP-based libraries such as libraries that are attached to an ACSLS Server, ADIC libraries attached to SDLC, and so on.
-
From the CommCell Browser, expand to Storage Resources | Libraries.
-
Right-click the appropriate library, and then click Properties.
The Library Properties dialog box appears.
-
Click the Media tab.
-
Click the Virtual mail slot for export check box.
-
Enter the starting slot number that must be used for storing media in the virtual mail slot in the Starts From box.
-
Specify the direction from the starting slot number.
The options are Up and Down.
-
Click OK.
Tracking History
After all of the pending actions are recorded, the Vault Tracker feature automatically catalogs the information in the Tracking History.
To display the information in the Actions pane before the information is moved to the history information, define a display time using the Time in hours to show the Vault Tracker history in actions pane option in the Media Management Configuration (Vault Tracker Configuration) dialog box.
Viewing the Tracking History
-
From the CommCell Browser, expand to Storage Resources | Vault Tracker.
-
Right-click Actions, and then click Tracking History.
The Media Movement Filter Criteria dialog box appears.
-
Select the required filter criteria, and then click OK.
The history information that is associated with the media movement appears in the Tracking History dialog box.
Deleting an Action from the Tracking History
You can Delete a pending action history or delete individual media action history of a pending action.
-
From the CommCell Browser, expand to Storage Resources | Vault Tracker.
-
Right-click Actions, and then click Tracking History.
The Media Movement Filter Criteria dialog box appears.
-
Select the required filter criteria, and then click OK.
The history information that is associated with the media movement appears in the Tracking History dialog box.
-
Right-click the action that you want to delete, and then click Delete.
The action is deleted from the tracking history.
Rolling Back an Action from the Tracking History
You can roll back an action if both the source and destination locations are export locations and the media is listed in the history information after it is marked as Reached Destination. This allows to roll back a location change that is incorrect.
The Roll back option is not available in the following situations:
-
When the media movement history has a library as the source or destination location.
-
When the media movement history failed.
-
From the CommCell Browser, expand to Storage Resources | Vault Tracker.
-
Right-click Actions, and then click Tracking History.
The Media Movement Filter Criteria dialog box appears.
-
Select the required filter criteria, and then click OK.
The history information that is associated with the media movement appears in the Tracking History dialog box.
-
Right-click the appropriate action, and then click Roll Back.
The action is rolled back in the history.
Pruning Tracking History
Tracking History information is pruned after 90 days by default. You can change the number of days with the Days to keep Vault Tracker records option in the Media Management Configuration (Vault Tracker Configuration) dialog box.
Export Locations
Adding an Export Location
-
From the CommCell Browser, expand to Storage Resources.
-
Right-click Locations, and then click New Location.
The Export Location Details dialog box appears.
-
In the Location box, type a name for the location.
-
From the Type list, select whether the location is Stationary or Transit location.
-
(Optional) In the Description box, type a brief description of the location.
-
Click OK.
The new location is added.
Note
In addition, locations can be added when you configure other Vault Tracker operations such as Vault Tracker policies, Export Media operation, and so on.
Modifying an Export Location
-
From the CommCell Browser, expand to Storage Resources | Locations.
-
Right-click the appropriate location, and then click Properties.
The Export Location Details dialog box appears.
-
Make any required modifications.
-
Click OK.
Deleting an Export Location
Make sure that the export location that you want to delete is not associated with a Vault Tracker policy or pending action. In addition, make sure that no media currently reside in the location.
-
From the CommCell Browser, expand to Storage Resources | Locations.
-
Right-click the appropriate location, and then click Delete.
-
A message appears that asks if you want to delete the location. Click Yes.
-
On the ribbon of the CommCell Console, click View, and then click Refresh.
The location is deleted.
Deleting Multiple Export Locations Simultaneously
Delete multiple locations simultaneously from the command line interface.
Make sure that the export locations that you want to delete are not associated with a Vault Tracker policy or pending action. In addition, make sure that no media currently resides in the locations.
-
Create a .bat file that uses the qdelete location command for each location that you want to delete.
For example:
qdelete location -loc location1 qdelete location -loc location2 qdelete location -loc location3 -
Place the .bat file in the <software installation path>\Base folder.
-
Run the .bat file.
The locations that you specified are deleted.
Manage the Media Repository
Note
You must have the Vault Tracker Enterprise license to manage the media repository.
A media repository provides a way of keeping track and managing media that are stored in outside storage locations. For example, to manage spare and new media, foreign media or media not used by the MediaAgents in this CommCell group, expired media, and so on, that reside outside the libraries.
When you create a shelf in a media repository, the various Media Groups are created automatically by default. If necessary, you can add additional media groups to the shelf. You must assign a default media type for the groups within the media repository. You can then add media that is available in the media repository using either specific barcodes or a range of barcodes.
A media repository can be designated as the target location when media is tracked with the Vault Tracker feature.
Adding a Media Repository
-
From the CommCell Browser, expand to Storage Resources | Vault Tracker.
-
Right-click Media Repository, and then click Add Shelf.
The New Shelf dialog box appears.
-
Type a shelf name.
-
Click OK.
The media repository is added.
Specifying the Default Media Type for a Media Group in the Media Repository
-
From the CommCell Browser, expand to Storage Resources | Vault Tracker | Media Repository | <media repository>.
-
Right-click the appropriate group, and then click Properties.
The Group Properties dialog box appears.
-
In the Media Type area, select the appropriate media type from the Default Media Type list.
-
Click OK.
Adding Media to a Media Group in the Media Repository by Barcode
The media group must have a media type associated with it before you can perform this procedure.
-
From the CommCell Browser, expand to Storage Resources | Vault Tracker | Media Repository.
-
Right-click the appropriate media repository, click Add Media, and then click By Barcodes.
The Media By Barcode dialog box appears.
-
In the Barcodes List box, type the barcodes that are associated with the media in the repository.
Type one barcode per line.
-
If necessary, select an Export Location.
-
Click OK.
The barcodes appear in the right pane.
Adding Media to a Media Group in the Media Repository by Range
The media group must have a media type associated with it before you can perform this procedure.
-
From the CommCell Browser, expand to Storage Resources | Vault Tracker | Media Repository.
-
Right-click the appropriate media repository, click Add Media, and then click By Range.
The Media by Pattern dialog box appears.
-
Enter the range of barcodes using <NUMBERSTART> followed by barcode pattern.
For example, to add media using the barcode pattern 100, you must specify <NUMBERSTART>100.
-
Enter the number of media that must be added.
Numbers are appended to the barcode pattern sequentially.
For example, if you add four media, the barcodes are 100,101, 102 and 103.
-
If necessary, select an Export Location.
-
Click OK.
The barcodes appear in the right pane.
Move Media Using Containers
Note
You must have the Vault Tracker Enterprise license to move media using containers.
When containers are used to ship media, you can add information about the containers. This information helps to identify the container in which the media is located when the media is recalled.
Containers can be created with a Vault Tracker policy by generating container names automatically. A container is created whenever the Vault Tracker policy is run and all of the locations for all the media that are associated with the job are associated with the container. In addition, containers can be manually.
When the capacity of a container has been reached, any remaining media is automatically carried over to the next available container that is defined in the Vault Tracker policy.
By default, automatic containers are not displayed as a Destination in Vault Tracker Policies. Enable the Allow user to select automatically created containers for Vault Tracker Policy option from Media Management Configuration: Vault Tracker dialog box to display the containers.
Generating Containers Automatically with a Vault Tracker Policy
-
From the CommCell Browser, expand to Policies | Vault Tracker Policies.
All of the available Vault Tracker policies appear in the right pane.
-
Right-click the appropriate policy, and then click Properties.
-
Click the Destination tab.
-
Select Export, and then select a location.
-
Click Container.
The Container Definition dialog box appears.
-
Click Define container name pattern.
-
Select the label and then click Add Token.
The selected label pattern appears.
-
In the Capacity box, enter the maximum number of media that the container can hold.
-
Click OK.
Note
In addition, you can define automatic container generation when you create a Vault Tracker policy with the Vault Tracker Policy wizard.
Creating a Container Manually
-
From the CommCell Browser, expand to Storage Resources | Vault Tracker.
-
Right-click Containers, and then click New Container.
The Container Details dialog box appears.
-
In the Container Name box, type the name.
-
In the Capacity (No of Tapes) box, enter the maximum number of media that the container can hold.
-
In the Tracking ID box, type an ID.
-
(Optional) In the Description box, type a description for the container.
-
Click OK.
The new container is added.
Configuring to Use Multiple Containers to Export Media
You can configure to use a specific set of containers to export media.
-
From the CommCell Browser, expand to Policies | Vault Tracker Policies.
All of the available Vault Tracker policies appear in the right pane.
-
Right-click the appropriate policy, and then click Properties.
-
Click the Destination tab.
-
Select Export, and then select a location.
-
Click Container.
-
Click Define container name pattern.
-
In the description space, enter the following code:
<CONTAINER_NAME_BEGIN>name1,name2,name3,name4,...<CONTAINER_NAME_END>Where:
name1, name 2 are the specific names of the containers in the pool which you want to use for exporting the media.
Notes:
-
If the containers specified in the code are not present, the system creates containers with the specified name and assign media to them during the media export operation.
-
After all the user defined containers are full, new containers are automatically generated with the following naming convention:
P_<policy_name>, P_<policy_name>_2, P_<policy_name>_3.
-
-
In the Capacity box, enter the maximum number of media that the container can hold.
-
Click OK.
Defining Exported Media Containers as Offsite Or Onsite
You can mark the media containers as offsite or onsite. The definition of onsite or offsite is dependent on your organization's specific environment.
For example: Building A is the main office (could be considered onsite) and building B is the storage location for building A (could be considered offsite).
You may mark the container offsite or onsite from the CommCell Console or you may run the ContainerSetup qCommand.
-
From the CommCell Browser, expand to Storage Resources > Vault Tracker > Containers.
All of the available containers appear in the right pane.
Note: Ensure that you select the Location column to be visible in the right pane.
-
Right-click the appropriate container, and then click Mark Container Offsite or Onsite.
A message appears that asks you to confirm the selection.
-
Click Yes.
The container is offsite or onsite as per your selection.
Deleting Container Information
Information about empty container is pruned based on the value (in days) this is defined in the Container cleanup interval days option in the Media Management Configuration (Service Configuration) dialog box.
In addition, you can delete container information manually from the Vault Tracker policy when the container is no longer needed.
Make sure that the container that you want to delete does not have any media assigned to it.
-
From the CommCell Browser, expand to Storage Resources | Vault Tracker | Containers.
All of the available containers appear in the right pane.
-
Right-click the appropriate container, and then click Delete.
A message appears that asks you to confirm the deletion.
-
Click Yes.
The container is deleted.
Associating Media with a Container
Note
Make sure that the media is marked as exported before adding the media to a container.
If media is not associated with a container automatically, there are other ways to create the association.
Associating Media with a Container When the Media is Marked as Reached Destination
-
From the CommCell Browser, expand to Storage Resources | Vault Tracker | Actions.
All of the Vault Tracker jobs with a pending action appear in the right pane.
-
Right-click a pending action, and then click Reached Destination.
The Set Container dialog box appears.
-
Click the Set Container check box, and then select the appropriate container.
-
Click OK.
Associating Media with a Container from a Pending Action
-
From the CommCell Browser, expand to Storage Resources | Vault Tracker | Actions.
All of the Vault Tracker jobs with a pending action appear in the right pane.
-
Right-click a pending action, and then click Set Container.
The Set Container dialog box appears.
-
Click the Set Container check box, and then select the appropriate container.
-
Click OK.
Associating Specific Media with a Container
-
From the CommCell Browser, expand to Storage Resources | Libraries | <library> | Media By Location | Exported Media.
The exported media appear in the right pane.
-
Right-click the appropriate media, and then click Properties.
The Media Properties dialog box appears.
-
On the General tab, click the Container check box, and then select the appropriate container.
-
Click OK.
Associating Media with a Container from an Export Location
-
From the CommCell Browser, expand to Storage Resources | Libraries | <library> | Media By Location.
-
Right-click Exported Media, and then click Set Location.
The Set Export Location dialog box appears.
-
Click the appropriate media.
To select more than one media, hold down the Ctrl key.
-
Click the Container check box, and then select the appropriate container.
-
Click OK.
Viewing the Media in a Container
-
From the CommCell Browser, expand to Storage Resources | Vault Tracker | Containers | <container>.
The media that are currently in the container appear in the right pane.
In addition, you can see which containers are associated with specific media in the Tracking Report or Media Information reports.
Moving Media to a Different Container
-
From the CommCell Browser, expand to Storage Resources | Vault Tracker | Containers.
-
Right-click the appropriate container, and then click Move all Media.
The Move all Media dialog box appears.
-
In the Destination Container list, select the container where you want to move the media.
-
Click OK.
-
In the right pane, select the destination container.
This list is updated and the media appear in the destination container.
Removing Media from a Container
-
From the CommCell Browser, expand to Storage Resources | Vault Tracker | Containers.
-
Right-click the appropriate container, and then click Remove all Media.
-
In the message that appears that asks you to confirm removing the media, click Yes.
-
In the CommCell Browser, select the appropriate container.
This list is updated and the media do not appear in the right pane.
Alerts
A time interval for generating Vault Tracker alerts can be defined with the Interval (Minutes) between Vault Tracker alerts option in the Media Management Configuration (Service Configuration) dialog box
Recall Media
The Recall Media feature allows you to bring media back temporarily from an export location for a specific operation, and then return the media to the export location when the operation is complete. For example, you can export media to another location with the intention of keeping the media at the export location for an defined period of time, but bring the media back from the export location for a specific purpose (such as a data recovery operation) prior to the original return date.
See Recall Media for more information.
Sending Media Offsite
Note
You must have the Vault Tracker Enterprise license to perform this task.
-
From the CommCell Browser, expand to Policies | Storage Policies.
-
Right-click the appropriate storage policy copy, and then click Media.
The Media List dialog box appears.
-
Right-click the appropriate media, and then click All Tasks | Export.
The Export Media dialog box appears.
-
Click the New Export Location check box, and then select an offsite location (such as Iron Mountain) from the list.
-
Click OK.
Iron Mountain Customer Identification Number
Note
You must have the Vault Tracker Enterprise license to perform this task.
You can record the unique Iron Mountain Customer Identification numbers for each Iron Mountain account provided to your enterprise. These numbers are used to generate the reports that require the Iron Mountain format.
Adding an Iron Mountain Customer Identification Number
-
From the CommCell Browser, expand to Storage Resources | Vault Tracker.
-
Right-click Iron-Mountain ID, and then click New Customer-ID.
The Customer-ID Information dialog box appears.
-
In the Customer ID box, type your Iron Mountain Customer Identification Number.
-
Click OK.
The number appears in the right pane.
Modifying an Iron Mountain Customer Identification Number
-
From the CommCell Browser, expand to Storage Resources | Vault Tracker | Iron-Mountain ID.
The Customer-IDs appear in the right pane.
-
Right-click the appropriate Customer ID, and then click Customer-ID.
The Customer-ID Information dialog box appears.
-
In the Customer ID box, modify the existing value.
-
Click OK.
The modified value appears in the right pane.
Deleting an Iron Mountain Customer Identification Number
-
From the CommCell Browser, expand to Storage Resources | Vault Tracker | Iron-Mountain ID.
The Customer-IDs appear in the right pane.
-
Right-click the appropriate Customer ID, and then click Delete.
The Customer-ID is deleted from the list in the right pane.
Performing Vault Tracker Operations from the Command Line Interface
You can perform several of the Vault Tracker operations from the command line interface. For more information, see Command Line Interface - MediaAgent - QCommands.