Overview
Based on your environment, you might need to fine-tune your Documentum instance or subclient. Following are the additional configurations that you can use to configure this agent.
Planning Your Backups
In order to recover a database during the event of a failure or data loss, you need to ensure that you always have the latest and consistent copy of the Documentum Repository data. To do this, you need to plan and decide on the backups to be performed. It is always recommended that you create separate subclients for each of these backups.
Note
Although you can re-configure the content of the Default Subclient to backup specific objects, we strongly recommend against it because this would disable the capability of the Default Subclient to serve as a catch-all entity for client data, thus increasing the likelihood that some data will not get backed up.
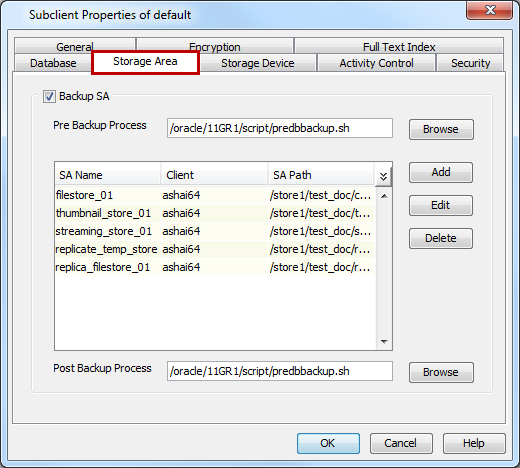
Storage Area Backup
Splitting up storage areas across different subclients allows for complete control of how often they are backed up. For example, you may want to backup specific storage areas four times a day and backup the database at the end of the day.
Therefore, a user-defined subclient must be created to specify only storage areas that are separate from the database.
-
From the CommCell Browser, navigate to Client Computers | <Client> | Documentum.
-
Right-click the <Instance>, point to All Tasks and then click New Subclient.
-
In the General tab, type the name (up to 32 characters) of the subclient that you want to create.
-
Click the Storage Area tab.
-
Select the Backup SA check box.
-
Click Add and enter the SA Name, Client, and its SA Path in which the storage area resides.
-
Click the Storage Device tab.
-
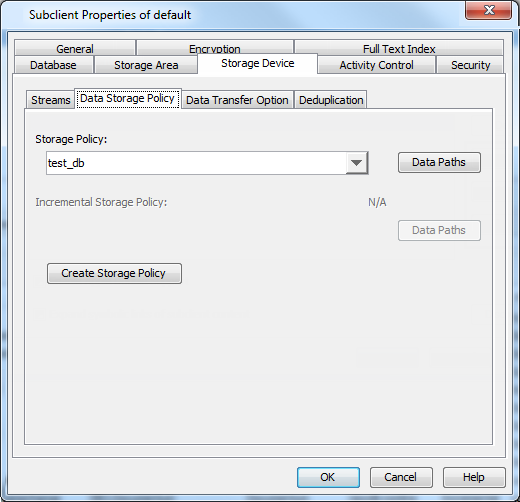
Select a <Storage Policy> to associate with this subclient from the storage policy list.
-
Click the Streams tab and configure streams for the storage areas.
-
Click OK to save the subclient configuration.
Notes
-
Ensure that Backup FTI and Backup DB are not selected in the Full Text Index and Database tabs.
-
In order to discover far stores and their associated clients in a distributed environment, ensure that they are configured correctly.
-
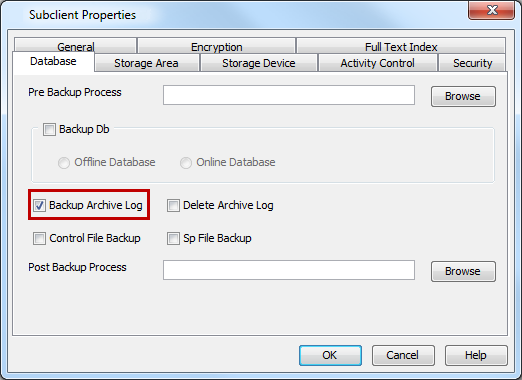
Archive Log Backup
Specifying only log files in a subclient allows you to back them up more frequently than backing up the entire database. Archive log backups enable you to recover database transactions that have been lost due to an operating system or disk failure. You can apply these archive logs to an online backup in order to recover a database.
Full backups generally includes both the data and logs. However, because of their importance in recovering data, it is recommended that you create separate subclients for backing up archived log files.
-
From the CommCell Browser, navigate to Client Computers | <Client> | Documentum.
-
Right-click the <Instance>, point to All Tasks and then click New Subclient.
-
Click the General tab, type the name (up to 32 characters) of the subclient that you want to create.
-
Click the Database tab.
-
Click Backup Archive Log check box.
-
Click the Storage Device tab.
-
Select a <Storage Policy> to associate with this subclient from the storage policy list.
-
Click the Streams tab and configure streams for the log.
-
Click OK to save the subclient configuration.
Note
Ensure that Backup FTI and Backup SA are not selected in the Full Text Index and Storage Area tabs.
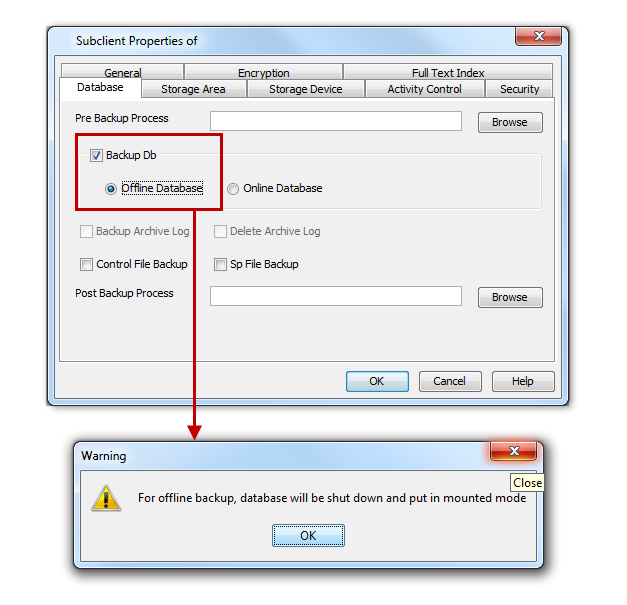
Offline Database Backup
Offline backups are performed when the database is shut down and unavailable for use. Offline backups are always full backups and do not include the archived log files.
In order to backup the database when it is offline, you need to create a separate user-defined subclient for offline backup.
-
Make sure that the database used for creating the subclient is up and running. This ensures that the system accesses the most recent configuration of the database.
-
From the CommCell Browser, navigate to Client Computers | <Client> | Documentum.
-
Right-click the <Instance>, point to All Tasks and then click New Subclient.
-
Click the General tab, type the name (up to 32 characters) of the subclient that you want to create.
-
Click the Database tab.
-
Select the Backup DB check box and click Offline Database.
-
You will be prompted with a Warning message.
For offline backup, database will be shut down and put in mounted mode.
Click OK.
-
Click the Storage Device tab.
-
Select a <Storage Policy> to associate with this subclient from the storage policy list.
-
Click the Streams tab and configure streams for the database.
-
Click OK to save the subclient configuration.
Note
Ensure that Backup FTI and Backup SA are not selected in the Full Text Index and Storage Area tabs.
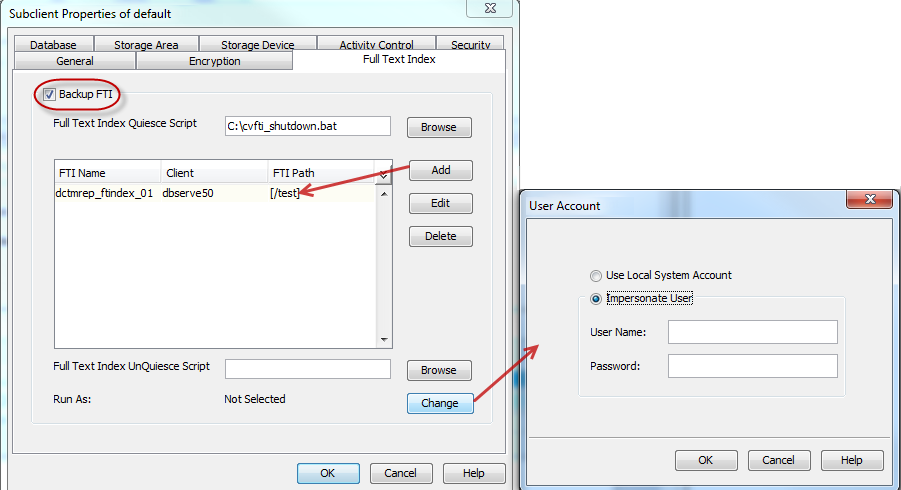
Full Text Index Backup
Including only full-text indexes in a subclient allows for complete control of how often they are backed up. For example, you may want to backup full-text indexes periodically.
Therefore, a user-defined subclient must be created to specify only full-text indexes.
-
From the CommCell Browser, navigate to Client Computers | <Client> | Documentum.
-
Right-click the <Instance>, point to All Tasks and then click New Subclient.
-
Click the General tab, type the name (up to 32 characters) of the subclient that you want to create.
-
Click the Full Text Index tab.
-
Select the Backup FTI check box.
-
Click Add and enter the FTI Name, Client, and its FTI Path in which the full-text index resides.
-
For the Windows client, click Change and select Impersonate User to enter the login credentials. Click OK. This option is not present for the UNIX clients.
-
Click the Storage Device tab, select a <Storage Policy> to associate with this subclient from the storage policy list.
-
Click OK to save the subclient configuration.
Note
Ensure that Backup DB and Backup SA are not selected in the Database and Storage Area tabs.
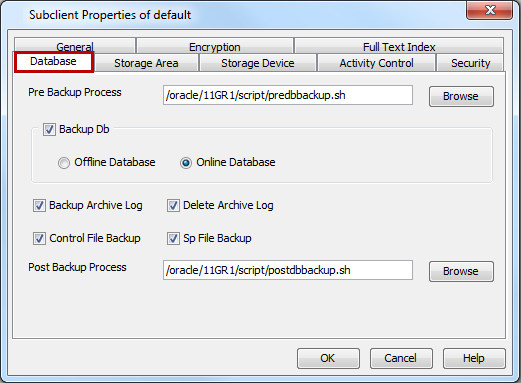
Online Database Backup
Online backups are performed when the database is online. For Oracle databases, the database must be in ARCHIVELOG mode. Data files are included when you back up the database in online mode. Archived log files, Oracle control files, and Oracle Server Parameter (SP) files can also be included in the backup. These backups do not require database downtime and are extremely useful when you need to perform a point-in-time restore of the Oracle database.
You can perform a full or incremental backups when the database is online. In order to backup the Oracle database when it is online, you need to create a separate user-defined subclient for online backup.
-
Make sure that the database used for creating the subclient is up and running. This ensures that the system accesses the most recent configuration of the database.
-
From the CommCell Browser, navigate to Client Computers | <Client> | Documentum.
-
Right-click the <Instance>, point to All Tasks and then click New Subclient.
-
Click the General tab and type the name (up to 32 characters) of the subclient that you want to create.
-
Click the Database tab.
-
Select the Backup DB check box.
By default, Online Database is selected.
-
Select the Backup Archive Log.
-
Select the Control File Backup.
-
Select the Sp File Backup.
-
-
Click the Storage Device tab.
-
Select a <Storage Policy> to associate with this subclient from the storage policy list.
-
Click the Streams tab and configure streams for the database.
-
Click OK to save the subclient configuration.
Note
Ensure that Backup FTI and Backup SA are not selected in the Full Text Index and Storage Area tabs.
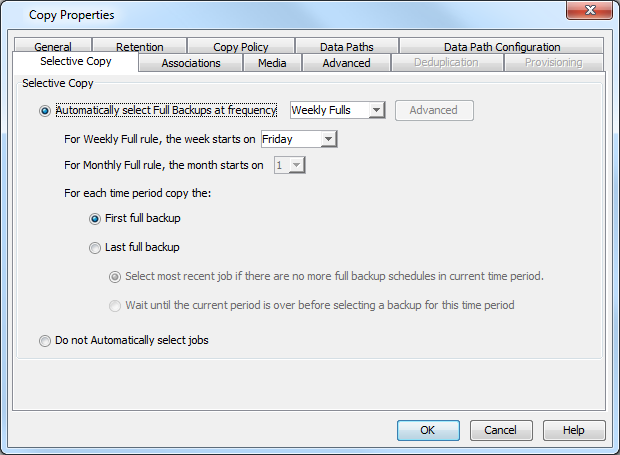
Selective Copy - Full Backup
A selective copy allows you to copy backup data selectively from a source copy to this copy, providing for better tape rotation. Since only selective backups can be copied to selective copies, the selective copies cannot be promoted to the primary copy, only synchronous copies can be promoted. Note that the data selection process does not have to be the same for all auxiliary copies.
During an auxiliary copy operation or a data protection operation that creates an inline copy, only those backups from the primary copy that meet certain criteria will be copied to a selective copy. You can define a selective copy to be time-based, automatically selected, or automatically not selected on the primary copy.
If the copy is defined as All Fulls, all full backups on the primary copy will be copied during an auxiliary copy operation or a data protection operation that creates an inline copy. If the copy is defined as time-based, only the first or last full backup that occurs within each selected weekly, monthly, quarterly, half-yearly, or yearly interval will be copied. You have the option of creating and associating a custom calendar to the copy, so that the intervals can be further customized.
Selective copy behavior also depends on the FTI configuration. If FTI components are configured, then you should back up the FTI components to make job eligible for selective copy, and also to recover the complete Documentum repository. If FTI components are not configured, then backing up the database and storage area is enough to make jobs eligible for selective copy, and also to recover the complete Documentum repository.
Only Openchain=0 jobs are eligible for selective copy. You can find this information in the CommServe database.
Configuring Subclient for Selective copy with Full Backups
-
Create a Selective Copy.
-
From the CommCell Browser, navigate to Policies | Storage Policies.
-
Right-click the <Storage_Policy> and click All Tasks | Create New Copy.
-
Type the Copy Name in Copy Name box.
Select the Selective Copy check box. The Selective Copy tab is enabled.
In Default Destination,
-
From the Library list, select the name of Library that will be used to create the selective copy.
-
From the MediaAgent list, select the name of a MediaAgent that will be used to create the selective copy.
-
From the Drive Pool list, select the name of a Drive Pool that will be used to create a selective copy.
-
From the Scratch Pool list, select the name of the Scratch Pool that will be used to create a selective copy.
Note
Drive Pool and Scratch Pool are not applicable for disk libraries.
Click OK.
-
-
Click Selective Copy tab.
By default, weekly fulls will be copied.
Click OK.
-
Click Copy Policy tab.
Clear All Backup check box under Backup Selection.
Click OK.
-
Click Selective Copy tab.
-
Click OK in the Auxiliary Copy Schedule dialog box.
-
From the CommCell Browser, navigate to Policies | Storage Policies | <Storage_Policy>.
The Selective Copy appears in the right pane of the CommCell Browser.
-
-
Associate a subclient with the <Storage_Policy_Copy>.
-
From the CommCell Browser, navigate to Client Computers | <Client> | Documentum.
-
Right-click the <Instance>, point to All Tasks and then click New Subclient.
-
In the Subclient Name box, type a name.
-
Click the Storage Device tab.
-
Select a storage policy from the Storage Policy list in the Data Storage Policy tab.
-
Click OK.
-
Configuring User Accounts for Backups
The Documentum iDataAgent requires the following application accounts to perform backup and restore operations:
-
A Docbase account to access the Documentum Docbase (or Repository).
-
A database account to access either Oracle or DB2 or SQL database.
The credentials for the Docbase and database accounts are provided during the instance configuration after the installation of the Agent. You can change the user accounts at the instance level for both application accounts.
Docbase User Account
The Documentum Agent requires a user account to log on to the related Documentum docbase to access the data. The user account is the Documentum Install owner account that was used to install the Documentum software.
The account is already set up on the client after the Documentum software installation.
Oracle User Account Privileges
The Documentum iDataAgent requires an Oracle user account to access the Oracle application and database. You may have separate user accounts to access these components.
The following tables illustrates the required privileges these user accounts should have.
-
An operating system account with administrator privileges for the Oracle application.
The following table defines the user account requirements for each operating system:
|
Operating System |
User Account |
|---|---|
|
Windows |
Note when using Oracle 12c, grant full control permission for the Oracle home user for the Commvault folder. |
|
UNIX |
Member of the user group assigned during the Agent installation. The operating system user account can also be used. |
-
An Oracle user account with the SYSDBA or SYSBACKUP (in Oracle version 12 or higher) privilege can access the Oracle target database. Provide the account information as a connect string with the following connection details:
-
The database user ID and password
-
The Oracle Service Name (as defined in the tnsnames.ora file)
Use separate accounts to access the target database and the recovery catalog database. The recovery catalog database user account must have RECOVERY_CATALOG_OWNER privileges, which are not required for the target database user.
By default, the user account for the target database has administration privileges and must be established so the Oracle database administrator can configure additional accounts (except Impersonate User).
-
Initially, the user account credentials are provided during the instance configuration after the installation of the Agent. You can subsequently change the user account information to access the Oracle database and application at the Instance level whenever the credentials are updated.
Change the Docbase Account
Use the following steps to change the Docbase (or Documentum Repository) user account details from the instance level:
-
Navigate to Client Computers | <Client> | Documentum.
-
Right-click the <Instance> and then click Properties.
-
Click Change.
-
In the User Name box, type the name of the user account.
-
In the Enter Password box, type the password for the user account.
-
In the Confirm Password box, retype the password, and then click OK.
-
Click Discover to validate the Docbase account you provided and to update the Storage Area and Full-text Indexes.
If the validation is successful, the Docbase Version and Docbase ID of the instance are updated based on the new user account.
-
Click OK.
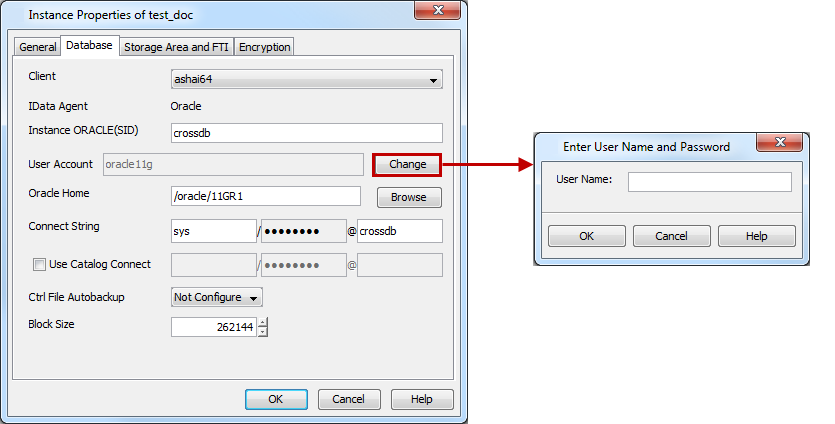
Change the Database Account
Use the following steps to change the Oracle database/application account credentials from the instance level:
-
Navigate to Client Computers | <Client> | Documentum.
-
Right-click the <Instance> and then click Properties.
-
Click the Database tab.
-
Click Change.
-
In the User Name box, type the name of the user account to access the Oracle application, and then click OK.
-
To change the database access credentials, type the following in the Connect String box to connect to the Oracle database:
-
Type the Database user ID.
-
Click the password box and type the password for the user ID in the Enter Password box.
-
In the Confirm Password box, retype the password, and then click OK.
-
Type the Oracle service name.
-
-
Click OK.
Modifying an Agent, an Instance, or a Subclient
You can modify the configurable properties available for your agent from the agent, instance, or subclient level as per need. For subclients, typically you modify configurable properties in a user-defined subclient and not the default subclient.
The following table describes the properties that can configured from the agent and instance levels.
To modify these properties:
-
From the CommCell Browser, double-click the agent, instance, or subclient you wish to modify.
Alternatively, you can also right-click the agent, instance, or subclient and then click Properties.
-
Navigate to the tab containing the property you wish to modify.
-
Modify the desired property and click OK.
|
Option |
Description |
|
Change the Documentum Repository Instance Name |
You can change the instance name for a Documentum Repository at the instance level. To change the name of the Repository in the General tab:
|
|
Change the Documentum Repository Paths |
You can change the paths of the Documentum Repository at the instance level. To change the path names in the General tab:
|
|
Change the Path to Oracle Home Directory |
You can change the installation path of the Oracle database at the instance level. To change the Oracle path in the Database tab:
|
|
Change Oracle Connect Details |
Specifies the database connect string. You can change the database connect string by entering 1) database user ID, 2) password for the user ID @ 3) Oracle service name in the three spaces provided. The user ID must have SYSDBA, ALTER SYSTEM and SELECT ANY TABLE system privileges. Alternatively, instead of the SELECT ANY TABLE privilege, you can create less powerful user IDs with the following object privileges:
|
|
Change the Storage Area and Full-Text Index after Discovery |
You can change the details of the Storage Areas and Full-Text Indexes at the instance level. When Discover is selected in the General tab, the Storage Areas and Full-Text Indexes are automatically discovered and the displayed in the Storage Area and FTI tab. To change the Storage Area or Full-Text Index details in the Storage Area and FTI tab:
Storage Areas and Full-Text Indexes can also be deleted in the Storage Area and FTI tab. |
|
Select Full-Text Index to Backup |
You can add, edit, or delete Full-Text Index details at the subclient level to determine which ones are backed up. Quiesce and UnQuiesce scripts can also be entered. To change the Full-Text Index details in the Full Text Index tab:
|
|
Select Oracle Database Components to Backup |
You can choose to backup the database in offline or online mode and specify whether to include control files (*.ctl), archived logs, parameter files (SP Files) in the backup. Pre and Post Backup scripts can also be entered. To change the Oracle Database details in the Database tab:
|
|
Select Storage Areas to Backup |
You can add, edit, or delete Storage Areas (file store) details at the subclient level to determine which ones are backed up. Pre and Post Backup scripts can also be entered. To change the Storage Areas details in the Storage Area tab:
|
|
Configure User Security |
You can configure user security from the agent or subclient level. You can perform the following functions:
|
|
Configure Activity Control |
You can enable backup and restore operations from the agent and subclient level. However, you can enable restore operations only from the agent level.
Refer to Activity Control documentation for a comprehensive overview prior to using this feature. |
|
View Software Version and Installed Updates |
The Version tab, at the Agent level displays the software version and post-release service packs and updates installed for the component. |
|
View Version of Documentum Repository |
Once an application has been discovered, the version of the application on which the iDataAgent was installed or upgraded on the client computer is displayed. This can be particularly useful in disaster recovery situations when you need to rebuild the environment. To view the version of an application,
|
|
Rename a Subclient |
You cannot rename a default subclient. You can only rename user-defined subclients. To rename a subclient,
|
|
Change Storage Policies |
You can modify the storage policies in any of the following situations:
You can change the storage policies for command line backup and log backup from the instance level.
|
|
Configure Data Transfer Options |
You can efficiently configure the available resources for transferring data secured by data protection operations from the subclient level. This includes the following:
To configure data transfer options,
|
|
View Data Paths |
You can view the data paths associated with the primary storage policy copy of the selected storage policy or incremental storage policy. You can also modify the data paths including their priority from the subclient level. From the Data Storage Policy tab, click Data Paths to view the data paths used by the subclient to access the storage media for data protection operations. |
|
Set the Number of Streams |
You can set the number of streams for database, log, or Storage Area backup at the subclient level.
Refer to Streams documentation for a comprehensive overview prior to using this feature. |
|
Configure a Subclient for Pre and Post Processing of Data Protection |
You can add, modify or view Pre-processes or Post-processes for the subclient. These are batch files or shell scripts that you can run before or after certain job phases. You can also change the user account for running Pre-processes or Post-processes for data protection operations of agents residing on Windows platforms. Consider the following before modifying the Pre-processes and Post-processes for the subclient.
Refer to Pre/Post Processes documentation for a comprehensive overview prior to using this feature. |
|
Enable and Disable Data Encryption |
You can enable data encryption from the instance and subclient level. When accessing the Encryption tab from the instance level, you are selecting either Network and/or Media-side encryption for third-party Command Line operations. When accessing this same tab from the subclient level, the settings selected apply only to the selected subclient content for operations run from the CommCell Console. Consider the following before enabling encryption:
Encryption can be set from the Encryption tab of the associated Properties dialog box at the instance and subclient level. Refer to the Data Encryption documentation for a comprehensive overview prior to using this feature |
Deleting an Instance or a Subclient
The following sections describe the steps involved in deleting an instance or subclient.
Note
When you delete an instance or subclient, the associated data is logically deleted and you can no longer access the corresponding data from CommCell Console for recovery purposes.
For information on how to recover data if you accidentally delete an entity, see Recovering Data Associated with Deleted Clients and Storage Policies.
Delete an Instance
Consider the following before deleting an instance:
-
When you delete a specific instance all job schedules and job histories that pertain to any of the levels within the deleted instance are deleted.
-
You cannot delete an instance if it is being backed up. Attempts to delete an instance under such conditions cause the deletion to fail. If a backup is in progress, either wait for the backup to complete or kill the backup job using the Job Manager. Once the backup is no longer in progress, you can delete the instance level.
-
You cannot delete an instance if there is only one instance present for an agent. To delete the final instance, you must remove the agent software from the client computer.
-
From the CommCell Browser, right-click the instance that you want to delete, click All Tasks and then click Delete.
-
Click Yes to confirm the deletion. (Clicking No cancels the deletion and retains the node.)
-
Type the requested phrase in the Enter Confirmation Text dialog box and click OK. This should delete the instance.
Delete a Subclient
Consider the following before deleting a subclient:
-
You cannot delete a default subclient.
-
Schedules associated with the subclient are also automatically deleted.
-
From the CommCell Browser, right-click the user-defined subclient that you want to delete, and then click Delete from the shortcut menu.
-
A confirmation message is displayed, asking if you want to delete the subclient.
Click No to cancel the deletion and retain the subclient, or click Yes to continue the deletion.