Applies to: Nutanix Prism 6.0
You can register the VM you created using the Commvault Nutanix Mine All-in-One Image on the Nutanix cluster.
Gather the Information
Gather the following information:
-
For the Nutanix cluster: The hostname, the username, and the password.
-
For the Nutanix objects service host: the IP address, the bucket name, the access key, and the secret key.
-
For the Commvault software: The email address you want to use for the CommCell administrator.
Launching the VM Console
-
On the Nutanix cluster, log on to Prism Central.
-
On the Explore tab, in the upper-left area of the page, select VM.
The VM dashboard appears.
-
In the search box, type the name of the VM you created, and then select it.
The VM Table view appears.
-
In the Summary section, click Power on.
An IP address is assigned to the VM.
-
In the Summary section, click Launch Console.
The VM console opens and a powershell command executes.
Registering the VM with Nutanix
-
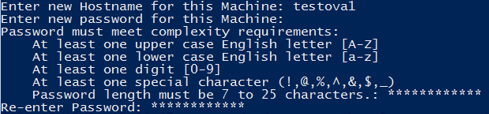
In the command line interface, enter information for the new VM:
-
VM hostname
-
Password
-
Re-enter password.
-
-
Press Enter.
-
Enter information for the Nutanix mine cluster:
-
Hostname or IP address
-
Username
-
Password

-
-
Press Enter.
A script runs that connects to the Nutanix cluster.
-
Beside Do you want to add this cluster as source cluster for automated backups?, type yes.
-
Enter information for the Nutanix Objects Service Host:
-
IP address
-
Bucket name
-
Access key
-
Secret key

-
-
Press Enter.
The Nutanix cluster and cloud storage information are written to the Nutanix.ini file. The location of this file appears in the command line interface.
A message appears that says Restarting the machine...Press Enter to continue...
-
Press Enter.
The VM Console closes.
After the VM restarts, in the Commvault software, a customization script creates a hypervisor and assigns a plan to the hypervisor. The VM Console opens and a message appears that says the Nutanix hypervisor was created successfully.
The Command Center opens and the Create new account dialog box appears.
Registering the VM with the Commvault Software
-
Enter the email address and password that you want to use for the Commvault administrator account.
-
Click Create account.