You can upgrade old Microsoft SQL Server editions to Microsoft SQL Server 2019 Standard Edition on the CommServe computer. The following procedure ensures that older components such as .NET Framework are removed. You should consider performing a hardware refresh or a VM refresh at same time you upgrade to Microsoft SQL Server 2019 Standard Edition.
Note
Beginning Feature Release 11.24, Commvault uses Microsoft SQL Server 2019 Standard Edition on Windows OS 2016 or higher.
Before You Begin
-
Write down all Commvault-related components that are currently installed on the CommServe computer (for instance, Workflow Engine and Web Server). You will need to re-install these components in Step 6 of the Procedure, below. To view the components that are currently installed, do the following:
-
From the CommCell Browser, right-click the CommServe and then click Properties.
-
In the CommCell Properties dialog box, click the Version tab. The packages are listed in the Update status area.
-
-
Verify that the disaster recovery backup files are saved in a location different than the Commvault software location.
As part of the SQL Server upgrade process, you will uninstall the Commvault software, and all Commvault files will be deleted. If you save the DR backup in the same location, the CommServe database dump file (the only remaining copy of your CommServe database) will also be deleted.
For information about setting the location of DR backup files, see either of the following:
-
Command Center: Configuring a Local Drive or Network Share as the Export Destination for Disaster Recovery
The location of DR backup files is found in Maintenance > DR backup (Daily) > Destination, as follows:
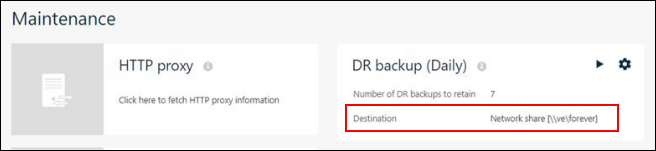
-
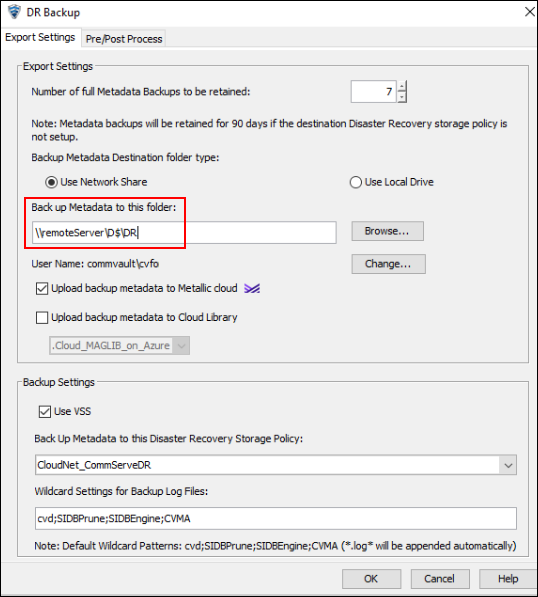
CommCell Console: Configuring a Local Drive or Network Share as the Export Destination for Disaster Recovery.
The location of DR backup files is found in the Back up Metadata to this folder box, as follows:
-
-
To upgrade the Microsoft SQL Server edition in Commserve LiveSync environments, follow the steps described in Upgrading Microsoft SQL Server Editions in CommServe LiveSync Environments.
-
If the CommServe server is also a MediaAgent, perform Step 5 and Step 6 in CommServe Hardware Refresh: Preparing the Old CommServe Computer for Shutdown.
Procedure
Note
Instead of performing Step 1 and Step 2, below, you may run the SQL Edition Upgrade workflow instead. This workflow disables CommCell activities, creates a disaster recovery backup, and sends an email with consolidated information. For more information, see Running SQL Edition Upgrade Workflow.
-
Disable CommCell activities as follows:
-
From the CommCell browser, do the following:
-
Right-click the CommServe node, and then click Properties.
The CommCell Properties dialog box appears, as follows:
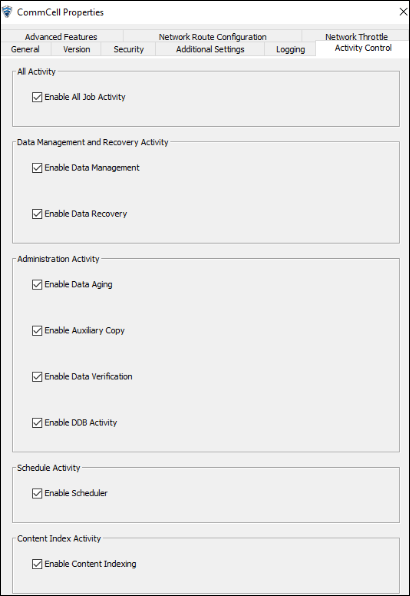
-
On the Activity Control tab, clear all options except Enable All Job Activity, and then click OK.
This ensures that no new jobs are performed, except for disaster recovery operations, VM provisioning jobs, and workflow jobs.
-
From the Job Controller, kill all jobs that are in progress, or wait for the jobs to finish.
-
-
From the Command Center, do the following:
-
From the navigation pane, go to Manage > CommCell.
The CommCell management screen appears, showing the Activity Control section, as follows:
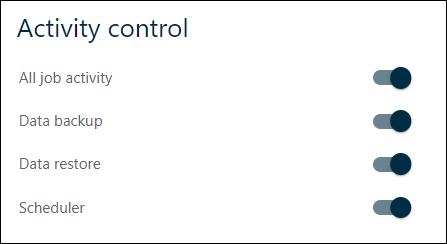
-
Under Activity Control, clear all options except All Job Activity.
This ensures that no new jobs are performed, except for disaster recovery operations, VM provisioning jobs, and workflow jobs.
-
-
-
Perform a disaster recovery (DR) backup as follows:
Note
IMPORTANT: Before you perform a DR backup, write down the location of the DR backup folder. For more information, see "Before You Begin", above.
-
From the CommCell Browser, do the following:
-
Right-click the CommServe node, and then click All Tasks > Disaster Recovery Backup.
-
In the Disaster Recovery Options dialog box, click OK.
-
-
From the Command Center, do the following:
-
Go to Manage > System.
The System page appears.
-
Click the Maintenance tile.
The Maintenance page appears.
-
Click the DR backup (Daily) tile.
-
Click the Run job icon
 .
.
-
-
-
Uninstall the CommServe software. For more information, see Uninstalling the CommServe Software.
Note
You can ignore the requirement to uninstall the MediaAgent and client computers, which is mentioned in the first bullet point in "Before You Begin" in the uninstallation procedure.
-
Uninstall the currently installed Microsoft SQL Server software. For instructions, refer to the Microsoft documentation.
-
Install the latest Long-Term Support (LTS) Commvault platform release or the latest Commvault platform release on the same hardware or on new hardware (for more information, see Installing Commvault Locally Using the Download Manager). During the installation procedure, enter the location of the CommServe database DR backup file (also called the dump file). This DR backup file is automatically upgraded if necessary. To submit the DR backup file, perform the following steps during the installation:
-
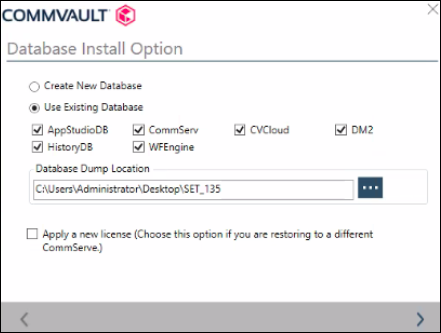
On the Database Install Option page (see below), select Use Existing Database, select CommServe.
If you had other Commvault-related server packages installed on the CommServe computer (for example, Workflow Engine and Web Server), select the options associated with them.
-
Under Database Dump Location, specify the location of the CommServe database DR backup file (and of any other database that you selected), and then click Next.
The dump files are located with your DR backup files. For example, the default name for the CommServe dump file is CommServ_[CSNAME]_[YYYY]_[MM]_[DD]_[HH]_[mm]_FULL.dmp
Where:
- [CSNAME] is the CommServe server name
- [YYYY] is the year the backup file was created
- [MM] is the month the backup file was created
- [DD] is the day the backup file was created
- [HH] is the hour the backup file was created
- [mm] is the minutes the backup file was created
-
On the Database Restore Options page (see below), select Recovery/Production in order to restore the environment.
-
-
Enable CommCell activities as follows:
-
From the CommCell Browser, do the following:
-
Right-click the CommServe node and then click Properties.
The CommCell Properties dialog box appears.
-
On the Activity Control tab, enable all the activities that you cleared when the CommServe database was on the old hardware, and then click OK.
-
-
From the Command Center, do the following:
-
Go to Manage > CommCell.
The CommCell management screen appears, showing the Activity Control section.
-
Under Activity Control, enable all activities.
-
-
-
If the CommServe server is also a MediaAgent, do the following:
-
If you have a tape library, the library should already be plugged into the new hardware. Make sure to reconfigure the library from the CommCell Console.
For more information, see "Configuring Devices" in Expert Storage Configuration - Advanced.
-
If you have a disk library, copy the local mount path folder to the same drive as on the old CommServe computer.
-
Install the MediaAgent software in the new CommServe computer using the steps described in MediaAgent Installation.
-