Hyper-V nodes can send backup data to directly connected storage, without using the local area network (LAN) to route the backup data through another node. You can configure LAN-free backups by using Hyper-V cluster shared volumes (CSV) as magnetic libraries, which is the simplest way to configure LAN-free backups.
LAN-free backups provide the following benefits:
-
Simplify library configuration
-
Automatically distribute jobs across all nodes for load balancing
-
Reduces the amount of time required for backups
-
Minimizes the impact on the network and other resources
About This Task
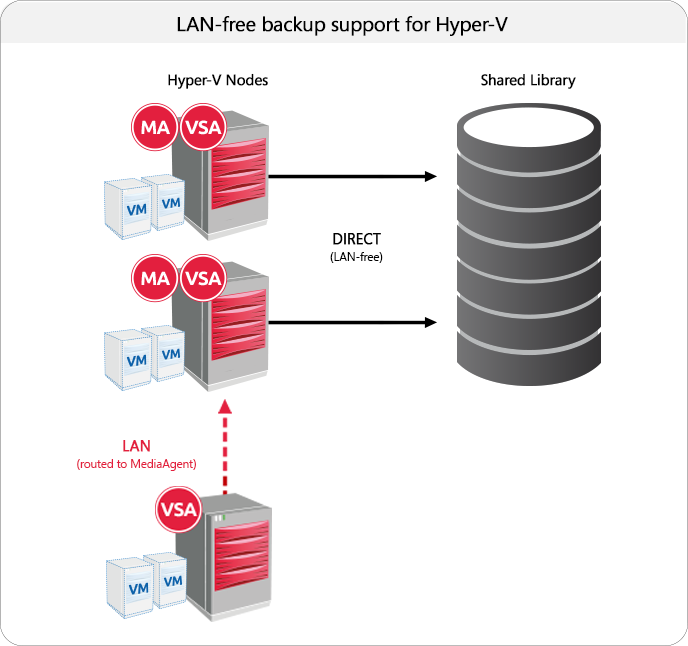
When a Hyper-V node initiates a job for a virtual machine, the coordinator VSA determines which MediaAgent is local to the virtual machine. The job stream is moved to the local MediaAgent, which sends data directly to shared storage without routing it through the LAN. Index updates for all nodes are managed at the coordinator VSA.
Important:
If the coordinator VSA becomes unavailable, all jobs restart, and a new VSA becomes the coordinator.
Before You Begin
When a Hyper-V node initiates a job for a virtual machine, the coordinator VSA determines which MediaAgent is local to the virtual machine. The job stream is moved to the local MediaAgent, which sends data directly to shared storage without routing it through the LAN. Index updates for all nodes are managed at the coordinator VSA.
Important:
If the coordinator VSA becomes unavailable, all jobs restart, and a new VSA becomes the coordinator.
Procedure
To enable all Hyper-V nodes in a cluster to perform LAN-free backups, complete the following configurations:
-
Configure a library to use cluster shared volume (CSV) storage.
-
From the CommCell Browser, expand Storage Resources >Libraries.
-
Right-click Libraries and select Add > Disk Library.
-
In the Add Disk Library dialog, enter the library name and select a MediaAgent.
The MediaAgent for the node acts as the coordinator for job streams directed to the library.
-
Specify the local storage:
-
Select Local Path.
-
For Disk Device, click the ... button to browse and select a volume in the C:\ClusterStorage folder.
For example, C:\ClusterStorage\Volume n, where n is the volume number.
-
-
Click OK.
A library and mount path are created under Libraries.
-
-
Configure the mount path sharing, by using the same cluster storage volume for each shared MediaAgent in the cluster:.
-
Right-click the mount path under the library that you created and select Properties.
-
In the Mount Path Properties dialog box, on the Sharing tab, click Share.
-
Select the MediaAgents for the remaining nodes in the cluster.
For each MediaAgent, select the same cluster storage volume. For example, C:\ClusterStorage\Volume n.
-
Click OK to add the shared MediaAgents.
-
Click OK to save the mount path settings.
-
-
Create a storage policy:
-
From the CommCell Browser, expand Policies > Storage Policies.
-
Right-click Storage Policies and select New Storage Policy.
-
In the Create Storage Policy Wizard, select Data Protection and Archiving and click Next.
-
Accept the remaining default values and click Finish to create the storage policy.
-
-
Add data paths for all nodes to the Primary copy for the storage policy:
-
From the CommCell Browser, expand the storage policy that you created. Right-click the Primary copy and select Properties.
-
To add data path candidates for the remaining nodes in the cluster, on the Data Paths tab, click Add.
-
Click OK to save the data path candidates.
-
Click OK to save the Copy Properties.
-
-
Add all the cluster nodes to the virtual server instance:
-
From the CommCell Browser, expand Client Computers > Virtual Client > Virtual Server.
-
Right-click the Instance and select Properties.
-
On the Nodes tab, click Add to include nodes in the cluster.
-
In the Select Clients / Client Groups dialog box, in the Exclude list, select clients and click Include to add them as nodes for the virtual server instance.
-
Click OK to save the client selections.
-
Click OK to save the Virtual Server Instance Properties.
-
Repeat substeps a to f for each client.
-
-
Specify the LAN-free storage policy for all subclients that will use LAN-free backups:
-
From the CommCell Browser, expand Client Computers > Virtual Client > Virtual Server > Instance > Backup Set.
-
Right-click a subclient and select Properties.
-
On the Storage Device tab, choose the storage policy that was created for LAN-free jobs.
-
Click OK to save the subclient properties.
-
Repeat substeps a to d for each subclient that will use LAN-free backups.
-