HyperScale 1.5 Appliance that has the CommServe and MediaAgentsoftware, and can access an USB drive containing the OVA files can be re-imaged.
Before You Begin
-
You will need a 128 GB USB Flash Drive (USB Key) for re-imaging process.
Note
USB external hard drives are not supported while re-imaging the appliance.
-
Disconnect any cables that are attached to FC HBA's before imaging.
Procedure
-
Copy the OVA files to an USB Flash Drive as follows:
-
Using a Windows computer, format the device and add a label as follows:
-
Attach the USB Flash Drive and allow it to be detected.
Once the device is detected, an Autoplay dialog box will be displayed.
-
From Windows Explorer, navigate to My Computer.
-
Right-click the USB Flash Drive and then click Format.
-
Select xFAT from the File System drop-down list.
-
Under Volume label, type CVLT_OVA.
-
Click Start.
The USB Flash Drive will be formatted.
-
-
Once the formatting is completed, create an
ovadirectory. -
Download the following files from the Commvault Store.
-
HyperScale Appliance Hosted Engine OVA
-
HyperScale Appliance Commserve OVA
-
-
Rename the files as follows:
<Appliance_Model> Appliance <Release_number>_<Date>.ova to
cvhcics.ovaHyperScale_Appliance_<Release_number>_HEOVA_<Date>.ova.to
rhvm-appliance-4.2-20190416.1.el7.ova -
Copy the files to the
ovadirectory in the USB Flash Drive.
-
-
Create a bootable ISO as follows:
-
Login to a remote workstation, that has access to the HyperScale nodes.
-
Download the HyperScale Appliance ISO file from theCommvault Store.
-
Mount the ISO using iRMC as follows.
-
Open a web browser from a remote workstation and enter the static IP of the iRMC.
The login screen is displayed.

-
Type in the credentials for the default administrator account as follows:
Username: admin
Password: admin
Click Login.
The iRMC Web Server interface is displayed.

-
-
Launch the Advanced Video Redirection window as follows:
-
Click the Advanced Video Redirection (AVR) button displayed on the top-right section of the iRMC Web Server interface, and then click Start Video Redirection.

This will launch a Java Applet. (If you do not want to use Java Applet, you can use HTML5 viewer. Click Settings > Services > Advanced Video Redirection (AVR) > Favour HTML5 over Java Applet.)
-
Click the Run button in the Do you want to run this application? prompt.
The AVR window will be displayed.

-
Login using the root credentials established during the initial setup.
The default credentials are as follows. (However, note that the password may have been reset during the initial setup.)
Login: root
Password: cvadmin
-
-
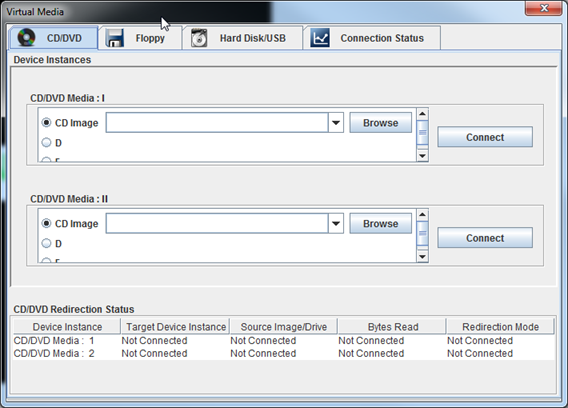
Mount the media
-
From the menu, click Media > Virtual Media Wizard.
The Virtual Media dialog box is displayed.
-
Click Browse and navigate to the folder containing the downloaded .ISO file.
-
Select the file and then click Open.
-
Click Connect.
-
-
-
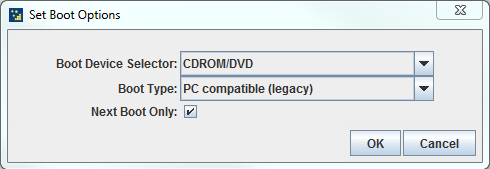
Change the boot options to boot from the virtual CD drive.
-
From the menu, click Power > Set Boot Options.
The Set Boot Options dialog box is displayed.
-
From the Boot Device Selector list, select CDROM/DVD.
-
Select the Next Boot Only check box.
-
Click OK.
-
-
Restart the node. From the menu, click Power > Power Cycle.
-
When prompted, choose the Preserve drives option. This will preserve the storage pool disks with the backup data, in the state that it was before re-imaging. (The Reinitialize drives option should be used for imaging a new node.)
The node will boot from the ISO and the imaging will start automatically.
This process may take some time (approximately 15 minutes) to complete.
A 'completed successfully' message will be displayed when the imaging process is finished.
-
Restart the node. (Launch the Advanced Video Redirection window and then click Power > Power Cycle from the menu.
What to Do Next
-
Important: Verify and ensure that all nodes have the same time and timezone settings.
-
If DHCP is enabled, setup a block to ensure that the correct nodes are identified and configured when the setup is run. For more information about setting up a block, see Setting up a Block.
-
If DHCP is disabled, then perform the following operations:
-
Assign a static IP to the re-image node. For more information about assigning a static IP, see Assigning a Static IP If DHCP is Disabled.
-
Setup a block to ensure that the correct nodes are identified and configured when the setup is run. For more information about setting up a block, see Setting up a Block.
-