Restore Active Directory by performing an Interactive Recovery using 1-Touch for Windows.
Primary Restore
Perform a primary restore to recover a standalone domain controller (DC) or the first domain controller in the network during a 1-Touch recovery. This method is essential for initializing SYSVOL replication in a new or isolated recovery scenario. This method is suggested in the following scenarios:
-
Recovery of a single DC in a non-replicated environment
-
First DC being restored in a multi-DC environment
-
Test lab setups where replication is not yet established
Authoritative Restore
Perform an authoritative restore when you need to force restored AD objects to replicate across all DCs, overriding any newer changes. This method is suggested in the following scenarios:
-
Accidental deletion of AD objects
-
AD Forest-wide corruption
-
Test environment recovery
Non-Authoritative Restore
Perform a non-authoritative restore to recover a DC to a previous state, allowing it to synchronize with other DCs during replication. This method is suggested in the following scenarios:
-
Recovery of a failed DC
-
Isolated DC failure
Note
Non-interactive Recovery and Virtualize Me default to non-authoritative restore.
Considerations for AD Recovery Using 1-Touch
Forest Recovery
-
Begin by restoring the forest root domain.
-
Use authoritative restore if the entire forest is compromised.
-
Ensure restoration of DNS and Global Catalog roles for proper functionality.
Child Domain Recovery
-
Can be restored independently if the forest root is intact.
-
Use non-authoritative restore unless specific objects require authoritative replication.
Prerequisites
-
Install the File System and Active Directory packages on the client.
-
Your system state backup must contain all files required to turn on the computer and run the Active Directory application. Do not filter out any OS directories or application files.
If filters are added to the subclient configuration and they filter out operating system components, then the restored machine may encounter operating system issues.
Procedure
-
Use the 1-Touch Live CD to boot the client computer.
-
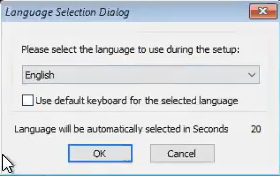
Optional: In the Language Selection Dialog dialog box, select a language from the list. To use the same language for the keyboard, click Use default keyboard for the selected language check box and click OK.
The 1-Touch Recovery Wizard appears.
-
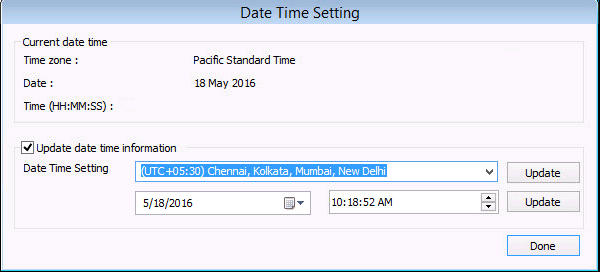
On the WinPE computer notification area, click on the clock and date settings. If you select a time from the Date Time Setting drop down list, click Update and then click Done.
-
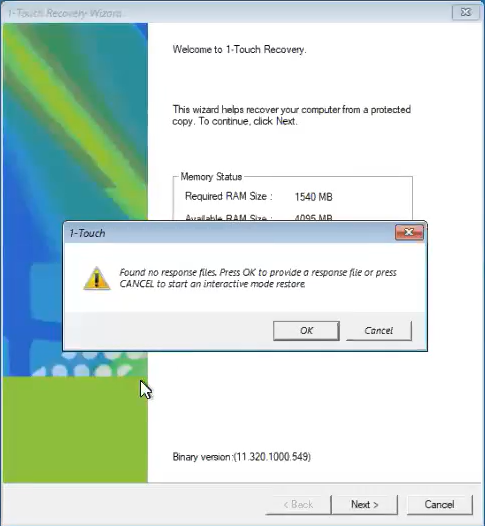
On the Welcome page, a warning message appears that says that the response files are not found. Click Cancel to start the interactive restore, and then click Next.
Make sure that you are installing the latest ISO updates by verifying the Binary version area for the latest service pack.
-
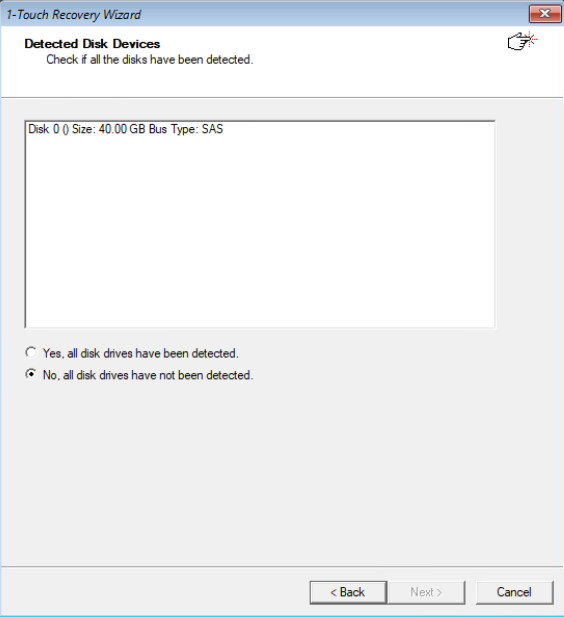
On the Detected Disk Devices page, do the following:
-
Click Yes, all disk drives have been detected.
If you do not see the required drivers, add the drivers to the downloaded ISO.
For more information on adding drivers, see Adding Drivers to Windows Driver Manager and Adding Windows Drivers for NIC and Mass Storage Devices.
-
Click Next.
-
-
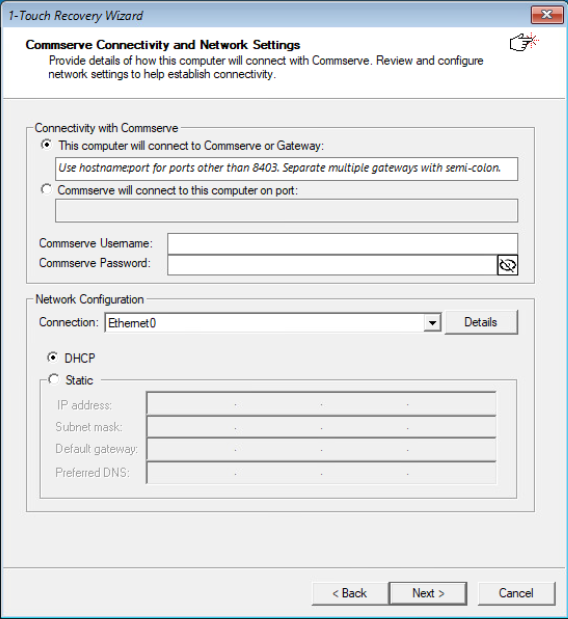
On the Commserve Connectivity and Network Settings page, make the following selections:
-
Select This computer will connect to Commserve or Gateway if your computer is configured to connect to CommServe directly or through a gateway.
-
Select Commserve will connect to this computer on port if your firewall rules allow CommServe to connect to your computer through a port.
-
Enter the CommServe Username and the CommServe Password that have the appropriate permissions.
-
From the Connection list, select the network connection.
-
Select the network configuration.
If you have selected the Static network configuration, then enter the IP address, Subnet mask, Default gateway, and Preferred DNS.
-
Click Next.
-
-
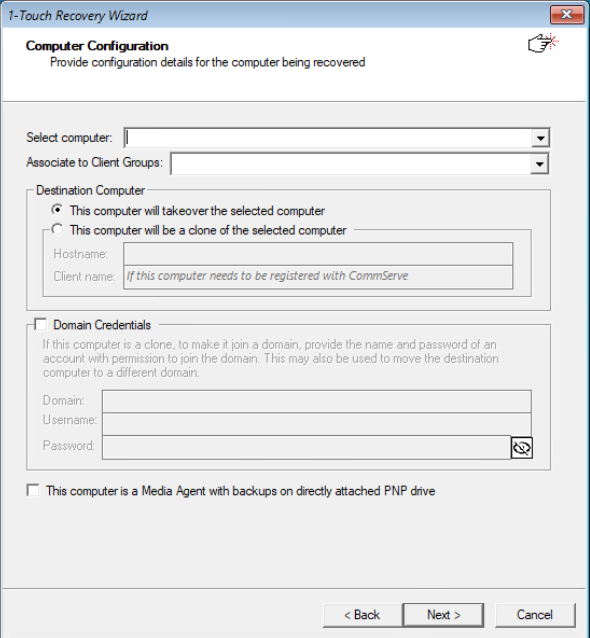
On the Computer Configuration page, make the following selections:
-
From the Select computer list, select the required system state backup client.
-
If you have assigned permissions at the client group level, from the Associate to Client Groups list, select the appropriate client group.
-
Select the Destination computer.
-
If you have selected This computer will be a clone of the selected computer, then enter the Hostname.
-
To add the destination or the cloned computer to a domain based on your requirement, enter the domain Username and Password.
-
Click Next.
-
-
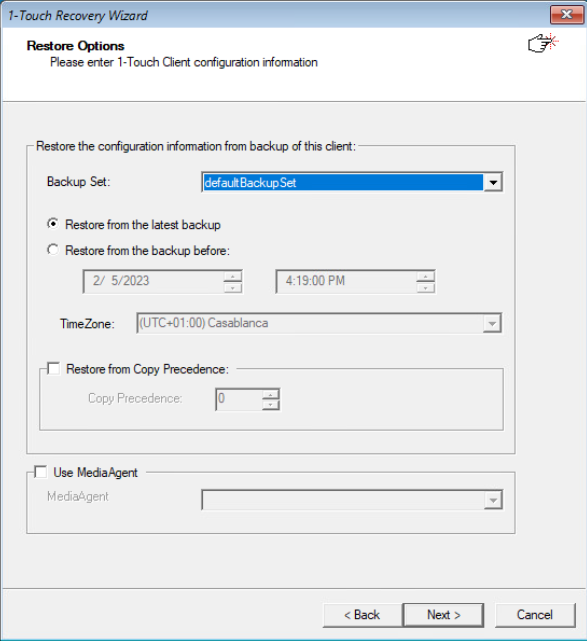
On the Restore Options page, review the restore options, and then click Next.
-
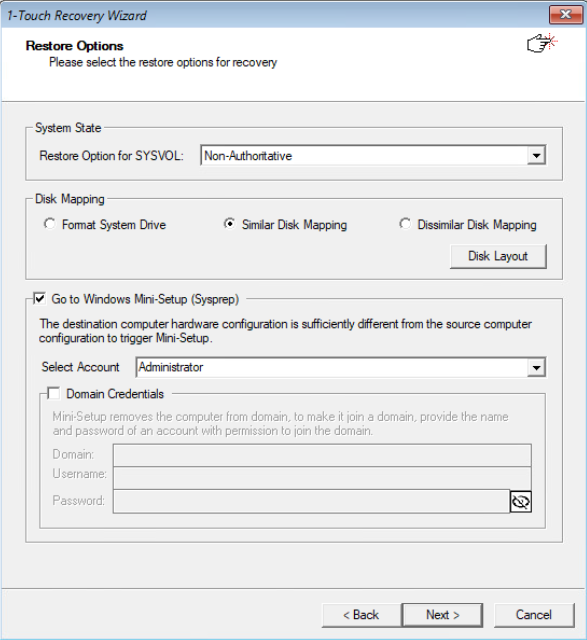
On the next page of Restore Options, review the restore options as follows:
-
In the System State section, select Non-Authoritative from the Restore Option for SYSVOL drop-down box. However, AD recovery is not supported using minisetup (sysprep) or with clone option.
-
If restoring on a domain controller, select one of the following from the Restore option for SYSVOL list:
-
Primary - Select this option when you are restoring for a standalone domain controller or the first domain controller restored in the network
-
Non-Authoritative - Select this option to restore the domain controller without replicating any changes to the other domain controllers on the network
-
Authoritative - Select this option to restore the domain controller and also replicate any changes to the other domain controllers on the network. You must run the ntdsutil to replicate the changes to the other domain controllers.
-
-
-
Select the Disk Mapping option based on the layout of your source and destination computers.
-
Multiple users can recover the data from your computer using 1-Touch Recovery. In the Select Account box, select an account that is part of the administrators group to restore Windows Mini-Setup (SysPrep) components after 1-Touch recovery.
-
To add the destination or the cloned computer to a domain based on your requirement, select the Domain Credentials check box, and then enter the domain credentials.
- To restore a Drive X from the source computer, select Dissimilar Disk Mapping to exclude the drive from the 1-Touch Recovery operation, else restore the Drive X with a different drive letter. After the recovery operation is complete, you can change the drive letter back to X.
-
Click Next.
-
-
Perform the Interactive Restore.