Settings for resources in cleanroom runbooks include resource group, storage account, region, recovery point, and post-recovery action scripts. You can also delete an resource or mark it as failed.
Go to the runbook that contains the resource
-
In the Command Center navigation pane, go to Secure > Cleanroom recovery.
-
On the Recovery groups tab, click the recovery group that contains the runbook.
-
On the Runbooks tab, click the runbook.
Reset overridden recovery options for all resources
When you modify a recovery option for a cleanroom site, you can apply that change to all resources in the associated runbook.
-
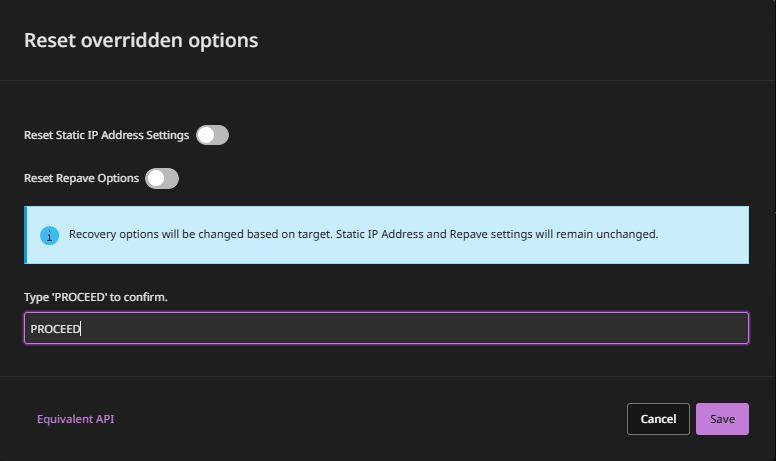
On the Steps tab, click Reset overridden options.
A confirmation message appears.
-
To reset the following, enable the toggle keys:
-
Reset static IP address settings: Resets static IP addresses on resources.
-
Reset repave options: Resets the Repave VM with new secure image setting on resources.
-
-
Confirm the change, and then click Save.
Go the resource
-
Expand the runbook phase that contains the resource.
-
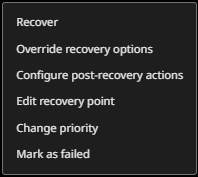
In the row for the resource, click the action button
 .
.
Override inherited recovery options
You can override the recovery options that a resource inherits from its recovery group.
-
Select Override recovery options.
-
Enter a name for the resource.
-
For Availability zone, select the AZ for the recovered EC2 instances.
-
For Instance type, select the EC2 instance type for the recovered EC2 instances.
The Automatic option attempts to recover the instances as the same EC2 instance type as the source.
-
For IAM role for Amazon EC2, select the role for authentication you created when you configured the Amazon EC2 hypervisor in Commvault.
-
For S3 bucket, select a bucket to store logs from script executions.
-
For Network, to select a VPC network, subnet, and ENI, follow these steps:
-
Click the browse button.
The Select network settings dialog box appears.
-
Select an existing ENI or create a new ENI.
When you create a new ENI, you can specify an IP address.
-
Click Save.
-
-
For Security groups, do one of the following:
-
To have the software attempt to assign the same security group from the source EC2 instance to the recovered EC2 instances, select Auto-assign.
-
To select a security group from the AWS account you're recovering the intances to, select Custom, and then select the security group.
-
-
For Volume type, the options are limited to only those that are supported for the volume size.
Volume types that are not supported for the volume size are visible, but not available to select.
To view the minimum and maximum volume sizes for a volume type that is not available, hover over that volume type.
-
For KMS key, select an encryption key or option:
-
Auto: This option is available for recovery to a different AWS Region.
If the identity that performs the recovery has the ec2:GetEbsDefaultKmsKeyId action, then the default KMS key for EBS encryption will have "Default EBS Key" tag. The ec2:GetEbsDefaultKmsKeyId action is included in amazon_restricted_role_permissions.json.
-
No encryption: This option is not recommended. The AWS Well-Architected Framework (SEC08-BP02) recommends enforcing encryption at rest for sensitive data.
Important
Commvault recommends enabling default encryption of EBS volumes in each AWS account that creates EBS volumes. For information, see Enable encryption by default.
The following key types are supported:
-
AWS managed keys
-
AWS owned keys
-
Customer managed keys, including multi-region keys
-
-
To rebuild the VMs with a secure image, follow these steps:
-
Enable the Repave VM with new secure image toggle key.
-
From the AMI selection list, select the OS image to create the new EC2 instances from.
-
From the Key pair list, select the Amazon EC2 key pair to access the recovered EC2 instances.
-
To attach the OS disk and data disk to the new VM during recovery, clear the Skip attaching OS disk check box.
If you leave this setting selected, the OS disk will not be attached to the new VM. Only the data disk will be attached.
-
-
Click Save.
-
Select Override recovery options.
-
In the VM display name box, enter a name for the resource.
-
From the Resource group list, select a resource group.
-
From the Region list, select a region.
The region must align with the region containing Air Gap Protect storage. Otherwise, recovery fails.
-
From the Storage Account list, select a Standard general-purpose v2 or Premium general-purpose storage account.
Only storage accounts that are associated with the region you selected for the resource are available.
-
From the VM size box, select a VM size.
Only VM sizes that are available for the resource group you selected are available.
-
From the Availability zone list, for Azure managed disks, select an AZ.
Only AZs that are in the region you selected for the recovered resource are available to select.
If you select the Auto option and if the feature is supported for the specified region and VM size, Commvault attempts to recover the resource to the same availability zone as the source. Otherwise, the resource is recovered without a zone (No Zone).
-
From the Disk type list, for managed disks, select the disk type: Original (same as the source), Standard HDD, Standard SSD, Premium SSD.
Consider the following:
-
When the Disk Type for the cleanroom site is set to Auto select, the disk type of the recovered resource is as follows:
-
For recovery of an Azure resource to an Azure cleanroom site, the disk type is the same as the source.
-
For any other resource type (such as VMware vSphere) to an Azure cleanroom site, the disk type is Standard HDD.
-
-
When the Disk Type for the cleanroom site is set to Premium SSD, but in the Override recovery options window, the Disk Type is set to Original, the disk type is as follows:
- For recovery of an Azure resource to an Azure cleanroom site, the disk type is the same as the source.
-
When the Disk Type for the cleanroom site is set to Auto select, and in the Override recovery options window, the Disk Type is set to Original, the disk type is as follows:
-
For recovery of an Azure resource to an Azure cleanroom site, when in the Override recovery options window, the VM size selected does not support Premium SSD (for example, D2v3), the disk type is Standard HDD.
-
For recovery of an Azure resource to an Azure cleanroom site, when in the Override recovery options window, the VM size selected supports Premium SSD (for example, B2ms), the disk type is the same as the source.
-
-
-
Under Network settings, follow these steps:
-
In the available network interfaces row, click the action button
, and then select Edit. -
From the Virtual network/subnet list, select the network.
You can specify any subnet that's in the same region as the selected resource group.
If you don't select a VNet, then the first VNet in the list and the first (default) subnet that it expands to are attached to the resource.
Static IP addresses from a source are not applied to the resource.
-
To create a public IP, enable the Create/assign public IP toggle key, and then from the Public IP type, select Dynamic or Static.
If a public IP address isn't required on the resource, don't enable the Create/assign public IP toggle key. By default, a public IP address is assigned to recovered Azure VMs.
-
From the Preferred private IP type list, select a custom or dynamic IP.
-
Click Submit.
-
-
From the Security group list, select a network security group.
-
To rebuild the recovered VM with a secure image, follow these steps:
-
Enable the Repave VM with new secure image toggle key.
-
From the Image option list, select the image to create the VM from.
-
Enter the credentials for the recovered VM.
-
If you don't want to attach the OS disk to the recovered VM, select Skip attaching OS disk.
If this setting is unselected, the OS disk is attached to the recovered VM, as a data disk.
-
-
Click Save.
Configure post-recovery actions
-
Custom scripts: Scripts that validate recovered VMs.
You can upload a file or enter a UNC path and credentials to access the path.
-
Windows PowerShell: Enter as
[file].ps1. -
Linux shell: Enter as
\\[path]\[file].sh.
If you have multiple scripts, to change the order they run in, click Reorder, and then drag and drop the scripts.
-
Edit the recovery point
You can modify the recovery point for a resource. By default, resources inherit the recovery point of the recovery group.
For resources that include databases or applications, the recovery point determines the point in time that's used to recover application data.
-
Disable the Use group recovery point toggle key.
-
Select a recovery point:
-
Latest: Use the most recent recovery point.
-
Point in time: Use a specific recovery point. A default time is selected. To change the time, click the calendar icon and select a date and time.
-
Change priority
You can modify the recovery priority of the resource. Priority specifies the order that resources are recovered in, with 1 being the highest priority.
Delete the resource
- In the row for the resource, click the action button , and then select Delete.
Mark as failed
If a resource is recovered in an unusable state, you can mark the resource as failed. For example, if a VM doesn't boot after recovery, you can mark the VM as failed, fix the problem that caused the failure, and then retry recovery.
Edit runbook template: Select a different runbook for an Active Directory resource
You can select a different forest recovery runbook for an Active Directory resource.