You can mount any available snapshot to access the data included in the snapshot. Follow the steps below to mount snapshots:When mounting multiple snapshots, note the following:
-
You can mount snapshots from different jobs
-
The snapshots selected for mounting should belong to the same agent (such as Windows File System, UNIX File System, or VMware)
-
Snapshots should be mounted on a MediaAgent with the same operating system as the snapshot volumes. For example, Windows volumes should be mounted on a Windows MediaAgent, and Linux volumes should be mounted on a Linux MediaAgent.
-
There are no limits on the number of snapshots to be mounted. However, increasing the number of snapshots that are selected also increases the time for mounting the snapshots.
-
For Virtual Server Agent (VSA), mount snapshots from the backup set or subclient level. Mounting snapshots from the storage policy is not supported.
-
For VMware, mounting multiple snapshots of the same volume at the same time is not supported
If required, you can configure the following additional settings:
-
If the niSCSIEnable additional setting is configured, IntelliSnap backup will always try to mount using iSCSI method. If this additional setting is not configured, IntelliSnap backup tries to mount using the FC method first.
-
By default the snapshot will be exposed to the first online Host Bus Adapter (HBA) on the ESX Server. To expose the snapshot to a specific HBA, configure the sPortInfo additional setting.
Enter the HBA identifier without colons (for example, 2100001B32813396 instead of 21:00:00:1B:32:81:33:96).
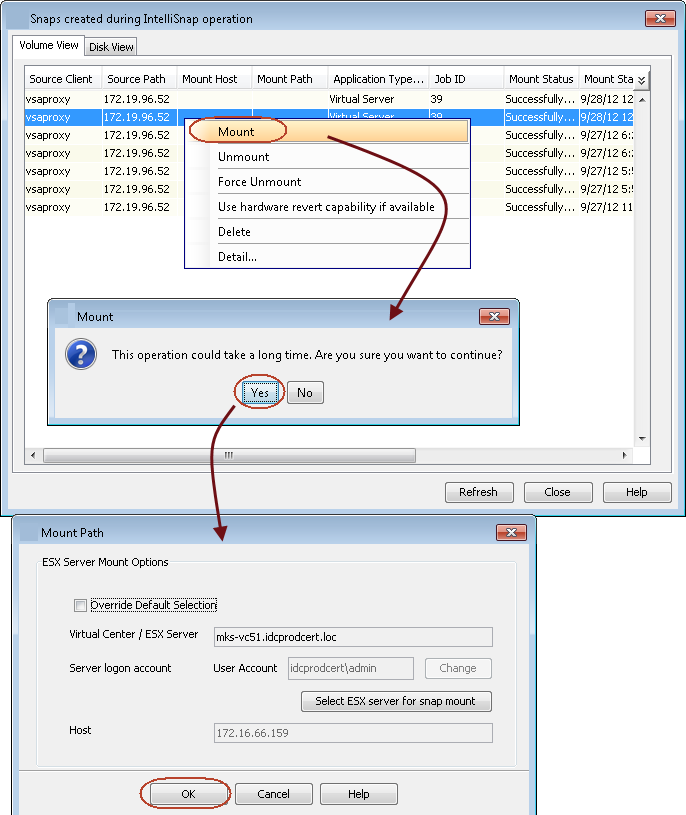
To mount a snapshot:
-
From the CommCell Browser, navigate to Client Computers > <vcenter_client> > VMware.
-
Right-click the backup set and click All Tasks > List Snapshots.
-
From the Snaps created during IntelliSnap operation dialog box, right-click the snapshot that you wish to mount and select Mount.
To select multiple snapshots, hold the <Shift> key and select the snapshots to be mounted.
You can also open the Snaps created during IntelliSnap operation dialog box by right-clicking the snapshot copy in a storage policy; but if you open the dialog box by this method, you can only view the list of snapshots and cannot mount the snapshots.
-
Click Yes to confirm the mount operation.
-
Click OK on the Mount path dialog box.
By default, the snapshot will be mounted on the ESX server configured for IntelliSnap backup. The ESX Server name and Logon account will be displayed in the Mount Path dialog box. If you want to mount the snapshot to a different ESX server, click Override Default Selection check box and click Select ESX server for snap mount. In the Browse ESX Server dialog box, select the required ESX server and click OK.
By default the snapshot will be exposed to the first Host Bus Adapter (HBA) on the ESX Server. To expose the snapshot to a specific HBA, configure the sPortInfo additional setting.
The following message will be displayed when the mount operation completes.
Mount Operation Completed Successfully.
-
Click OK.
-
Click Close on the Snaps created during IntelliSnap operation dialog box.