Note
File Discovery, Archiving, and Migrating Data to Cloud is deprecated in this version. For more information about the Obsolescence Policy, see Obsolescence Policy.
Effective Release
11.21 (Version 11, Feature Release 21)
Replacement
Instead of the File discovery feature, you can use the File Storage Optimization feature.
To archive your data using the Command Center, you can use Archiving Files.
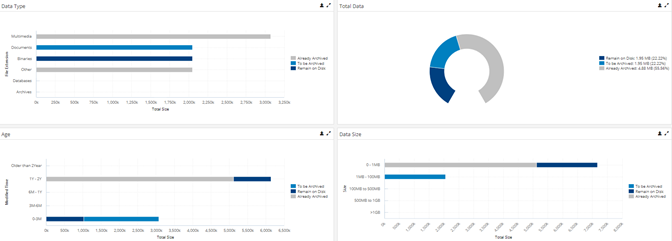
The Archiving Dashboard displays summary information about the total size of the data and the data that is archived already or data that is to be archived. You can use the dashboard to understand the current status of operations and to go to detail pages.
-
From the navigation pane, go to Protect > Archiving.
The Archiving page appears.
-
Click the File Server.
The File Server details page appears.
The top row of the dashboard provides summary information for key items.
Click the text label under Rules to predict the files that are qualified for archiving based on certain rules:
-
File Size: Files are archived based on the size of the file.
-
File modified: Files are archived based on the last modified date of each file within the volume or folder/directory.
-
File accessed: Files are archived based on the last accessed date of each file within the volume or folder/directory.
Note: You can either select the File modified time or the File accessed time for your files. A text message is displayed that confirms the rules you set.
-
-
To archive files based on file extensions or file types, select All file types.
The following file types are available in the All file types list. To view the extensions that are automatically excluded for each File Type, see File Extensions Included in the File Type List.
-
Audio
-
Image
-
Office
-
Text
-
Video
-
-
Optional: To add more file extensions, click Add more extensions.
-
You can archive files based on the owner of the file along with file size, file access time, or modified time of files. By default, files owned by all users are archived.
Note
Archive files based on file owners feature applies to only CIFS shares.
-
To select ownership as the criteria for archiving files, complete the following steps:
-
Move the All file owners toggle key to the left and turn it off.
-
In the Add/Remove Owners box, do one of the following:
-
To select all owners, click Select All.
-
To clear all selected owners, click Select None.
-
To search for a specific owner, in the Search box, type the owners name.
-
-
To view the list of file owners, you must have selected the Collect owner info check box when you created the file server else perform the following steps for an existing file server:
-
Go to Protect > Archiving, click on the Actions column, and then click Edit File Server.
-
In the Owner information area, click Edit, and then select the Collect owner information check box.
-
Run an analytics job for the file server.
-
-
-
In the second row, you can view the following information:
-
Data Type: Click the bar graph to view the size of files configured for archiving based on file extensions such as:
-
Multimedia files
-
Binaries
-
Archives
-
Documents
-
Databases
-
-
Total Data: Click the circle to view the files that remain on disk, files to be archived and the files that are archived already.
-
-
In the bottom row, you can view the following information:
-
Age: Click the bar graph to view the modified time of files or accessed time of files.
-
Data Size: Click the bar graph to view the size of files on your file server.
Tip: If you are not satisfied with the selections, you can edit the rules again to receive the required result.
-
-
Under Rules, click Next.
The Archiving properties page appears.
-
In the Plan box, select the name of the plan. If you have not created a plan yet, see Plans.
-
The Modified time older than, File size, Select share access node boxes are pre-populated with the information you provided in the Dashboard. You can review rules and change the Select share access node (primary client computer) at this level. Once you review the rules, you can go to the Dashboard to preview the files that will be qualified for archiving.
The primary client computer is used to perform backup and archive operations.
-
Click Start archiving.
Backup operations run as per the schedule in the Plan you selected. Data Analytics job runs as per the Data Analytics schedule.
Additional Data Reports in the Web Console
You can view more detailed reports of your data from the Data Cube interface in the Web Console, such as the following:
For more information, see Visualizing Data Cube Sources.
Viewing Items in a Compressed File On the Web Console Dashboard
You can view the items in a compressed file in the duplicate file report using the nPushMetaDataWithCRC additional setting.
-
For CIFS share, zip files, .7z and .tar files are supported.
-
For NFS share, only .7z files are supported.
To the access node computer, add the nPushMetaDataWithCRC additional setting as shown in the following table:
|
Property |
Value |
|---|---|
|
Name |
nPushMetaDataWithCRC |
|
Category |
FileSystemAgent |
|
Type |
DWORD |
|
Value |
1 |
Viewing Overlapping Content In Reports
If two subclients have content that overlaps, then the files on the subclient on which the most recent analytics job ran, is displayed in the reports.
Fine Tuning the Rules for Archiving
After your archiving job runs based on the rules you set up, you can return to the dash board and adjust the rules based on your requirement. The Dashboard displays the following information based on the type, age, size of the file:
-
Data that has been archived.
-
Data that will be archived with the subsequent archiving operation.
-
Data that will remain on the disk.
Important Considerations for NFS shares
The following files, paths, and extensions are excluded from the report that is displayed on the Archiving Dashboard.
-
Files smaller than the default file system block size.
-
The following paths are excluded from the report:
-
Software Installation Path
*:\Program Files\Commvault\ContentStore\**
-
Commvault temp directory
C:\Users\Commvault Services account\AppData\Local\Temp
-
Commvault Log Files Directory
C:\Program Files\Commvault\ContentStore\Log Files
-
Index Cache Directory
C:\Program Files\CommVault\ContentStore\IndexCache
-
-
The following extensions are excluded from the report:.
-
/usr/**
-
/bin/**
-
/lib/**
-
/boot/**
-
/dev/**
-
/etc/**
-
/var/**
-
/tmp/**
-
/sbin/**
-
/lib64/**
-
/opt/**
-
/sys/**
-
/kernel/**
-
/devices/**
-
/proc/**
-
/selinux/**
-
/stand/**
-
/**/*.a
-
/**/*.so
-
/**/*.so.*
-
/**/*.lib
-
/**/*.la
-
/**/*.o
-
/**/*.ln
-
/**/*.sl
-
/**/*.csh
-
/**/*.sh
-
/**/*.ksh
-