Full Backups
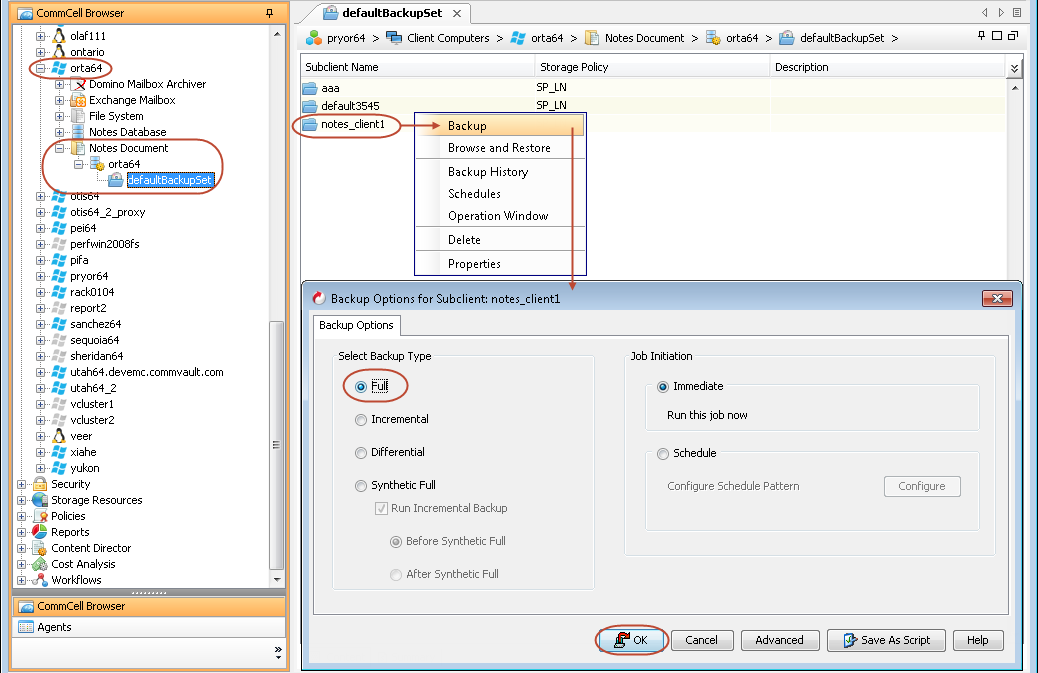
Full backups provide the most comprehensive protection of data. To perform a full backup:
-
In the CommCell Browser, expand Client Computers | <Client> | Notes Documents | <Partition> |< Backupset>.
-
In the <Backupset>tab, right-click <Subclient>, and then click Backup.
-
In the Backup Options dialog box, select Full.
-
Click OK.
In the Job Controller tab, you can track the progress of the job. When the backup has completed, the Job Controller displays Completed.
Incremental Backups
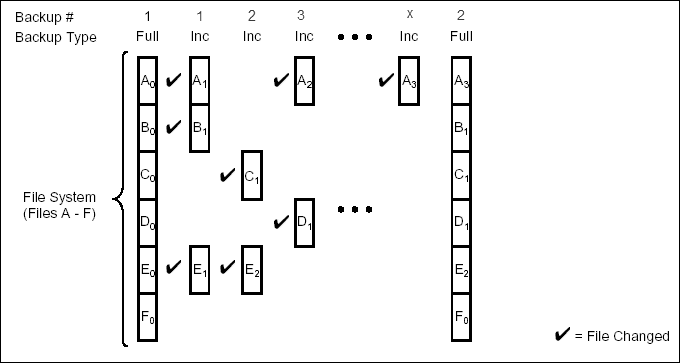
An incremental backup contains only data that is new or has changed since the last backup, regardless of the type. On average, incremental backups consume less media and use less resources than full backups.
The illustration clarifies the nature of full and incremental backups.
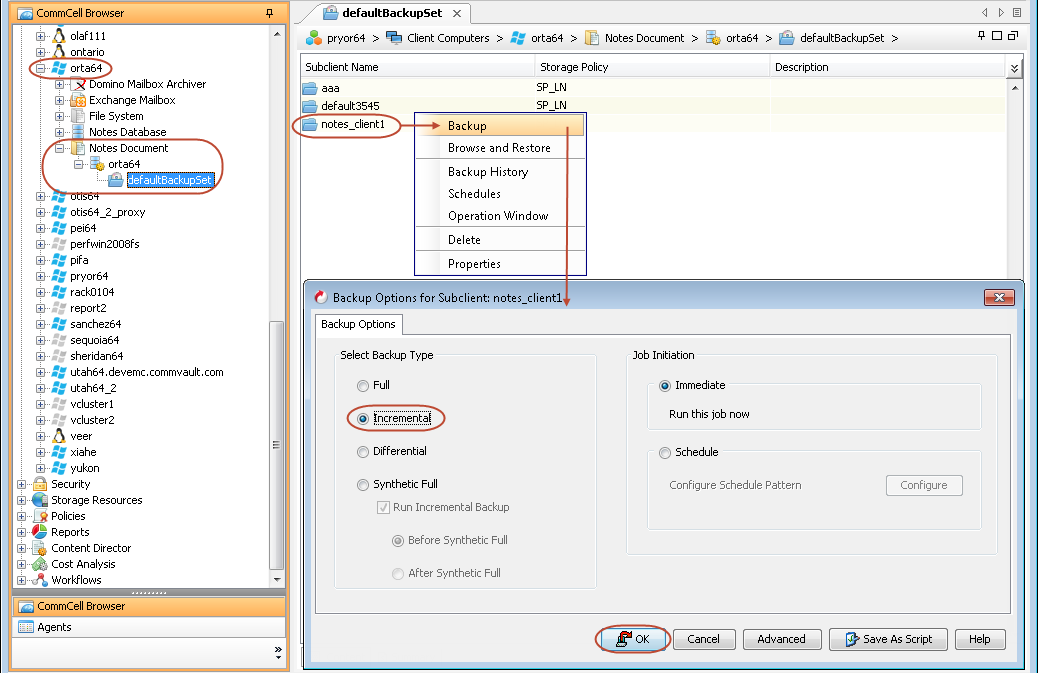
Follow steps given below to perform an incremental backup:
-
In the CommCell Browser, expand Client Computers | <Client> | Notes Documents | <Partition> |< Backupset>.
-
In the <Backupset> tab, right-click <Subclient>, and then click Backup.
-
In the Backup Options dialog box, select Incremental.
-
Click OK.
In the Job Controller tab, you can track the progress of the job. When the backup has completed, the Job Controller displays Completed.
Differential Backups
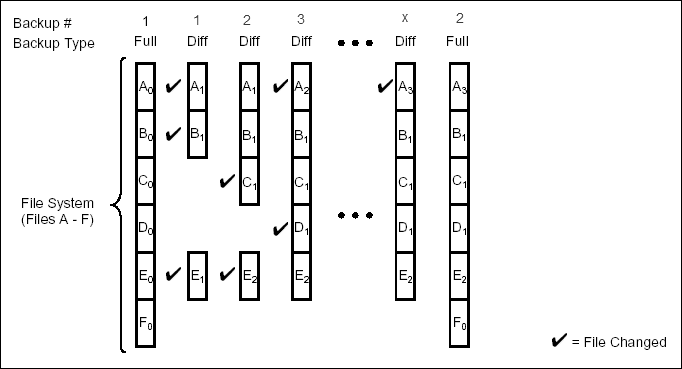
A differential backup contains only the data that is new or has been changed since the last full backup. Differential backups consume less media and use less resources than full backups. Differential backups are cumulative. This means that each differential backup contains all changes accumulated since the last full backup. Each successive differential backup contains all the changes from the previous differential backup.
-
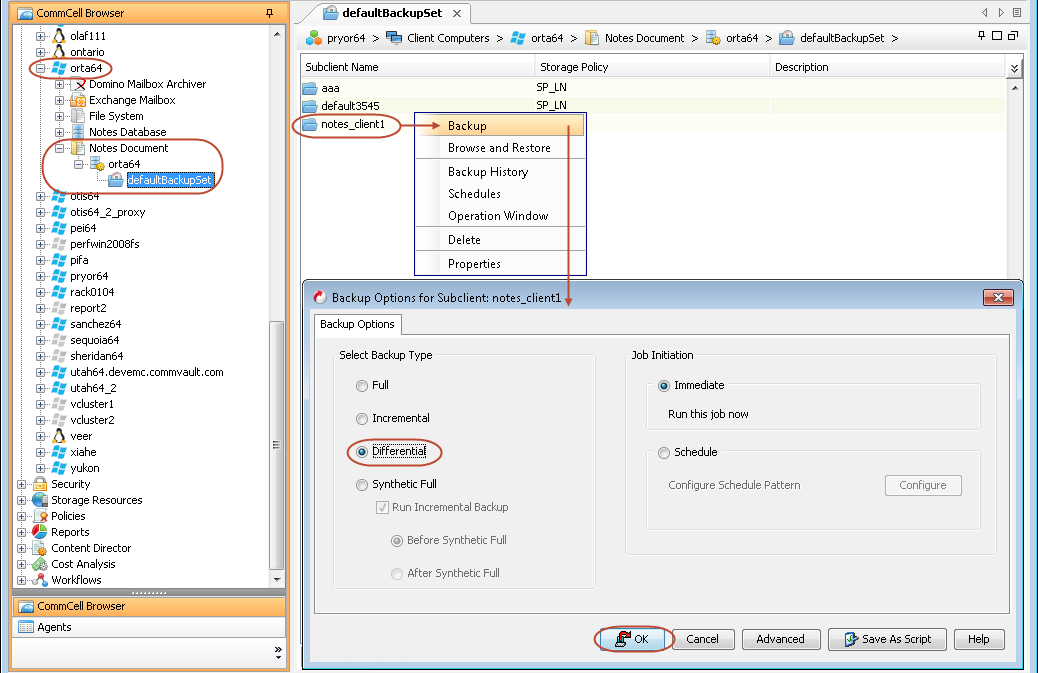
In the CommCell Browser, expand Client Computers | <Client> | Notes Documents | <Partition> |< Backupset>.
-
In the <Backupset> tab, right-click <Subclient>, and then click Backup.
-
In the Backup Options dialog box, select Differential.
-
Click OK.
In the Job Controller tab, you can track the progress of the job. When the backup has completed, the Job Controller displays Completed.
Synthetic Full Backups
A synthetic full backup is a synthesized backup, created from the most recent full backup and subsequent incremental and/or differential backups. The resulting synthetic full backup is identical to a full backup for the subclient.
Unlike full, incremental, and differential backups, a synthetic full backup does not actually transfer data from a client computer to the backup media. Therefore, they do not use any resources on the client computer.
Synthetic full backups are media-based; they read backup data from one media and simultaneously write (restore) the result to the new active media within the same media group. As a result, synthetic full backups require that at least two media drives for the same storage policy be available at the time the job is started. Synthetic full backups cannot be performed on subclients where the storage policy is associated with a stand-alone drive.
Running Synthetic Full Backups
Synthetic full backups can either be started manually or scheduled to occur at regular intervals.
Note
-
You cannot run a synthetic full backup job if no incremental or differential backups were run after the last full or synthetic full backup.
-
For file systems and VMs, the system will run an automatic synthetic full backup job only if all of the following conditions are true:
-
The current application size is greater than or equal to 1 GB.
-
The sum of the sizes of the backup jobs in the current cycle is greater than or equal to 1 GB.
-
The sum of the sizes of the backup jobs in the current cycle is greater than the current application size by more than 50%.
-
-
In the CommCell Browser, expand Client Computers | <Client> | Notes Documents | <Partition> |< Backupset>.
-
In the <Backupset>tab, right-click <Subclient>, and then click Backup.
The Backup Options dialog box appears
-
Select Synthetic Full.
-
Click OK.
In the Job Controller tab, you can track the progress of the job. When the backup has completed, the Job Controller displays Completed.
Scheduling a Backup
Follow the steps below to schedule a backup:
-
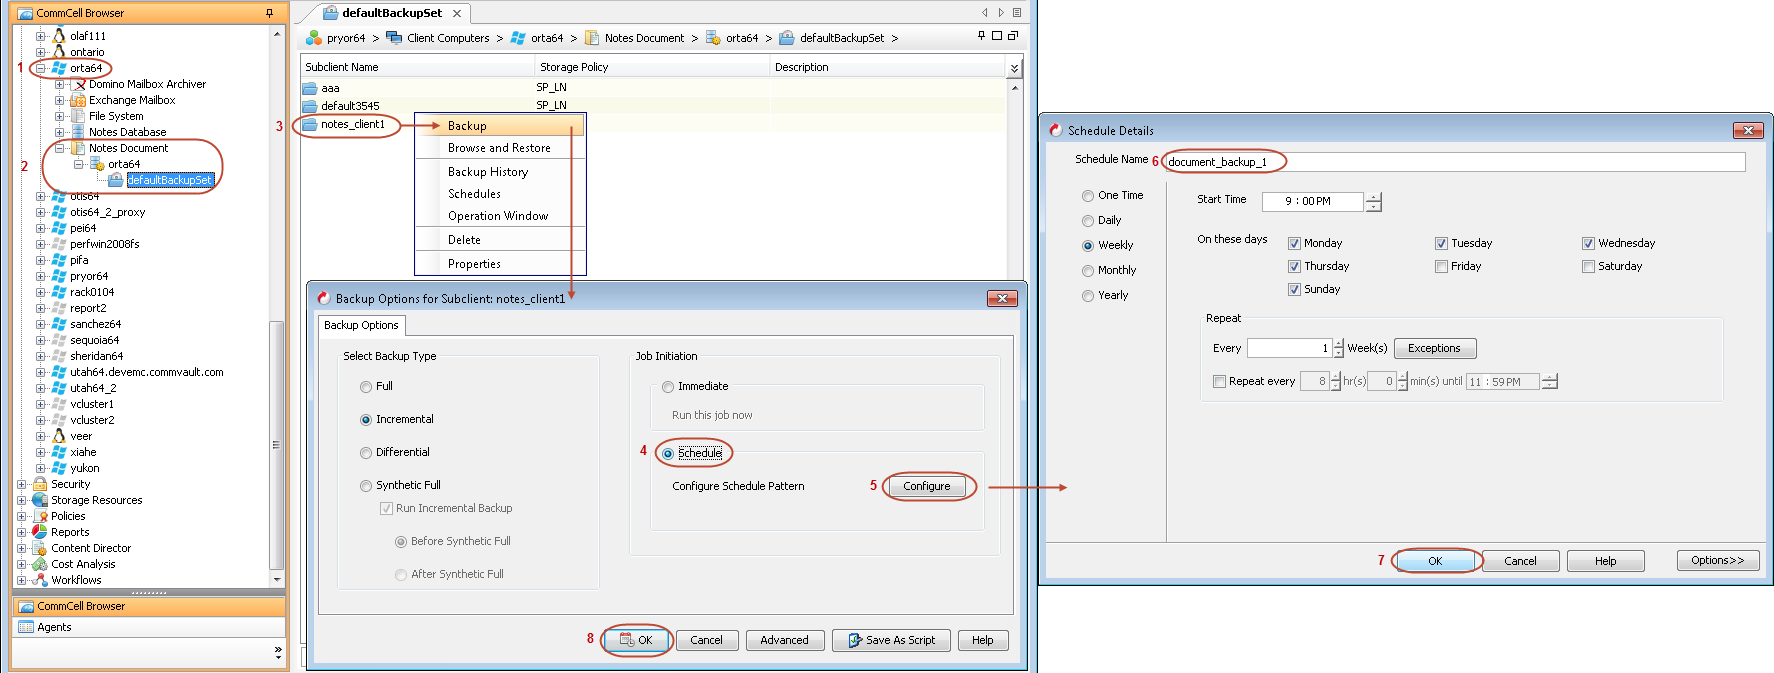
In the CommCell Browser, expand Client Computers | <Client> | Notes Documents | <Partition> |< Backupset>.
-
In the <Backupset>tab, right-click <Subclient>, and then click Backup.
-
In the Backup Options dialog box, select Schedule, and then click Configure.
-
In the Schedule Name box, enter a name for the schedule, and then select the appropriate scheduling options.
For example:
Select Weekly, and then change the Start Time to 9:00 PM.
-
Click OK to close the Schedule Details dialog box.
-
Click OK to close the Backup Options dialog box.
-
The backup job will execute according to the options that you selected.
Managing Jobs
Configure Job Restartability for an Individual Job
-
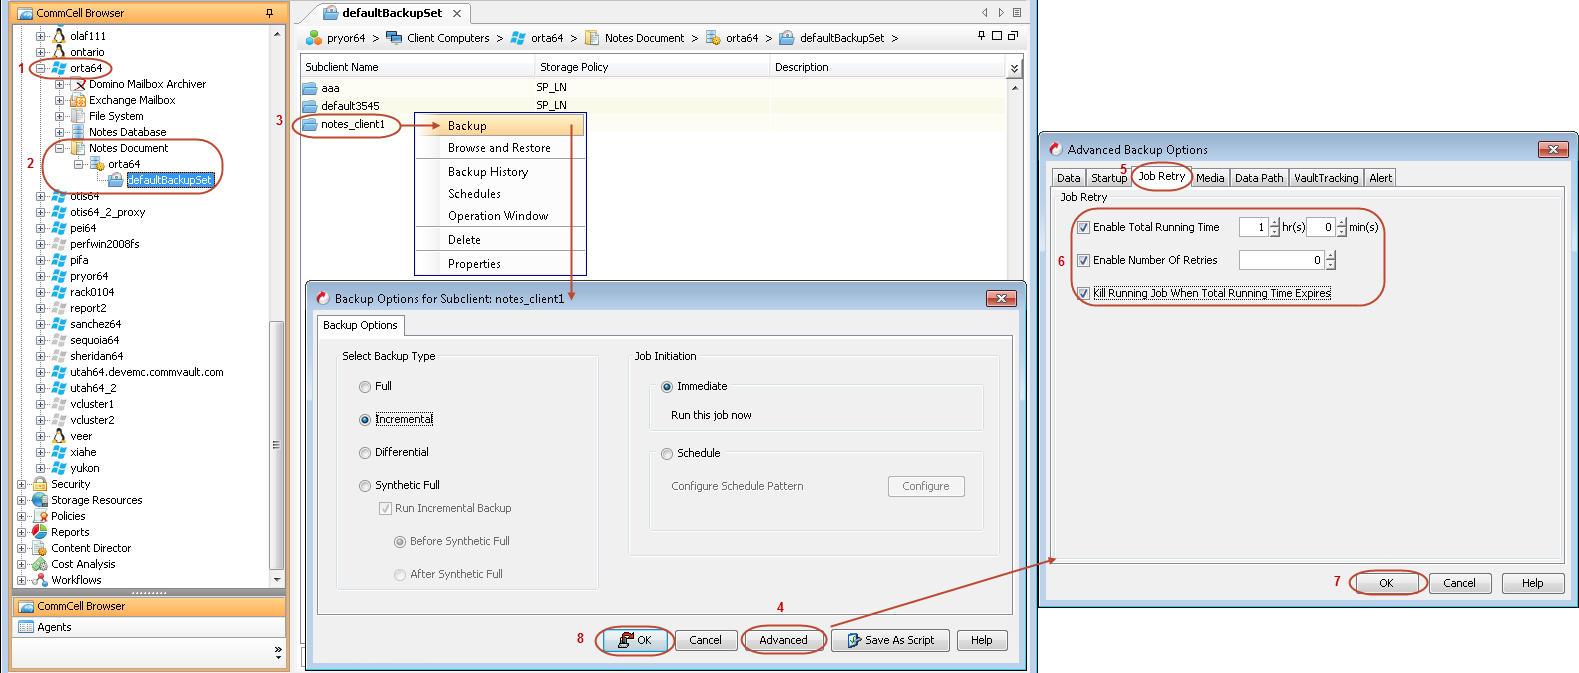
In the CommCell Browser, expand Client Computers | <Client> | Notes Documents | <Partition> |< Backupset>.
-
In the <Backupset>tab, right-click <Subclient>, and then click Backup.
-
Click Advanced.
-
In the Advanced Backup Options dialog box, click the Job Retry tab.
-
Select Enable Total Running Time and specify the maximum elapsed time before a job can be restarted or killed.
Select Kill Running Jobs When Total Running Time Expires to kill the job after reaching the maximum elapsed time.
-
Select Enable Number Of Retries and specify the number of retries.
-
Click OK.
-
Click OK to close the Backup Options dialog box.
Controlling Jobs
The following controls are available for running jobs in the Job Controller window:
|
Suspend |
Temporarily stops a job. A suspended job is not terminated; it can be restarted at a later time. |
|
Resume |
Resumes a job and returns the status to Waiting, Pending, Queued, or Running. The status depends on the availability of resources, the state of the Operation Windows, or the Activity Control setting. |
|
Kill |
Terminates a job. |
Suspending a Job
-
From the Job Controller of the CommCell Console, right-click the job and select Suspend.
-
The job status may change to Suspend Pending for a few moments while the operation completes. The job status then changes to Suspended.
Resuming a Job
-
From the Job Controller of the CommCell Console, right-click the job and select Resume.
-
As the Job Manager attempts to restart the job, the job status changes to Waiting, Pending, or Running.
Killing a Job
-
From the Job Controller of the CommCell Console, right-click the job and select Kill.
-
Click Yes when the confirmation prompt appears if you are sure you want to kill the job. The job status may change to Kill Pending for a few moments while the operation completes. Once completed, the job status will change to Killed and it will be removed from the Job Controller window after five minutes.
Additional Options
The following table describes the available additional options to further refine your backup operations:
|
Option |
Description |
Related Topics |
|
Startup Options |
The Startup Options are used by the Job Manager to set priority for resource allocation. This is useful to give higher priority to certain jobs. You can set the priority as follows:
|
|
|
Alerts |
This option enables users or user groups to get automatic notification on the status of the data protection job. Follow the steps given below to set up the criteria to raise notifications/alerts:
|
Refer to Alerts. |
|
Command Line Backups |
Command Line Interface enables you to perform backups or restore from the command line. The commands can be executed from the command line or can be integrated into scripts. You can also generate command line scripts for specific operations from the CommCell Browser using the Save As Script option. |
Refer to Command Line Interface. |
|
CommCell Readiness Report |
The CommCell Readiness Report provides you with vital information such as connectivity and readiness of the Client, MediaAgent, and CommServe. It is useful to run this report before performing a backup or a recovery operation. Follow the steps given below to generate the report:
|
Refer to CommCell Readiness Report. |
|
Backup Job Summary Report |
The Backup Job Summary Report provides you with information about all of the backup jobs that are run in last 24 hours for a specific subclient. You can get information such as status, time, data size, and so on for each backup job. It is useful to run this report after performing the backup. Follow the steps given below to generate the report:
|
Refer to Backup Job Summary Report. |
|
Data Path Options |
Data Protection operations use a default Library, MediaAgent, Drive Pool, and Drive as the Data Path. You can use this option to change the data path if the default data path is not available. Follow the steps given below to change the default data path:
|
Refer to Change Data Path. |
|
Start New Media |
The Start New Media option enables you to start the data protection operation on a new media. This feature provides control over where the data physically resides. Use the following steps to start the data protection operation on a new media:
|
Refer to Start New Media. |
|
Mark Media Full on Success |
This option marks the media as full, two minutes after the successful completion of the data protection job. This option prevents another job from writing to this media. Follow the steps given below:
|
Refer to Export Media. |
|
Allow Other Schedules To Use Media Set |
The Allow Other Schedules to use Media Set option allows jobs that are part of the schedule or schedule policy and using the specific storage policy to start a new media. It also prevents other jobs from writing to the same set of media.
|
Refer to Creating an Exportable Media Set. |
|
Extended Data Retention |
This option allows you to extend the expiration date of a specific job. This will override the default retention set at the corresponding storage policy copy. Follow the steps given below to extend the expiration date:
|
Refer to Extended Retention Rules. |
|
Vault Tracker |
This feature provides the facility to manage media that is removed from a library and stored in offsite locations. Depending on your Vault Tracker setup, select the required options. Use the following steps to access and select the Vault Tracker options.
|
Refer to Vault Tracker. |