Access Nodes for Restore Operations
Multiple access node selection is not supported for restore operations. Restore operations use only the first access node in the available access nodes list.
For browse operation to work, you must select the first access node in the available access nodes list.
Performing an Out-of-Place Restore
You can restore the data to following locations:
-
Different folder on the same computer from which the data was backed up
-
Different computer running supported versions of Unix
-
Different OpenVMS client in the same cluster
Keep in mind that the destination computer must reside in the same CommCell as the client whose data was backed up.
When you perform an out-of-place restore, the original user and group permissions are preserved.
Restoring Data to a Different Folder on the Same Client
Follow the steps given below to restore data to a different folder on the same client from which data is backed up:
-
From the CommCell Browser, navigate to Client Computers | <Client> | Proxy Client File System | <Backup Set>.
-
Right-click the <Subclient>, and then click Browse and Restore.
-
On the Browse and Restore Options dialog box, click View Content.
-
Select the data that you want to restore, and then click Recover All Selected. Clear the Restore to same folder check box.
-
Type the destination path for restore in the Specify destination path box.
-
Use the options in the Preserve Source Paths area to exclude folders (and its contents) from the source path.
For Example: If the selected data is /SCS1$DK00/MEMOS, and you want to restore data only from the MEMOS folder, set the Preserve <n> level from end of source path option to 1.
If the selected data is /SCS1$DK00/MEMOS/SALES, and you want to restore the data from MEMOS and SALES folders, set the Remove <n> level from beginning of source path option to 2.
-
Click OK.
Restoring Data to a Different Client
By default, Commvault prepends the OpenVMS SCS (System Communications Services) node numbers to the backup and restore paths.
For example:
/SCS001$DKA0/VMS$COMMON
Procedure:
-
From the CommCell Browser, navigate to Client Computers | <Client> | Proxy Client File System | <Backup Set>.
-
Right-click the <Subclient>, and then click Browse and Restore.
-
On the Browse and Restore Options dialog box, click View Content.
-
Select the data that you want to restore, and then click Recover All Selected. Clear the Restore to same folder check box.
-
In the Destination Client list, select the client. You can select any client that is in the same CommCell as that of the client from which the data was backed up.
-
Select the Restore to same folder check box to restore to the same folder on the destination.
You cannot perform a restore to a different OpenVMS client by selecting the Restore to same folders check box because the OpenVMS SCS node numbers would be different. You must provide an absolute destination path or browse and select the destination path.
-
Click OK.
Note
If you select the Restore to same folder check box, the data will be restored to the same folder on the destination client. All the existing data in that folder will be overwritten during the restore operation.
Performing a Cross-Platform Restore
You can perform the following cross-platform restores :
- Restores across all the supported versions of Unix.
Follow the steps given below to perform a cross-platform restore:
-
From the CommCell Browser, navigate to Client Computers | <Client> | Proxy Client File System | <Backup Set>.
-
Right-click the <Subclient>, and then click Browse and Restore.
-
On the Browse and Restore Options dialog box, click View Content.
-
Select the data that you want to restore, and then click Recover All Selected. Clear the Restore to same folder check box.
-
In the Destination Client list, select the client. You can select any client that is in the same CommCell as that of the client from which the data was backed up.
-
Type the destination path for restore in the Specify destination path box. You can either browse and select or type the destination path, but make sure that the browse path is in the UNIX File System format.
-
Click OK.
Restoring to NFS-Mounted File System
You can restore data to an NFS-mounted file system.
-
From the CommCell Browser, navigate to Client Computers | <Client> | Proxy Client File System | <Backup Set>.
-
Right-click the <Subclient>, and then click Browse and Restore.
-
On the Browse and Restore Options dialog box, click View Content.
-
Select the data that you want to restore, and then click Recover All Selected. Clear the Restore to same folder check box.
-
In the Destination Client list, click the client computer that hosts the mounted file system.
-
Clear the Restore to same folder check box.
-
In the Specify destination path box, type the network share and the destination folder. You can either browse and select or type the destination path, but make sure that the browse path is in the UNIX File System format.
-
Click OK.
Restoring Data Using a Map File
You can restore individual files and folders to different locations using a map file containing a list of files to be restored, with their corresponding restore paths. The map file must be created on the access node.
Creating a Map File
The map file is a text file in the CSV (Comma Separated Value) format. Follow the steps given below to create a map file:
-
Create a text file on the client computer where you want to restore the data.
-
Add the mapping information in the file in the following format:
"<source path>","<destination path>"
- If the specified destination folder is not available, the necessary destination folder will be created during the restore.
The specified paths for both the source and destination should be absolute paths within the same client computer.
You can provide following information in a map file:
|
Information |
Example |
|
File to File Mapping |
"/SCS1$DK00/DIR1/FILE1.txt","/SCS1$DK00/DIR1/FILE2.txt" |
|
Folder to folder mappings |
"/SCS1$DK00/DIR1/","/SCS1$DK00/DIR2/" |
|
Drive to drive mappings |
"/SCS1$DK00/MNT","/SCS1$DK00/USR" |
|
Rename files/folder during restore |
"/SCS1$DK00/DIR4/FILE14/file2.txt","/SCS1$DK00/DIR5/FILE3.txt" |
|
Filter certain files |
"/SCS1$DK00/DIR1/FILE5","" |
Adding Files and Folders with Unicode Characters to a Map File
If the path or the filename contains Unicode characters, the Map File must be converted to a format that can be used by the data protection operation. The Unicode Conversion utility must be used to convert the Map File to a format that can be provided as input. The conversion utility must be located on the proxy client.
-
Using a text editor, create a file that contains a list of files or folders with Unicode characters and save the file as a Unicode text file.
-
From the command line, navigate to the <software install folder>/Base folder and type the following:
./CVconvertUnicode $[source file] $[destination file]
where:
-
<source file> is the full path and name of the file created in Step 1.
-
<destination file> is the full path and name of the destination file. This file is automatically created by the utility.
-
-
Use the destination file as the Map File to perform the restore.
Restoring Using a Map File
Use the following procedure to restore a list of files and folders from a computer and each of these files have a different destination.
-
From the CommCell Browser, navigate to Client Computers | <Client> | Proxy Client File System | <Backup Set>.
-
Right-click the <Subclient>, and then click Browse and Restore.
-
On the Browse and Restore Options dialog box, click View Content.
-
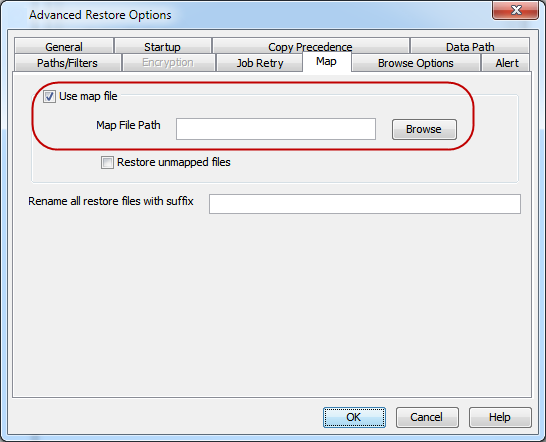
Select the data that you want to restore, and then click Recover All Selected. Click Advanced.
-
Select the Map tab.
-
Select the Use map file check box and click Browse to navigate to the map file.
-
Clear the Restore unmapped file check box.
-
Click OK.
-
Click OK to start the restore.
Combining Browse and Restore with the Map File Restore
Use the following procedure to restore a set of files to a specified location with some files within that set to different destinations.
-
From the CommCell Browser, navigate to Client Computers | <Client> | Proxy Client File System | <Backup Set>.
-
Right-click the <Subclient>, and then click Browse and Restore.
-
On the Browse and Restore Options dialog box, click View Content.
-
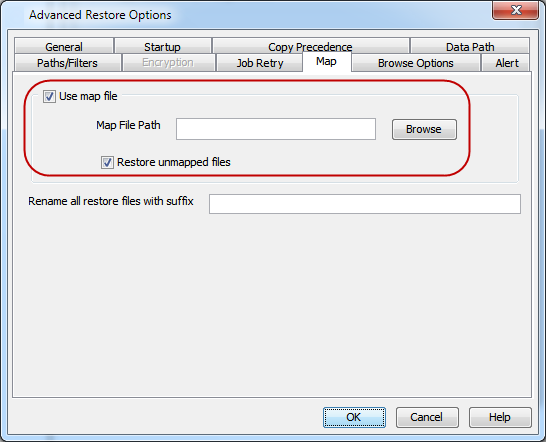
Select the data that you want to restore, and then click Recover All Selected. Click Advanced.
-
Select the Map tab.
-
Select the Use map file check box and click Browse to navigate to the map file.
-
Select the Restore unmapped file check box.
-
Click OK.
-
Click OK to start the restore.
Renaming Files on Restore
If you do not want to overwrite the existing files during restores, you can append a suffix to the filenames and restore them as new files. (This suffix is appended to the end of the filename regardless of the extension.)
-
Follow the steps given below to rename files during the restore:From the CommCell Browser, navigate to Client Computers | <Client> | Proxy Client File System | <Backup Set>.
-
Right-click the <Subclient>, and then click Browse and Restore.
-
On the Browse and Restore Options dialog box, click View Content.
-
Select the data that you want to restore, and then click Recover All Selected. Clear the Restore to same folder check box.
-
In the Destination Client list, select the client.
-
Click Advanced.
-
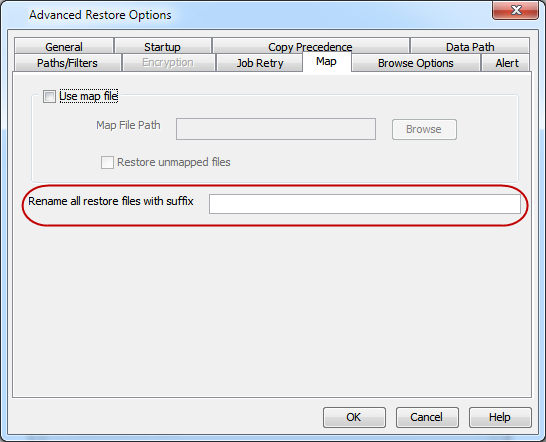
In the Advanced Restore Options dialog box, select the Map tab.
-
Enter the desired string that you want to append as a suffix to the filenames in Rename all restore files with suffix and click OK. For Example: Enter the string TEMP to rename FILE.TXT to FILE.TXTTEMP.
-
Click OK.
-
Click OK to start the restore.
Overwriting Data during Restores
By default, the data in the destination is overwritten when the restored version is newer than the one in the destination.
-
Use the following steps to overwrite data irrespective of the destination version:From the CommCell Browser, navigate to Client Computers | <Client> | Proxy Client File System | <Backup Set>.
-
Right-click the <Subclient>, and then click Browse and Restore.
-
On the Browse and Restore Options dialog box, click View Content.
-
Select the data that you want to restore, and then click Recover All Selected. Ensure that the Overwrite Files check box is selected.
-
Click Unconditional Overwrite.
-
Click OK.
Note
Clear the Overwrite Files check box when restoring to a computer that has different hardware and different software device drivers.
Filtering Data from Restores
During a restore operation, you can specify the files, directories, and file name patterns that you want to filter and exclude from restoring.
-
From the CommCell Browser, navigate to Client Computers | <Client> | Proxy Client File System | <Backup Set>.
-
Right-click the <Subclient>, and then click Browse and Restore.
-
On the Browse and Restore Options dialog box, click View Content.
-
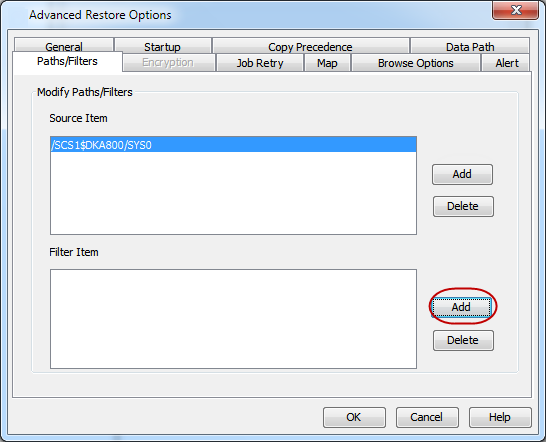
Select the data that you want to restore, and then click Recover All Selected. Click Advanced.
-
Click the Paths/Filters tab.
-
If you want to exclude any files or folders from restore operation, click Add for Filter Item list and enter the path of the data. Wildcard entries must be expressed as complete paths.
You can also click Delete to remove existing source or filter items.
-
Click OK.
-
Click OK to start the restore.
Supported Wildcards
The following wildcards can be used in filters to include or exclude data when restoring data.
|
Wildcards |
Description |
Examples |
|
* |
Any number of characters. This wildcard is used in the following scenarios:
|
*.doc will restore all files with the extension .doc (e.g., STATUS.doc, MISSION.doc). /SCS1$DK00/TEST/*.doc;1 will restore all .doc files only in the /TEST directory A*.so will restore all files with the extension .so (e.g., ALVSC.so, ADVDCC.so) on the client computer which have the name beginning with "A". /SCS1$DK00/FINANCE/TEST/* will restore all the files and directories in the "TEST" directory under the "FINANCE" directory. Any sub-directories under the TEST directory will not get restored. |
|
? |
Any one character. This wildcard can be used in the following scenario: All files (or directories) for which any one character in the file name or the directory name is variable. |
/SCS1$DK00/ACCESS? will restore any directory or file for which the name begins with- "ACCESS" followed by any one character such as ACCESS1 or ACCESS5. However, ACCESS12 or ACCESS15 will not get restored because the last two characters in the name are variable. /SCS1$DK00/CLASS/REPORT? will restore any directory or file under /CLASS directory for which the character in the place of ? is variable. For example: /CLASS/REPORT1 and /CLASS/REPORT2 will get restored. However, /CLASS/REPORT15 will not get restored. |
|
[] |
Set or range of characters. |
/SCS1$DK00/CLASS/[A-M]*.doc will restore any file with .doc extension for which the name begins with the letters "A" through "M”. /[AEIOU]*.doc will restore any file name that ends with .doc and begins with the letters A, E, I, O, or U. /SCS1$DK00/CLASS/FINANCE/REPORT[1-47-9] will restore files REPORT1, REPORT2, REPORT4, REPORT7, REPORT8, REPORT9 under FINANCE directory. /SCS1$DK00/DEPARTMENT-[A-CS] will restore files DEPARTMENT-A, DEPARTMENT-B, DEPARTMENT-C and DEPARTMENT-S. |
|
[!] |
The negation of a set or range of characters. You can use the wildcard in the following scenario: Restore all files in a directory except the files for which the name starts with any character from the specified set or range of characters. |
/SCS1$DK00/TEST/[!AEIOU]*.doc would restore all .doc files in the TEST directory that start with a letter other than A, E, I, O, or U. |
|
** |
Any number of characters across any number of path levels. |
/SCS1$DK00/**/MOVE.cpp - will restore the file named MOVE.cpp located at any directory level. (e.g., /TEST/NEWAPP/MOVE.cpp and /OPT/KDE3/SRC/MOVE.cpp) /SCS1$DK00/ETC/** - will restore directories and files under /ETC. All the sub-directories under these directories will also be included. |
-
When you use wildcards to specify the subclient content, the content path appears in Italics.
-
If you want all the files with the file extension .doc to be restored from any level, then specify the content as *.doc. If any subclient content doesn’t start with /, then /**/ will be prefixed to the content to match at any level. E.g., *.doc will be /**/*.doc.
-
If user wants to treat *, ?, [ ] as literals in the subclient content and not as wildcards, then the user can escape the wildcard by adding \ before the wildcard. E.g., /REPORT\[2011-2012\]/*.doc restores all the .doc files under /Report[2011-2012].
-
More than one type of wildcard can be used when specifying subclient content (e.g., /DCVOL?/ORCL[1-47]/**/*.log).
Restoring Only When Data Exists on the Destination
-
Follow the steps given below to restore the only data that already exists in the destination computer. This ensures any data removed from the destination computer is not reintroduced by the data recovery.From the CommCell Browser, navigate to Client Computers | <Client> | Proxy Client File System | <Backup Set>.
-
Right-click the <Subclient>, and then click Browse and Restore.
-
On the Browse and Restore Options dialog box, click View Content.
-
Select the data that you want to restore, and then click Recover All Selected. Ensure that the Overwrite Files check box is selected. (If it is not selected, only those files that do not exist on the destination will be restored.)
-
Select the Restore only if target exists check box.
-
Click OK.
Resubmitting a Restore Job
You can rerun a failed or completed restore job. This is useful when you want to use all the options and settings configured for the original job.
Follow the steps given below to rerun a restore job:
-
From the CommCell Browser, navigate to Client Computers.
-
Right-click the <Client> and click View | Job History.
-
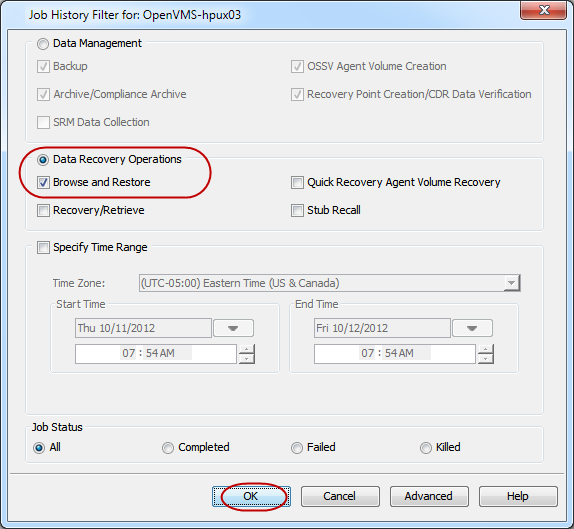
Click Data Recovery Operations.
-
Select the Browse and Restore check box and clear all other check boxes.
-
Click OK.
-
Right-click the restore job that you want to resubmit from the Data Recovery Job History tab and click Resubmit Job.
-
Click OK to start the restore.
Restoring by Jobs
You can select a specific backup job for a restore. This method of restoring data is faster and useful in the following scenarios:
-
To restore point-in-time data associated with a specific backup job
-
To restore multiplexed data from the same client
Avoid running restores by jobs for jobs associated with the default backup set, if you do not want to restore the operating system files or directories. The entire content of the backed up client will be restored and the client where you are restoring might run out of space.
Restores by jobs use the same number of streams that you configured for the subclient. For more information on configuring multiple streams for subclients, see Configuring Multiple Streams for Backups.
Restoring Deleted Files
Follow the steps given below to restore deleted files:
-
From the CommCell Browser, navigate to Client Computers | <Client> | Proxy Client File System | <Backup Set>.
-
Right-click the <Subclient>, and then click Browse and Restore.
-
On the Browse and Restore Options dialog box, click View Content.
-
Select the data that you want to restore, and then click Recover All Selected. Click Advanced.
-
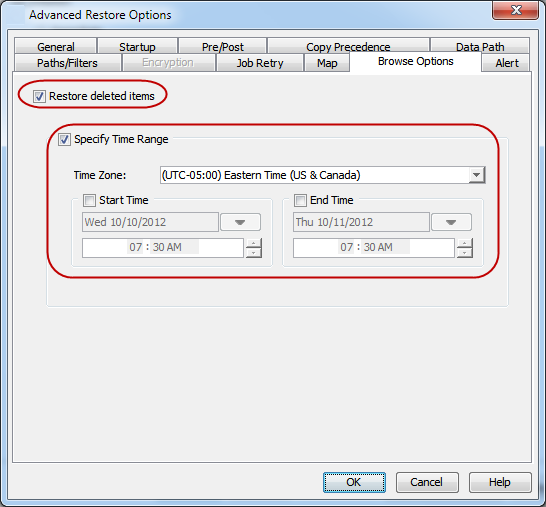
Select the Browse Options tab.
-
Select the Restore deleted items check box and then select the Specify Time Range check box.
-
Select the time range to restore the files, deleted in that period of time.
-
Click OK.
-
Click OK to start the restore.
Scheduling a Restore
-
From the CommCell Browser, navigate to Client Computers | <Client> | Proxy Client File System | <Backup Set>.
-
Right-click the <Subclient>, and then click Browse and Restore.
-
On the BrowseandRestoreOptions dialog box, click View Content.
-
Select the data that you want to restore, and then click Recover All Selected.
-
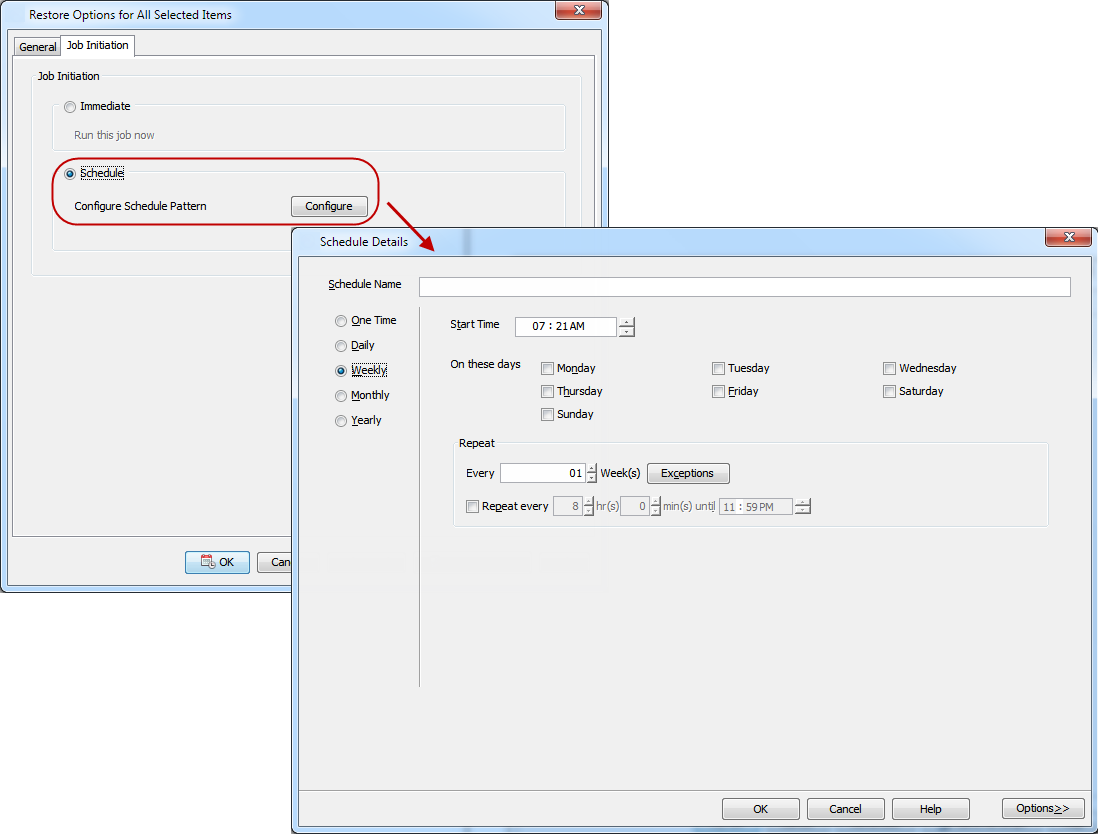
On the RestoreOptionsforAllSelectedItems dialog box, click the Job Initiation tab, and then click Schedule.
-
Click Configure.
-
On the ScheduleDetails dialog box, select the appropriate scheduling options. For example:
-
Click Weekly.
-
Check the days you want the run the restore job.
-
Change the Start Time to 9:00 PM
-
Click OK.
-
-
Click OK.
The restore job will execute as per the schedule.
See Scheduling for a comprehensive information on scheduling jobs.
Managing Restore Jobs
Once you initiate the restore operation, a restore job is generated in the Job Controller. Jobs can be managed in a number of ways. The following sections provide information on the different job management options available:
Restarting Jobs
Jobs that fail to complete successfully are automatically restarted based on the job restartability configuration set in the Control Panel. This configuration can be changed at any time; however, changes to this configuration will affect all jobs run in the entire CommCell.
It is also possible to override the default CommServe configuration for individual jobs by configuring retry settings when initiating the job. This configuration, however, will apply only to the specific job.
Configure Job Restartability at the CommServe Level
-
From the CommCell Console ribbon, click the Home tab, and then click Control Panel.
-
In the Data section, click Job Management.
The Job Management dialog box is displayed.
-
On the Job Restarts tab, select the job information.
-
In the Job Type box, select the job type that you want set the restart capability for (for example, File System and Indexing Based (Data Recovery)).
-
Select the Restartable check box.
-
Optional: to change the maximum number of times that the Job Manager tries to restart a job, in the Max Restarts box, select the number of times.
-
Optional: to change the time interval between attempts for the Job Manager to restart the job, in the Restart Interval (Mins) box, select the number of minutes.
-
-
Click OK.
Configure Job Restartability for an Individual Job
-
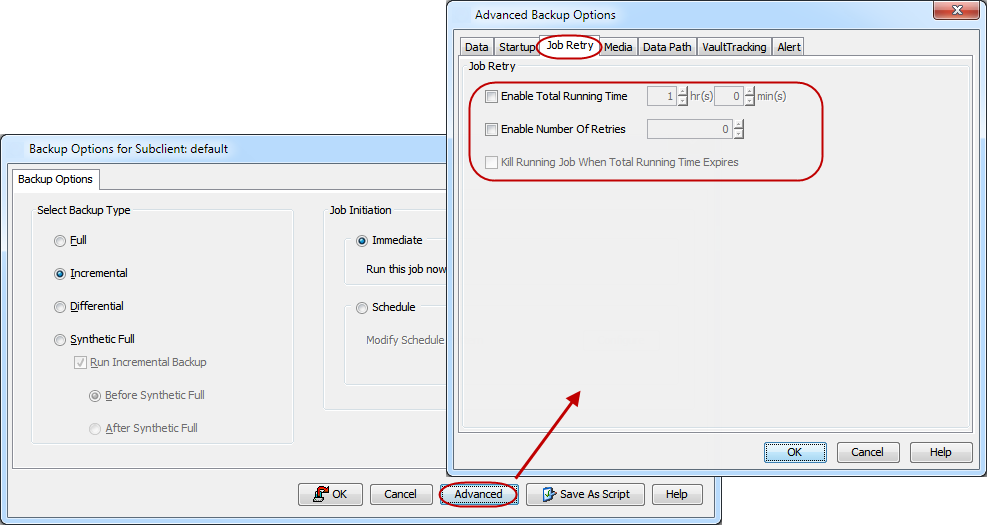
From the Restore Options dialog box, click Advanced, then select the Job Retry tab and specify the following as desired:
-
Total Running Time - The maximum elapsed time, in hours and minutes, from the time that the job is created.
-
Number of Retries - The number of times that Job Manager will attempt to restart the job.
-
Kill Running Jobs When Total Running Time Expires - Option to kill the job when the specified Total Running Time has elapsed, even if its state is "Running".
-
-
Click OK.
Controlling Jobs
The following controls are available for running jobs in the Job Controller window:
|
Suspend |
Temporarily stops a job. A suspended job is not terminated; it can be restarted at a later time. |
|
Resume |
Resumes a job and returns the status to Waiting, Pending, Queued, or Running. The status depends on the availability of resources, the state of the Operation Windows, or the Activity Control setting. |
|
Kill |
Terminates a job. |
Suspending a Job
-
From the Job Controller of the CommCell Console, right-click the job and select Suspend.
-
The job status may change to Suspend Pending for a few moments while the operation completes. The job status then changes to Suspended.
Resuming a Job
-
From the Job Controller of the CommCell Console, right-click the job and select Resume.
-
As the Job Manager attempts to restart the job, the job status changes to Waiting, Pending, or Running.
Killing a Job
-
From the Job Controller of the CommCell Console, right-click the job and select Kill.
-
Click Yes when the confirmation prompt appears if you are sure you want to kill the job. The job status may change to Kill Pending for a few moments while the operation completes. Once completed, the job status will change to Killed and it will be removed from the Job Controller window after five minutes.
Additional Restore Options
Several additional options are available to further refine your restore operations. The following table describes these options, as well as the steps to implement them.
Be sure to read the overview material referenced for each feature prior to using them.
|
Option |
Description |
Related Topic |
|
Skip Errors and Continue |
This option allows a restore job to continue regardless of media errors and outputs a file that lists the full path names of the files that failed to get restored.
|
|
|
Use Exact index |
This option allows you to associate the media with the most recent index available in the CommCell.
|
|
|
Skip Errors and Continue |
This option allows a restore job to continue regardless of media errors and outputs a file that lists the full path names of the files that failed to get restored.
|
|
|
Startup Options |
The Startup Options are used by the Job Manager to set priority for resource allocation. This is useful to give higher priority to certain jobs. You can set the priority as follows:
|
Refer to Job Priority and Priority Precedence. |
|
Copy Precedence |
By default, the system retrieves data from the storage policy copy with the lowest copy precedence. If the data was pruned from the primary copy, the system automatically retrieves data from the other copies of the storage policy in the lowest copy precedence to highest copy precedence order. Once the data is found, it is retrieved, and no further copies are checked. You can retrieve data from a specific storage policy copy (Synchronous Copy or Selective Copy). If data does not exist in the specified copy, the data retrieve operation fails even if the data exists in another copy of the same storage policy. Follow the steps given below to retrieve the data from a specific storage policy copy:
|
Refer to Recovering Data From Copies. |
|
Data Path Options |
The data recovery operations use a default Library, MediaAgent, Drive Pool, and Drive as the Data Path. You can use this option to change the data path if the default data path is not available. Follow the steps given below to change the default data path: The following are some of the important situations where you may need to change the data path:
|
Refer to Change Data Path. |
|
Encryption |
If the client's data is encrypted with a pass phrase, you must enter the pass-phrase to start the data recovery operation. Follow the steps given below to enter the pass-phrase:
|
Refer to Data Encryption. |
|
Alerts |
This option enables users or user groups to get automatic notification on the status of the data recovery job. Follow the steps given below to set up the criteria to raise notifications/alerts:
|
Refer to Alerts and Notifications. |
|
Command Line Restores |
Command Line Interface enables you to perform backups or restore from the command line. The commands can be executed from the command line or can be integrated into scripts. You can also generate command line scripts for specific operations from the CommCell Browser using the Save As Script option. |
Refer to Command Line Interface. |
|
CommCell Readiness Report |
The CommCell Readiness Report provides you with vital information such as connectivity and readiness of the Client, MediaAgent, and CommServe. It is useful to run this report before performing a backup or a recovery operation. Follow the steps given below to generate the report:
|
|
|
Restore Job Summary Report |
The Restore Job Summary Report provides you with information about all the data recovery jobs that are run in last 24 hours for a specific client and agent. You can get information such as failure reason, failed objects, job options, and so on. It is useful to run this report after performing the restore. Follow the steps given below to generate the report:
|
Refer to Restore Job Summary Report. |