You can upgrade Microsoft SQL Server on non-CommServe computer clients that contain database packages (for example, Web Server, Workflow Engine, and Metrics Server). The following procedure ensures that older components such as .NET Framework are removed. You should consider performing a hardware refresh or a VM refresh at same time you upgrade to Microsoft SQL Server 2019 Standard Edition.
Note
-
Beginning Feature Release 11.24, Commvault uses Microsoft SQL Server 2019 Standard Edition on Windows OS 2016 or higher.
-
Microsoft SQL Server 2019 is not compatible with Windows OS 2012. If you are running Windows OS 2012 or Windows OS 2012 R2, then Microsoft SQL Server 2016 will be installed as part of a fresh CommServe server installation.
-
If you are using Download Manager to download Commvault media with MS SQL Server 2016 onto a computer with an internet connection, and that media needs to be installed on a CommServe computer running Windows Server 2012 or Windows Server 2012 R2 computer, you must download Microsoft SQL Server 2016, which is compatible with those operating systems (MS SQL Server 2019 is not compatible with Windows Server 2012 or Windows Server 2012 R2). You can use the bDownloadSQL2016 registry key on the downloading computer to download Commvault media with MS SQL Server 2016, instead of Commvault media with MS SQL Server 2019. For more information, see the Troubleshooting article "Download Microsoft SQL Server 2016 Instead of Microsoft SQL Server 2019 Using Download Manager".
Before You Begin
Write down all Commvault-related components that are currently installed on the remote server computer (for example, Web Server, Workflow Engine, and Metrics Server). You will need to re-install these components in Step 6 of the Procedure, below.
To view the components that are currently installed, do the following:
-
From the CommCell Browser, in the Client Computers node, right-click a remote client and then click Properties.
The Client Computer Properties dialog box appears.
-
On the Version tab, the installed packages are listed in the Update status area.
Procedure
-
Login to the remote server computer and then open SQL Server Management Studio.
-
Using SQL Server Management Studio, back up all Commvault databases to an accessible location as follows:
-
Go to server_instance > Databases.
-
Right-click a database, point to Tasks, and then click Back Up.
The Back Up Database dialog box appears.
-
In the Backup type box, select Full.
-
In the Backup Component area, select Database.
-
In the Backup set area, accept the default backup set name displayed in the Name box. If needed, you can specify a different name.
-
In the Backup set will expire area, specify when the backup set should expire. By default, the backup set is set to never expire.
-
In the Destination area, specify the location where the database should be backed up. By default, the database backup is saved to the local disk, in the MS SQL Server installation directory.
If you want to specify a different location, click Remove and then click Add to specify the new location. Make sure the backup file is saved as <Database_Name>.dmp.
-
Click OK.
-
Copy the database .dmp file to an accessible location.
-
For all databases listed in Step a., above, repeat Step b. to Step i., above.
-
-
Uninstall the database packages of the Web Server, Workflow Engine, and Metrics Server packages locally. For more information, see Uninstalling Commvault Locally from Windows Clients.
Note
When following that uninstallation procedure, you can selectively uninstall database packages (see Step 4, bullet 2 of the "Interactive Uninstallation" procedure on that page).
-
Uninstall the currently installed Microsoft SQL Server software. For more information, see the Microsoft documentation, Uninstall an Existing Instance of SQL Server (Setup).
-
Run the latest installer of the installed Commvault feature release on the same hardware. For more information, see Installing Commvault Locally Using the Download Manager.
-
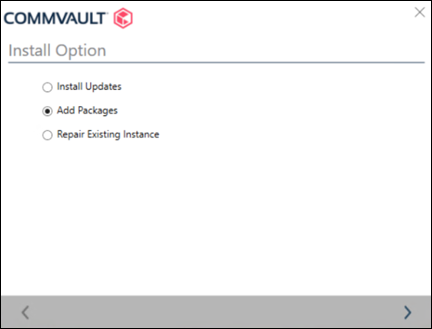
During the installation procedure, select the same Commvault instance, and then select Add Packages on the Install Option page, as follows:
-
Select the same Commvault database packages that were selectively removed in Step 3, above.
-
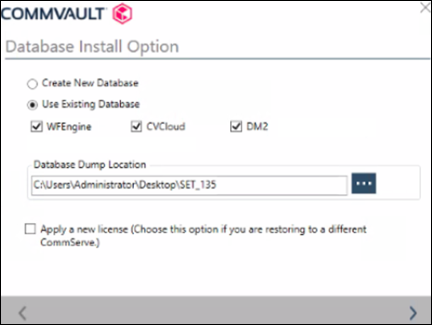
On the Database Install Option page (see below), select Use Existing Database, and then select the database packages that you added and that you performed a .dmp database backup for in Step 2, above.
-
On the Database Install Option page (see above), in Database Dump Location, enter the location of the .dmp database backup file that was created in Step 2, above. This DR backup file is automatically upgraded if necessary.
-
Click Next.
-
After installation completes, click Finish.
-
-
Redeploy any custom workflows for the Workflow Engine.