Follow these steps to apply Microsoft’s Conditional Access policy and define a specific IP address range to securely manage access to all your Azure applications.
Before You Begin
-
Disclaimer: This procedure is performed using the Microsoft Entra admin center. The application is subject to change without notice. Consult Microsoft documentation, for example, see Microsoft Entra Conditional Access documentation.
-
To complete the steps mentioned below, ensure you have the following:
-
An Azure P2 license
-
A Microsoft Entra Workload ID
-
The Policy.Read.All application permission enabled in your Azure APIs
-
Procedure
-
Sign in to the Microsoft Entra admin center.
-
On the navigational pane, click Conditional access.
The Conditional access | Overview page appears.
-
On the left panel, under Manage, click Named locations.
Named locations represent the network nodes or geographic regions from which your application can be accessed. These may include backup access nodes or other trusted infrastructure endpoints.
-
At the top of the page, click IP ranges location.
The New IP location screen appears.
-
Enter the required details and then click Create.
-
Name: Enter a name for the IP range.
-
Mark as trusted location: Select the check box to mark the IP range as trusted.
-
 button: Click the button and Enter a new IPv4 or IPv6 range, and then click Add.
Refer to Commvault Cloud Service Endpoints IP Addresses for Microsoft 365, SaaS Apps, Google Workspace, Azure and AWS Workloads for the list of latest IP addresses.
-
-
On the left pane, click Policies.
The Conditional Access | Policies page appears.
-
On the upper-left area of the page, click New policy.
The New Conditional Access policy screen appears.
-
Enter a Name for the policy.
-
Configure the remaining required Assignments, and then click Create.
-
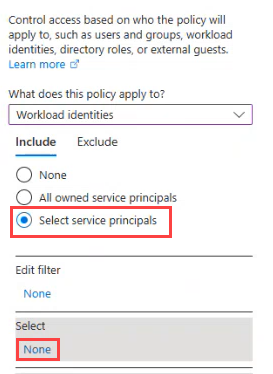
On the User or workload identities tab:
-
On the Select service principals screen, choose the Azure apps you want to include in the policy, and then click Select.
You can use the Search field to find the apps you want to add.
-
Select Workload identities from the What does this policy apply to dropdown.
-
Under Include, choose Select service principals, and then under Select, click None.
-
-
On the Target resources tab:
-
Leave the Resources (formerly cloud apps) dropdown option selected.
-
Under Include, choose the All resources (formerly 'All cloud apps') option.
-
-
On the Network tab:
-
On the Select networks screen that appears, select the newly created IP range (done in step 5.) from the list of networks, and then click Save.

-
Set the Configure toggle key to Yes.
-
Under Exclude, choose the Selected network and locations option, and then under Select, click None.
-
-
On the Grant tab:
-
On the Grant screen that appears, select Block access.
-
Click Select.
-
-
Set the Enable policy toggle key to On.
-