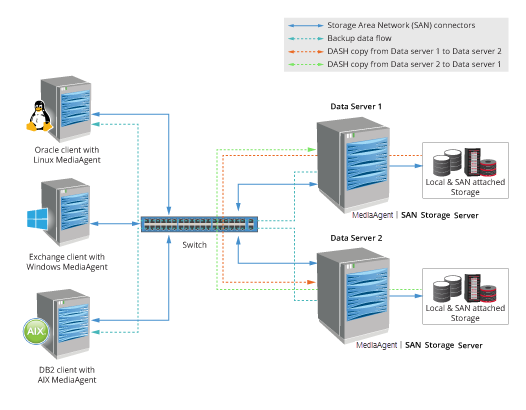
High availability data servers can be setup to get continuity and/or reliability for data protection and recovery operations using SAN Data Servers.
Prerequisites
-
Get the right hardware for the SAN Data Server MediaAgents.
-
See Shared SAN Data Server - System Requirements for Fibre Channel for a list of supported platforms, both hardware and software.
-
For sufficient hardware requirements for the MediaAgents, see CommCell Sizing.
-
-
Setup the hardware for the high availability SAN Data Server MediaAgents.
- See Determining the Configuration for the Shared SAN Data Server for more information on determining your configuration.
-
Identify the clients that will be backed using these Data Server MediaAgents.
-
Windows, Linux and AIX clients are currently supported.
-
See System Requirements - MediaAgentfor a list of supported versions in these platforms.
-
Procedure
Step 1: Setup SAN Data Server MediaAgents
-
Install MediaAgent software on the SAN Data Servers. (For documentation purposes, this is referred to as SAN Data Server MediaAgent 1 with Library 1 and SAN Data Server MediaAgent 2, with Library 2.)
For instructions, see MediaAgent Installations.
-
The following steps are crucial during this MediaAgent installation.
Ensure that you select the MediaAgent and the SAN Storage Server packages during installation.
From the Policy Selection page, do not select any storage policy from the Storage Policy list during the installation.
-
-
Configure the libraries attached to these MediaAgents.
- Depending on your setup, this could be any one of the configurations described in Shared SAN Data Server.
Step 2: Setup Clients with MediaAgents
-
Install the MediaAgent software on all the clients that will backup data to the Data Server MediaAgents. (For documentation purposes, this is referred to as Client MediaAgents.)
For instructions, see MediaAgent Installations.
-
During installation, select the MediaAgent package along with the packages that are needed on the client. (Make sure that the operating system is supported before you install. See Prerequisites above for supported operating systems.)
-
Do not select a storage policy, in the Policy Selection page.
-
Step 3: Share the Mount Path With All MediaAgents
-
Verify and ensure that the mount paths are shared with all the MediaAgents setup in Step 1 and Step 2 above.
For instructions, see Share a Mount Path.
- Select Data Server - FC from the Transport Type list,
Step 4: Setup High Availability Backups using Alternate Data Paths
-
Create a Storage Policy with Deduplication enabled, using any one of the Client MediaAgents and Library 1.
For more information, see Creating a Storage Policy with Deduplication.
-
All the MediaAgents that share the mount path (Step 3 above) will be automatically added as Data Paths in the Storage Policy.
-
Add an additional mount path, using any one of the Client MediaAgents and Library 2.
For instructions, see Configuring Alternate Data Paths for Primary Copies.
-
-
From the clients, configure the Subclients to use this newly created storage policy for backing up data.
-
Right the subclient and click Properties.
-
Click the Storage Device tab and select this newly created Storage Policy from the list.
-
Click OK.
-
Step 5: Setup High Availability Restores using Auxiliary Copy
-
Create a secondary copy for the Storage Policy using Data Server MediaAgent 2 and Library 2.
For instructions, see Creating a Synchronous Copy.
-
Add Data Server MediaAgent 1 and Library 1 as an additional Data Path. (Data Server MediaAgent 2 and Library 2 will be automatically included as a data path.)
For instructions, Configuring Alternate Data Paths for Secondary Copies.
-
Enable the Write to a different library compared to source copy option from the Media tab of the Storage policy Copy Properties
Note: This option is crucial and must be enabled to ensure that a copy of the data is replicated in the alternate library, ensuring high availability.
-
-
Disable the System created schedule for Auxiliary Copies.
For instructions, see Enabling or Disabling a Schedule.
-
Setup a Auxiliary copy schedule using Data Server MediaAgent 1 as the MediaAgent. The schedule should be configured to run frequently, so that data is constantly replicated in the other library.
For instructions, see Schedule Auxiliary Copies.
Step 6: Test your Setup
-
Testing Backups
-
Temporarily disable Data Server MediaAgent 1 and run a backup from one of the clients.
For instructions, see Disable a MediaAgent.
-
You will notice that the backup is routed to Library 2 using Data Server MediaAgent 2.
For instructions, see Viewing Additional Job Information in the Job Controller.
-
Similarly, you can disable Data Server MediaAgent 2 and run a backup from one of the clients to verify that the backup is routed to Library 1 using Data Server MediaAgent 1.
-
-
Testing Auxiliary Copy schedules
-
Verify that the schedules for Auxiliary Copy jobs are run as soon as the backups are run so that the data is replicated in the other library.
For instructions, see Viewing Auxiliary Copy Job History.
-
If necessary, you can fine-tune the schedules for the Auxiliary Copy jobs so that it is run as soon as a backup operation is completed.
See also Enabling Frequent (Timely) Replication of Backup Jobs Completed during an Auxiliary Copy Operation for additional information on Auxiliary Copy scheduling.
-
-
Testing Restores
You can test the restore using one of the following methods.
-
Temporarily disable Data Server MediaAgent 1 and perform a restore operation from the subclient that backed up data through Data Server MediaAgent 1 to Library 1.
For instructions, see Disable a MediaAgent.
The restore job should successfully restore the data using Data Server MediaAgent 2 , Library 2.
-
Alternately, restore data using Data Server MediaAgent 2, Library 2. (For instructions, see Restore, Recover, or Retrieve Data Using a Specific Library, MediaAgent, Drive Pool, and Drive.)
This restore job should also successfully restore the data.
-