You must use Dev-Test groups to set up Amazon Virtual Labs.
Before You Begin
- Create an Amazon Virtual Lab Policy.
Procedure
-
In the CommCell Browser, expand Dev-Test & DR, right-click Dev-Test Groups and then click New Group.
The Dev-Test Group dialog box appears.
-
On the Enter the Group Name and Description page, name the group, type a description, and then click Next.
-
On the Select Client page, select the Amazon Virtualization clients that you want to use as live mounts in the virtual lab:
-
From the Available list, select one or more clients, and then click Add to add them to the Selected list.
-
Click Next.
-
-
On the Select Machines page, select the client machines that you want to include:
-
The Place Machines in Isolated Network option is selected automatically.
-
From the Source list, select Templates.
-
From the Policy list, select an Amazon Virtual Lab policy.
-
From the VM Template list, select one or more clients.
-
Optional: Include all client machines. Select Select All.
-
Click Next.
-
-
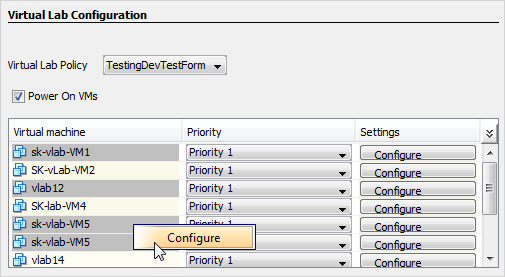
On the Virtual Lab Configuration page, configure settings for the virtual lab:
-
To power on VMs as soon as they are created, select Power On VMs.
-
In the Virtual Machine list under Priority, for each VM in the app, select the order in which you want the VM to power on.
-
To configure post-processing operations for a VM, under Settings, click Configure:
-
To execute custom scripts after the VM is created, in the Post Operation Process box, specify the location of the script file.
-
To enter a set of credentials for logging on to the computer where the script file is located, click Configure, enter the user name and password, and then click OK.
-
Click OK to close the Live Mount Configure Options dialog box.
-
-
To configure post-processing operations for multiple VMs, press Ctrl and select each VM you want to use:
-
Right-click the VMs and click Configure.
The Live Mount Configure Options dialog box appears.
-
In the Post Operation Process box, specify the location of the script file.
-
Click OK to close the Live Mount Configure Options dialog box.
-
-
To continue creating VMs according to priority settings after a VM fails to build, select Continue validating VMs after a failure.
-
To configure the time period to wait before building the next VM according to priority, next to Priority Interval, type or select the number of minutes.
-
Click Next.
-
-
On the Summary page, click Finish.