HyperScale Reference Architecture can be setup without network bonding, on Fujitsu PRIMERGY RX2540 M5 servers.
Before You Begin
-
Verify that the hardware meets the designs specifications provided in Fujitsu PRIMERGY RX2540 M5.
-
Use the data collected in the Preinstallation Checklist to setup the nodes.
-
For creating or scaling out the HyperScale Storage Pool, we recommend to use the same size disk.
-
To achieve disk level redundancy and for better performance, we recommend to have Non-RAID on spindle disks for storage. However, if there is already a hardware RAID card in the node, you must bypass the RAID card and configure them as independent physical disks.
-
Ensure that 10 GigE network ports are used for HyperScale Storage Pool communications. (Separate 10 GigE network ports for Data Protection network and StoragePool network.)
-
Each node must have two network ports.
-
One network port is used for Commvault communication and the IP address associated with the network port must resolve to the host name used for Commvault communication.
-
The other network port is used for storage pool communication and the IP address associated with the network port must resolve to the host name used for Commvault communication with sds suffix.
-
For example: If the IP address associated with network port used for Commvault communication resolves to hostname scaleout1, the IP address associated with network port used for storage pool communication will resolve to scaleout1sds.
-
-
Ensure that you have separate subnets for the Data Protection network and for the StoragePool network.
Procedure
-
Download the latest ISO (HyperScale 1.5) as follows:
-
Open a Web browser, and then go to Commvault Store.
-
Download the latest ISO.
-
-
Use a USB flash drive to copy the ISO and make it bootable as follows:
-
On a Linux system, copy the ISO locally, and connect a USB drive to the system.
-
Create a bootable USB using the following command:
# dd if=path of ISO of=/dev/sdx bs=4mWhere:
X(insdx) is the drive letter assigned by Linux to the USB drive, and not a partition on the USB. -
Once the process completes, attach the USB drive to a node.
-
-
Power on the node.
The boot device prompt, similar to the following will be displayed.
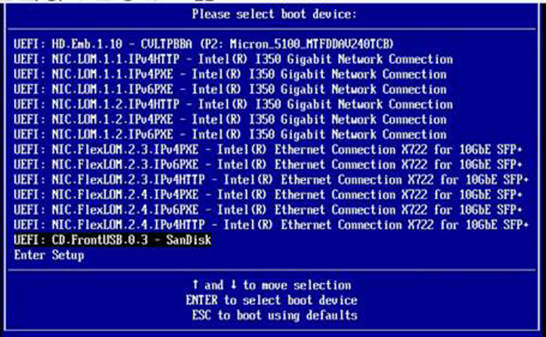
-
Select the USB drive as the boot device and then press <Enter>.
The Node Configuration page will be displayed.
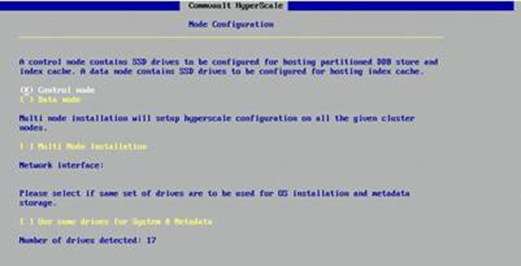
-
Choose the Control node option, and then click Next.
The System Drives page will be displayed.
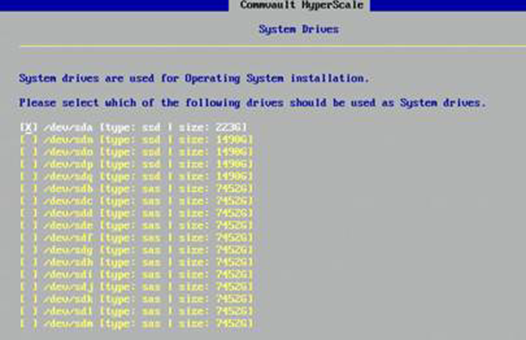
-
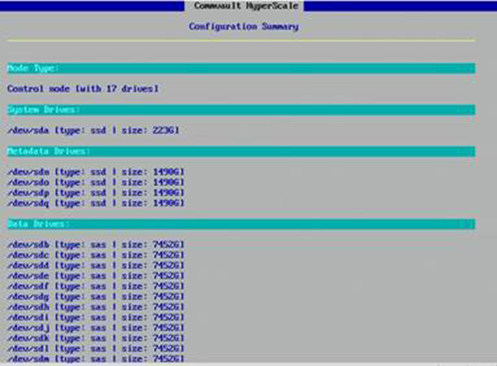
Choose the M.2 Drive (223G) for installing the operating system, and then click Next.
The Metadata Drives page will be displayed.
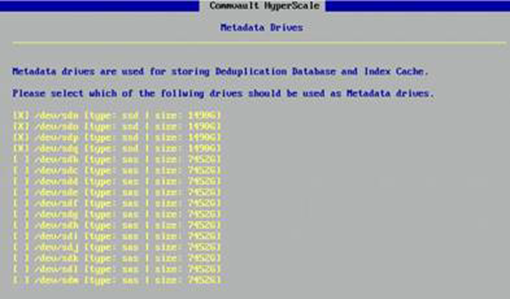
-
Choose 4 x (1490G) SSD Drives for Metadata, Index Cache, and Deduplication Database (DDB), and then click Next.
The Data Drives page will be displayed.
-
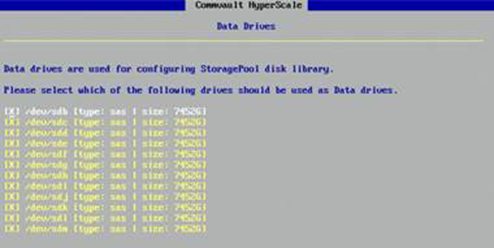
Choose 12 x (7452G) SAS drives for Storage Pool, and then click Next.
The Configuration Summary page will be displayed.
-
Click Apply.
The program installs the software and displays the progress in the Installation Status page.
This process will take some time to complete.
Click Finish to complete the installation.
-
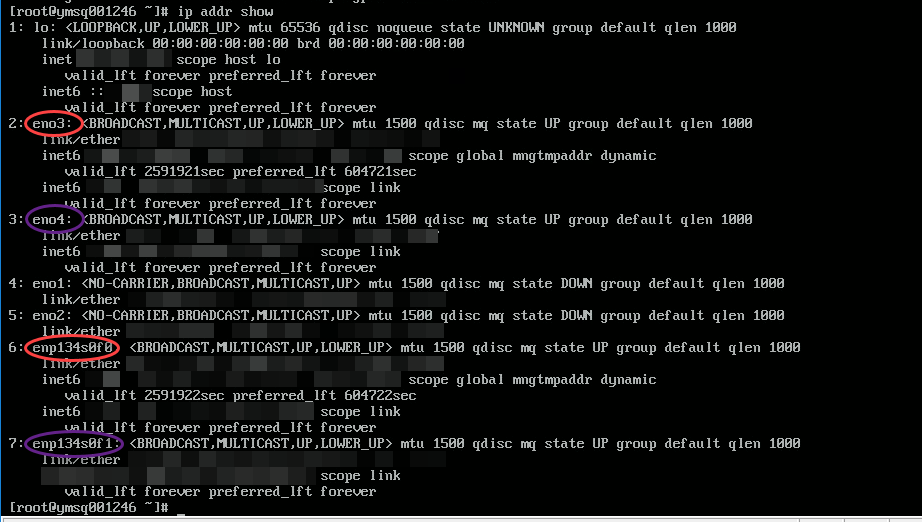
Get the network interface name for the node, using the following command:
# ip address showOutput similar to the following will be displayed.
-
Navigate to the following folder:
# cd $[/opt/commvault/MediaAgent] -
Configure the Data Protection network on the node, using the following command:
Use the information obtained in step 10 (above) to provide the correct interface name for data protection.
# ./cvconfigrefarchnw.py –c –e $[eno3] –i $[xxx.xx.x.x] –n $[xxx.xx.x.x] –g $[xxx.xx.x.x] –d $[xxx.xx.x.x] $[xxx.xx.x.x]Where:
-cOption to configure network -e Network interface name -i IP address of the interface -n Netmask IP of the interface -g Gateway IP for the interface to connect to -d DNS IPs for the interface to configure with (2 DNS IPs, separated by space, can be configured.) -
Configure the Storage Pool network on the node, using the following command:
Use the information obtained in step 10 (above) to provide the correct interface name for storage pool.
# ./cvconfigrefarchnw.py –c –e $[eno4] –i $[xxx.xx.x.x] –n $[xxx.xx.x.x] -
Update
/etc/hostswith the FQDN of the storage pool, using the following command:# ./cvconfigrefarchnw.py –c –e $[eno4] –i $[xxx.xx.x.x] –n $[xxx.xx.x.x] -f $[host_namesds.company.com]Note
For storage pool communication, the network port must resolve to the host name used for Commvault communication with the
sdssuffix.For example: If the IP address associated with network port used for Commvault communication resolves to hostname
scaleout1.company.com, the IP address associated with network port used for storage pool communication will resolve toscaleout1sds.company.com. -
Restart the network service to reflect the new IP, using the following command:
# systemctl restart network -
Manage the Commvault storage pool services, using the following command:
# ./CVSDS -aNote
The -a option is important as it treats the node as reference architecture.
-
Restart the Commvault services, using the following command:
# systemctl restart commvault -
Open
/var/log/commvault/Log_Files/CVWebScale.logand verify that the node has been setup with the platform type as Reference architecture, as shown in the following example:
Caution
Contact Commvault Customer Support if you do not see this information in the log file.
-
Deploy the node, using the following command:
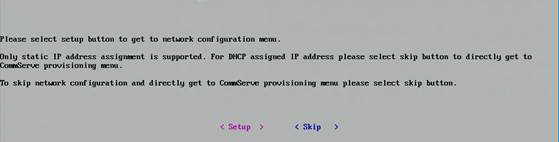
# ./setupsdsThe following prompts will be displayed:

-
Type the FQDN hostname and the root password for the node, and then click OK.
-
Select Skip.
-
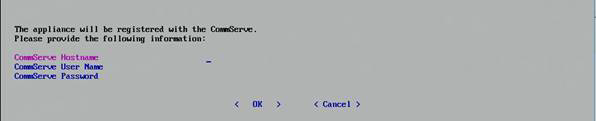
Type the CommServe host credentials to register the MediaAgent node with the CommServe host, and then click OK.
The node will be configured and a message will be displayed when the configuration process is finished.
This completes the steps for setting up the nodes.
-
What to Do Next
-
Repeat the steps on the other HyperScale nodes in the storage pool.
-
If this is the last node in the storage pool, perform the following steps:
-
Install the latest Commvault service pack and updates for the MediaAgents.
For more information about installing service packs, see Updating the Commvault Software on an Existing Server.
-
Create a HyperScale Storage Pool in the CommServe using the nodes.
For more information about creating storage pools, see Configuring a HyperScale Storage Pool.
-