You can replace a Commvault HyperScale X node when the node becomes completely unusable due to hardware issues. You can also replace the node if you accidently reinitialized the node during a refresh operation. When you replace the node, all the drives are reformatted and the data drives are reconstructed using the other nodes in the storage pool. The replace operation also restores and rebuilds the drives that contain the Deduplication Database (DDB) and Index Cache.
Before You Begin
Enable root access, if root access is disabled in the storage pool. For more information, see Enabling or Disabling Root Access.
Verify that your environment meets the requirements that are mentioned in the Existing Node Requirements section in Prerequisites for Adding Nodes to an Existing HyperScale X Storage Pool.
Procedure
-
Login to the Windows based computer.
-
Download the latest HyperScale Appliance ISO <Version_Number> (for example, 11.36 HyperScale ISO 3.2408) from Commvault Store.
-
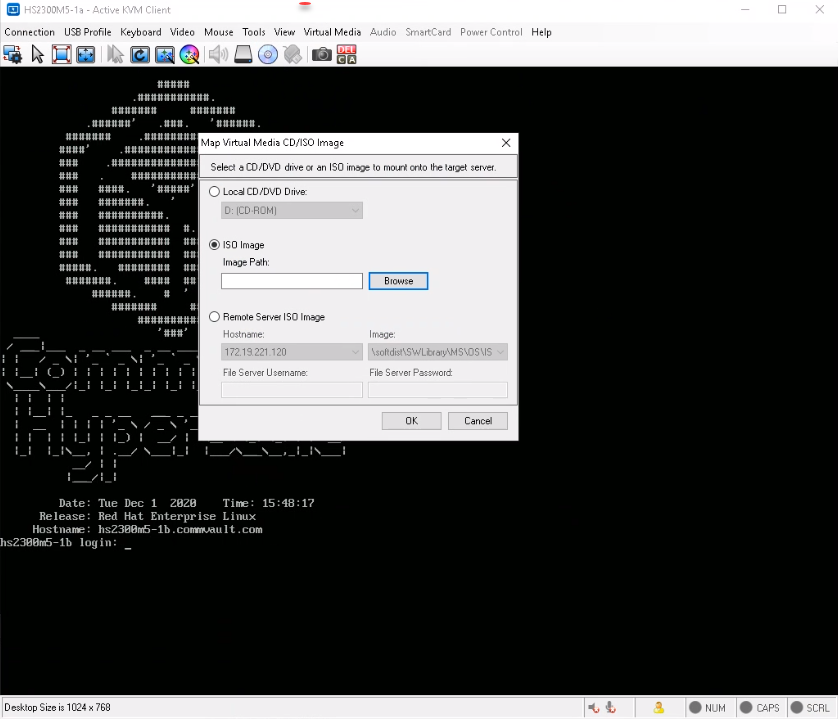
Access the node using the KVM management console in your environment.
-
Map the downloaded ISO image as a virtual media from the KVM Management console.
Click here to view a sample image.
-
Reboot the node using the virtual media as follows.
-
Login to the node as root. (Press <Alt> + <Ctrl> + <F2> if the login prompt is not displayed.)
-
Type
reboot. -
During the boot sequence press <F12> when the following message is displayed. (This message will be displayed briefly for a few moments only during the boot sequence.)
Press F2 to enter Setup or <F12> to enter Boot Menu. -
Select the virtual media as the boot device and press <Enter>.
The Commvault HyperScale Install will be started.
-
-
If you are using a node that has an existing HyperScale configuration, the HyperScale Configuration Detected screen is displayed.
If you are using a new node, this screen will not appear.
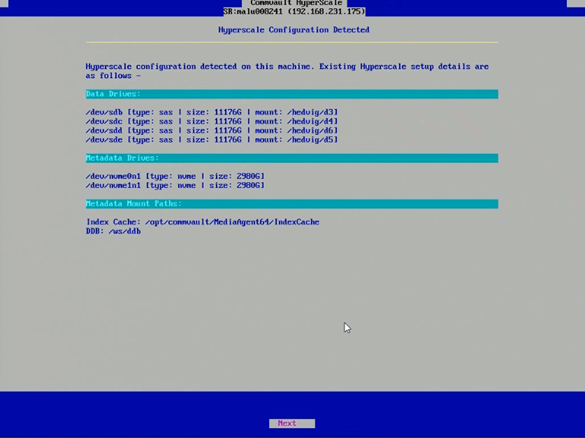
Choose Next.
-
The Preserve Data screen is displayed.
Select the Reinitialize Drives option and then click Next.
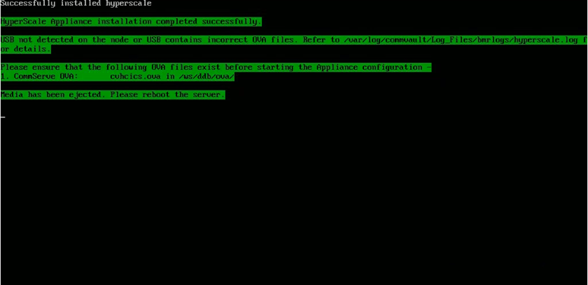
The installation process will be started. This process will take some time to complete.
The following message is displayed when the installation is complete.
-
Reboot the node.
-
After the reboot, login using the following default credentials:
Login: root
Password: cvadmin
(Press <Alt> + <Ctrl> + <F2> if the login prompt is not displayed.)
-
Configure the Hyperscale network using the
hsxsetupcommand on the replaced node. Make sure to exit after the network configuration is complete. -
Run the following commands on one of the existing cluster nodes other than the reimaged node:
cd /opt/commvault/MediaAgent64/task_manager
./cvmanager.py -t Replace_Node
The following message appears:
INFO : Initializing HyperScale Task Manager INFO : Commvault HyperScale Task Manager Initialized. Hostname of the node to replace: -
Enter the hostname of the node that you want to restore.
The following message appears:
Root password of existing cluster: [Re-Enter to Confirm] - Root password of existing cluster: -
Enter the root password which was added during the initial Hyperscale node configuration. (This root password would be the same root password used in the other nodes.)
The following message appears:
Are you registering with Metallic (y/n): -
Enter n.
The following message appears:
CommServe fully qualified hostname: -
Enter the name (FQDN) of the existing CommServe computer.
The following message appears:
Are you registering with an AuthCode (y/n): -
Enter n.
The following message appears:
Enter a user name with permissions for registering new clients:
Enter the users password:
[Re-Enter to Confirm] - Enter the users password:
Enter the credentials that must be used to access the CommServe server.
Note: The Commserve FQDN and credentials must be the same as the one that was originally used before replacing the node.
-
Verify the status of the replaced node in the storage pool as follows:
-
From the navigation, click Storage > HyperScale X.
The HyperScale page appears.
-
Verify the Status column for the MediaAgent that you have replaced.
The status appears as Media agent under Maintenance when the replace operation is in progress.
After the node is replaced the Status column for the MediaAgent will appear as Online.
-
Verify that the node is replaced by clicking the node.
The <node> page is displayed. Check the following details:
-
Server Information area
-
Disk Status under the Disks area
-
-
-
Enable ransomware on the replaced node as described in Enabling Ransomware Protection for a HyperScale MediaAgent.
What to Do Next
-
Install the operating system updates on the replaced node to synchronize the operating system with the other nodes in the cluster.
After you install the OS updates, verify that you have the latest maintenance release, OS and CVFS updates on the node.
-
Disable root access, if root access was originally disabled in the storage pool. For more information, see Enabling or Disabling Root Access.