Do I need to set up 1-Touch server to perform 1-Touch recovery?
No. You don't need 1-Touch Server to perform the 1-Touch Recovery. You need to install File System iDataAgent on the client computer and then enable 1-Touch feature. For more information, refer to Enable 1-Touch.
You must perform at least one full backup before performing the 1-Touch recovery of the client computer. It is recommended to perform the backup of default subclient periodically. This will capture any changes in the client configuration. For more information, refer to Perform A Backup.
Do I need a new BootCD for each client I plan to recover?
No. Use the 1-Touch Linux Live CD provided as DVD04 or You can also download the 1-Touch ISO image with the latest updates and use it for each of your clients. For more information, see Prepare for Recovery.
Do I need any specific operating system utilities to perform 1-Touch recovery?
The following tables list the utilities required for 1-Touch. These are the standard operating system utilities that are distributed with the Ubuntu and RHEL/SuSE Linux distributions.
Note
If the prerequisites for a system state (1-Touch) backup are not met, the backup job will continue to back up the file system data and report the error during the post-backup phase. This ensures that the data remains protected even when the 1-Touch phase fails.
Debian and Ubuntu:
|
arch |
e2image |
last |
mv |
swapon |
kexec |
|
awk |
echo |
ldd |
netstat |
sync |
|
|
basename |
egrep |
ln |
openvt |
tail |
|
|
bash |
eject |
locale |
parted |
tar |
|
|
cat |
env |
ls |
passwd |
tee |
|
|
chgrp |
expr |
lsmod |
pidof |
test |
|
|
chmod |
false |
lspci |
ping |
time |
|
|
chown |
fdisk |
lvdisplay |
ping6 |
top |
|
|
chroot |
fgrep |
lvm |
ps |
touch |
|
|
chvt |
file |
lvmdiskscan |
pvcreate |
tr |
|
|
cksum |
find |
lvscan |
pvdisplay |
true |
|
|
clear |
fsck |
mkdir |
pvs |
tset |
|
|
cp |
fsck.ext2 |
mke2fs |
pvscan |
tty |
|
|
cpio |
fsck.ext3 |
mkfifo |
pwd |
umount |
|
|
cut |
getopt |
mkfs |
reboot |
uname |
|
|
date |
grep |
mkfs.ext2 |
rm |
uptime |
|
|
dd |
gunzip |
mkfs.ext3 |
rmdir |
vgcfgbackup |
|
|
depmod |
gzip |
mkinitramfs |
rmmod |
vgcfgrestore |
|
|
df |
head |
mkswap |
route |
vgchange |
|
|
diff |
host |
modinfo |
sdiff |
vgcreate |
|
|
dir |
hostname |
modprobe |
sed |
vgdisplay |
|
|
dirname |
ifconfig |
mknod |
sleep |
vi |
|
|
dmesg |
insmod |
mktemp |
stty |
whereis |
|
|
du |
kill |
more |
su |
which |
|
|
e2fsck |
killall |
mount |
swapoff |
zcat |
Oracle Linux, CentOS, RHEL, and SuSE Linux:
|
arch |
echo |
last |
mv |
sync |
|
awk |
egrep |
ldd |
netstat |
tail |
|
basename |
eject |
ln |
openvt |
tar |
|
bash |
env |
locale |
parted |
tee |
|
cat |
expr |
ls |
passwd |
test |
|
chgrp |
false |
lsmod |
pidof |
time |
|
chmod |
fdisk |
lspci |
ping |
top |
|
chown |
fgrep |
lvcreate |
ping6 |
touch |
|
chroot |
file |
lvdisplay |
ps |
tr |
|
chvt |
find |
lvm |
pvcreate |
true |
|
cksum |
fsck |
lvmdiskscan |
pvdisplay |
tset |
|
clear |
fsck.ext2 |
lvscan |
pvs |
tty |
|
cp |
fsck.ext3 |
mkdir |
pvscan |
umount |
|
cpio |
gawk |
mke2fs |
pwd |
uname |
|
cut |
getopt |
mkfifo |
reboot |
uptime |
|
date |
grep |
mkfs |
rm |
usleep |
|
dd |
grub or grub2 |
mkfs.ext2 |
rmdir |
vgcfgbackup |
|
depmod |
gunzip |
mkfs.ext3 |
rmmod |
vgcfgrestore |
|
df |
gzip |
mkinitrd |
route |
vgchange |
|
diff |
head |
mkswap |
sdiff |
vgcreate |
|
dir |
host |
modinfo |
sed |
vgdisplay |
|
dirname |
hostname |
modprobe |
sleep |
vi |
|
dmesg |
ifconfig |
mknod |
stty |
whereis |
|
du |
insmod |
mktemp |
su |
which |
|
e2fsck |
kill |
more |
swapoff |
zcat |
|
e2image |
killall |
mount |
swapon |
Can I convert a physical machine into a virtual machine?
Yes. When a CommServe is connected to an ESX server, you can convert a physical machine (computer) into a virtual machine using the 1-Touch backup data. You can also modify the hardware and network configuration of the client while converting it into a virtual machine. For more information, refer to Getting Started with Virtualizing Linux Clients Using VMware and Getting Started with Virtualizing Linux Clients Using Hyper-V.
Are all the iDataAgents present on the source client preserved on the cloned client?
No. All of the agents installed interactively on the source client will be re-registered on the cloned client. Agents that were installed later via remote install using CommCell Console are not re-registered. You may need to re-install and configure those on the cloned client if they are required.
How to set up a PXE Server for network boot?
-
Ensure that the machine where you are setting up Network boot or PXE boot is running nfs server, tftp server and dhcp server in the same subnet as the client. Preferably, use a Linux host to setup the pxe boot.
-
Copy or mount the Linux 1-Touch Live CD ISO to the Linux host and set up nfs server to export this mount point.
-
Copy the kernel and initrd to the host tftp server directory. The default location is /tftpboot.
-
Configure dhcp server options such that the restoring client will obtain a dynamic IP address and the PXE boot configuration files will be passed to the client.
For example: Create a dhcp configuration file (/etc/dhcpd.conf) as follows:
authoritative
 ddns-update-style none;
 allow bootp;
 allow booting;
 subnet 172.16.64.0 netmask 255.255.252.0
 {
     option routers 172.16.64.1;
     option subnet-mask 255.255.252.0;
     option domain-name-servers 172.19.59.6;
     option domain-name-servers 172.19.59.7;
     option ip-forwarding off;
     default-lease-time 21600;
     max-lease-time 43200;
     host garuda5 {
         hardware ethernet 00:0c:29:c8:bf:11;
         fixed-address 172.16.65.165;
         next-server 172.16.66.167;
         filename "linux-install/pxelinux.0";
     }
 }
The hostname of the client that needs to be assigned the IP address is garuda5
MAC address of the client that needs to be assigned IP is 00:0c:29:c8:bf:11
IP that will be assigned to the client being booted through dhcp is 172.16.65.165
IP address of the tftp server is 172.16.65.167
The location on the tftp server where pxelinux.0 boot loader is located: linux-install/pxelinux.0
A prefix of /tftpboot will automatically be added to the filename provided in the /etc/dhcpd.conf file. So the actual location on the tftp server where pxelinux.0 is located is "/tftpboot/linux-install/pxelinux.0".
-
Create a configuration file to setup a TFTP server at the following location: /tftpboot/linux-install/pxelinux.cfg.
The file should have a name like 01-00-0c-29-c8-bf-11 (MAC address of the client that is being booted through TFTP) or AC1041A5 (IP address that is being assigned to client in the hex notation.) The configuration file contents can be as below:
default onetouch
 label onetouch
 kernel onetouch/vmlinuz
 append initrd=onetouch/initrd.img crashkernel=32M@0 ramdisk_blocksize=1024 ramdisk_size=1024M root=/dev/ram rw method=nfs:172.16.65.167:/mnt/netboot ip=dhcp
The kernel and initrd locations are relative to the location mentioned in dhcpd.conf file. For example: When you create the dhcpd.conf file as mentioned above, the kernel and initrd will be located /tftpboot/linux-install/onetouch.
-
Edit the /etc/xinetd.d/tftp configuration file as follows to enable the tftp services.
disable=no -
Restart the xinetd service. This can also be done by running chkconfig tftp on.
The kernel and initrd will be extracted from the 1-Touch boot CD. The network boot will access the contents of boot CD through NFS.
For example: If you have created the above configuration file @ /tftpboot/linux-install/pxelinux.cfg/01-00-0c-29-c8-bf-11, the NFS location that will be used for network boot is 172.16.65.167:/mnt/netboot.
-
Use the following commands for creating the network boot setup.
Copy the bootcd.iso to the TFTP server.
 mkdir -p /mnt/cdrom
 mount -t iso9660 bootcd.iso /mnt/cdrom -o loop
 cp -f /mnt/cdrom/isolinux/initrd.img /tftpboot/linux-install/onetouch
 cp -f /mnt/cdrom/isolinux/vmlinuz-2.6.27.29-0.1-default /tftpboot/linux-install/onetouch/vmlinuz
The above commands will create the kernel and initrd required for Network boot.
-
Create the NFS mount point from where the CD contents can be accessed.
cp -rf /mnt/cdrom/* /mnt/netbootHere /mnt/netboot is a NFS mount point which can be accessed by the restored system through NFS.
-
After creating the above setup, reboot the client being restored and choose to boot through network in BIOS.
How to set up an ESX Server to boot a virtual machine?
-
Log on to ESX Server.
Download the ISO Image on ESX Server.
Start the ESX Server Client.
-
Click CD/DVD Drive 1 | Connect to ISO Image on Local Disk.
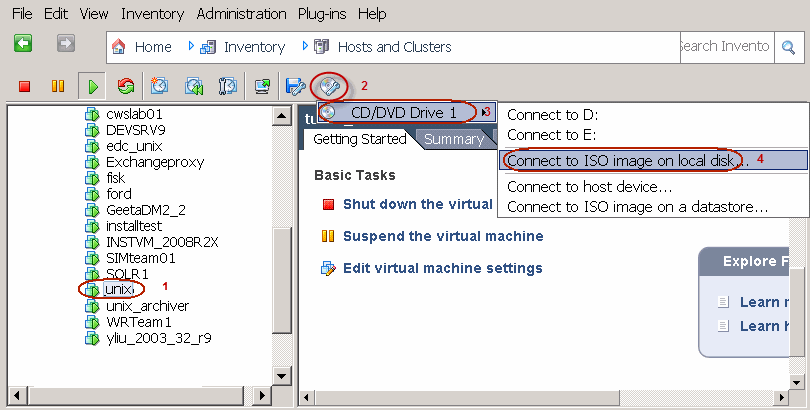
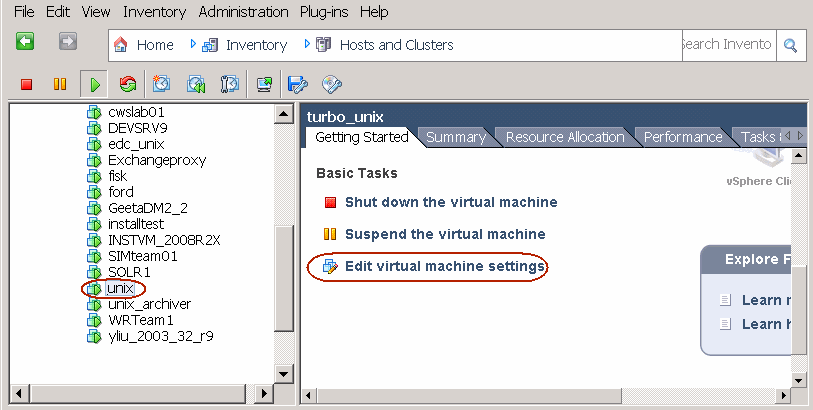
-
Click Edit virtual machine settings.
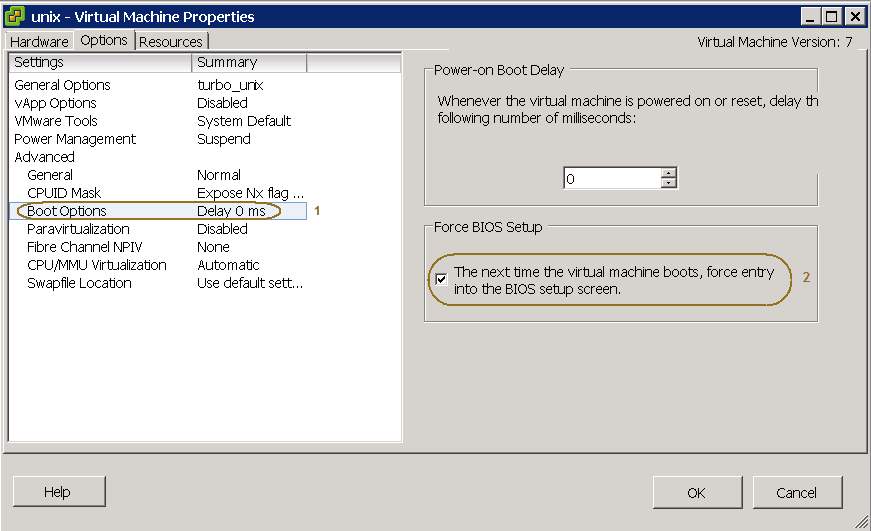
-
Click Options.
Click Boot Options.
Click The next time virtual machine boots, force entry into BIOS setup screen.
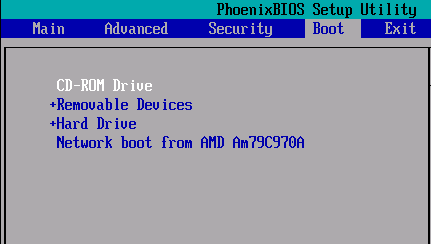
-
Power Off the virtual machine.
Power On the virtual machine.
Select CD-ROM Drive from the Boot menu.
Can I perform an in-place restore of a virtual machine that is at a higher compatibility version than 5.5?
Yes. To perform an in-place restore of a virtual machine that is at a higher compatibility version than 5.5, create a new virtual machine by setting the compatibility version to 5.5 or higher, and then attach the existing disks to the new virtual machine.
1-Touch Linux DVD4 is unable to find or load a hardware driver?
During 1-Touch Recovery, a driver missing error shows up when the 1-Touch DVD4 cannot locate and load some specific hardware driver/s. In such cases,
-
Determine the phase when driver load failed.
1-Touch Recovery and VirtualizeME processes are carried out in two phases.
-
When the machine being recovered is booted using DVD04, the client boots up using a customized kernel (re) distributed by Commvault. Once booted, any driver missing error message showing up before YaST GUI is launched falls under the first phase.
-
After the system state restore, kexec operation is invoked to boot up the backed up machine's kernel. Any driver missing error message that you see after the reboot falls under the second phase.
-
-
Compile the driver for the specific kernel version.
It is recommended to report any driver missing error messages via Technical Support. If it is critical to proceed without delay, the specific drivers may be compiled for the following kernel version:
3.1.10-1.16-default
The kernel module is compiled for x86 (32-bit).
Missing storage driver error messages during the first phase may be ignored as only the networking and keyboard/display drivers are required in this phase.
-
Copy and load the drivers.
Copy the required drivers to a USB removable disk, partitioned such that the first partition is a vfat/ext2/ext3 file system.
-
Insert the USB disk and look up for the device name using the dmesg command.
-
Check if the device exists in /dev
-
For example, to check for the device named sdb:
# ls -l /dev/sdb*- lists device names like sdb, sdb1.
-
If the device is not listed, use the following steps:
# mknod /dev/sdb b 8 16- the minor number should be as per the device naming convention followed in Linux
# mknod /dev/sdb1 b 8 17# mkdir /mnt# mount /dev/sdb1 /mnt
-
-
Copy and load the driver:
# cp /mnt/<driver>.ko /lib/modules/`uname -r`/<path>
# modprobe -f <driver>
Ensure that you use the modprobe -f option to load the custom built drivers.
-
How can I restart the recovery YaST UI after loading custom drivers or if the recovery process falls back to a shell?
-
For VirtualizeME, the UI should not be restarted manually. Kill the VirtualizeME job to make sure the VM is deleted and resubmit the job after making appropriate changes.
-
For interactive 1-Touch recovery, if the UI fails to load due to some missing drivers or if it falls back to shell, report to the Technical Support with appropriate logs. If you are able to resolve the error manually by loading custom drivers or by making any necessary corrections, use the following steps to restart the YaST UI:
-
Make sure the YaST UI is stopped:
# killall y2base -
Go to the first virtual terminal by hitting Alt+F1.
-
Navigate to the root directory, and type the command
# cd /-
If the error occurred in the first phase.
# /usr/lib/YaST2/bin/y2base /1touch.ycp ncurses -
If the error occurred in the second phase.
# chroot /chroot /launchyast.sh
-
-
What system mount points should I include as the subclient content during backups?
Select the root directory (/) as the subclient content and use filters to exclude specific directories and mount points. Verify that the system mount points are not excluded from backups; otherwise, 1-Touch recovery fails.
As a minimum, set the below system mount points as subclient content for backup:
-
/boot
-
/usr
-
/etc
-
/lib*
-
/var
-
/opt
-
<swap>
-
<mount point where commvault is installed>
Include directories with suffix "64" wherever applicable.
A system mount point residing on a volume group is not recovered. What do I do?
-
To avoid this problem, select the option to recover only the system mount points. For more information, see Interactive Recovery.
-
If you cannot fix the problem, create a new volume group using the ADM Interface.
-
Add a physical volume to the volume group using the ADM Interface. See Add New Physical Volumes.
-
Create logical volume on the volume group. See Add New Logic Volumes.
-
Create the system mount point that you want to recover.
A system mount point residing on a Mpath device is not recovered. What do I do?
-
To avoid this problem, select the option to recover only the system mount points. For more information, see Interactive Recovery.
-
After the client is recovered, a list of all the available external disk and devices is displayed.
-
Create the system mount point that you want to recover on the external drive.
Otherwise, you can create the lost system mount point on a logical volume or a partition in the recovered disk.
Why are my bind mount points restored as directories after a 1-Touch restore operation?
Bind mount points are not filtered from backup operations by default. However, you can exclude the bind mount points from backup operations by using one of the following methods:
-
For client computers using Indexing Version 1, you can exclude bind mount points from backup operations by using an additional setting. See Enabling Skip Bind Mount Points for Backup Operations.
-
Add the bind mount points to backup filters to exclude the mount points from backup operations. For more information, see Configuring Filters for Backups.
Can I restore Btrfs subvolumes during 1-Touch recovery?
Yes. You can restore Btrfs subvolumes during 1-Touch recovery and VirtualizeME operations. Note the following considerations:
-
If you choose the Automatic Disk Layout option during a VirtualizeME operation, the size of each Btrfs mount point is increased to a total of the utilized size plus an additional 512 MB to allow for increased metadata size requirements.
-
To restore a subvolume, you must select the parent subvolume in the nesting hierarchy.
Can I perform 1-Touch recovery remotely?
Yes. You can restore Btrfs subvolumes during 1-Touch recovery and VirtualizeME operations. Note the following considerations:
-
If you choose the Automatic Disk Layout option during a VirtualizeME operation, the size of each Btrfs mount point is increased to a total of the utilized size plus an additional 512 MB to allow for increased metadata size requirements.
-
To restore a subvolume, you must select the parent subvolume in the nesting hierarchy.
How do I restore data post-upgrade from a 1-Touch computer?
We recommend you to upgrade the MediaAgent and Client after upgrading the CommServe and then run a first full backup.
However, if it is not possible to follow the above mentioned recommendation then, use the following steps to restore data post-upgrade:
Note: Restoring data is supported if you upgrade from Version 9 and Version 10 to Version 11.
|
Scenarios |
|||
|---|---|---|---|
|
Only CommServe is upgraded |
|
|
Not supported |
|
CommServe and MediaAgent are upgraded |
|
|
Not supported |
|
CommServe, MediaAgent and client are upgraded
|
|
|
Not supported |
|
CommServe, MediaAgent and client are upgraded
|
|
|
All new features from Version 11 are supported. |
|
CommServe, MediaAgent and client are upgraded
|
|
|
Not supported |
Can I filter out specific files and folders from restore operation during 1-Touch recovery?
Yes. You can filter out specific data from restore operation during 1-Touch recovery at any step in the second phase of 1-Touch recovery, before partitioning disks:
-
Press ALT+F2 to go to an alternate terminal.
-
Add the files and folders that you want to filter from the restore operation to the /tmp/restore_skip_list file.
Note: Wildcards are not supported in the file and folder names.
Once the restore operation starts, you can verify that the content was filtered in the /fullsys.xml file.
I entered IP of the machine where I want to export the ADM GUI, but it doesn't work?
-
Check if you can ping to the machine using another terminal. Select ALT + F(n) to open another terminal if needed
-
Check if the machine has an X server running with no authentication. For example: Xming
-
IF this has not solved the problem, keep all the required data ready and escalate the issue.
-
Configure NFS share or any other method to transfer the data.
My disks are partitioned and formatted, but now the recovery process has stopped with an error. What do I do?
-
Check for any error such as bad disks, bad FC port.
-
If this does not solve the problem, keep all the required data ready and escalate the issue.
-
Configure NFS share or any other method to transfer the data.
-
Set up the same recovery over serial console and set up a webex.
My file system data has been recovered, but now the recovery process has stopped with an error concerning the Bootloader. What do I do?
-
Check for errors in cvrestore.log and /tmp/grub.log
-
If this does not solve the problem, keep all the required data ready and escalate the issue.
-
Configure NFS share or any other method to transfer the data.
-
Use the bootcd hidden menu option rescue to boot up and tweak the bootloader if required.
-
Set up the same recovery over serial console and set up a WebEx.
Can I change the client name and client host name during 1-Touch recovery?
You can change the client host name during the 1-Touch recovery. For more information, see Change the Client Configuration during Interactive Recovery or Change the Client Configuration during Non-Interactive Recovery.
You can not change the client name during the 1-Touch recovery.
Can I change the IP address, net mask and default gateway of the client during 1-Touch recovery?
Yes. For more information, see Change the Client Configuration during Interactive Recovery or Change the Client Configuration during Non-Interactive Recovery.
Can I change the DNS search suffix and name server IP address of the client during 1-Touch recovery?
Yes. For more information, see Change the Client Configuration during Interactive Recovery or Change the Client Configuration during Non-Interactive Recovery.
Why am I unable to see the temporary clients created during 1-Touch recovery?
The data aging process deletes the temporary original_client_name_recovery clients when the following conditions are met:
-
The temporary original_client_name_recovery client is at least 24 hours old.
-
The MMConfig extended configuration space parameter DA_CONFIG_DELETE_DECONFIGURED_CLIENTS_WITH_NO_DATA is set to 1.
QScript to set the MMConfig parameter value:
qoperation execscript -sn setConfigParam -si "DA_CONFIG_DELETE_DECONFIGURED_CLIENTS_WITH_NO_DATA" -si "1"
Does 1-Touch support machines configured with software RAID?
No. Software RAID (mdadm) and fake RAID (dmraid) are currently not supported.
Can I perform 1-Touch recovery using a non-primary NIC?
Yes. The following table lists the different 1-Touch recovery modes and the steps to perform recovery using a non-primary NIC:
|
Recovery Mode |
Configuration Steps |
|---|---|
|
Interactive 1-Touch recovery |
|
|
Non-Interactive 1-Touch recovery/Cloning a Client Computer |
|
|
Virtualize Me |
|
Which NIC must be specified as the default gateway for 1-Touch recovery if I have multiple NICs?
Specify the default gateway for the NIC that is used to connect to the CommServe computer for 1-Touch recovery. You can specify only one default gateway.
Can I perform a 1-Touch restore if link aggregation (LAG) is configured on the destination computer?
No. If link aggregation is configured on the destination computer such that communication through only a standalone NIC is not allowed, then the 1-Touch restore process cannot configure the NICs and fails to communicate with the network gateway. You must reconfigure the LAN ports temporarily to allow using the standalone NICs by the 1-Touch restore process. This specifically applies to 802.3ad, that is, mode 4 type bonded NIC configuration.
Is VLAN tagging supported for 1-Touch recovery?
Yes. You can set VLAN ID on the 1-Touch recovery NetworkConfig page if the client that is being recovered needs software VLAN tagged NIC configuration to communicate with the CommServe or MediaAgent during recovery.
VLAN ID is a numeric value between 1-4095. When you specify a VLAN ID, a new virtual NIC will be brought up on the selected physical NIC with name: ethX.vlanID. VLAN tagged NICs follow four naming conventions:
-
VLAN_PLUS_VID (e.g., vlan0023)
-
VLAN_PLUS_VID_NO_PAD (e.g., vlan23)
-
DEV_PLUS_VID (e.g., eth1.0023)
-
DEV_PLUS_VID_NO_PAD (e.g., eth1.23)
The naming type in use is saved in the system state backup.
During the first and second phases of 1-Touch recovery, the VLAN_PLUS_VID_NO_PAD naming type is always used. However, as part of network persistence, the appropriate network configuration file will be reconfigured based on the naming type in use on the backed up machine.
What are the considerations for performing 1-Touch recovery from block-level backups?
The following considerations apply when performing a 1-Touch recovery from block-level backup for UNIX:
-
You cannot enable 1-Touch and block-level backup features on the default subclient at a time.
-
To perform 1-Touch recovery from block-level backups, you must run block-level backup operations in a different MediaAgent (unlike the source computer).
-
1-Touch recovery is not supported with volume-level restores from a snapshot copy.
Logging and log file collection during recovery failures
If the 1-Touch recovery process fails at any of the phases during recovery, a popup window will be displayed with an error message. Depending on the phase where the error occurred, the logs can be accessed via a URL using a browser, if the network is configured , or via a file path if the network is not configured.
|
Popup |
Log file collection |
|
Popup window shows a URL |
If the popup window displays a URL in the error message, open the URL from a browser on any machine that can connect to the client, and then download the latest tgz file containing the list of consolidated logs. |
|
Popup window shows a file path |
|
|
No popup window or if there is no file path in the popup window |
|
Note
Logs will also be copied over to the CommServe log file directory in the 1touchclientlogs-<client_name>.tgz file if the recovery process fails after the temporary client installation has completed (in each of the phases during recovery).