Prepare for Recovery
You can download the ISO file from the Cloud Services website.
-
Go to the Commvault Store page on the Cloud Services website.
On the Commvault Store page, the software media items are displayed.
-
On the left side of the page, under the MEDIA KITS filter, click 1-Touch.
-
Click the Download button next to the software media that you want to download. For a list of available installation media, see Installation Media List.
For example, to download the 1-Touch ISO application for Linux computers, look for V11 DVD4 (Linux Live CD) with the latest service pack.
Note
Use the single-stage DVD generation process as described in 1-Touch for Linux - Single-Stage DVD.
This process is mandatory for machines that are booted by using the UEFI boot loader. This process is recommended for physical machines that are booted by using the BIOS boot loader.
CommServe version
Recommended ISO for the restore operation
Service Pack 14 and lower
Latest Service Pack 14 ISO
Service Pack 15 to Feature Release 19
Latest Feature Release 19 ISO
Feature Release 20 and higher
ISO of the latest Feature Release
-
Use this ISO image to boot the client using one of the following methods:
-
Burn a Live CD and boot the client.
-
Copy the ISO image to a NFS server and setup a PXE Server to perform a network boot.
-
Copy the ISO image on a ESX server and setup the ESX server to boot a virtual machine.
Restriction: If you are restoring to a virtual machine, note that only legacy network adapters are supported on Hyper-V virtual machines.
-
Recovery on a Similar System
If you are restoring to a computer which has the same hard disk configuration as that of the backed up computer, perform a Recovery on a Similar System using one of the following methods:
Note: The target disk size must be same or greater.
Non-Interactive Recovery
A recovery point is a point-in-time configuration of the client containing the network configuration, mount point details and information about the client itself. A new client configuration (recovery point) is generated on subsequent backups if the client's hardware has changed, or changes have been made to the network, storage or mount point configuration.
Use the client configuration stored on the CommServe to create a recovery response file needed to perform a non-interactive recovery.
-
Connect a USB drive to a Linux computer and use the following command to format the USB drive:
mkfs.vfat -I /dev/<drive_name>For example:
mkfs.vfat -I /dev/sdbNote
Do not partition the disk. Use the drive as a full disk.
-
Mount the formatted USB drive to a directory and copy the 1-Touch response file to the USB drive.
-
From the CommCell Console, navigate to <Client>.
Right-click the <Client> and click All Tasks | 1-Touch Recovery Points.
-
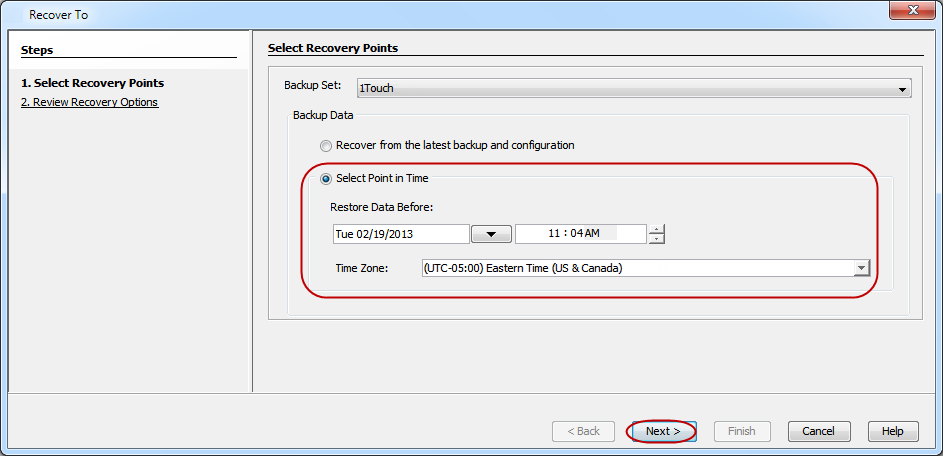
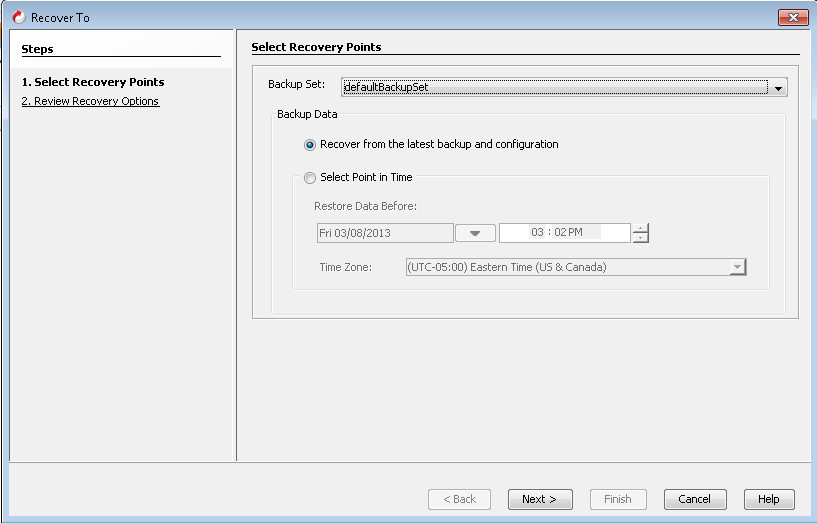
On the Select Recovery Points page, click Select Point in Time.
Select the most recent client configuration to create a recovery response file.
Click Next.
-
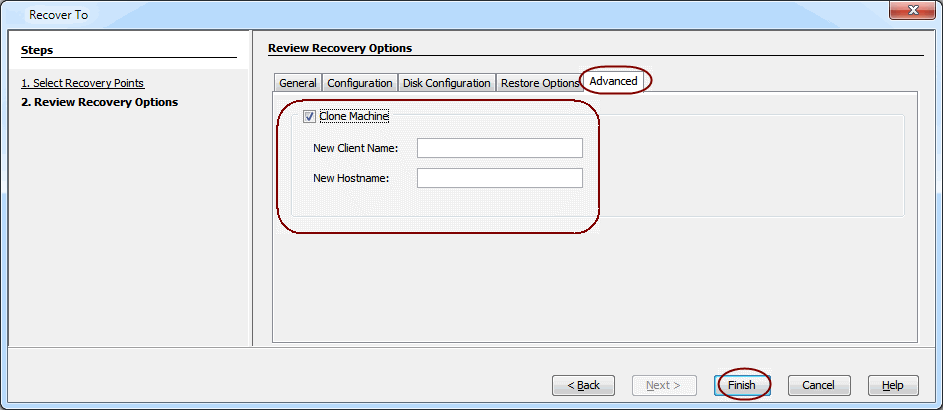
Review all of the hardware configuration options selected under different tabs of the Review Recovery Options dialog. For a list of available options, refer to Options - 1-Touch for Linux.
Note
If you want to clone the client computer, click the Advanced tab. Otherwise, continue with the next step.
You can exclude bind mount points from backup operations. For more information, see FAQ - Skip bind mount points.
-
Click Finish.
-
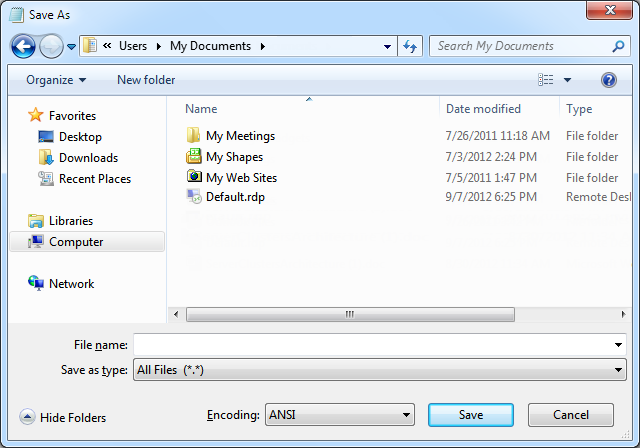
Save the recovery response file as onetouchresponse.xml.
-
Connect the formatted USB drive to the computer where recovery response file is stored.
-
Copy the recovery response file to the formatted drive.
-
Connect the USB drive to the client.
-
Boot the client using the ISO image.
-
Type Default and press Enter to start the default recovery.
On certain hardware, after the system state restore, the kexec system call fails and the machine reboots. On such hardware, we recommend to select the nolapic boot option. Similarly, the noapic boot option is relevant to a particular hardware configuration.
Note: Selecting the nolapic or noapic boot options for default recovery might result in incorrect hardware initialization.
-
Select OK and press Enter to start the system state and file system restore.
The system state and the file system data backed up during the most recent backup will be restored.
-
Remove the USB drive connected to the client when the client computer is booting with backup kernel.
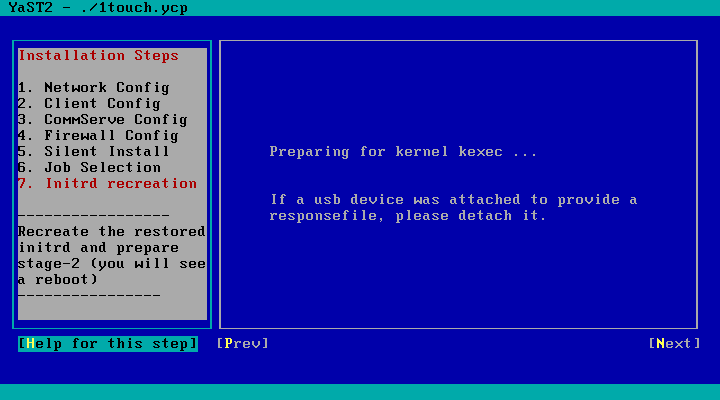
-
Press Enter.
-
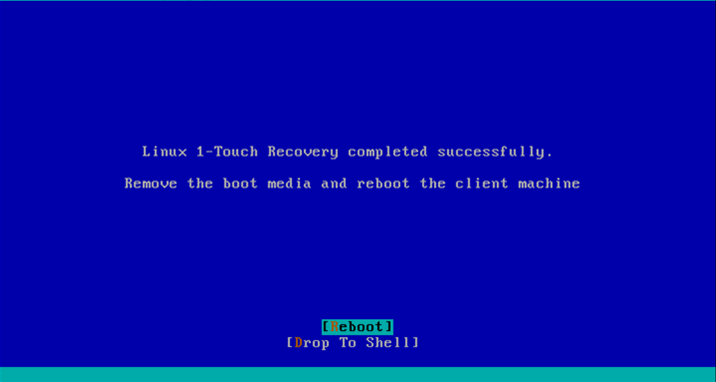
Remove the 1-Touch Linux Live CD and reboot the system.
Refer Logging and Log File Collection during Recovery Failures in case of recovery failure at any phase.
Interactive Recovery
Perform the interactive recovery when you don't want to use the recovery response file.
-
Keep the Client Information Checklist ready.
-
Boot the client using the ISO image.
-
Type Default and press Enter to start the default recovery.
On certain hardware, after the system state restore, the kexec system call fails and the machine reboots. On such hardware, we recommend to select the nolapic boot option. Similarly, the noapic boot option is relevant to a particular hardware configuration.
Note: Selecting the nolapic or noapic boot options for default recovery might result in incorrect hardware initialization.
-
Select Interactive and press Enter.
-
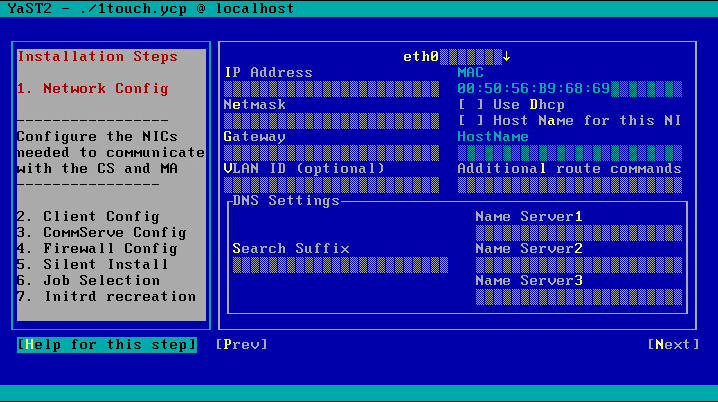
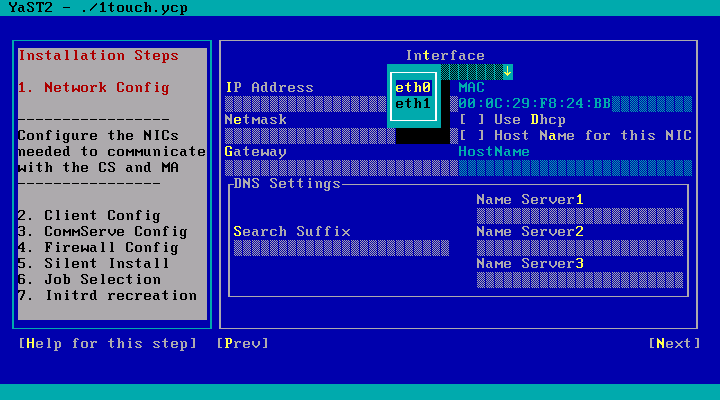
On the Network Config page, enter the IP address, network and name server details of the network specified in the client information checklist.
If VLAN tagging for NICs is required, enter the VLAN ID. For more information, see FAQ - VLAN tagging support.
In the Additional Route Commands field, you can add additional networking commands that are executed after the selected NIC has been brought up. You can also add additional static routes in this field. Multiple commands must be separated by a semi-colon.
Example
route add -net 10.10.10.0 netmask 255.255.255.0 gw 172.19.109.1; ip route add 10.20.0.0/16 dev eth0
Note: The networking commands must be valid and the commands must use only standard system utilities. These commands take effect automatically during the second phase when the network is re-configured.
Select Next and press Enter.
-
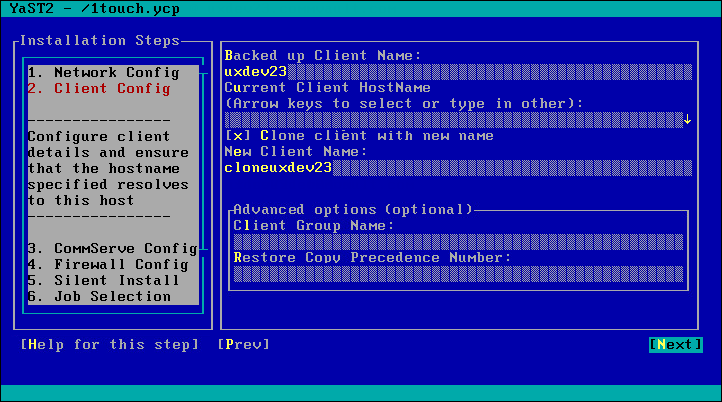
On the Client Config page, enter the short name of the backed up client in the Backed up Client Name field, and then select the fully qualified client hostname of the client that you are performing recovery on, from the Current Client HostName selection box.
The Current Client Hostname list contains values of all hostnames entered on the Network Config page and the client hostname present in the recovery response xml file. It also contains the hostnames resolved via nslookup for each IP address configured on the Network Config page. You can also enter a new client hostname manually as specified in the client information checklist. This hostname will be used during recovery and will persist on the machine after the recovery completes.
The hostname must be resolvable from the CommServe and the MediaAgent to the client being recovered. Skip the hostname field to enable installation of the client being recovered with an IP instead of hostname.
Select Next and press Enter.
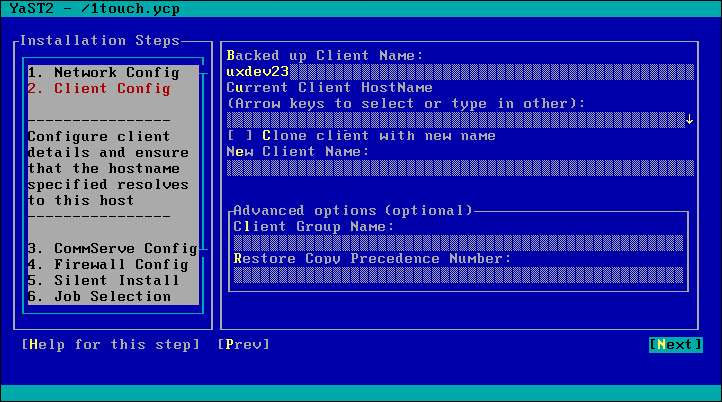
If you want to clone the client computer, select the Clone client with new name check box and enter the new client name. Otherwise, continue with the next step.
-
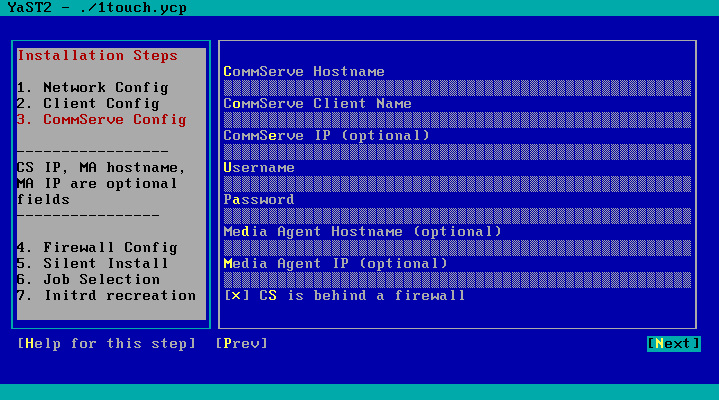
On the CommServe Config page, enter the details of the CommServe and the MediaAgent specified in the client information checklist.
Select Next and press Enter.
-
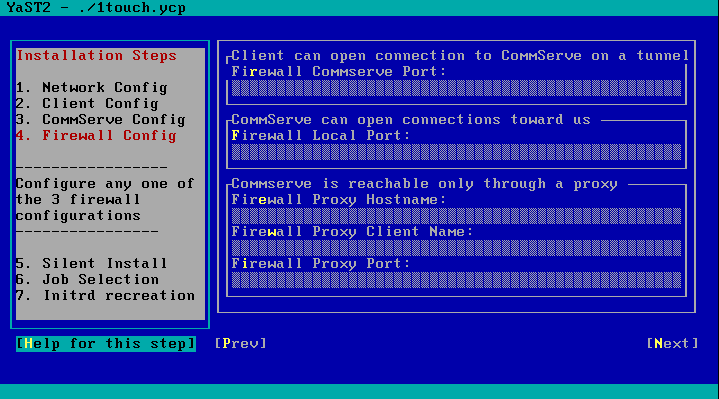
On the Firewall Config page, enter the details of the firewall as specified in the client information checklist.
Select Next and press Enter.
-
The Installation Progress page appears, showing the installation process. If there is an error during installation, select one of the following options:
-
Ok - to start the recovery process again from the CommServe Configuration page.
-
Abort - to exit the recovery process.
-
-
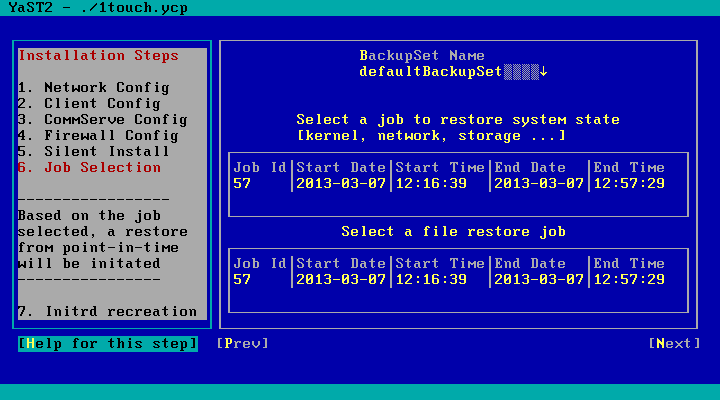
On the Job Selection page, select Next and press Enter.
By default the system state and the file system data, backed up during the most recent backup is restored. You can select a backup job to restore the system state data and a backup job to restore the file system data.
-
The recovery process now boots into the kernel that was restored from the backup of the source client. After the boot up completes, the GUI will restart and perform a temporary commvault client install before showing up the Multipath Settings page. The temporary client will be initially installed to use port numbers 8111 and 8112. The temporary client will be deleted after the recovery process completes, and the client being recovered will be registered with the port numbers used by the original client.
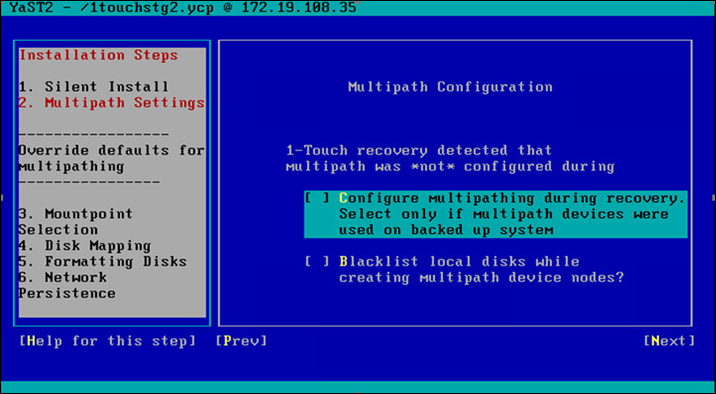
On the Multipath Settings page, select Next and press Enter.
-
If Linux native multipathing needs to be enabled, select the Configure multipathing during recovery check box.
By default, the selection will be made based on the configuration of the backed up machine. Do not change the default value of this option when performing a Recovery on a Similar System .
-
To ignore the local disks while generating multipath devices during a restore, select Blacklist local disks check box.
-
-
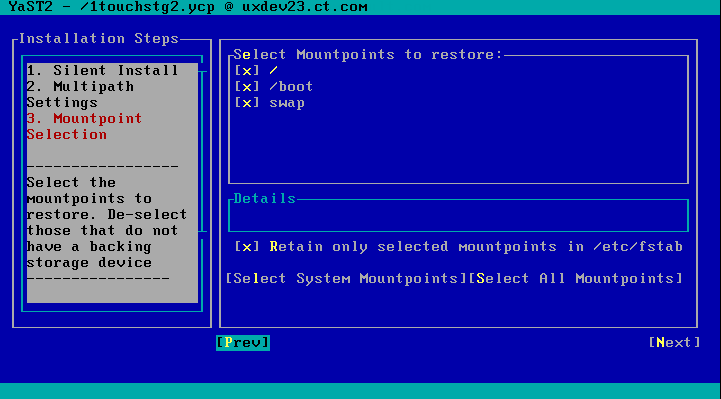
On the Mountpoint Selection page, select Next and press Enter.
By default, the system mount points are selected for restore. You can select the mount points that you want to recover.
Btrfs subvolumes are supported for restore. See FAQ: Can I restore Btrfs subvolumes during 1-Touch recovery for additional information.
You can exclude bind mount points from backup operations. See FAQ: Skip bind mount points for additional information.
-
On the Disk Mapping page, select Next and press Enter.

You can filter out specific files and folders from restore operation. For more information, see FAQ - Filter out specific files and folders from restore operation.
-
Select Yes and press Enter.

-
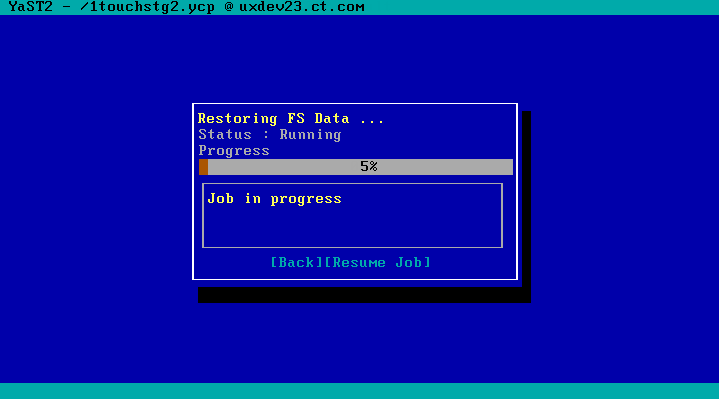
File system restore starts.
-
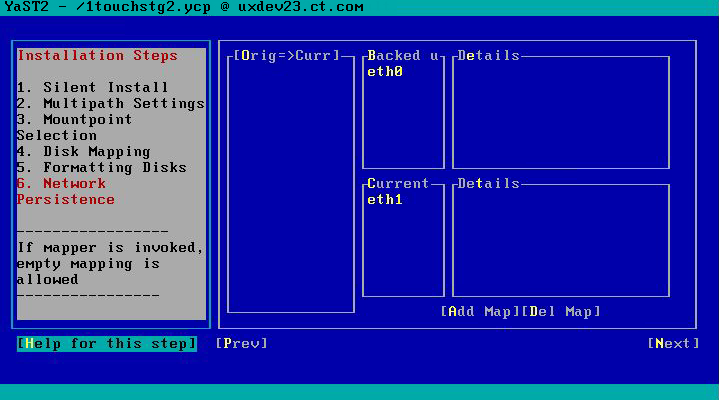
On the Network Persistence page, the option to persist the network configuration used during the recovery process onto the machine after it boots up, appears. The options available are:
-
No: Do not persist any configuration. Upon reboot, the machine has the network configuration of the backed up machine. Select this option if VLAN tagged NICs are configured.
-
Yes-only configured: Persist the network configuration of only those NICs that were enabled and configured during the recovery (this option is selected by default).
-
Yes-All: Persist the network configuration for all NICs detected during recovery. An empty configuration file is created for the NICs that were detected but not configured during the recovery process.
Select Next and press Enter.

-
-
If there is a mismatch in the network configuration on the source (backed up) machine and the current machine, you can map the network interfaces. You may choose not to add any map on this page, and by default, the network interfaces on the current system are mapped to the network interfaces on the backed up machine that have the same name. To override this option, select one NIC from each of the boxes labeled Backed Up and Current, and map using Add Map. It is recommended to leave this option empty, in most of the cases.
Example:
The backed up machine has 1 NIC named eth0 and the current machine has 1 NIC named eth1. On selecting each NIC, the details for the NIC appear. Proceeding from this page without adding any map ensures that the configuration used on eth1 will be applied to the active NIC on the machine. The name may now be different, depending on udev rules present on the restored machine..
Select Next and press Enter.
-
Press Enter.
-
Remove the 1-Touch Linux Live CD and reboot the system.
Refer Logging and Log File Collection during Recovery Failures in case of recovery failure at any phase.
Recovery on a Dissimilar System
If you are restoring to a computer which has the different hard disk configuration than that of the backed up computer, perform a Recovery on a Dissimilar System using one of the following methods:
Non-Interactive Recovery
A recovery point is a point-in-time configuration of the client containing the network configuration, mount point details and information about the client itself. A new client configuration (or recovery point) is generated on subsequent backups if the client's hardware has changed, or changes have been made to the network, storage or mount point configuration.
Use the client configuration stored on the CommServe to create a recovery response file needed to perform a non-interactive recovery.
-
Connect a USB drive to a Linux computer and use the following command to format the USB drive:
mkfs.vfat -I /dev/<drive_name>For example:
mkfs.vfat -I /dev/sdbNote
Do not partition the disk. Use the drive as a full disk.
-
Mount the formatted USB drive to a directory and copy the 1-Touch response file to the USB drive.
-
From the CommCell Console, navigate to <Client>.
Right-click the <Client> and click All Tasks | 1-Touch Recovery Points.
-
On the Select Recovery Points page, click Select Point in Time.
Select the most recent client configuration to create a recovery response file.
Click Next.
-
Review all of the hardware configuration options selected under different tabs of the Review Recovery Options dialog. For a list of available options, refer to Options - 1-Touch for Linux.
Note
If you want to clone the client computer, click the Advanced tab. Otherwise, continue with the next step.
You can exclude bind mount points from backup operations. For more information, see FAQ - Skip bind mount points.
-
Click Finish.
-
Save the recovery response file as onetouchresponse.xml.
-
Connect the formatted USB drive to the computer where recovery response file is stored.
-
Copy the recovery response file to the formatted drive.
-
Connect the USB drive to the client.
-
Boot the client using the ISO image.
-
Type Default and press Enter to start the default recovery.
On certain hardware, after the system state restore, the kexec system call fails and the machine reboots. On such hardware, we recommend to select the nolapic boot option. Similarly, the noapic boot option is relevant to a particular hardware configuration.
Note: Selecting the nolapic or noapic boot options for default recovery might result in incorrect hardware initialization.
-
Select OK and press Enter to start the system state and file system restore.
The system state and the file system data backed up during the most recent backup will be restored.
-
Remove the USB drive connected to the client when the client computer is booting with backup kernel.
-
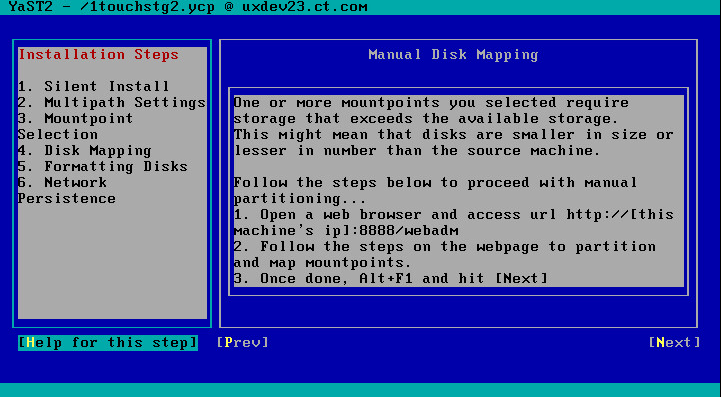
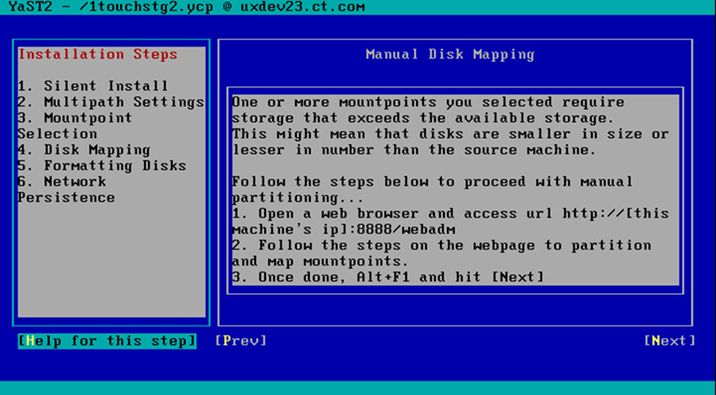
On the Disk Mapping page, follow the instructions for manual disk mapping using the WebADM Disk Mapper.
Select Next and press Enter.
If a mismatch in storage is detected, the 1-Touch recovery process attempts to automatically map the available storage with what is required based on the selected mount points and the configuration state during backup.
However, the 1-Touch recovery process cannot automatically map storage in the following cases:
-
When the number of disks on the computer being recovered are less than that of the disks on the source computer
-
When the sizes of disks on the computer being recovered are less than that of the disks on the source computer
To perform manual storage mapping, you must use the WebADM Disk Mapper. After the storage mapping is complete, you can continue the recovery process from the YaST GUI.
-
-
Select Next and press Enter.
You can filter out specific files and folders from restore operation. For more information, see FAQ - Filter out specific files and folders from restore operation.
-
Select Yes and press Enter.
-
Press Enter.
-
Remove the 1-Touch Linux Live CD and reboot the system.
Refer Logging and Log File Collection during Recovery Failures in case of recovery failure at any phase.
Interactive Recovery
Perform the interactive recovery when you don't want to use the recovery response file.
-
Keep the Client Information Checklist ready.
-
Boot the client using the ISO image.
-
Type Default and press Enter to start the default recovery.
On certain hardware, after the system state restore, the kexec system call fails and the machine reboots. On such hardware, we recommend to select the nolapic boot option. Similarly, the noapic boot option is relevant to a particular hardware configuration.
Note: Selecting the nolapic or noapic boot options for default recovery might result in incorrect hardware initialization.
-
Select Interactive and press Enter.
-
On the Network Config page, enter the IP address, network and name server details of the network specified in the client information checklist.
If VLAN tagging for NICs is required, enter the VLAN ID. For more information, see FAQ - VLAN tagging support.
In the Additional Route Commands field, you can add additional networking commands that are executed after the selected NIC has been brought up. You can also add additional static routes in this field. Multiple commands must be separated by a semi-colon.
Example
route add -net 10.10.10.0 netmask 255.255.255.0 gw 172.19.109.1; ip route add 10.20.0.0/16 dev eth0
Note: The networking commands must be valid and the commands must use only standard system utilities. These commands take effect automatically during the second phase when the network is re-configured.
Select Next and press Enter.
-
On the Client Config page, enter the short name of the backed up client in the Backed up Client Name field, and then select the fully qualified client hostname of the client that you are performing recovery on, from the Current Client HostName selection box.
The Current Client Hostname list contains values of all hostnames entered on the Network Config page and the client hostname present in the recovery response xml file. It also contains the hostnames resolved via nslookup for each IP address configured on the Network Config page. You can also enter a new client hostname manually as specified in the client information checklist. This hostname will be used during recovery and will persist on the machine after the recovery completes.
The hostname must be resolvable from the CommServe and the MediaAgent to the client being recovered. Skip the hostname field to enable installation of the client being recovered with an IP instead of hostname.
Select Next and press Enter.
If you want to clone the client computer, select the Clone client with new name check box and enter the new client name. Otherwise, continue with the next step.
-
On the CommServe Config page, enter the details of the CommServe and the MediaAgent specified in the client information checklist.
Select Next and press Enter.
-
On the Firewall Config page, enter the details of the firewall as specified in the client information checklist.
Select Next and press Enter.
-
The Installation Progress page appears, showing the installation process. If there is an error during installation, select one of the following options:
-
Ok - to start the recovery process again from the CommServe Configuration page.
-
Abort - to exit the recovery process.
-
-
On the Job Selection page, select Next and press Enter.
By default the system state and the file system data, backed up during the most recent backup is restored. You can select a backup job to restore the system state data and a backup job to restore the file system data.
-
The recovery process now boots into the kernel that was restored from the backup of the source client. After the boot up completes, the GUI will restart and perform a temporary commvault client install before showing up the Multipath Settings page. The temporary client will be initially installed to use port numbers 8111 and 8112. The temporary client will be deleted after the recovery process completes, and the client being recovered will be registered with the port numbers used by the original client.
On the Multipath Settings page, select Next and press Enter.
-
If Linux native multipathing needs to be enabled, select the Configure multipathing during recovery check box.
By default, the selection will be made based on the configuration of the backed up machine. Do not change the default value of this option when performing a Recovery on a Similar System .
-
To ignore the local disks while generating multipath devices during a restore, select Blacklist local disks check box.
-
-
On the Mountpoint Selection page, select Next and press Enter.
By default, the system mount points are selected for restore. You can select the mount points that you want to recover.
Btrfs subvolumes are supported for restore. See FAQ: Can I restore Btrfs subvolumes during 1-Touch recovery for additional information.
You can exclude bind mount points from backup operations. See FAQ: Skip bind mount points for additional information.
-
On the Disk Mapping page, follow the instructions for manual disk mapping using the WebADM Disk Mapper.
Select Next and press Enter.
-
Select Next and press Enter.
-
Select Yes and press Enter.
-
File system restore will start.
-
You will be presented with an option to persist the network configuration used during the process of this recovery onto the machine after it boots up. The options available are:
-
No: Do not persist any configuration. Upon reboot, the machine will have the network configuration of the backed up machine.
-
Yes-only configured: Persist the network configuration of only those NICs that were enabled and configured during the recovery (this option is selected by default). Select this option if VLAN tagged NICs are configured but verify the network configuration files manually to ensure that the correct NIC configuration is applied.
-
Yes-All: Persist the network configuration for all NICs detected during recovery. An empty configuration file will be created for the NICs that were detected but not configured during the process of this recovery.
Select Next and press Enter.
-
-
If there is a mismatch in the network configuration on the source (backed up) machine and the current machine, you will be presented with an option to map the network interfaces. You can choose not to add any map on this screen, and by default, the network interfaces on the current system will map to the network interfaces on the backed up machine that have the same name. If you wish to override this option, select one NIC from each of the boxes labeled Backed Up and Current, and map using Add Map. It is recommended to leave this option empty, in most of the cases.
In the screenshot, the backed up machine had 1 NIC named eth0 while the current machine has 1 NIC named eth1. On selecting each NIC, you will see details for the NIC. Proceeding from this screen without adding any map will ensure that the configuration used on eth1 will be applied to the active NIC on the machine. The name may now be different, depending on udev rules present on the restored machine.
Select Next and press Enter.
-
Press Enter.
-
Remove the 1-Touch Linux Live CD and reboot the system.
Refer Logging and Log File Collection during Recovery Failures in case of recovery failure at any phase.
Map Disks Using the WebADM Mapper
When you perform an interactive recovery on a dissimilar system, you can use the WebADM Disk Mapper tool to manually map disks.
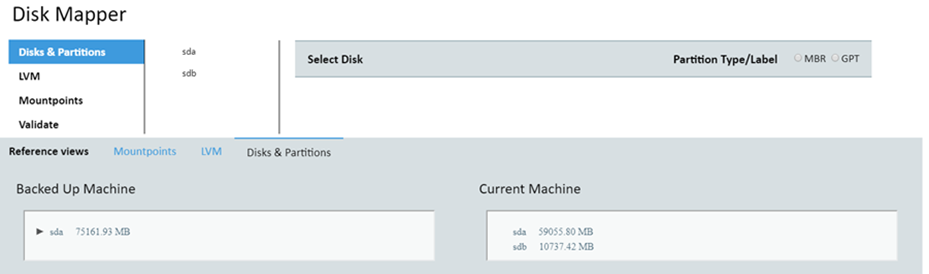
The WebADM Disk Mapper tool is a self-service utility for the system administrators to have full control over disk partitioning, LVM creation, and mount point creation on the computer being recovered.
The user interface of the WebADM Disk Mapper tool is divided into a work area and a reference view. You create the disk partitions, LVMs, and mount points in the work area. The reference view displays the details of the backed up computer and the computer being recovered. The details of the computer being recovered are updated with every change made in the work area.
Procedure
-
Open your Mozilla Firefox web browser and type the WebADM URL in the address bar.
The URL should be in the following format: http://target_computer_IP_address:port/webadm.
The Disk Mapper interface appears.
-
On the Disks & Partitions tab, create partitions:
-
Click the name of the disk.
-
Select a partitioning scheme:
-
To select MBR partitioning scheme, click MBR.
-
To select GPT partitioning scheme, click GPT.
-
-
Optional: To use the entire disk as a physical volume or as a specific file system partition, from the Use Full Disk As list, click the appropriate option.
-
To create a partition , under Partition Type/Label, click Add Partition.
-
Enter the partition name and size, and then select the file system type for the partition.
-
To make the partition bootable, select the bootable check box. Otherwise, select the primary check box.
-
To save the partition configuration, click Save.
Under Reference Views, the disk name and size of the target computer appears.

-
-
On the LVM tab, create volume groups and logical volumes:
-
To create volume groups, in the Volume Groups box, click Add.
-
Enter a volume group name and click
 .
. -
To create physical volumes, in the Physical Volumes box, click Add.
-
From the Select PV list, select a physical volume and then click
. -
To create logical volumes, in the Logical Volumes box, click Add.
Note
Make sure that you have created at least one physical volume before adding a logical volume.
-
Enter the logical volume name and size and click
.
-
-
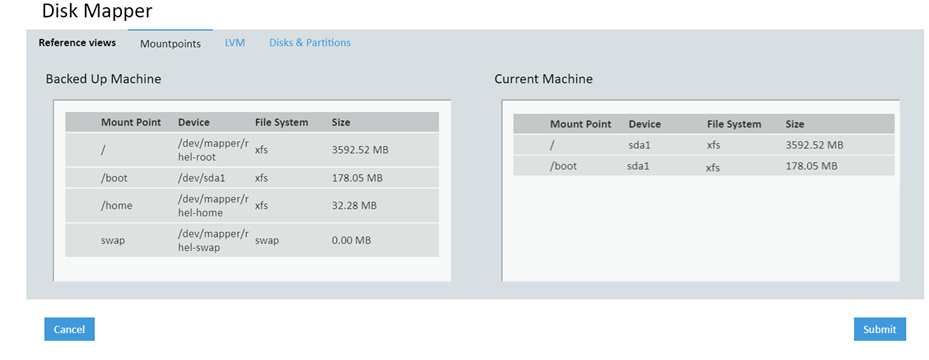
On the Mount Points tab, add the required mount points:
-
Click Add.
-
Select mount points, device, and file system type.
-
Under Mount Options, enter the required mount option switches. For example, r, to mount the file system as read-only.
-
Click Save.
Under Reference Views, the mount points on the source and target computers appear.

-
-
On the Validate tab, review if all the mount points and the associated devices are selected:
-
To add additional mount points, click No on the confirmation message, and then add the required mount points.
-
To start 1-Touch recovery, click Submit.
-
-
Close the web browser window.
-
On the client computer, select Next and press Enter.
-
Continue the 1-Touch recovery operation on a dissimilar computer.
Cloning a Client Computer
Cloning is the process of creating a replica of a client computer from its backup. You can create a clone of a client computer during 1-Touch restore. This feature allows the user to seamlessly set up a cloned computer with a different hostname/ IP configuration while the source computer is still up and running. This comes handy when setting up a standby server during disaster recovery testing.
If protection for the cloned machine is required, backup schedules need to be set up. The settings on the source client such as the subclient and backup set options, schedules, storage policies etc. will not be preserved on the cloned client. If required, additional iDataAgents can be installed and configured from the CommCell Console. 1-Touch cloning is not available if the CommCell is in the Lockdown mode.
The cloned client will be initially installed to use port numbers 8111 and 8112. After the restore completes successfully, the cloned client will be registered with the port number 8400.
Cloning is supported via both Interactive and Non-interactive 1-Touch recovery methods.
Follow the steps below to clone a client computer:
-
From the CommCell Browser, right-click the <Client>, point to All Tasks and click 1-Touch Recovery Points.
-
Click Next.
-
Click the Advanced tab.
-
Select the Clone Machine check box.
-
Type the client name in the New Client Name box.
The Client Name is the name of the client which will be created for the clone computer in the CommServe. Ensure that the client name is not used by any other client in the CommServe.
-
Type the fully qualified domain name of the virtual machine in the New Hostname box.
-
Click Finish and save the response file.
-
Perform Non-interactive 1-Touch recovery or Interactive 1-Touch recovery on a computer different than the client computer.
Using an End-User Account for 1-Touch Recovery
The Administrator can create a separate end-user account to perform the 1-Touch recovery.
The end-user account must have appropriate permissions to perform 1-Touch recovery. For more information on the required permissions, see User Security Permissions and Permitted Actions by Feature.
You can assign the permissions at the client level, client group level, or from the Control Panel. For instructions, see Client Owner Security. To review the permissions required to perform installations from the CommCell Console, see Prerequisites for Installations Using the CommCell Console.
Non-Interactive Restore
By default, the user account that you have used to log into the CommCell Console is used to perform the virtualization job. However, if you use the Active Directory User account to log into the CommCell console, you must enter the password for the user account to create the response file. If you have logged in as the CommCell Console administrator, you do not need the password to create the response file.
Follow these steps to use an alternate user account for non-interactive restore.
-
From the CommCell Browser, navigate to <Client>.
Right-click the <Client>, and then click All Tasks | 1-Touch Recovery Points.
-
On the SelectRecoveryPoints page, click Next.
-
On the ReviewRecoveryOptions page, click Use a different user account in the Specifyuseraccount area.
-
Enter the credentials for the user account which you want to use to perform the non-interactive restore.
Review all the hardware configuration options selected under different tabs of the Review Recovery Options page.
-
Click Finish.
Interactive Restore
Follow these steps to use an alternate user account for interactive restore.
-
Boot the client using the ISO image.
-
On the Linux1-TouchLiveCD dialog, type Default and then hit Enter to start the default recovery.
-
Select Interactive, and then hit Enter.
-
On the NetworkConfig page, enter the IP address, network and name server details of the network specified in the client information checklist.
Select Next and hit Enter.
-
On the ClientConfig page, enter the short name of the client and select the fully qualified client host name from the Current Client HostName selection box; it contains values of :
-
all host names entered on the previous network configuration page along with the client host name present in the recovery response xml file, and
-
the hostnames resolved via nslookup for each IP address configured on the network configuration page
This selection can be ignored and a new client host name can be manually entered as specified in the client information checklist. This host name will be used during recovery and will persist on the machine after the recovery completes.
Make sure that the host name is resolvable from the CommServe and the MediaAgent to the client being recovered. This field may be left blank to enable installation of the client being recovered with an IP instead of hostname.
Select Next and hit Enter.
If you want to clone the client computer, select the Clone client with new name check box and enter the new client name. Otherwise, continue with the next step.
-
-
On the CommServeConfig page, enter the details of the CommServe and MediaAgent specified in the client information checklist.
Enter the credentials for the user account which you want to use for 1-Touch recovery.
Select Next and hit Enter.
-
Continue with the steps for Interactive Restore.
Additional Options
Create a Response File Using Point-in-Time Backup
By default, the latest data and configuration of the client computer, backed by the default backup set, will be used to create the response file. However, you can create the response file using data and configuration backed up at any point in time. Use the following steps to create a response file using a point in time backup:
-
From the CommCell Console, navigate to <Client>.
-
Right-click the <Client> and click All Tasks | 1-Touch Recovery Points.
-
Click Select Point in Time.
-
Select a date and time to specify the point-in time. All the data backed up before the specified point in time will be used to create the response file.
The default time zone of the CommServe is used to determine the point in time. If you want to restore data backed up in a different time zone, select the required Time Zone.
-
Click Next.
Note
Review all the hardware configuration options selected under different tabs of the Review Recovery Options dialog before clicking Next.
-
Click Finish.
-
Save the recovery response file as onetouchresponse.xml.
-
Connect the formatted USB drive to the computer where recovery response file is stored.
-
Copy the recovery response file to the formatted drive.
Create a Response File Using a User Defined Backup Set
By default, the data and configuration of the client computer, backed up by default backup set is used to create the response file. You can create a user defined backup set to backup data and configuration for the 1-Touch recovery. Use the following steps to create a response file using the data backed up by a user defined backup set:
-
From the CommCell Console, navigate to <Client>.
-
Right-click the <Client> and click All Tasks | 1-Touch Recovery Points.
-
Select a non-default backupset from the Backup Set list.
-
Click Next.
Note
Review all the hardware configuration options selected under different tabs of the Review Recovery Options dialog before clicking Next.
-
Click Finish.
-
Save the recovery response file as onetouchresponse.xml.
-
Connect the formatted USB drive to the computer where recovery response file is stored.
-
Copy the recovery response file to the formatted drive.
Recover the Client to a Different Firewall Configuration
If you want to change the firewall configuration of the client before recovering it, follow the steps given below:
-
From the CommCell Console, navigate to <Client>.
Right-click the <Client> and click All Tasks | 1-Touch Recovery Points.
-
Click Select Point in Time.
Select the most recent client configuration to create a recovery response file.
Click Next.
-
If you want to clone the client machine:
-
Click the Advanced tab.
-
Select the Clone Machine check box.
-
Type the name of the new client in the New Client Name box.
The new client name will be used during recovery and once the recovery completes, all the agents will be registered on the new client name. This will ensure that after recovery, the machine has a commvault client of its own that does not clash with the client used for backup.
Note
The new client name must be unique on the CommServe. If the cloning option is not selected then there should not be any client with name - <original_client_name>_recovery. Make sure such clients are deleted before proceeding.
-
-
Click Finish.
Note
Review all the hardware configuration options selected under different tabs of the Review Recovery Options dialog before clicking Finish.
-
Save the recovery response file as onetouchresponse.xml.
-
Perform recovery:
-
Open the file onetouchresponse.xml using a text editor.
-
Enter the port number in onetouchresponse.xml.
For example: The Firewall Setting in the onetouchresponse.xml will be as follows:
tunnel_ports=8600
-
Save onetouchresponse.xml.
-
Use the updated recovery response file to perform the non-interactive recovery.
-
Change the Client Configuration during Interactive Recovery
During interactive recovery, follow the steps given below to change the client configuration:
-
Boot the client using the ISO image.
-
Type Default and press Enter to start the default recovery.
-
Select Interactive and press Enter.
-
Enter the IP address, network and name server details of the network specified in the client information checklist.
Select Next and press Enter.
-
Enter the short name of the backed up client in the Backed up Client Name field, and then select the fully qualified client hostname of the client that you are performing recovery on, from the Current Client HostName selection box.
The Current Client Hostname list contains values of all hostnames entered on the Network Config page and the client hostname present in the recovery response xml file. It also contains the hostnames resolved via nslookup for each IP address configured on the Network Config page. You can also enter a new client hostname manually as specified in the client information checklist. This hostname will be used during recovery and will persist on the machine after the recovery completes.
The hostname must be resolvable from the CommServe and the MediaAgent to the client being recovered. Skip the hostname field to enable installation of the client being recovered with an IP instead of hostname.
Select Next and press Enter.
- If you want to clone the client machine, select the Clone client with new name check box.
This screen is displayed if Clone client with new name option is selected.
Enter the name of the new client. The new client name will be used during recovery and once the recovery completes, all the agents will be registered on the new client name. This will ensure that after recovery, the machine has a commvault client of its own that does not clash with the client used for backup.
Select Next and press Enter.
-
Enter the details of the CommServe and MediaAgent that are used to backup the client.
Select Next and press Enter.
-
Continue the Recovery on Similar or Dissimilar System.
Clone Client with a New Name
You can clone the client with a new name during the restore process. This will be useful if the source computer and the computer being recovered are different and you do not want to turn off the source client until the restore completes successfully. The new client name will be used during recovery and once the recovery completes, all the agents will be registered on the new client name. This will ensure that after recovery, the machine has a commvault client of its own that does not clash with the client used for backup.
-
Boot the computer where you want to recover the client using the ISO image.
-
Type Default and press Enter to start the default recovery.
-
Select Interactive and press Enter.
-
Enter the IP address, network and name server details of the network specified in the client information checklist.
Select the bonding master from the backed up NICs and the slave that was configured during recovery from the current machine list and add to map. If not sure, always leave the mapping empty and proceed to the next screen.
Select Next and press Enter.
-
Enter the short name of the backed up client in the Backed up Client Name field.
-
Enter the fully qualified hostname of the client that you are performing recovery on, in the Current Client HostName box.
Alternatively, you can select the client hostname from the Current Client HostName selection box which contains values of all hostnames entered on the previous network configuration screen along with the client hostname present in the recovery response xml file as well as the hostnames resolved via nslookup for each IP address configured in the network configuration screen. This selection can be ignored and a new client hostname can be manually entered as specified in the client information checklist. This hostname will be used during recovery and will persist on the machine after the recovery completes.
Make sure that the hostname is resolvable from the CommServe and the MediaAgent to the client being recovered. This field may be left blank to enable installation of the client being recovered with an IP instead of hostname.
-
Select the Clone client with new name check box.
-
Enter the name of the new client in the New Client Name field.
-
Complete the Recovery on Similar or Dissimilar System.
During the restore, the Linux File System iDataAgent will be installed in the restore only mode with the new client name and host name. This hostname will persist on the machine after the recovery completes. The CommServe and the MediaAgent should be able to connect to the computer being recovered with the new host name. After the restore completes successfully, the temporary client will be deleted. The original client name and hostname and network settings, which were backed up will be restored.
Response File for Non-Interactive Recovery
During a similar or dissimilar system restore, you can access the recovery response file from an NFS location or an ISO file instead of using the USB drive.
From an NFS Location
-
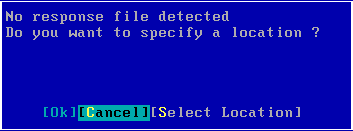
Boot the client using the ISO image.
-
Type Default and press Enter to start the default recovery.
-
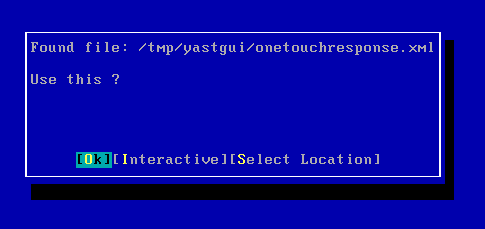
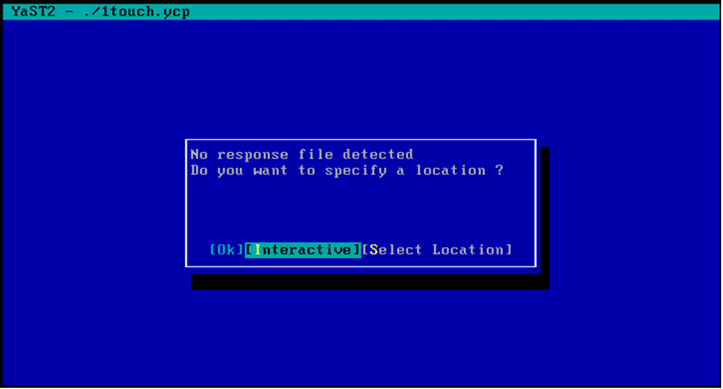
Select Select Location to specify the NFS location of the response file.
-
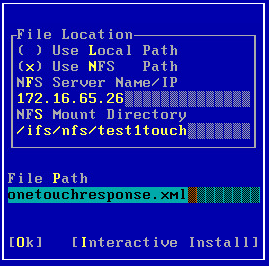
Select Use NFS Path.
In the NFS Server Name or IP field, enter the NFS server name or IP address.
In the NFS Mount Directory field, enter the mount directory on the NFS server.
In the File Path field, enter the response filename.
Note: Make sure that the response filename is onetouchresponse.xml.
Example:
If you have the file onetouchresponse.xml located on the server mynfs.com under the share /unix/1touch in the folder client1, provide the following values:
In the NFS Server Name or IP field, type mynfs.com.
In the NFS Mount Directory field, type /unix/1touch.
In the File Path field, type onetouchresponse.xml.
-
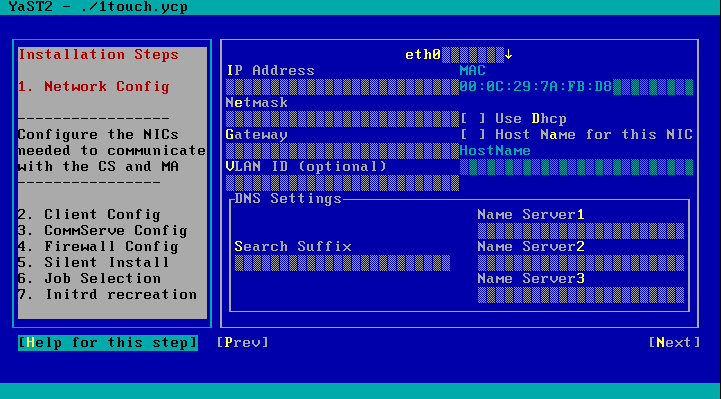
Enter the IP Address of the client.
Enter Net Mask of the client.
Enter the Gateway of the client.
Enter the DNS Suffix for the client.
Select Next and press Enter.
The system state and the file system data backed up during the most recent backup is restored.
-
Follow the steps described in the Recovery on a Similar System or Recovery on a Dissimilar System depending upon the hard disk configuration of the client.
From an ISO File
-
Use a program such as ImgBurn to create an ISO file from the exported response file.
-
Attach the ISO file as the second CD-ROM device. (Verify that the DVD is attached to the first CD-ROM device as seen by the guest Virtual Machine (VM)).
-
When the VM boots up and prompts for the response file, press Alt+F2 to open an alternate terminal.
-
Type the command to mount the ISO file:
#mkdir /iso; mount -oro /dev/sr1 /iso -
Press Alt+F1 to go back to the first terminal.
-
Select the local file option and choose the path as "/iso/xml_file_name".
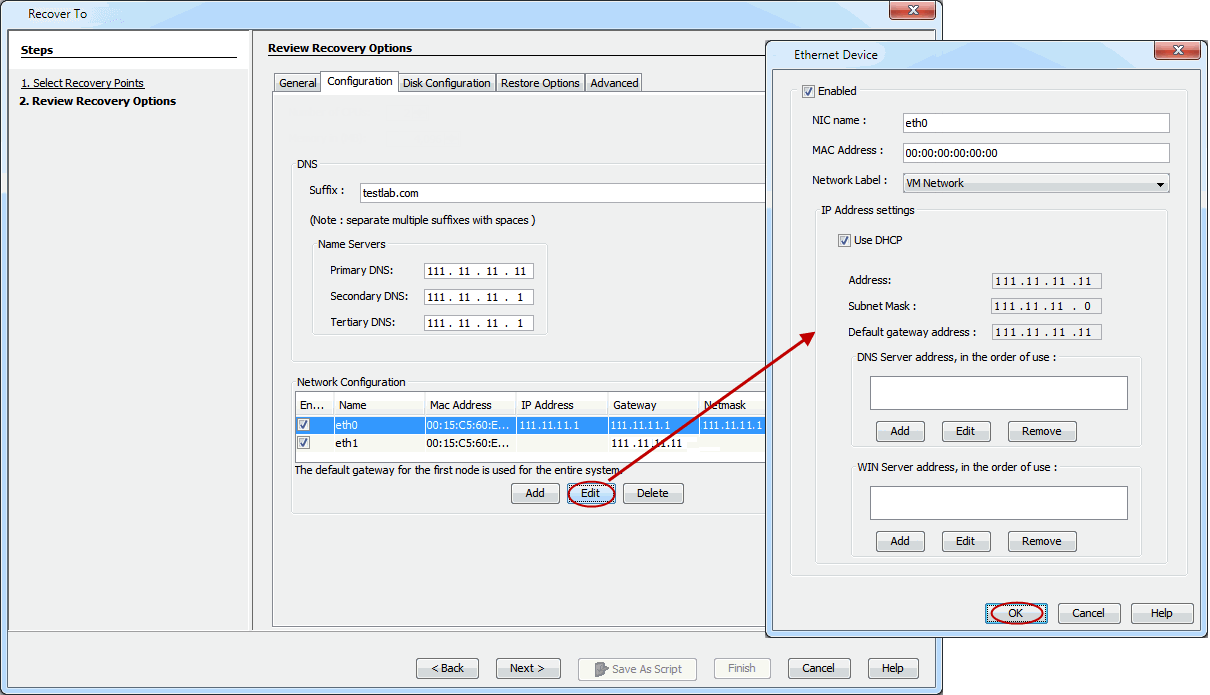
Changing the Network Configuration during a Non-Interactive Recovery
You can change the network configuration of the client before creating a response file and then use the modified response file for a non-interactive recovery. Follow the steps given below to change the network configuration of a client:
-
From the CommCell Console, navigate to <Client>.
-
Right-click the <Client> and click All Tasks | 1-Touch Recovery Points.
-
Click Next.
-
Click Configuration tab. It displays a list of current network configurations of the client.
-
Select the network configuration which you want to modify and click Edit.
-
Modify the IP address or any other network configuration details.
Click Use DHCP if you want to use DHCP instead of static IP address.
-
If you want to use DNS, click Add and enter the IP address of the DNS Server.
If you want to use WINS, click Add and enter IP address of the WINS Server.
-
Click OK.
-
Click Next.
-
Click Finish and save the response file.