Viewing Job History
You can view the job history for jobs that have run within a specific time range and also as per their job status. By default, the job history displays all job status. However, you can customize and view the job history for a particular job status or time range.
For Jobs Within a Specific Time Range
Use the following steps to view the job history of jobs performed within a specific time range:
-
From the CommCell Browser, expand Client Computers.
-
Right-click the client and click View > Job History.
The Job History Filter dialog box appears.
-
Select the Specify Time Range check box.
-
From the Time Zone list, select the backup time zone.
-
Enter the time range in the Start Time and End Time boxes.
-
Click OK.
For Specific Job Status
By default, the job history displays all job status. Use the following steps to view a particular job status in the job history of a client:
-
Under Job Status, select the status that you want to see in the job history:
-
Completed
-
Failed
-
Killed
-
-
Click OK.
For Specific Jobs
Use this procedure when you want to view the job history of one or more jobs.
-
From the CommCell Browser, expand Client Computers.
-
Right-click the client and click View > Job History.
The Job History Filter dialog box appears.
-
In the Job ID area, select the jobs that you want to view.
-
To view a single job, select Job ID and then type type the job ID in the box.
-
To view a sequential job range, select Job Id Range and then type the first job ID and last job ID in the boxes.
-
-
Click OK.
Viewing Details of a Job
You can view detailed information about a job, such as how many files were backed up during a data protection operation, the reason an auxiliary copy job failed to start, the throughput of a backup, the job status of the job, etc. Additional job details as applicable per agent can also be viewed, such as the items that failed or were successfully protected during a data protection operation, items that were restored during a data recovery operation, associated media (of a data protection operation), job events, and the log files of the job.
Use the following steps to view the details of a job:
-
In the CommCell Browser, right-click the appropriate entity and click View > Job History.
The Job History Filter dialog box appears.
-
Click OK.
-
From the Job History window, right-click the job and then click View Job Details.
The Job Details dialog box appears, displaying detailed job history.
-
Click OK.
Viewing the Events of a Job
Use the following steps to view the events of an active job in the Job Controller:
-
From the CommCell Console ribbon, click the Home tab and then click Job Controller.
-
Right-click any running job and click View Events.
All the events associated with the selected job will be displayed.
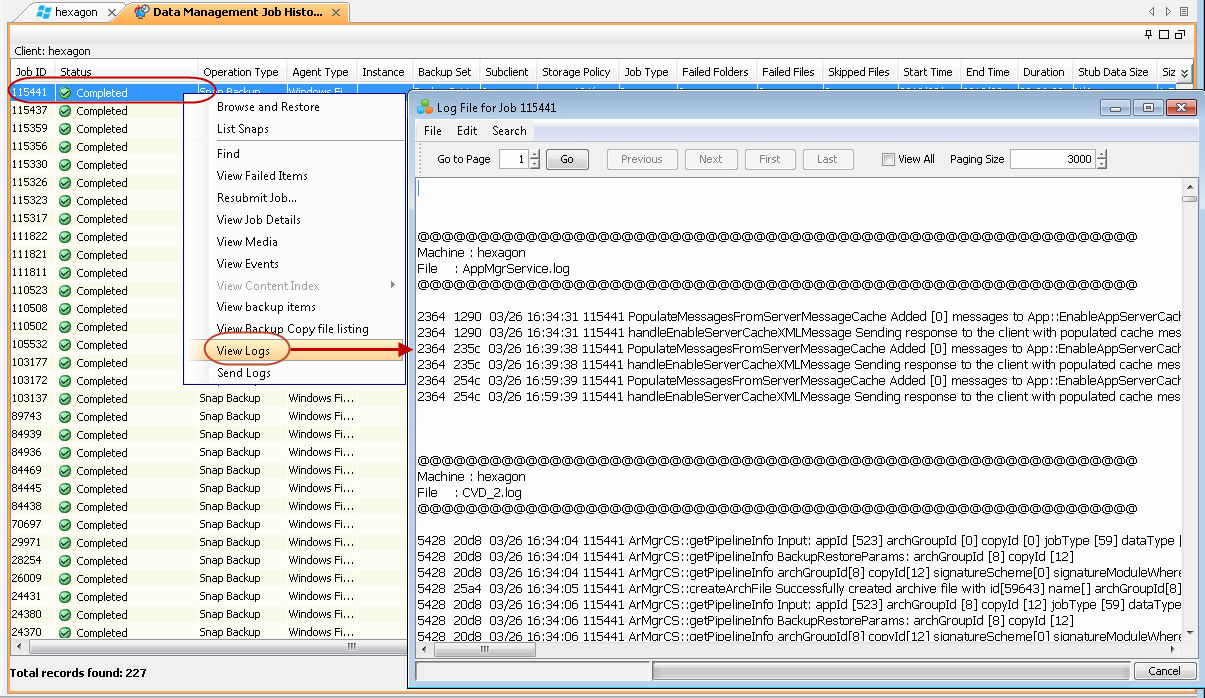
Viewing the Logs of a Job
You can view the log files of a job in the Job History window.
Use the following steps to view the log files of a job (from the Job History window of a client, as an example):
-
Click OK.
-
From the Job History window, right-click the job and then click View Logs.
-
The Log File for Job nwindow appears, displaying the contents of the log file related to the selected Job History.
-
Click Cancel.
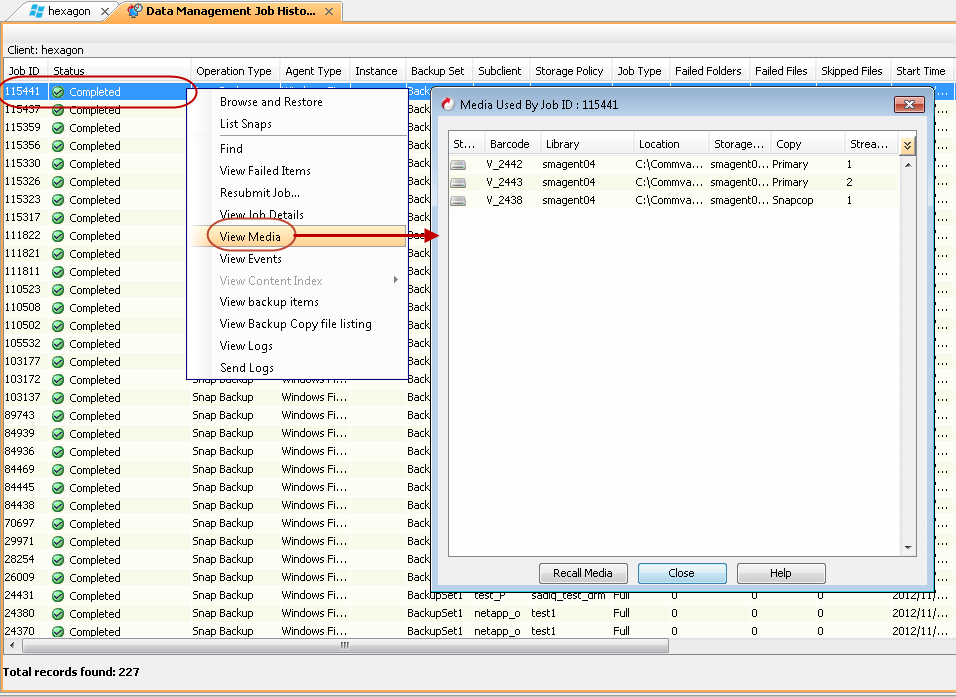
Viewing the Media for a Job
You can view the media associated with a specific job in the Job History window.
Use the following steps to view the media associated with a job (from the Job History window of a client, as an example):
-
Click OK.
-
From the Job History window, right-click the job and then click View Media.
-
The Log File for Job nwindow appears, displaying the contents of the log file.
Click Close.
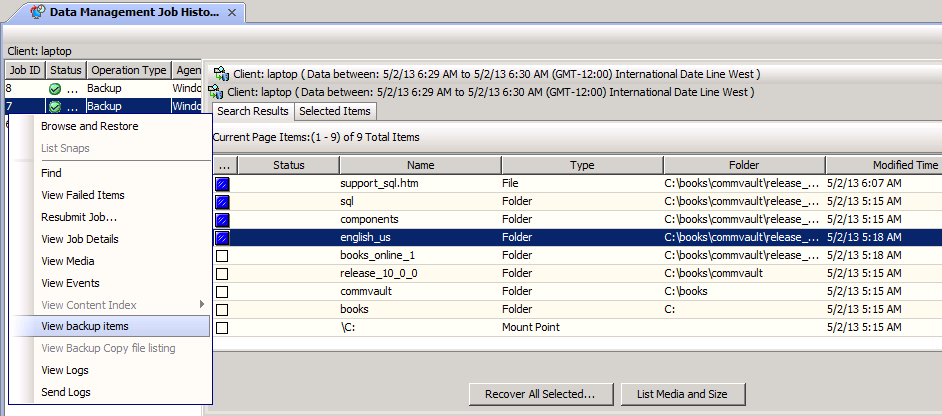
Viewing Successfully Backed Up Items for a Job
You can view the list of successfully backed up or archived files and messages from the Job History window. In addition you can also perform a restore operation and/or a list media operation on the selected items that were backed up successfully.
Use the following steps to view the list of items that were successfully backed up for a job (from the Job History window of a client, as an example):
-
Click OK.
-
From the Job History window, right-click the job and then click View Backup Items.
The Backup File List nwindow appears, displaying the items that were successfully backed up.
Viewing Failed Items for a Job
You can identify the number of failed operations for a job from the Job History window. These include individual files that may fail the job even though a particular job completed successfully. Some items fail because they are locked by the operating system or application and cannot be opened at the time of the backup operation. This often occurs with certain system-related files and database application files.
Use the following steps to view the list of items that failed to backup for a job (from the Job History window of a client, as an example):
-
Click OK.
-
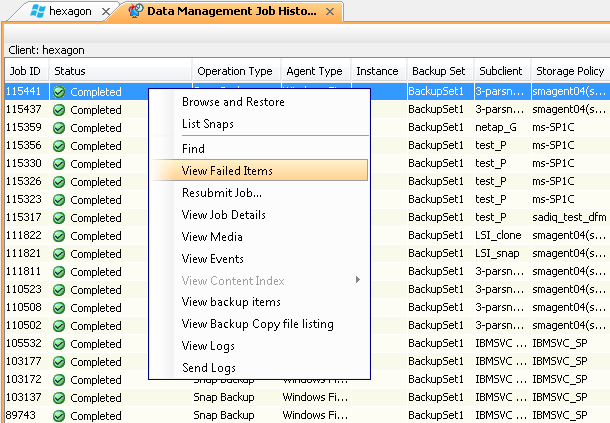
From the Job History window, right-click the job and then click View Failed Items.
-
The Unsuccessful Backup Files window appears, displaying the items that failed to backup.
Click Close.
Viewing Items That Were Successfully Content Indexed
You can view the status of the content indexing jobs from the Job History window. The Content Indexing history can be viewed from the Agent, Instance, BackupSet and Subclient levels.
Use the following steps to view the list of items that were successfully content indexed during an Offline Content Indexing operation using the eDiscovery Exception Report.
Before You Begin
You must be able to access the Web Console to view the eDiscovery Exception Report. If you are logged in to the CommCell Console as a user with the Compliance Search and Reports Management permissions, you do not have to log in to the Web Console and will be automatically redirected to the eDiscovery Exception Report for the content indexing job.
Procedure
-
From the CommCell Browser, right-click the CommServe icon and click View > Admin Job History.
-
From the Admin Job History Filter click Offline Content Indexing under the Job Type.
-
Click OK.
-
From the Admin Job History window, right-click the job and then click View Content Index > Successful Items.
-
If prompted, log in to the Web Console from your Web browser.
The browser redirects to the eDiscovery Exception Report in the Web Console for the selected content indexing job.
For more information, see eDiscovery Exception Report.
Viewing Items That Failed to Content Index
To view the items that failed to be content indexed for a particular content indexing job, go to the eDiscovery Exception Report in the Web Console and perform a search query using the content indexing job ID filter (cijid). See eDiscovery Exception Report.
Viewing Recovered or Restored Items
When viewing files that are restored in the Restored Files window, each of the files is listed with the restore status level appended at the end of the file path. The possible status levels are:
-
RESTORED
Successfully restored files will be listed with RESTORED appended to the file path.
-
FAILED
If files are not restored/recovered due to errors, the file paths will be appended with FAILED.
-
OLDER
Under some circumstances, the system may not restore/recover certain files because they are older versions of the same files already present in the files system; these files are appended with the word OLDER.
Use the following steps to view the restored items associated with a job:
-
From the CommCell Browser, right-click the appropriate entity and click View > Job History.
The Job History Filter dialog box appears.
-
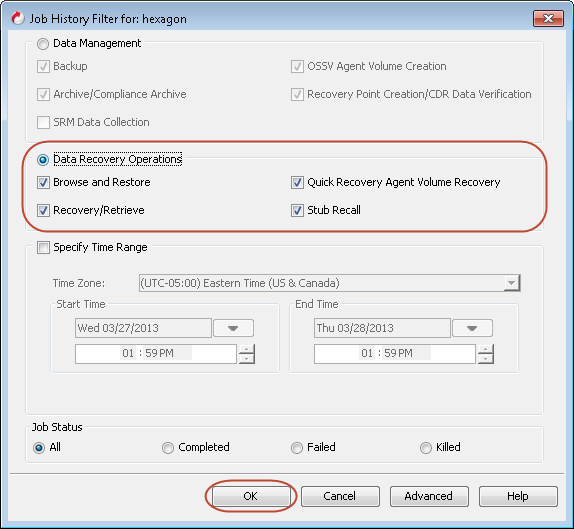
From the Job History Filter window, select Data Recovery Operations.
-
Click OK.
-
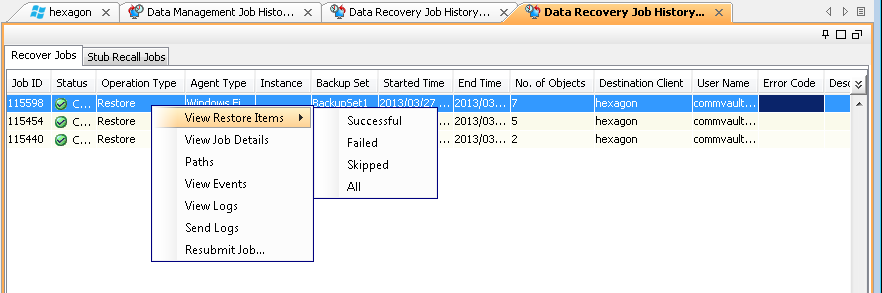
From the Job History window, right-click the job and then click View Restore Items | All.
-
The Restore Files window appears, displaying the files that were restores.
Click Close.
Viewing SAP Oracle BR Tools Logs
View SAP Oracle Backup BR Tools logs for a job. This option is available at the CommServe, MediaAgent and Client level for SAP Oracle backup jobs.
The SAP Oracle BR Tools log files for backup jobs are zipped and placed in the following directory.
$SAPDATA/logs_<timestamp>/<hostname>/SAPBACKUP_<client_id>_<SAP_INSTANCE_ID>.7z
-
In the CommCell Browser, right-click the appropriate entity and click View | Job History.
-
Click OK.
-
From the Job History window, right-click a SAP Oracle backup job and then click View BR Tools Log.
-
The Oracle Sap Backup Log dialog box appears, displaying the SAP Oracle backup BR Tools logs.
- View the log file contents by using the Next and Prev buttons or by entering a number in the on Page box and clicking Go.
-
Click OK.
Viewing Job Information
Information about a job is continually updated and available in the Job History window. Once a job is finished, detailed information about that job is obtainable using the Job History.
The following job information is displayed, depending on the selected Job History:
|
Column Name |
Description |
|---|---|
|
Agent Type |
The agent that is performing the operation (for example, Windows 2008 File System). |
|
Alert |
The name of the job-based alert, if configured for the job. |
|
Automated Content Classification Policy |
Name of the Automated Content Classification Policy. |
|
Backup Set |
The backup set that was protected/recovered during the operation and to which the subclient belongs. |
|
Backup Type |
The type of backup that was conducted: Differential, Full, Incremental or Synthetic. |
|
Client/Client Computer |
For data protection operations, the client computer to which the backup set and subclient belong. For data recovery operations, the computer from which the data originated. |
|
Completion Time |
The log creation time for the last log file of max chain. This time is the client time and not the CommServe time. |
|
Content Indexed |
Displays Full, Partial, or No to indicate whether content indexing was used for the operation. Operations performed with older releases of the software may display Yes or No. Note that if a job is displayed as partially content indexed, not all of the data protected in the job was content indexed successfully. Rerun content indexing on this job so that the protected data is fully content indexed. |
|
Delay Reason |
The description of the reason why the operation may be pending, waiting, or failing. |
|
Description |
A brief description of the running job. |
|
Destination Client |
The destination client to which the recovered data will be stored. |
|
Drives/Mount Paths |
The drives/mount paths that are being used by the operation. For more information about media, see Media Operations. |
|
End Time |
The date and time on the CommServe when the operation was completed. |
|
Elapsed |
The duration of time consumed by the operation. |
|
Errors |
Displays any errors that have occurred during the operation, such as a hardware problem or the job has run outside of an operation window. (See Viewing the Error Codes for a Job for more information.) |
|
Error Code |
Error Code for job pending or job failure reason. (See Viewing the Error Codes for a Job for more information.) |
|
Estimated Completion Time |
The time that the system estimates for this job to be completed. |
|
Failed Files |
The number of files that were not included in the operation. |
|
Failed Folders |
The number of folders that were not included in the operation. |
|
Index |
Displays New Index to indicate a new index was created during the operation. If blank, a new index was not created. |
|
Instance/Partition |
The instance/partition in the client computer that represents the database that was included in this operation. |
|
Job ID |
A unique number allocated by the Job Manager that identifies the data protection, data recovery, or administration operation. |
|
Job Initiation |
The origin of the operation: the CommCell Console (Interactive), a schedule (Scheduled), or a third party interface (Third Party). |
|
Job Type |
The type of operation that is being conducted on data. |
|
Last Update Time |
The last time the Job Manager received job updates for the operation. |
|
Legal Hold Name |
The Name specified for the Legal Hold data. |
|
Legal Hold Retention Time |
The time frame for which the Legal Hold Data will be retained. |
|
Libraries |
The libraries that is being used by the operation. |
|
Maximum Number of Readers |
The maximum number of readers that can be used for the operation. |
|
Max Restarts |
The maximum number of times the job will be restarted after a phase of the job has failed. This is set in the Job Management (Job Restarts) tab. |
|
MediaAgent |
The MediaAgent to which the operation is being directed. |
|
Number of Readers in Use |
The number of readers currently in use for the operation. |
|
Number of Objects |
The total number of objects including successful, failed and skipped. |
|
Operation |
The type of data protection, data recovery, or administration operation being conducted. |
|
Phase |
The current phase of the operation. The number of phases varies depending on the operation. |
|
Priority |
The priority that is assigned to the operation. (For more information, see Job Priorities and Priority Precedence). |
|
Primary Copy Library |
The library of a primary copy that is being used by the operation. |
|
Progress |
A status bar indicating its progress. The progress bar is not visible for certain operations (e.g., data aging) or for the initial phases of some data protection operations. The Job Controller progress bar will not display the progress of SAP for MAXDB backup and restore jobs accurately. This is true because Commvault cannot detect data or objects transferred by SAP for MAXDB due to the way SAP for MAXDB transfers these items. |
|
Range of Log Files |
For DB2, the minimum and maximum log sequence backed up by the job. |
|
Retained By |
The type of retention rules defined for the job, basic or extended. For more information, see Data Aging. |
|
Restart Interval |
The amount of time the Job Manager will wait before restarting a job that has gone into a pending state. This is set in the Job Management (Job Restarts) tab. |
|
Size of Application |
The amount of the application data that has been protected. If job has completed with multiple attempts, the amount displayed may be larger. |
|
Size of Backup |
The amount of compressed data that has been protected, which includes all application data and metadata. |
|
Size on Media |
The total size of data that was transferred to the media (excluding duplicated data). The amount displayed is the compressed amount (if compression is enabled) includes valid and invalid attempts of the backup jobs. |
|
Start/Start Time |
The date and time on the CommServe when the operation started. |
|
Status |
The status of the operation. For job status descriptions, see Job Status Descriptions. |
|
Storage Policy |
The storage policy to which the operation is being directed. |
|
Subclient |
The subclient that was protected during the operation. Note that a deleted subclient will have a Unix time stamp appended to its name in cases where another subclient is currently using the same name as the deleted subclient. |
|
Transferred |
The amount of data that has been transferred for the operation at the present time. |
|
User Name |
The name of the user who initiated the operation. |
Viewing Job History for Backup Copy Jobs
The Backup Copy Job History can be viewed from the CommServe, client, Agent, Instance, BackupSet and Subclient levels for all backup jobs. You can view detailed information about backup copy jobs in the Job History window.
The section below provides the steps to view the backup copy job history of a Client:
-
In the Job History Filter dialog box, click Advanced.
-
In the Data Protection History Advanced Filter dialog box, click the Include Backup Copy Jobs check box and then click OK.
-
Click OK.
-
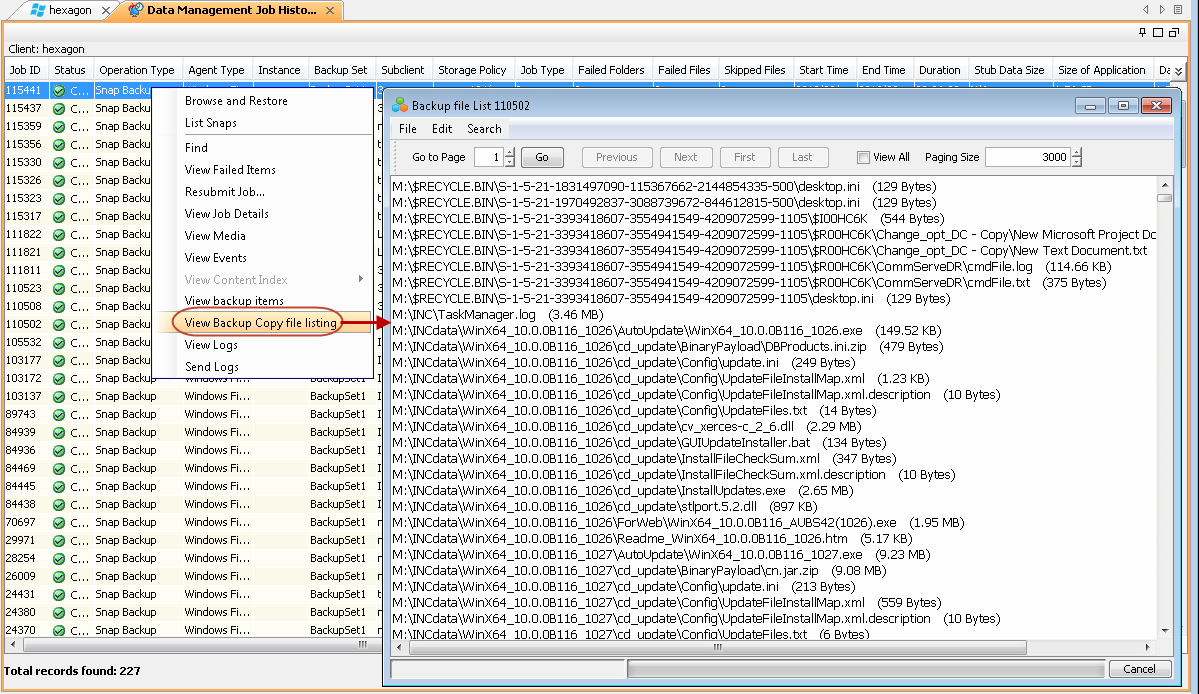
From the Job History window, right-click the job and then click View Backup Copy File Listing.
The Backup Copy File List window appears, displaying detailed job history.
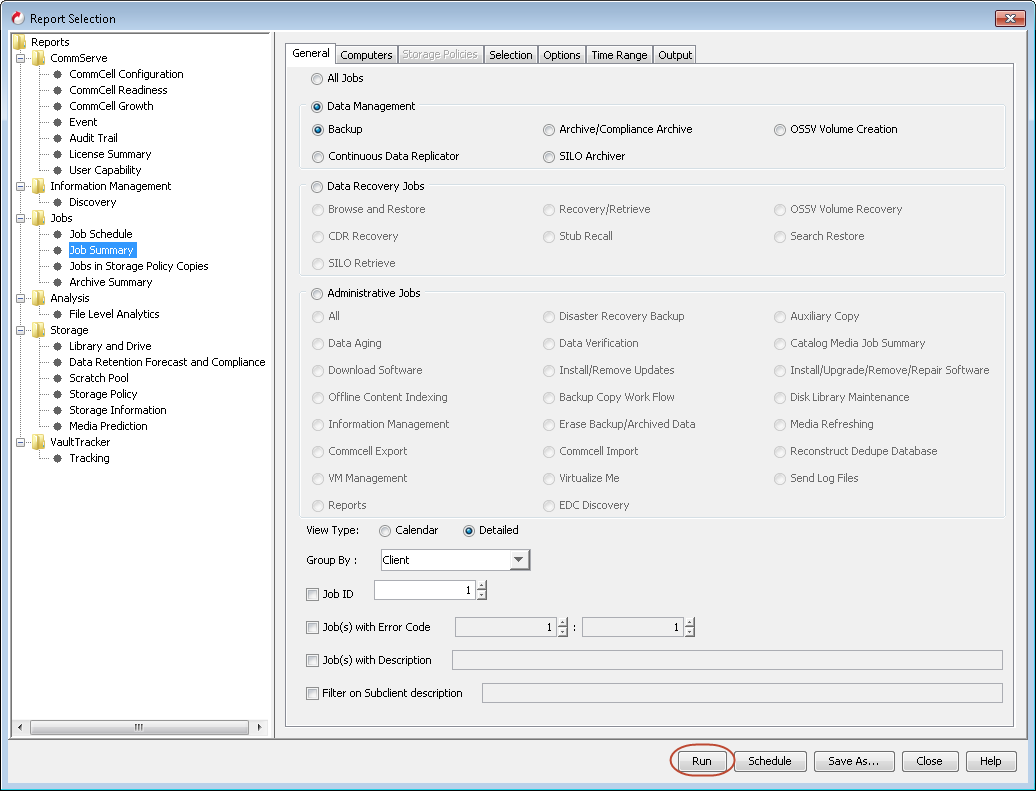
Job Summary Report
The Job Summary Report displays all data management, data recovery, and administrative jobs that ran in the CommCell during a specified period of time. The report also includes information about all media options. Please refer Job Summary Report for details.
Use the following steps to generate Job Summary Reports:
-
From the Reports menu in the CommCell Console, click Summary.
-
Select suitable options and click Run.
Job Summary Report appears in your default browser.