Basic Recovery
1-Touch recovery restores data from the backup set, and all the subclients in it, including the deleted subclients.
Before You Begin
You must configure the NIM master and the NIM client prior to performing a 1-Touch backup. For more information, see http://www-01.ibm.com/support/docview.wss?uid=isg3T1010383.
Procedure
-
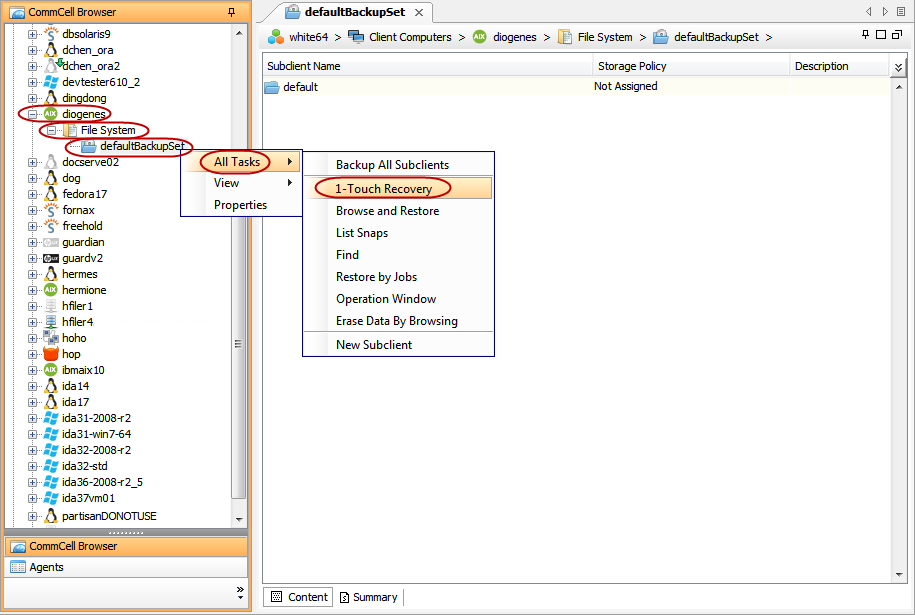
Login to CommCell Console using CommCell credentials.
-
From the CommCell Browser, navigate to Client Computers | <Client> | File System.
Right-click the defaultBackupSet and click All Tasks | 1-Touch Recovery.
-
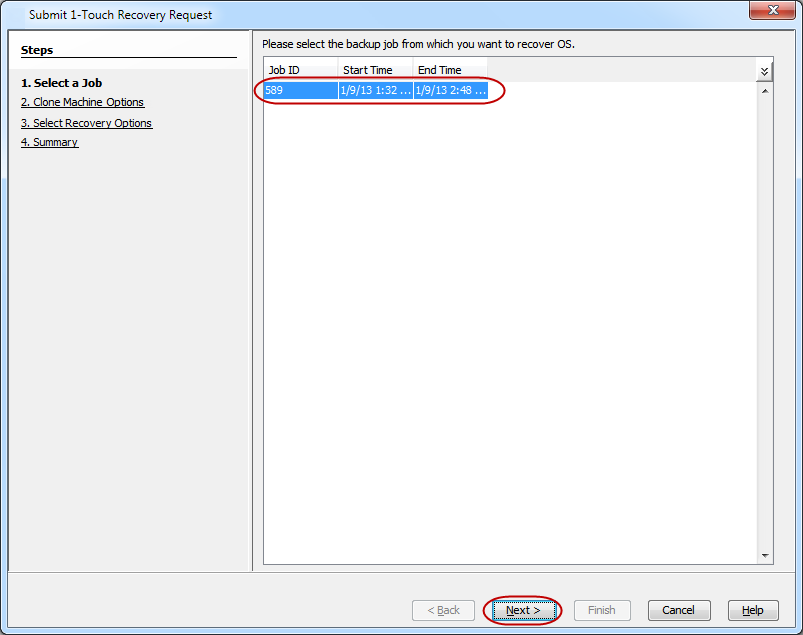
Select the backup job for recovering the operating system.
Click Next.
-
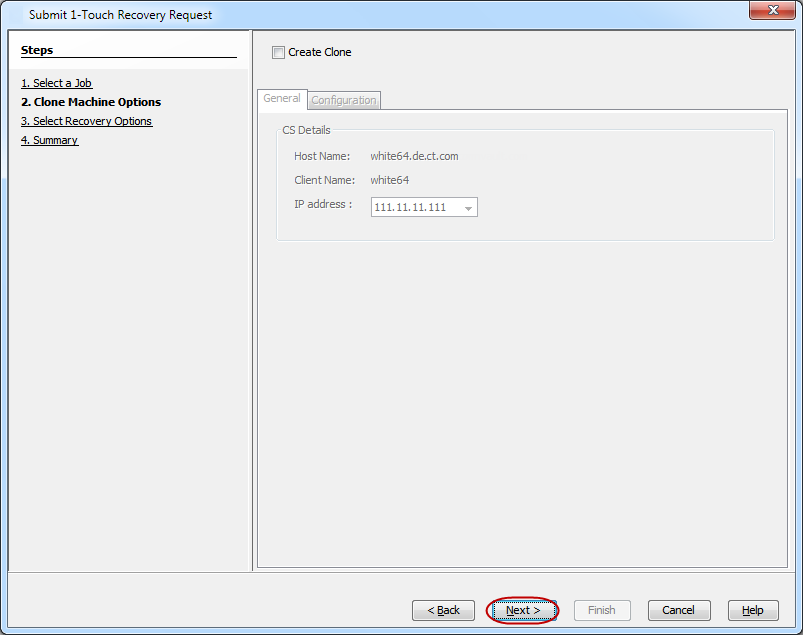
Click Next.
-
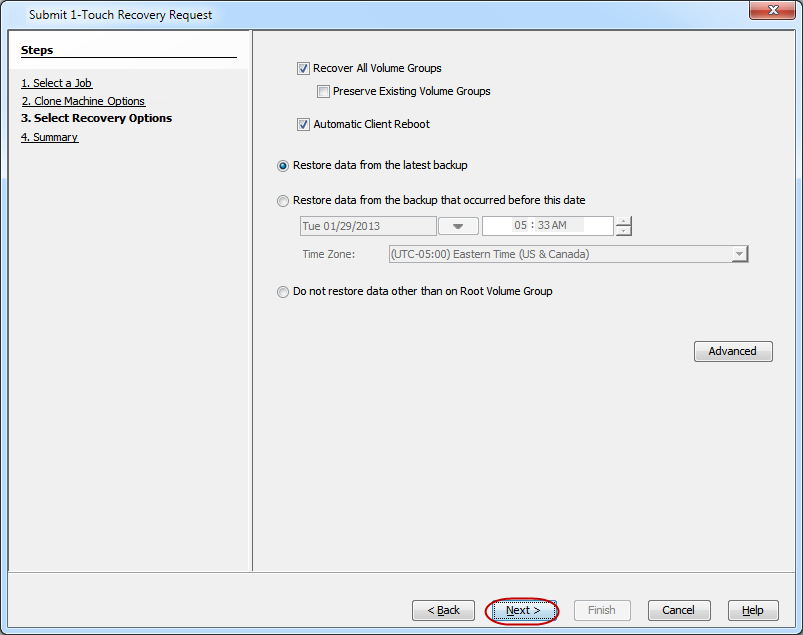
Click Next.
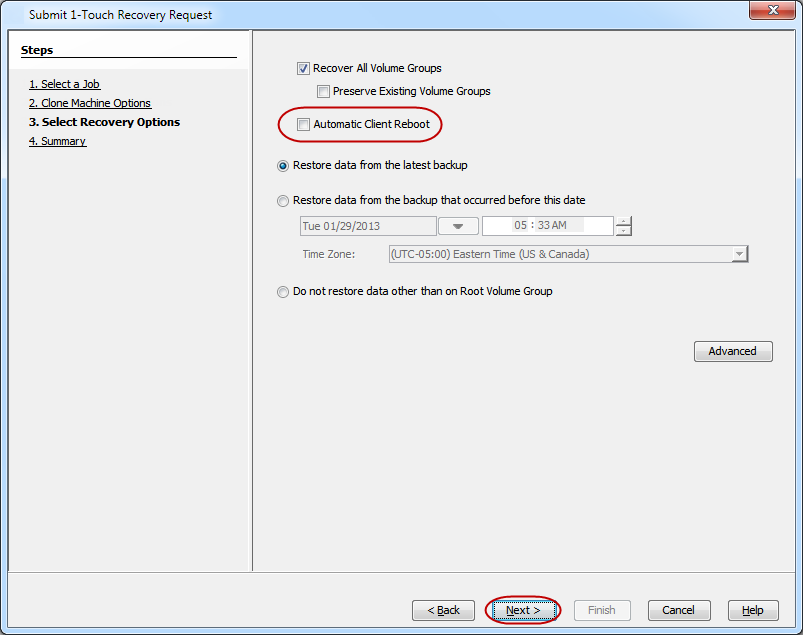
Select the Automatic Client Reboot check box.
-
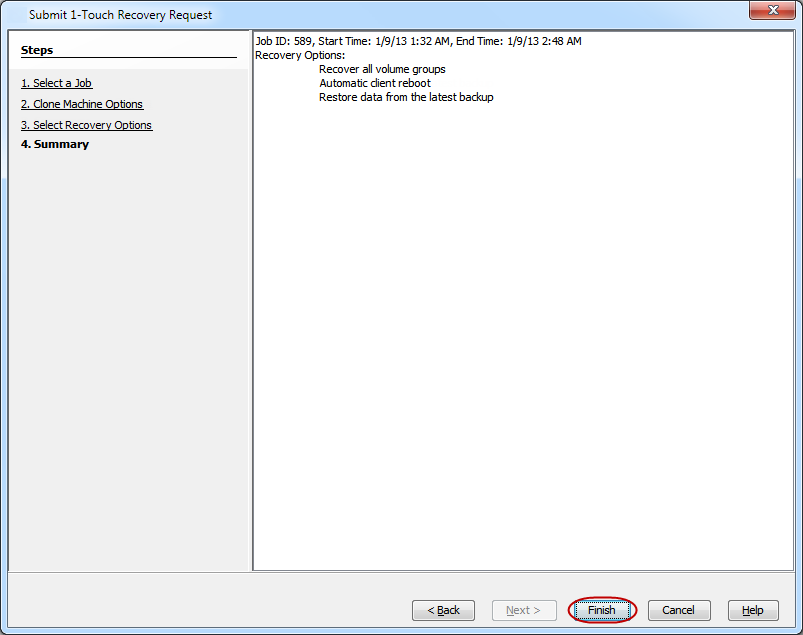
Review the recovery options.
Click Finish.
Advanced Recovery
When AIX operating system is not running or if additional manual steps are required on the client, you have to manually perform the network boot for the client.
Procedure
-
From the CommCell Browser, navigate to Client Computers | <Client> | File System.
Right-click the defaultBackupSet and click All Tasks | 1-Touch Recovery.
-
Select the backup job for recovering the operating system.
Click Next.
-
Click Next.
-
Clear the Automatic Client Reboot check box.
Click Next.
Note
If the Automatic Client Reboot option is not selected, the client certificates will not be revoked and the client will not automatically reboot.
In such cases, to start the subsequent phases of 1-Touch recovery:
-
Revoke the client certificates manually. See Revoking Client Certificate for more information, and
-
Reboot the client manually and choose to boot from the server.
-
-
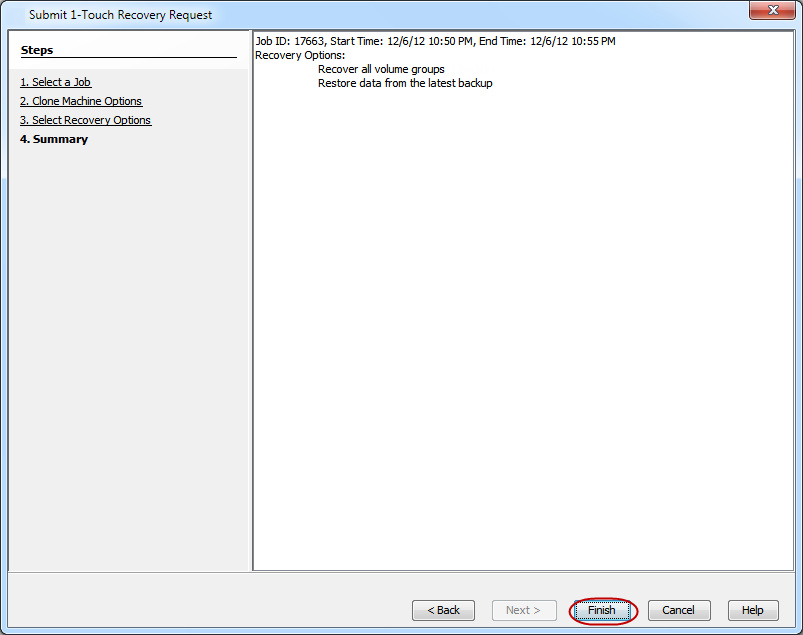
Review the recovery options.
Click Finish.
-
Wait for the 1-Touch recovery job to complete restoring mksysb to the NIM master.
-
If the client is running operating system you can perform any necessary steps required on client computer.
If the client doesn’t have the operating system, connect it to the network and switch power ON.
-
Navigate to the SMS menu
-
Configure network interface if required to use the NIM master server.
-
Boot the client computer using network interface.
-
If Restore Data option is selected, a new restore job will be automatically started.
-
After the client computer reboot and the restore job are complete, verify if the client is up and services are running.
-
Check connectivity from the CommCell Console.
-
Restoring Data Backed Up before a Specific Date
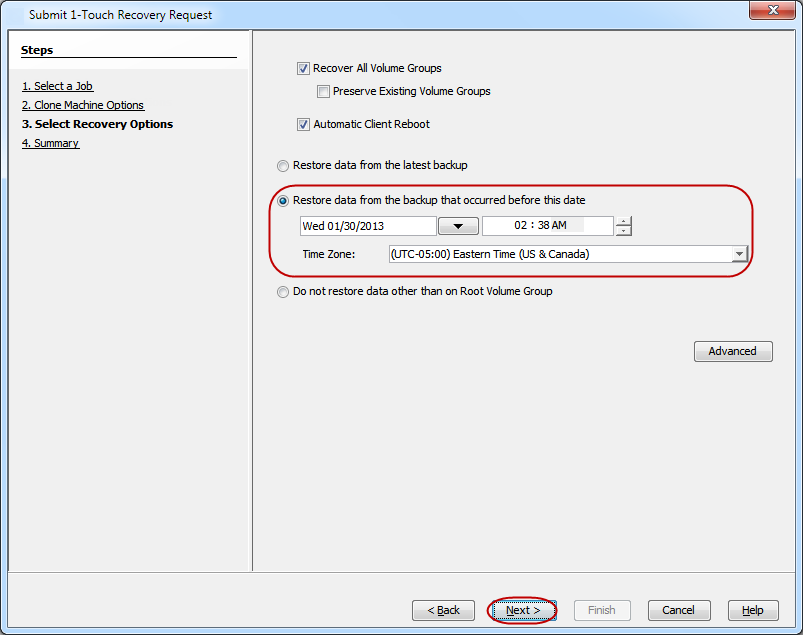
You can perform a point-in-time restore of the system state. You can recover data from a backup that occurred before the specified date and time.
-
From the CommCell Browser, navigate to Client Computers | <Client> | File System.
-
Right-click the defaultBackupSet and click All Tasks | 1-Touch Recovery.
-
In the Submit 1-Touch Recovery Request dialog box, click Select Recovery Options.
-
Select the Automatic Client Reboot check box.
-
Click Restore data from the backup that occurred before this date and select a date and time.
-
Select a Time Zone.
-
Click Next.
-
Click Finish.
Changing the Priority of the Restore Job
You can increase the priority of a restore job. If you want to perform the 1-Touch recovery on a high priority, follow the steps given below:
-
From the CommCell Browser, navigate to Client Computers | <Client> | File System.
-
Right-click the defaultBackupSet and click All Tasks | 1-Touch Recovery.
-
In the Submit 1-Touch Recovery Request dialog box, click Select Recovery Options.
-
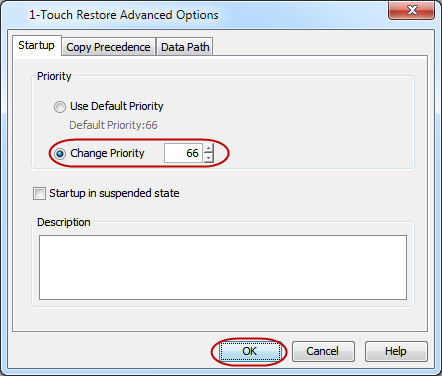
Click Advanced.
-
Click Change Priority.
-
Select a priority number - 0 is the highest priority and 999 is the lowest priority.
-
Click OK.
-
Click Next.
-
Click Finish.
Starting the Restore Job in Suspended State
If there are multiple jobs running simultaneously on the CommServe, you can hold the restore job on suspended state. Once the CommServe is freed up, you can resume the restore job from the Job Controller window.
-
From the CommCell Browser, navigate to Client Computers | <Client> | File System.
-
Right-click the defaultBackupSet and click All Tasks | 1-Touch Recovery.
-
In the Submit 1-Touch Recovery Request dialog box, click Select Recovery Options.
-
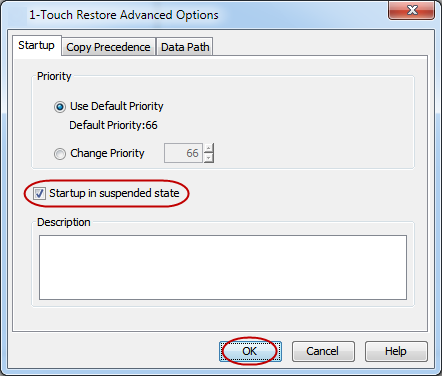
Click Advanced.
-
Click the Startup in suspended state check box.
-
Click OK.
-
Click Next.
-
Click Finish.
Restoring Data from a Copy Precedence
By default, 1-Touch recovery will restore the data from the primary copy. But if you want to restore data from a particular storage policy copy, you can specify the copy precedence.
-
From the CommCell Browser, navigate to Client Computers | <Client> | File System.
-
Right-click the defaultBackupSet and click All Tasks | 1-Touch Recovery.
-
In the Submit 1-Touch Recovery Request dialog box, click Select Recovery Options.
-
Click Advanced.
-
Click the Copy Precedence tab.
-
Select the Restore from copy precedence check box.
-
Select the number from Copy Precedence list..
-
Click OK.
-
Click Next.
-
Click Finish.

Restoring Data from a Specific Data Path
If you want to restore the data from a specific location on a MediaAgent, you can specify the data path as follows:
-
From the CommCell Browser, navigate to Client Computers | <Client> | File System.
-
Right-click the defaultBackupSet and click All Tasks | 1-Touch Recovery.
-
In the Submit 1-Touch Recovery Request dialog box, click Select Recovery Options.
-
Click Advanced.
-
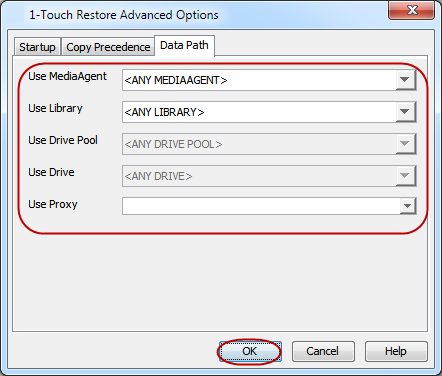
Click the Data Path tab.
-
Select the MediaAgent from UseMediaAgent list.
-
Select the Library from UseLibrary list.
-
Select the drive pool and drive from UseDrive Pool and UseDrive lists for tape library.
-
Select the name of the Proxy server from UseProxy list, if you wish to restore using a proxy server.
-
Click OK.
-
Click Next.
-
Click Finish.
Cloning a Client Computer
Cloning is the process of creating a replica of a client computer from its backup. You can create a clone of a client computer during 1-Touch restore. This feature allows the user to seamlessly set up a cloned computer with a different hostname/ IP configuration while the source computer is still up and running. This comes handy when setting up a standby server during disaster recovery testing.
The settings on the source client such as the subclient and backup set options, schedules, storage policies, and so on will not be preserved on the cloned client. If required, additional iDataAgents can be installed and configured from the CommCell Console. 1-Touch cloning is not available if the CommCell is in the Lockdown mode.
Procedure
-
From the CommCell Browser, navigate to Client Computers | <Client> | File System.
-
Right-click the defaultBackupSet, and then click All Tasks | 1-Touch Recovery.
-
Select the backup job for recovering the operating system, and then click Next.
-
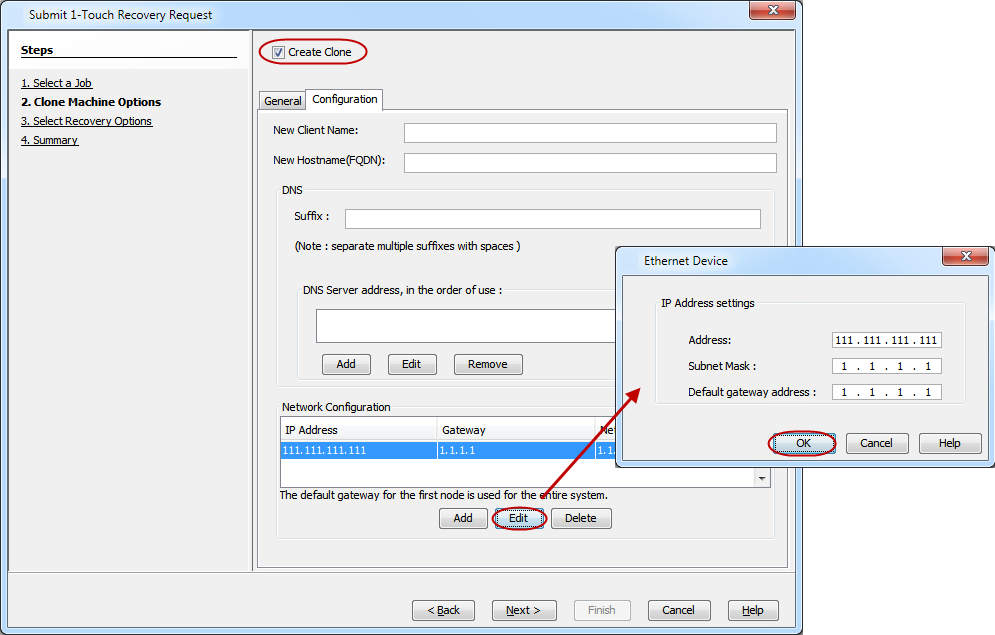
Select the Create Clone check box.
-
Enter the IP address of the CommServe used to backup in the IP address box.
-
Click the Configuration tab. It displays a list of current network configurations of the client.
-
Type the new client name in the New Client Name box.
The new client name is the name of the client which will be created for the clone computer in the CommServe. Make sure that the client name is not used by any other client in the CommServe.
-
Type the fully qualified domain name of the new client machine in the New Hostname box.
-
To use DNS, enter the DNS suffix in the Suffix box and click Add to enter the IP address of the DNS Server.
-
Click Add to create a network configuration and specify the IP address and other network configuration details.
To modify an existing network configuration, select it and click Edit.
-
Click OK.
-
Review the recovery options and modify as needed. Click Next.
-
Click Finish.
-
Wait for the 1-Touch recovery job to complete restoring the mksysb to the NIM master.
-
If the destination client is up and running, perform any necessary steps required to reboot the computer.
At the time of booting, go to the SMS menu and configure the network interface with the IP address provided in step 10 as well as the subnet mask, gateway address, and IP address of the NIM master. Continue the boot process with the network boot option.
After the destination client boots from the network, the basic operating system will be recovered. If option to restore data was selected, then an out of place restore job will be automatically started to restore source client's data to the cloned destination client.