Choosing Restore Types
When restoring Hyper-V data, you can select one of the following restore type:
Full Virtual Machine
This restore type is selected by default. This restore type will be useful in the following scenario:
-
You are unable to turn on the virtual machine. However the disks (VHD files) are available for the machine
-
You want to restore an entire virtual machine to a specific point-in-time.
-
You want to move the virtual machine to a new Hyper-V host.
Virtual Machine Files
Use this restore type to restore disks (VHD files) from a virtual machine. This restore type will be useful in the following scenario:
-
The virtual machine is running, but one of its disk has errors.
-
The storage device hosting the disks has errors or not available.
Note: File level browse and restore of 4K sectored disks is not supported.
Guest Files or Folders
Use this restore type to restore files or folders from a virtual machine.
This restore type will be useful in the following scenario:
-
A file or folder on the virtual machine has errors and you are unable to open the file or the folder.
-
You want to restore a file or a folder to a specific point-in-time.
Considerations
Restores cannot modify configuration files directly. For restores, the Virtual Server Agent imports the virtual machine from the backup and modifies the VM configuration after importing the VM (for example, attaching restored disks and reconfiguring networks). This type of restore is also supported for Windows Server 2012 R2 nodes.
Limitations
Microsoft Windows Server 2016 and Later Versions
-
For file-level restores or full VM restores from IntelliSnap backup operations, the proxy host that you designate for the restore operations cannot be a member of the cluster nodes where the source VM resides. To designate the proxy host (MediaAgent) for this scenario, follow these steps:
-
From the CommCell Browser, go to Client Computers > Virtualization Client > Virtual Server > instance > DefaultBackupSet.
-
Right-click the subclient, and then select Browse and Restore.
-
The Browse and Restore Options dialog box appears.
-
On the Advanced Options tab, from the Use MediaAgent list, select the MediaAgent.
-
-
Because of a Microsoft limitation, you cannot implement Disk Signature changes.
Live Browse Limitations
For information about Live Browse limitations, see Live Browse from IntelliSnap - Microsoft Hyper-V.
In-Place Restores
Restoring a Full Virtual Machine
-
From the CommCell Browser, expand Client Computers > virtualization_client > Virtual Server >Hyper-V > backup_set.
-
Start the restore from a subclient or backup set:
-
From the subclient, right-click the subclient and then select Browse and Restore.
-
From the backup set, right-click the backup set, point to All Tasks, and click Browse and Restore.
-
-
In the Browse and Restore Options dialog box, ensure that Full Virtual Machine is selected, and then click View Content.
-
From the list of backed up virtual machines, select one or more virtual machines that you want to restore, and then click Recover All Selected.
The Restore VM wizard launches and displays the Destination page.
-
Specify the destination and the proxy to be used for the restore.
By default, VMs are restored in place to the original location for the source VM, and the restore is performed using the preferred VSA proxy for the virtualization client.
-
In Place: Clear this checkbox to restore out of place.
-
Virtualization Client: Displays the virtualization client for the source VM. To restore to a different Hyper-V environment, select a different virtualization client from the list.
-
Instance Details: Displays the user account for the selected virtualization client.
-
Destination Client: Displays the default VSA proxy for the restore. To use a different proxy, select a Hyper-V server from the list. Only proxies that match the type of the virtualization client are displayed.
When a virtual machine is restored, it is automatically mounted to the Hyper-V Server of the specified destination client.
If you are restoring to a CSV volume, select the client that owns the volume.
-
-
Click Next.
The wizard displays the Virtual Machines page. With an in-place restore no changes are required.
-
Click Next.
The wizard displays the Restore Options page.
-
Optional: Select restore options:
-
Disk Provisioning: Select from Original, Fixed and Dynamic.
-
Original: (default) Select to use the same disk provisioning that the source virtual machine used at the time of backup.
-
Fixed: Select to allocate disk space for all disks. A fixed virtual disk has reserved storage that is the same size as the virtual disk itself.
-
Dynamic: Select to allocate disk space for all disks. Dynamic disk storage is not reserved and is allocated as needed during runtime. This allows for storage over commitment under the assumption that most disks are not fully utilized and storage capacity can be utilized better.
-
-
Power ON Virtual Machine after Restore: Select this check box to start the virtual machine automatically after the restore is complete.
-
Unconditionally Overwrite VM and VHDs in destination path: Select this check box to replace virtual machines and VM disks with the same name at the specified destination.
-
-
Click Next.
The wizard displays the Job Options page.
-
Run the job immediately or configure a schedule for the restore.
-
Click Next.
The wizard displays a Summary page for the restore.
-
To further customize the restore operation, click Advanced.
For more information about advanced options, see Advanced Restore Options.
-
Click Finish to submit the restore job.
Restoring Virtual Machine Files
Follow the steps given below to restore a disk from a virtual machine:
-
From the CommCell Console, navigate to Client Computers > virtualization_client> Virtual Server > Hyper-V.
-
Right-click the backup set that contains the data to restore and click All Tasks > Browse and Restore.
-
In the Browse and Restore Options dialog, select Virtual Machine files and click View Content.
-
Expand the listing in the Content tab and navigate to the required volume on a virtual machine.
The right pane of the Content tab displays all the files in the volume.
-
Select the required disks.
You can select multiple disk files to restore. If you have created a checkpoint for the virtual machine, select any associated .avhdx files as well as the base disks.
-
Click Recover All Selected.
-
On the Restore Options for All Selected Items dialog:
Option
Steps
Select a proxy:
-
In the Destination client list, select the Hyper-V server that was used to back up the virtual machine.
-
Specify the existing location of the disk in the Specify destination path box or click Browse to select a new location.
Convert virtual machine disk:
See Converting Virtual Machine Disks. If you select a disk to restore that is not in VHDX format, the conversion option is not presented.
-
Under Virtual Disk Conversion, select the Convert Disk to option and use one of the following values:
-
VMDK: VMware virtual disk format. The VMDK disk is created with thick lazy zeroed provisioning. After conversion, you can attach the converted disk to an existing VMware virtual machine, or create a VMware virtual machine from the disk using vSphere.
-
VHD: Legacy virtual hard disk format for Hyper-V.
-
-
-
Click OK.
Notes:
When you create a checkpoint for a virtual machine, an associated .avhdx file is created for the virtual machine disk. If you restore virtual disk files from such a backup, you must restore both the base (parent) disk and any associated .avhdx files (child disks). After restoring disk files, you can run the following PowerShell command to relink the parent and child files:
PS C:\> Set-VHD -Path child_disk.avhdx -parentpath parent_disk.vhdx -IgnoreIdMismatch
After running this command you can mount the disk and browse guest files on the virtual machine disk.
When you restore a virtual machine disk file, the permissions associated with the original virtual machine are not restored. As a result, you might not be able to start a VM that refers to the disk file. You can address this issue by removing and re-adding the disk to the VM, by using Hyper-V Manager to reset the correct security permissions, or by using the icacls command to restore permissions as described in Hyper-V virtual machine may not start, and you receive a “‘General access denied error’ (0x80070005)” error message.
Converting Virtual Machine Disks
As part of the process of restoring virtual machine disk files, you can convert disks to a new format:
-
VMware virtual machine disks in the VMDK format can be converted to VHD or VHDX.
-
Hyper-V disks in the VHDX format can be converted to VMDK or VHD.
After converting a disk, you can attach it to an existing VM or use it to create a new VM. Disk conversion can be used to move data from one platform to another, or as the first step in migrating a virtual machine from one platform to another.
Virtual machines created from converted disks can be backed up and restored using the same processes as virtual machines created directly in VMware or Hyper-V.
Considerations
-
Disk conversion is supported for both Windows and Linux VMs and for disks using thin or thick disk provisioning, and can be initiated from full or incremental backup jobs.
-
Disk conversion is not supported from differential backups, or for virtual machines with multiple snapshots.
-
You can initiate a disk conversion when performing a Browse and Restore operation on a subclient from a full, synthetic full, or incremental backup job.
Note
Instead of browsing a subclient, you can also view backup history and select a specific backup job to browse for a disk; but when using this method you can only initiate a disk conversion from a full or synthetic full backup job.
Guest Files and Folders
To restore files and folders to a Windows client, the client must have one of the following components installed:
-
Virtual Server Agent
-
Windows File System Agent (full or restore only)
You cannot restore files and folders directly to a Linux virtual machine. Instead, restore to another destination and copy the data to the virtual machine.
Considerations
-
The version of the file system agent on the destination VM must be the same as the version of the Virtual Server Agent.
-
For Windows:
-
You can perform the Browse and Restore operation by right-clicking a backup set. However, if the backup set contains some subclients configured for regular backup and other subclients configured for IntelliSnap backup, you must select the Browse and Restore option by right-clicking the subclient.
-
To live browse and restore files from an IntelliSnap backup of a Windows VM executed with a Linux MediaAgent, you must include the Windows MediaAgent information on the Advanced Options tab for the Browse request. This Windows MediaAgent cannot be a member of the cluster node, and it must be Hyper-V role enabled.
-
You can restore files from NTFS file systems with the following limitations:
-
The formatted cluster size (allocation unit) must be 1024 or greater.
-
You cannot restore any archived files and folders.
-
You cannot restore files that have been dehydrated by Windows 2012 dedup.
-
-
To live browse and restore files from an ReFS volume from a backup of a Windows 2016 VM, you must use a MediaAgent running on Windows 2016 or later.
-
Linux
- The virtual machine must have the ext2 or ext3 file system.
Restoring Files and Folders
Follow the steps given below to restore a file or folder on a virtual machine to its original location:
-
From the CommCell Console, navigate to Client Computers > virtualization_client> Virtual Server > Hyper-V .
-
Right-click the <backup> set that contains the virtual machine that you want to restore, and click All Tasks > Browse and Restore.
-
Select Guest Files or Folders on the Restore Options dialog box, and click View Content.
-
Click
 and navigate to the required volume on a virtual machine.
 The right pane displays all the files and folders in the volume.
-
Select a file or a folder in the right pane.
-
Click Recover All Selected.
-
In the Destination client list, select a client where you want to restore the file or folder.
-
Specify the existing location of the file or the folder in the Specify destination path box, or click Browse to select the location.
-
Click OK.
Restoring Guest Files and Folders Using UNIX MediaAgents
For file-level restores from disk-level backups using any Unix (AIX, HP-UX, or Solaris) MediaAgent, perform the following steps:
-
From the CommCell Console, click Control Panel.
-
On the Control Panel, click Storage > Media Management.
-
On the Media Management Configuration dialog, click the Resource Manager Configuration tab.
-
For the Allow restore jobs to use alternative MediaAgent and Drive Pool to access required media parameter, click in the Value column and enter 1.
-
Click OK.
-
From the CommCell Console, navigate to Client Computers > virtualization_client > Virtual Server > Hyper-V.
-
Right-click a backup set and select All Tasks | Browse and Restore.
-
In the Restore Options window, select Guest Files and Folders; then click the Advanced Options tab.
-
In the Use MediaAgent list, select a Windows MediaAgent.
-
Click View Content.
-
In the client content window, select the virtual machine from which to restore the files and folders.
-
Select guest files and folders to be restored; then click Recover All Selected. You cannot select an entire volume to restore.
-
On the Restore Options for All Selected Items dialog, click OK.
Out-of-Place Restores
Note
When a virtual machine is restored to a destination host that does not have the same names for virtual switches as the source host, the network adapter is not restored. The network connection is restored only if the same connection is available on the destination host at the time of the restore.
Before running an out-of-place restore, you can create a virtual switch on the destination host with a name that matches the virtual switch on the source Hyper-V host. Only use this approach if it is appropriate to use the same network connection for the virtual machine on the new host.
Otherwise, after the virtual machine is restored, manually connect the network adapter to a different virtual switch on the destination host.
Restoring a Virtual Machine to a Different Location
-
From the CommCell Browser, expand Client Computers > virtualization_client > Virtual Server >Hyper-V > backup_set.
-
Start the restore from a subclient or backup set:
-
From the subclient, right-click the subclient and then select Browse and Restore.
-
From the backup set, right-click the backup set, point to All Tasks, and click Browse and Restore.
-
-
In the Browse and Restore Options dialog box, ensure that Full Virtual Machine is selected, and then click View Content.
-
From the list of backed up virtual machines, select one or more virtual machines that you want to restore, and then click Recover All Selected.
The Restore VM wizard launches and displays the Destination page.
-
Specify the destination and the proxy to be used for the restore.
By default, VMs are restored in place to the original location for the source VM, and the restore is performed using the preferred VSA proxy for the virtualization client.
-
In Place: Clear this checkbox to restore out of place.
-
Virtualization Client: Displays the virtualization client for the source VM. To restore to a different Hyper-V environment, select a different virtualization client from the list.
-
Instance Details: Displays the user account for the selected virtualization client.
-
Destination Client: Displays the default VSA proxy for the restore. To use a different proxy, select a Hyper-V server from the list. Only proxies that match the type of the virtualization client are displayed.
When a virtual machine is restored, it is automatically mounted to the Hyper-V Server of the specified destination client.
If you are restoring to a CSV volume, select the client that owns the volume.
-
-
Click Next.
The wizard displays the Virtual Machines page. With an in-place restore no changes are required.
-
For an out-of-place restore, specify parameters for the restore:
-
Select one of the following options:
-
New folder: Restore the virtual machine to a different location on the original Hyper-V server. This is useful when you want to restore the virtual machine to a point in time and want to retain the current data and configuration of the virtual machine.
-
Hyper V default folder: Restore the virtual machine to the default location of the Hyper-V Server. This is useful when you are restoring a virtual machine to a different Hyper-V server, and you do not know which volume on the server has the required space to restore the virtual machine.
-
-
VM and Disk: This column displays the names of the virtual machines to be restored. Expand a virtual machine to view the disks in that virtual machine.
-
Change VM Display/Disk name to: To rename any VM or disk, click in row for the VM or disk, and then enter the new name.
If you rename a disk, do not change the file extension.
-
Destination Path: In the row for a VM, click ..., and then select a destination folder on the client where you want to restore all the disks on the virtual machine.
If you are restoring to a CSV volume, specify the path of the CSV to which the VM should be restored.
If you want to restore each disk in the different location, click the row for each disk in the Destination Path column and select a location for the disk.
-
Settings: To change multiple settings for one or more VMs, select the VMs. In the Settings column, click Configure, and then select from the following options:
-
VM display Name: If you selected a single VM, this box shows the display name to be used for the restored VM. You cannot change that value on the Settings dialog box.
-
Edit Destination VM Name: If you selected multiple VMs, you can add a prefix or a suffix to the display names for all selected virtual machines as part of the restore operation. Click Prefix or Suffix and then type the prefix or suffix to be added to the display name.
-
Register Virtual Machines with Failover Cluster: Select this option to register the restored VM with the failover cluster immediately after the restore. After a virtual machine is registered, it can migrate to any Hyper-V server within the cluster.
-
Network Adapter Configuration: Select an available network adapter from the Network Adapter list.
By default, the network adapter of the original VM is selected automatically if the same network adapter is available on the Hyper-V Server.
If you select Not Connected, the virtual machine is restored without a network connection.
-
On a 2008 R2 Hyper-V server with the failover cluster, if the UAC (User Account Control) is enabled, you must manually register the restored virtual machine.
-
-
-
Click Next.
The wizard displays the Restore Options page.
-
Select restore options:
-
Disk Provisioning: Select from Original, Fixed and Dynamic.
-
Original: (default) Select to use the same disk provisioning that the source virtual machine used at the time of backup.
-
Fixed: Select to allocate disk space for all disks. A fixed virtual disk has reserved storage that is the same size as the virtual disk itself.
-
Dynamic: Select to allocate disk space for all disks. Dynamic disk storage is not reserved and is allocated as needed during runtime. This allows for storage over commitment under the assumption that most disks are not fully utilized and storage capacity can be utilized better.
-
-
Power ON Virtual Machine after Restore: Optional: Select this check box to start the virtual machine automatically after the restore is complete.
-
Unconditionally Overwrite VM and VHDs in destination path: Optional: Select this check box to replace virtual machines and VM disks with the same name at the specified destination.
-
-
Click Next.
The wizard displays the Job Options page.
-
Run the job immediately or configure a schedule for the restore.
-
Click Next.
The wizard displays a Summary page for the restore.
-
To further customize the restore operation, click Advanced.
For more information about advanced options, see Advanced Restore Options.
-
Click Finish to submit the restore job.
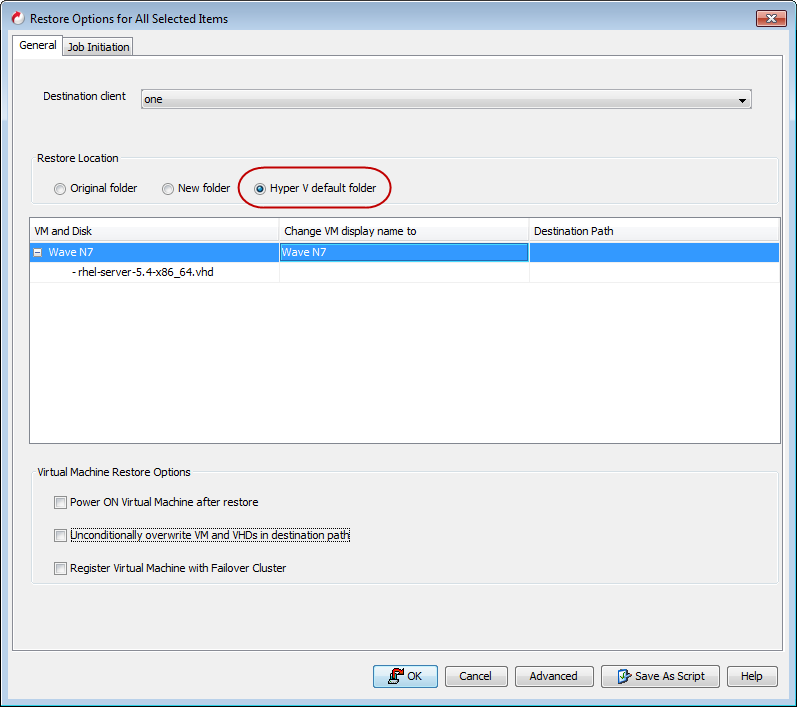
Restoring a Virtual Machine to a Default Location
By default, when you restore a full virtual machine, it gets restored to its original location on the original Hyper-V Server. You can restore the virtual machine to the default location of the Hyper-V Server. This will be useful when you are restoring a virtual machine to a different Hyper-V server and you do not know which volume on the server has the required space to restore the virtual machine.
Follow the steps given below to restore a virtual machine to the default location on the Hyper-V server:
-
From the CommCell Console, navigate to Client Computers | <Microsoft Hyper-V Client> | Virtual Server | Hyper-V.
-
Right-click the backup set that contains the virtual machine that you want to restore and click All Tasks | Browse and Restore.
-
In the Restore Options dialog box, click View Content.
-
Select a virtual machine in the left pane. The configuration and VHD files of the virtual machine are displayed in the right pane.
You cannot select a configuration file or a VHD file when you have selected Full Virtual Machine as the Restore Type.
-
Click Recover All Selected.
-
Select Hyper v default folder.
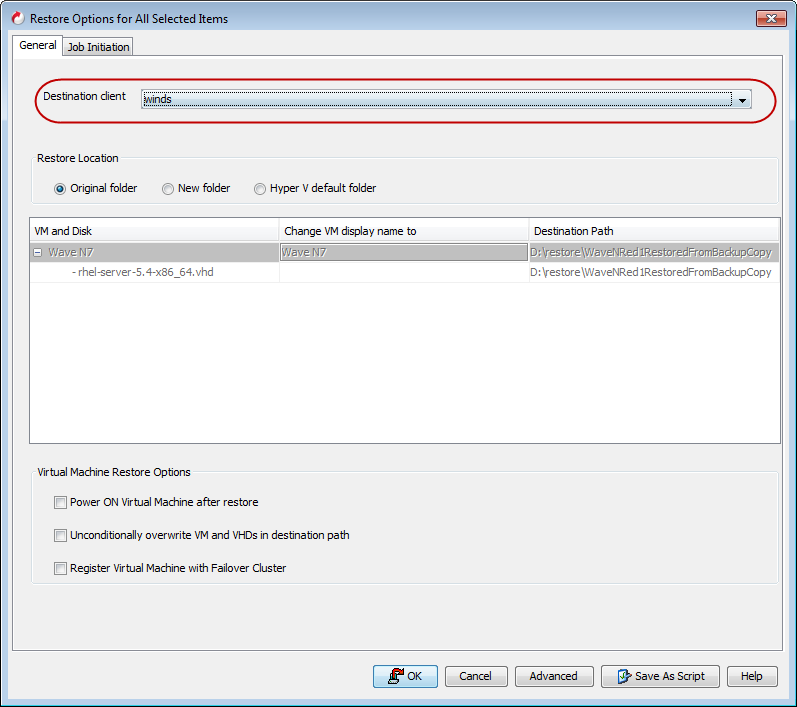
Restoring a Virtual Machine to a Different Hyper-V Server
An entire virtual machine can be restored to different Hyper-V Server. This provides the flexibility to distribute restored virtual machines to a location with greater space and resource availability This is useful when the virtual machine's original location is not optimal.
Note: Windows 2012 R2 virtual machines must be restored to a Windows 2012 R2 Hyper-V server. Restores to an earlier version of Hyper-V server (Windows 2012 or 2008 R2) is not supported.
-
From the CommCell Console, navigate to Client Computers | <Microsoft Hyper-V Client> | Virtual Server | Hyper-V .
-
Right-click the backup set that contains the data you want to restore and click All Tasks | Browse and Restore.
-
In the Restore Options dialog box, click View Content.
-
Select the virtual machine in the left pane. The configuration and VHD files of the virtual machine are displayed in the right pane.
-
Click Recover All Selected in the bottom of the window.
-
In the Destination Client list, select a Hyper-V server.
-
Click OK. When a virtual machine is restored, it is automatically mounted to the Hyper-V Server of the destination client you selected.
If a virtual machine with the same name already exists on the selected Hyper-V server, all the data and configuration of the virtual machine will be overwritten by the restored virtual machine. To avoid this, you can change the name of virtual machine while restoring it to a different Hyper-V server.
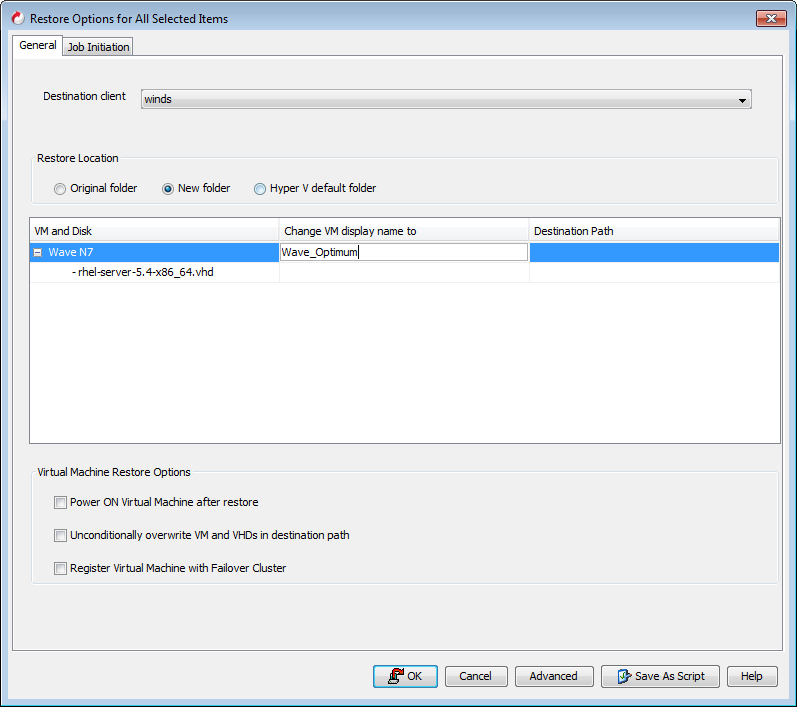
Changing the Name of a Virtual Machine
You can change name of a virtual machine while restoring the virtual machine. You can change the name when restoring the virtual machine to a new location or Hyper-v default folder. Renaming the VM avoids data loss if a virtual machine with the same name already exists in the new location or in the Hyper-V default folder.
-
From the CommCell Console, navigate to Client Computers | virtualization_client| Virtual Server | Hyper-V .
-
Right-click the backup set that contains the data to restore and click All Tasks | Browse and Restore.
-
In the Restore Options dialog box, click View Content.
-
Select the virtual machine in the left pane. The configuration and VHD files of the virtual machine are displayed in the right pane.
-
Click Recover All Selected in the bottom of the window.
-
Click New folder or Hyper V default folder.
-
Click in the first row of Change VM display name to column and enter a new name of the virtual machine.
-
Click OK.
Restoring Virtual Machine Disks to a Different Location
You can change the location of a virtual disk while restoring the disk. This will be useful when you want to attach a disk from one virtual machine to another virtual machine.
Follow the steps given below to restore a disk to a location different than its existing location:
-
From the CommCell Console, navigate to Client Computers | virtualization_client| Virtual Server | Hyper-V .
-
Right-click the backup set that contains the virtual machine to restore and click All Tasks | Browse and Restore.
-
On the Restore Options dialog box, select Virtual Machine Files and click View Content.
-
Click
and navigate to the required volume on a virtual machine. The right pane displays all the files in the volume. Select the volume or required files from the volume. -
Click Recover All Selected.
-
In the Destination client list, select a client that has the virtual server agent installed.
-
Specify the location of the disk in the Specify destination path box or click Browse to select the location on the destination client.
-
Click OK.
Restoring Files and Folders to a Different Location
Follow the steps given below to restore a file or folder on a virtual machine to a location different than its original location:
-
From the CommCell Console, navigate to Client Computers | virtualization_client| Virtual Server | Hyper-V .
-
Right-click the backup set that contains the virtual machine to restore and click All Tasks | Browse and Restore.
-
Select Guest Files or Folders on the Restore Options dialog box and click View Content.
-
Click
and navigate to the required volume on a virtual machine. The right pane displays all the files and folders in the volume. -
Select a file or a folder in the right pane.
-
Click Recover All Selected.
-
In the Destination client list, select a client where you want to restore the file or folder.
-
Specify the location of the file or the folder in the Specify destination path box or click Browse to select the location on the destination client.
-
Click OK.
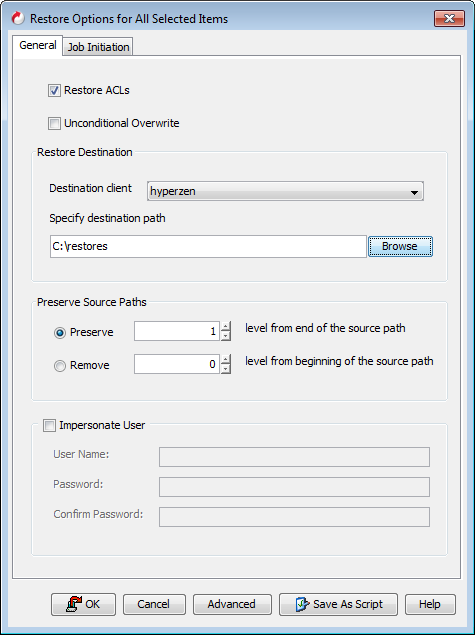
Restoring Files and Folders to a UNC Path or NFS-Mounted File System
Before restoring a file or folder on a virtual machine, ensure that Collect File Details was selected in the subclient properties.
Follow the steps given below to restore a file or folder on a virtual machine to a UNC Path (Windows client) or NFS Mounted File System (Unix client):
-
From the CommCell Console, navigate to Client Computers | virtualization_client| Virtual Server | Hyper-V .
-
Right-click the backup set that contains the virtual machine to restore and click All Tasks | Browse and Restore.
-
Select Guest Files or Folders on the Restore Options dialog box and click View Content.
-
Click
and navigate to the required volume on a virtual machine. The right pane displays all the files and folders in the volume. -
Select a file or a folder in the right pane.
-
Click Recover All Selected.
-
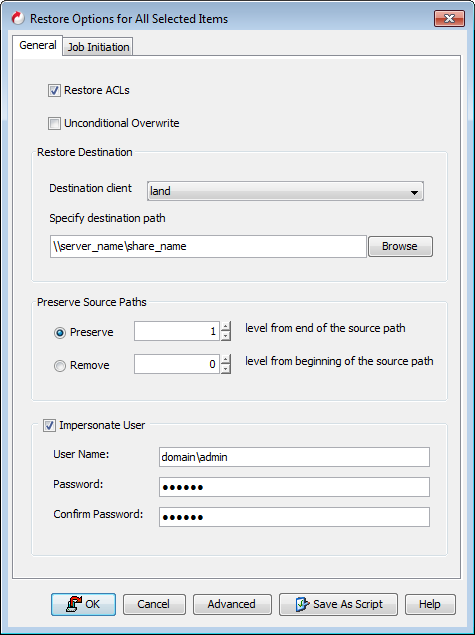
In the Destination client list, select a Hyper-V server.
The destination client must reside in the same CommCell as the client whose data was backed up.
-
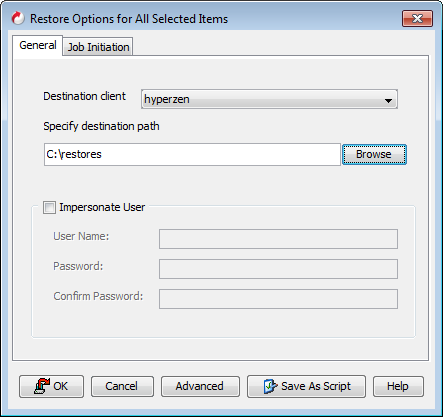
In the Specify destination path box enter the UNC path or the location of NFS mounted file system.
For example, enter \\servername\sharename. Do not specify a drive letter associated with a mapped drive.
The restored data assumes the rights (i.e., permissions) of the parent folder.
-
Select the Impersonate User check box.
-
Enter a username and password that has all permissions for the UNC path to which the data will be restored. This user should be allowed to create files in the destination folder. Without these permissions, the recovery operation will not complete successfully.
-
Click OK.
When restoring data to a UNC path (Windows) or NFS-mounted file system (Unix) is similar to a cross-computer restore except that:
-
The restored data passes through the client computer to the mapped share/file system.
-
The computer that hosts the share or mounted file system need not be another client within the CommCell.
-
All data restored to the shared directory assumes the security attributes (i.e., permissions) of the parent directory.
Viewing and Restoring a File Version
The View All Versions feature enables you to view multiple versions of a file that has changed across different backup jobs. Use this feature to restore a specific version of a file from a Browse and Restore or Find operation.
Note
-
Backups must be performed using the Collect File Details option.
-
You can use this feature to recover a single version for an individual file. You cannot recover multiple versions of a file in the same request.
-
To browse for a file version based on the time of the backup:
-
Initiate a restore.
-
Choose the following options on the Browse and Restore Options dialog:
-
Select Guest Files and Folders.
-
Click the Time Range tab.
-
Select Absolute Time or Relative Time; then enter a time range or time period.
-
-
Click View Content.
A Client tab is displayed for the backup job.
-
In the left pane, navigate to the required volume on the virtual machine with the file to be restored.
The guest files and folders on the volume are displayed in the right pane.
-
On the Client tab, right-click a file and select View All Versions.
The available versions for the selected file are displayed in the right pane.
-
To find a file version:
-
Execute a Find operation from a backup set or subclient:
-
Right-click the backup set and click All Tasks | Find.
-
Right-click the subclient and click Find.
-
-
Enter the file name or pattern in the File Name box.
To specify a file name pattern, use the following wildcards or a combination of wildcards:
*
Any number of characters (for example, Accounting*)
?
Any one character (for example, user_group?)
[]
A range of characters (for example, [a-k]Lee)
[!]
A negation of a range of characters (for example, [!a-k]Lee)
-
In the Search within these folders box, enter the location where you want to search for the file. Do not include the drive letter in the location.
-
Click View Content.
The files that match the criteria are displayed on the Search Results tab.
-
Select a file on the Search Results tab; then right-click the file and select View All Versions.
The available versions for the selected file are displayed in the right pane.
After displaying file versions on the Client or Search Results tab:
-
Select the file version to restore.
-
Complete the restore operation.
For details, see Restoring Guest Files and Folders.
Automatically Power On Restored Virtual Machines
Once a virtual machine has been restored, it can be automatically powered after the completion of the restore job.
-
From the CommCell Console, navigate to Client Computers | <Microsoft Hyper-V Client> | Virtual Server | Hyper-V .
-
Right-click the backup set that contains the data you want to restore and click All Tasks | Browse and Restore.
-
In the Restore Options dialog box, click View Content.
-
Select the virtual machine in the left pane. The configuration and VHD files of the virtual machine are displayed in the right pane.
-
Click Recover All Selected in the bottom of the window.
-
Select Power On Virtual Machine after Restore check box.
Click OK. When a virtual machine is restored, it is automatically mounted to the Hyper-V Server.
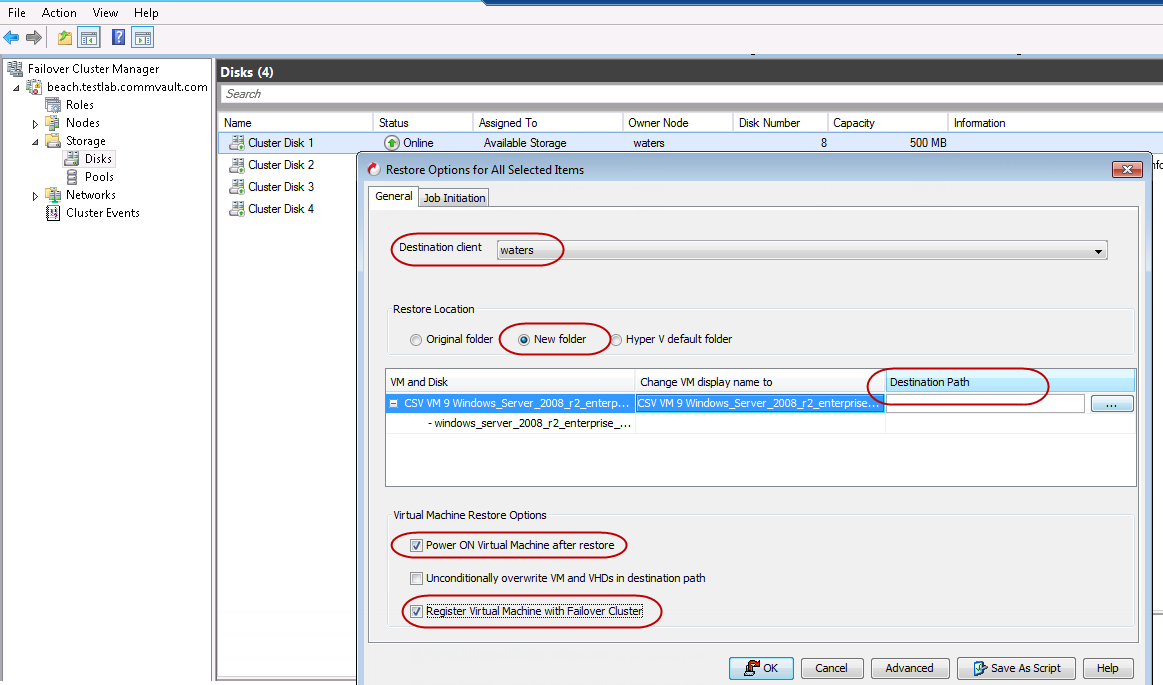
Restoring a Virtual Machine to a Cluster Shared Volume
You can restore a virtual machine to a cluster shared volume in a Hyper-V cluster.
-
Inside the Failover Cluster Manager, find the owner of the cluster shared volume onto which you want to perform a restore.
-
From the CommCell Console, navigate to Client Computers | <Microsoft Hyper-V Client> | Virtual Server | Hyper-V .
-
Right-click the backup set that contains the data you want to restore and click All Tasks | Browse and Restore.
-
In the Restore Options dialog box, click View Content.
-
Select the virtual machine in the left pane. The configuration and VHD files of the virtual machine are displayed in the right pane.
-
Click Recover All Selected in the bottom of the window.
-
The Destination client list by default, displays the name of the last node used to backup the virtual machine. However, you can select a different owner of the cluster shared volume from the drop-down list available.
-
Select the New folder option.
-
Click into the first row of Destination Path column and click
 . Specify the path of the Cluster Shared Volume to which the Virtual Machine has to be restored.
 -
Select the cluster shared volume and click OK on the Browsing for destination folder dialog box.
-
Select the Register Virtual Machine with Failover Cluster check box. This will ensure that the virtual machine will be registered with the failover cluster immediately after the restore. Once the virtual machine is registered, you can migrate it to any Hyper-V server with in the cluster.
Note
In order to register the virtual machine with the failover cluster, ensure that the user name specified in during the creation of a virtualization client is part of the following administrator groups on the Hyper-V host:
Hyper-V Administrators group
Local Administrators group (for Windows Hyper-V Server 2008 R2)
For a Hyper-V cluster, the user account must have full Cluster Permissions (Read and Full Control).
-
Click OK.
When a virtual machine is restored, it is automatically mounted to the Hyper-V Server of the destination client you selected. It will be automatically registered with the failover cluster.
Note
You have to manually register the Virtual Machine running on 2008 R2 Hyper-V server with the failover cluster if the UAC (User Account Control) is enabled on it.
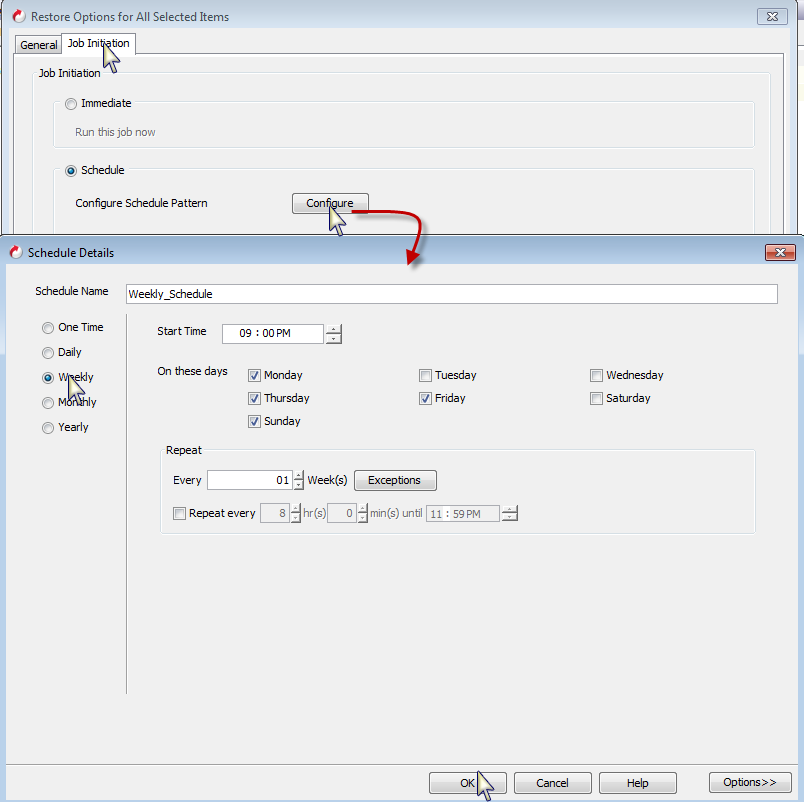
Scheduling a Restore
-
From the CommCell Console, navigate to Client Computers | <Microsoft Hyper-V Client> | Virtual Server | Hyper-V.
-
Right-click Backup Set or Subclient, click All Tasks | Browse and Restore.
-
In the Restore Options window, click View Content.
-
Select the virtual machine in the left pane. The configuration and VHD or VHDX files of the virtual machine are displayed in the right pane.
-
Click Recover All Selected in the bottom of the window.
-
Click Job Initiation tab and click Schedule.
-
Click Configure.
-
Select the appropriate scheduling options. For example:
-
Click Weekly.
-
Check the days you want the run the restore job.
-
Change the Start Time to 9:00 PM
-
Click OK to close the Schedule Details dialog box.
-
Click OK to close the Restore Options dialog box.
The restore job will execute as per the schedule.
-
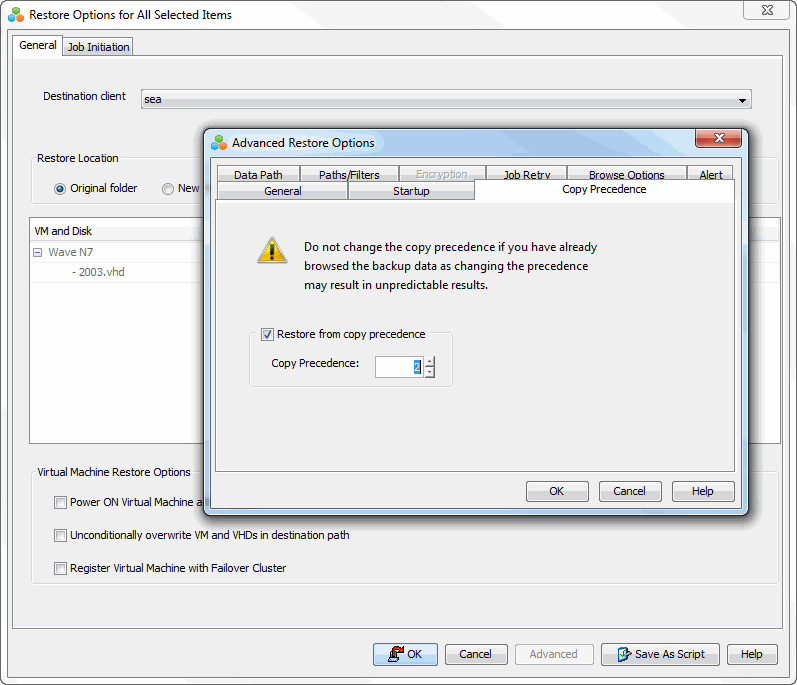
Restoring Data from a Backup Copy
You can perform a restore from a backup copy by setting the appropriate copy precedence number.
-
From the CommCell Browser, navigate to Client Computers| virtualization_client | Virtual Server | Hyper-V | backup_set.
-
Right-click the subclient that contains the snapshots to restore and select Browse and Restore.
-
On the Restore Options dialog, click View Content.
-
From the Browse window, select the data to restore in the right pane and click Recover All Selected.
-
From the Restore Options for All Selected Items dialog, click Advanced.
-
Click the Copy Precedence tab and select Restore from Copy Precedence.
-
In the Copy Precedence box, type the copy precedence number for the backup copy; then click OK.
-
Click OK to start the restore job.
Browse and Restore by Job History
You can restore full virtual machines or guest files and folders from a specific backup job:
-
Full Virtual Machine - Restore a full virtual machine by restoring from a full backup job.
-
Guest Files or Folders - Restore guest files and folders to the file system of any client that supports file and folder restores. You can restore guest files and folders from incremental backup jobs.
Perform the following steps to restore data by jobs:
-
From the CommCell Console, navigate to Client Computers | <VirtualizationClient> | Virtual Server| <InstanceName> | <BackupSet>.
-
Right-click the subclient and select Backup History.
-
On the Backup History Filter dialog, click OK.
-
From the Backup Job History tab, right-click the backup job to be restored and select Browse and Restore.
-
From the Restore Options dialog box, select the type of restore and click View Content.
-
On the Content tab, select the data to be restored.
-
Click the Recover All Selected button at the bottom of the window.
-
Select the desired restore options and click OK.
Manage Restore Jobs
Once you initiate the restore operation, a restore job is generated in the Job Controller. Jobs can be managed in a number of ways. The following sections provide information on the different job management options available:
Restart Jobs
Jobs that fail to complete successfully are automatically restarted based on the job restart configuration set in the Control Panel. This configuration can be changed at any time; but changes to this configuration affect all jobs run in the entire CommCell.
You can also override the default CommServe configuration for individual jobs by configuring retry settings when initiating the job. This configuration only applies to the specific job.
Note
Restore jobs for the Virtual Server Agent are restarted from the beginning.
Configure Job Restarts at the CommServe Level
-
In the CommCell Console, click the Control Panel icon and then under Data, click Job Management.
-
In the Job Restarts tab of the Job Management dialog, select a job type from the Job Type list, then select the Restartable option.
-
To change the maximum number of times the Job Manager tries to restart a job, select a number in the Max Restarts box.
-
To change the time interval between attempts by the Job Manager to restart the job, select a number of minutes in the Restart Interval (Mins) box.
-
Click OK to save your changes.
Configure Job Restarts for an Individual Job
-
From the Browse and Restore Options dialog, click Advanced, then select the Job Retry tab and specify the following as needed:
-
Total Running Time - The maximum elapsed time, in hours and minutes, from the time that the job is created.
-
Number of Retries - The number of times that Job Manager attempts to restart the job.
-
Kill Running Jobs When Total Running Time Expires - Option to kill the job when the specified Total Running Time has elapsed, even if its state is "Running".
-
-
Click OK.
Resubmit Jobs
If a restore job fails to complete successfully, you can resubmit the job without the need to reconfigure the original job's restore options using the Resubmit Jobfeature. When a job is resubmitted, all the original options, restore destinations, and other settings configured for the job remain intact.
Resubmit a Restore Job
-
From the CommCell Browser, right-click a client computer and select View | Job History.
-
From the Job History Filter dialog, select the Data Recovery Operations and Browse and Restore options.
-
To view more advanced options, click Advanced.
-
From the Data Recovery History Advanced Filter dialog, select the destination client to view for restore jobs, then click OK.
The system displays the results of the options you selected in the Data Recovery Job History window.
-
-
Right-click any job and select Resubmit.
-
Select the job options.
-
Click OK.
Control Jobs
The following controls are available for running jobs in the Job Controller tab of the CommCell Console:
|
Suspend |
Temporarily stops a job. A suspended job is not terminated; it can be restarted at a later time. Only preemptible jobs can be suspended. |
|
Resume |
Resumes a job and returns the status to Waiting, Pending, Queued, or Running, depending on the availability of resources or the state of the operation windows and activity control settings. Restore jobs for the Virtual Server Agent are resumed from the beginning. |
|
Kill |
Terminates a job. |
These controls can be applied to:
-
All jobs in the Job Controller.
-
All selected jobs in the Job Controller, providing you have security associations at the required level for each job selected.
-
All data protection operations running for a particular client, or for a client and agent.
-
All data protection operations running for a particular MediaAgent.
Control a Job
From the Job Controller tab of the CommCell Console, right-click the job and select Kill, Suspend, or Resume.
-
When killing a job:
If you are sure you want to kill the job, click Yes on the confirmation prompt. The job status may change to Kill Pending for a few moments while the operation completes. Once completed, the job status changes to Killed; after five minutes the job is removed from the Job Controller window.
-
When suspending a job:
The job status may change to Suspend Pending for a few moments while the operation completes. The job status then changes to Suspended.
-
When resuming a job:
As the Job Manager attempts to restart the job, the job status changes to Waiting, Pending, or Running.
Additional Restore Options
Several additional options are available to further refine your restore operations. The following table describes these options, as well as the steps to implement them.
Be sure to read the overview material referenced for each feature prior to using them.
|
Option |
Description |
Related Topics |
|
Automatically Detect Regular Expressions |
This option allows you to automatically detect regular expressions (wildcard characters) in the virtual machines assigned to a subclient. This allows you to restore the files and folders in virtual machines which contain regular expressions in their name (e.g., c:\[test1]).
|
|
|
Impersonate User |
This information is needed only if you intend to restore data to a mapped network drive, shared network drive, or directory to which you do not have access privileges. You can impersonate a windows logon information with an account that has access rights to restore data.
|
|
|
Startup Options |
The Job Manager uses the startup priority setting when allocating required resources. This is useful if you have jobs that are very important and must complete, or jobs that can be moved to a lower priority.
|
Refer to Job Priority and Priority Precedence. |
|
Copy Precedence |
When you select the Restore from copy precedence option, the system recovers or retrieves data from the selected storage policy copy (Synchronous Copy or Selective Copy). If data does not exist in the specified copy, the data recovery or retrieve operation fails, even if the data exists in another copy of the same storage policy. When cleared (the default), the system recovers or retrieves data from the storage policy copy with the lowest copy precedence. If the data was pruned from the primary copy, the system automatically recovers or retrieves from the other copies of the storage policy in the lowest copy precedence to highest copy precedence order. Once the data is found, it is recovered or retrieved, and no further copies are checked.
|
Refer to Recovering Data From Copies. |
|
Data Path Options |
Data Recovery operations use a specific data path (Library, MediaAgent, Drive Pool, and Drive) to perform restore operations as configured in the CommCell. By default, the system automatically identifies the data path for restore operations. You can change the data path in the Advanced Restore Options dialog by selecting a different MediaAgent, library, drive pool, or drive. The following are some of the important situations where you may need to change the data path:
|
Refer to Change Data Path. |
|
Encryption |
You can configure encryption for a subclient during the data recovery operation. To encrypt data during data recovery operations using the CommCell Console, you must configure encryption at the client level first, then at the subclient level. If you configure data encryption with a pass phrase and do not elect to export the pass phrase to destination clients, you must enter the pass phrase during immediate data recovery operations. Scheduled data recovery operations require you to export the pass phrase.
|
Refer to data encryption. |
|
Job Retry Options |
Restore jobs can be restarted either by a user or automatically by the Job Manager. You can specify the maximum elapsed time before a job can be restarted or killed and the maximum number of restart attempts.
|
Refer to Job Management. |
|
Alert |
The Alert option is used to set criteria for notifications or alerts that are triggered by job status, such as failure, success, or any other conditions triggered by the restore job. Adding alerts helps the user or the user group get automatic notification about the status of a restore job.
|
Refer to Alerts and Notifications. |
|
CommCell Readiness Report |
CommCell Readiness Report provides you with important information about the potential problems that can impact your restore operations before they occur. |
Refer to CommCell Readiness Report. |
|
Restore Job Summary Report |
Restore Job Summary Reportprovides you the summary of all restore jobs during a specified time period for each client. Select Restore option from the Job Summary Report Selection dialog box, to view the Restore Job Summary Report. |
Refer to Restore Job Summary Report. |
Related Topics
Provides comprehensive information on scheduling jobs.
Provides comprehensive information on managing jobs.
Provides comprehensive information on media management and prediction.