MM0001: Tape library is not detected by Windows Server 2003 MediaAgents
Symptom
When certain Windows updates and service packs are installed on Windows Server 2003 MediaAgents, tape libraries might not be detected.
Resolution
Apply the Windows hot fix as described in the following Microsoft Knowledge Base article:
"Error returned by the IOCTL_SCSI_GET_INQUIRY_DATA operation on a Windows Server 2003-based computer: 'STATUS_INVALID_DEVICE_REQUEST'", http://support.microsoft.com/kb/943545/en-us
MM0002: Barcodes change after firmware upgrade or restart
Symptom
Error Code 64:39:
 Media label does not match.
Cause
After a library firmware is upgraded or restarted, the library reports all media with different barcodes than prior to the upgrade or restart. All of the media with data and existing spares are marked exported with no location and the error message appears.
Resolution
Method 1
This is the preferred method.
-
From the CommCell Console, select Storage Resources | Libraries.
-
Right-click the appropriate library, and then click Properties.
The Properties dialog box appears.
-
Click the Status tab, and then clear the Enable Library check box.
-
Refer to the library manual or contact your library hardware vendor to configure the library so that the library reads the barcodes the same way it read the barcodes before the upgrade or restart.
-
After you or your library hardware vendor has configured the library, in the Properties dialog box, select the Enable Library check box on the Status tab.
-
When the library is online, perform a full scan of the library.
-
Make the media is listed in the old format.
-
In the case of assigned media, right-click the media, and then click View Contents to make sure that the media still has data.
-
Delete all of the spares in the library that have a new barcode.
-
Select Storage Resources | Libraries | <Library Name> | Media by Groups | Default Scratch.
-
Hold down the Ctrl key, and then in the right pane, select all of the appropriate media.
-
Right-click the selected media, and then click All Tasks | Delete.
-
Method 2
Use this method if you want to change the barcode format.
-
Delete all of the spares in the library with that have the new barcodes.
-
Select Storage Resources | Libraries | <Library Name> | Media by Groups | Default Scratch.
-
Hold down the Ctrl key, and then in the right pane, select all of the appropriate media.
-
Right-click the selected media, and then click All Tasks | Delete.
-
-
Right-click the library, and then click Update Barcodes.
A message appears that asks you if you want to continue.
-
Click Yes.
The Update Barcodes dialog box appears.
-
If you want, add a prefix/suffix to or remove a prefix/suffix from the barcode.
-
Click OK.
-
Perform a full scan of the library.
MM0003: Block size errors occur during backup job or auxiliary copy operations
Symptom
The backup job or Auxiliary Copy operation fails with one of the following error messages:
Error Code 25:31:
 A read error occurred for JobID [...] for the tape in Library [...] Drive [...]. Tape volume block size encountered is different from this product's standard. Please insert a new tape or erase the data on this tape and re-run the job.
Error Code 40:79:
The block size is incorrect on the tape. Please format the tape using TapeTest.exe application and try again. For more help, call Customer Support.Error Code 62:317:
The current block size on the tape is incorrect.Error Code 62:1154:
While trying to read the media label on tape, the tape block size encountered is unrecognizable and unsupported by the application.Cause
You used new media, or you used media that have already been formatted with a block size that is not supported by Commvault software. The media might have been used by another product previously. Commvault software supports only the values that are available in the software when you edit a data path.
Resolution
Perform this procedure only if you are certain that the media are new or imported from a different backup environment.
Warning
In this procedure, you format all of the media. Any data on the media will be erased.
If you have a small number of media, format the media with the TapeToolGUI.
If you have a large number of media, it might not be possible to format each one individually. Configure the software to overwrite the media automatically.
Note
The Erase Media option is a licensed feature.
-
From the CommCell Browser, go to Storage Resources | Libraries.
-
Right-click the appropriate library, and then click Properties.
-
In the dialog box that appears, click the Media Usage tab.
-
In the Overwrite Media area, select When content verification fails.
A warning appears that tells you that any errors will be ignored.
-
Read the warning carefully, and then click OK.
-
From the CommCell Browser, select Media by Location | Media in Library that is under the library that you selected previously.
-
Right-click the media that you want to erase, and then click Options | Erase Media.
Note
Make sure that you clear the When content verification fails check box in the Library Properties dialog box immediately after you erase the media.
MM0004: "End-of-Data Marker" and "No More Data is on the Tape" errors
Symptom
Job fails with one or more of the following errors:
Error Codes 40:6 or 40:64
Error occurred in Library [...],Drive Name [...],Barcode [...],Path [...] [The end-of-data marker was reached during an operation] For more help call please call your vendor's support hotline.Error Code 40:78
The end-of-data marker was reached during an operationError Code 62:318
No more data is on the tape.Cause
An error was encountered while the media was accessed, whether reading, seeking, or writing to it. In many cases, a portion of the media has been damaged. However, the error might be related to other hardware components.
Resolution
-
Make sure the latest Service Pack is installed on the CommServe® host and MediaAgents.
Note
The CommServe host and all of the MediaAgents that are in the same CommCell® group must include all of the additional updates to the same level of current Service Pack. In addition, you must apply any other updates that were released after the Service Pack to both the CommServe host and the MediaAgents.
-
If the error occurred during a backup, keep the media, but mark the media full so that no new backup uses this media. For more information, see Mark a Media Full.
Although the media has bad sections, there might still be valid data on it, depending on where the error was encountered. However, the same errors might be encountered when you restore or copy data from this media.
-
If the error occurred during an auxiliary copy, you must prevent jobs that were written to the bad portion of the media from being copied so that the Auxiliary Copy operation can proceed.
-
To determine which job to disable, examine the error in the Event Viewer.
The Job ID that is listed in the Backup Jobs part of the error message is the job that was written to the damaged portion of the media.
Error Code 40:91 Failed to Copy or verify Chunk [...] in media [...], Storage Policy [...], Copy [...], Host [...], Path [...], File Number [...], Backup Jobs[...]. -
Prevent the job from being copied. For more information, see Prevent Jobs from Being Copied.
Note
Depending on the location and extent of the damage, it might affect more than one job. Therefore, the jobs cannot be restored.
-
-
If the error occurred during a restore, data that was written to the damaged part of the media probably cannot be recovered.
-
To rule out the possibility of hardware or firmware issues, contact your library hardware vendor.
MM0005: There is no media in the drive
Symptom
One or more jobs may be pending or waiting with the error:
Failed to mount media with barcode [...] side [...] into drive [...] in library [...] on host [...]. SCSI Operation: Load Tape Drive. Reason: There is no media in the drive. Advice: Please upload log files from CommServe MediaAgent and Client and contact your vendor s support hotline with the job ID of the failed job.
Resolution
-
Manually mount the media that is indicated in the error message into any of the drives.
-
From the CommCell Browser, click Storage Resources | Libraries | <library> | Media By Location | Media In Library.
-
Right-click the media, and then click All Tasks | Verify Media.
-
In the dialog box that appears, specify which resources are used to load media into a drive.
-
Click OK.
-
-
Continue to manually mount and verify each media.
-
If the error occurs for a specific media, the media is faulty.
-
If you cannot load the media into the drive through the front panel or by using the management software, the hardware is faulty.
-
-
If the hardware is faulty, contact your library hardware vendor.
MM0006: Tape block size is not recognized while media label is read
While the media is accessed, one of the following error occurs:
Error Code 62:1154:
While trying to read the media label on tape, the tape block size encountered is unrecognizable and unsupported by the application.Error Code 62:305:
Tape volume block size selected is not supported by the underlying HBA card. Change Block size on data path to a lower level and start a new media.Usually, the error message accompanies a Failed to mount media with barcode error message.
Symptom
Your adapter and drive are not supported, or the driver software is not up to date.
Resolution
-
Use the Hardware Compatibility Matrix to verify that your adapter and driver are supported.
-
If necessary, update your driver software to the latest version.
If updated the driver software recently, you might need to reinstall the previous version.
Symptom
Your HBA (Host Bus Adapter) card cannot handle the block size that is used, or the HBA is not supported. The default block size used is 64 KB, but 32 KB is appropriate for most HBA cards.
Resolution
The block sizes that the Commvault software supports might not be supported by the HBA card. This procedure validates the block sizes that are supported by the Commvault software.
-
In the CommCell Browser, navigate to Storage Policies | <library>.
-
Right-click the appropriate drive, and then click Validate Drive.
The Validate Drives dialog box appears.
-
Select 32 from the Volume Block Size (KB) list, and then click OK.
-
If the validation succeeded, configure the data paths to use a 32 KB block size.
-
From the CommCell Browser, right-click the appropriate storage policy copy, and then click Properties.
The Copy Properties dialog box appears.
-
Click the Data Paths tab.
-
Select the appropriate data path, and then click Properties.
The Data Path Properties dialog box appears.
-
In the Block Size (KB) area, select Use specified value, and then select 32 from the list.
-
Click OK.
-
Click OK.
-
-
If the validation does not succeed for the 32 KB block size, repeat the validation procedure with each of the supported block sizes until the validation succeeds.
-
If the validation does not succeed regardless of which block size you used, then the HBA card might be defective and you must contact your library hardware vendor for assistance.
MM0007: There is no active controller for the library
One or more jobs are pending or waiting with the following error:
Library [], MediaAgent [], Drive Pool [], Media[]: There is no active controller for this library.
Resolution
Using the CommCell Console
-
In CommCell Console, check that the MediaAgents are online.
-
If the MediaAgents are not online, check that there is network connectivity between the CommServe® host and the MediaAgents.
-
In the CommCell Browser, navigate to Storage Resources.
-
Right-click the library that is offline, and then click Properties.
The Library Properties dialog box appears.
-
Click the Library Controller tab and determine which MediaAgent is acting as the Active Library Controller.
-
If the MediaAgent is not the Active Library Controller, check the Failover Library Controller list.
-
Select the appropriate library controller, and then click Details.
The Library Controller details appear.
-
Click Reset Controller.
-
Click Close.
-
Check whether the library comes back online.
You might have to press F5 more than once to refresh the view.
The library should be online if the Active Library Controller is now the MediaAgent (MA).
If the library is not online after you reset the controller, use the MediaAgent to bring the library back online.
Using the MediaAgent
-
Log onto that MediaAgent either remotely or directly.
-
Open the Windows Device Manager.
-
Make sure that the Medium Changer is visible (either online or offline) in the Device Manager.
-
Make sure that the correct number of drives is visible.
-
Check that each tape drive has a valid driver installed.
-
If there is no driver installed on the tape drives, download the driver from the library hardware vendor's Web site and install it.
Note
Go to the Compatibility Matrices to determine if the driver that you use is supported.
-
If either the Medium Changer or the correct number of drives does not appear in the Device Manager, then there might be a hardware error. In this case, contact your library hardware vendor.
-
You can try to restart the MediaAgent to see if drives appear. However, if the drives do not appear in the Device Manager, then they will not appear in the CommCell Console.
-
-
If the drives appear in the Device Manager, then open the Windows command prompt.
-
Navigate to the \\Program Files\[installation directory]\Base directory, and then type scanscsitool to start the scanscsitool utility.
After the scanscsitool utility starts, it provides information about the library and its drives.
Note
For troubleshooting purposes, you should print the output of the scanscsitool to a text file.
For example:scanscsitool \> c:\\scsi.txt.
You can open the file in Notepad. -
Check the Library Information and make sure that the drive count is correct and that the serial number is visible. If the serial number is blank or the drive count is a negative number (-1), then the operating system cannot communicate with the Medium Changer.
Note
You can try to change the status of the Medium Changer in the Device Manger. That is, either enable or disable the Media Changer, and then run the scanscsitool again. If that does not fix the issue, then there is a problem with the library hardware. In this case, contact the library hardware vendor.
-
Check the Tape Drive Information. Make sure that the SerialNumber is not blank.
Sometimes, the serial number can appear blank if there is a tape loaded in the drive.
-
Check to see if a tape is loaded. If one is, then you must unload the tape manually using the library's front panel.
-
Run the scanscsitool again.
-
If there is no tape loaded, return to the Device Manager and make sure that each tape drive has a driver installed.
-
Use the Device Manager to check all of the failover MediaAgents that are attached to this MediaAgent.
-
If all of the drives are correct, but the library does not come back online, then restart the Commvault services on the Medium Changer.
-
If the library is not online, send the logs from the MediaAgent and the CommServe host to your Software Provider.
Resolution
If you cannot reset the library or if it remains offline, check that:
-
There are no media stuck in the library.
-
The library's front panel status shows that it is ready and online.
-
The library is visible and accessible to the operating system.
-
At least one library controller MediaAgent is online.
MM0008: Performing a read test with TapeToolGui utility
You can use the TapeToolGui to troubleshoot performance or damage issues on media. You must run the TapeToolGui.exe on the MediaAgent server that is attached to the tape drive the uses the media that you want to test.
Caution
Misuse of the TapeToolGui utility can result in data loss. We strongly recommended that you open a support case with your Contracted Support Service before you use the utility.
Verify the Access Path for the Tape Drive
Use this procedure for both Window-based servers and Unix-based servers to determine the tape drive's access path, and to load the media.
-
From the CommCell Console, navigate to Storage Resources | Libraries | <library name> | <Master Drive Pool>.
-
Right-click the drive where you will load the media, and then click Properties.
-
In the Drive Properties dialog box, do either of the following:
-
If the drive is active, click the Status tab, and then click Details in the Active Drive Controller area.
-
If the drive is not active, click the Drive Controller tab, select the appropriate drive controller, and then click Details.
The Drive Controller Details dialog box appears.
-
-
Write down the Access Path value.
-
Click Close.
-
Click OK.
-
From the CommCell Console, navigate to Storage Resources | Libraries | <library name> | Media by Location | Media in Library.
-
Right-click the appropriate media, and then click Load Media.
-
In the Load Media dialog box that appears, select the appropriate MediaAgent, Drive Pool, and Drive, and then click OK.
-
Check the Event Viewer to make sure that the media is loaded into the correct drive.
-
Before you continue, make sure that no jobs are using the MediaAgent.
Windows-Based Servers
Use this procedure for Windows-based servers to stop the MediaAgent services, and perform the read test using the TapeToolGui.
-
Establish a remote desktop connection to the appropriate MediaAgent.
-
On the Start menu, click All Programs | Commvault, and then click Process Manager.
-
In the Process Manager dialog box that appears, click the Services tab, and then select the appropriate MediaAgent.
-
To stop the MediaAgent services, click the button with the red square.
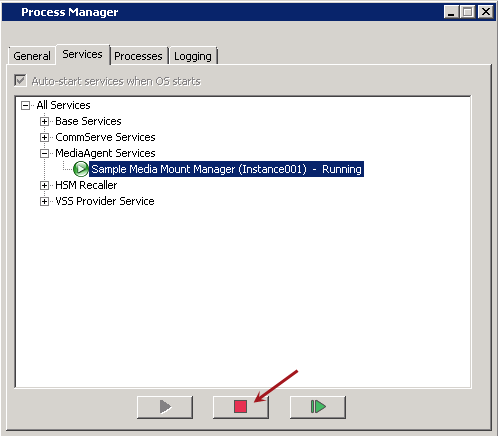
-
In the message that appears that asks you if you want to stop the services, click Yes.
-
In Windows Explorer, navigate to C:\<software installation path>\Base, and then double-click TestToolGui.exe.
-
To make sure that you loaded the correct media, select Read Label, and then select the access path that you recorded previously from the Tape Name list.
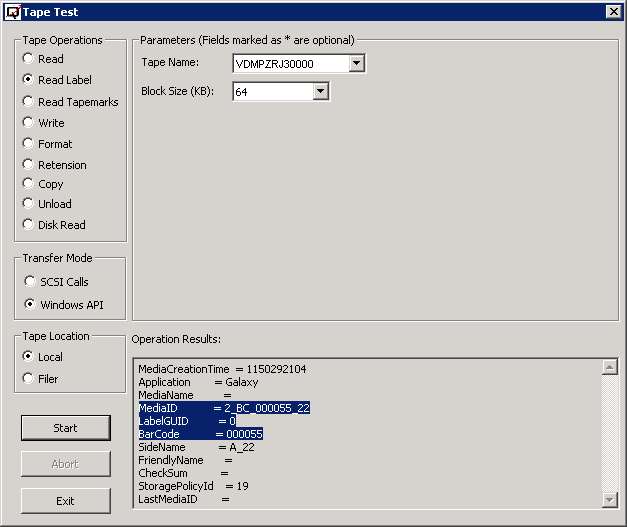
-
Click Start.
In the Operation Results area, information about the media appears, including the On Media Label (OML) and the media's original barcode. If the OML does not appear, the media is either blank or it has been overwritten.
-
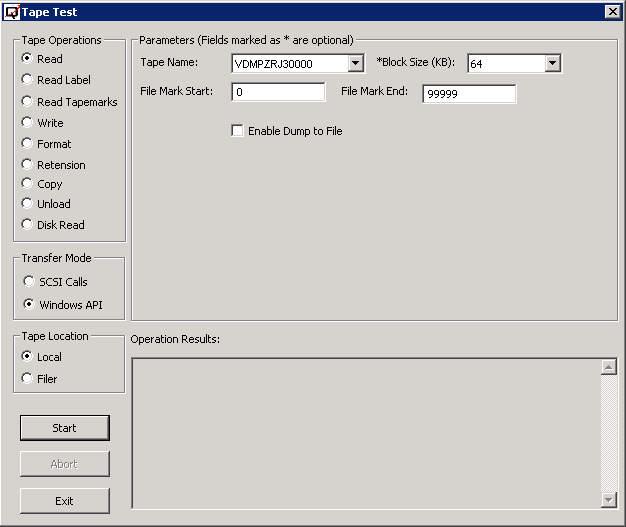
After you have verified that it is the correct media, select Read.
-
Select the access path from the Tape Name list, and make sure the Block Size value is 64.
The Read operation reads the data from the media at the file level and reports statistics based on EOF. You only need to specify File Mark if you want to test a specific portion of the media.
-
Click Start.
TapeToolGui reads the media and logs the current file mark and the amount of data that is read for reference.
-
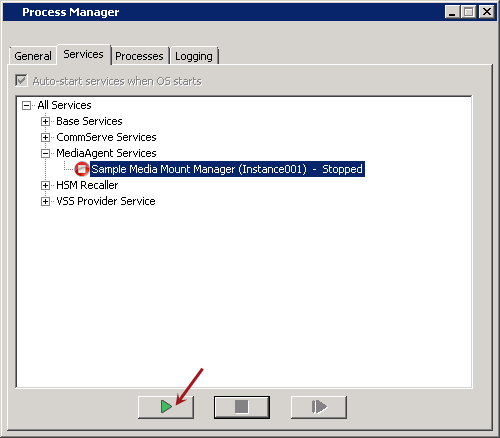
In the Process Manager dialog box, click the green arrow button to start the MediaAgent services.
-
From the CommCell Console, navigate to Storage Resources | Libraries | <library name> | Media by Location | Media in Library.
-
Right-click the media that you tested, and then click Unload Media.
UNIX-Based Servers
Use this procedure for Unix-based servers to stop the MediaAgent services, and perform the read test using the TapeToolGui.
-
To stop the MediaAgent services, at the Unix prompt # or [root@servername], type:
[root@servername]# commvault stop <instance_name>Then press Enter.
-
To start the TapeToolGui, type:
[root@servername]# . /opt/commvault/Base <instance_name>Then press Enter.
[root@servername]# ./TapeToolThen press Enter.
 This program will attempt to read or write from/to one of the SCSI drives attached to this MediaAgent.
 You are running it in interactive mode. For the list of options try $ TapeTool -help
 Please make sure that you are NOT running any backups/restores on this MediaAgent. If you do so, unrecoverable data corruption may occur during execution of this program.
 Press <ENTER> to initiate SCSI bus scan ...
-
Press Enter.
A list of the detected devices appears. For example:
The following tape devices have been detected: 1. (scsidev@scsi6:0.3.0) 2. (scsidev@scsi6:0.4.0) 3. (scsidev@scsi6:0.5.0) 4. (scsidev@scsi6:0.6.0) Enter device node number you want to use: -
Type the appropriate number, and then press Enter.
1) Read from scsidev@6:0.3.0 2) Write to scsidev@6:0.3.0 3) Display OML of media in scsidev@6:0.3.0 4) Exit Your choice: -
Type 1, and then press Enter.
We can reposition the tape behind the specified file marker before starting to read or write... Enter the file marker for initial positioning: [0] 0 -
Press Enter.
Please specify the block size to use when accessing the tape. Default tape block size in Galaxy 4.2 or older is 32K. Default tape block size in Galaxy 5.0 is 64K. Tape block size (e.g 65536 or 64k): [65536] -
Press Enter.
READING FROM... scsidev@1:1.2.0 FILEMARK....... 1 BLOCKSIZE...... 65536 Press <ENTER> to start reading ... -
Press Enter.
The read test results appear.
+ Querying drive status ... TAPE IN DRIVE. + Querying tape status ... LOADED. + Rewinding tape ... done. + Positioning tape after 1 marker ... done. + Setting block size to 65536 ... done. + Reading until EOF ... + Reading until EOF: 0MB read at 0.0MB/sec, 0.1GB/hr, 0.1GB/hr avg. + Reading until EOF: 141MB read at 15.8MB/sec, 55.4GB/hr, 45.4GB/hr avg. + Reading until EOF: 295MB read at 17.0MB/sec, 59.9GB/hr, 51.9GB/hr avg. + Reading until EOF: 448MB read at 17.1MB/sec, 60.0GB/hr, 54.4GB/hr avg. + Reading until EOF ... done. + Total 524288000 bytes read. Press <ENTER> to continue ... -
Press Enter.
Specify whether you want to read or write to the tape: 1) Read from scsidev@1:1.2.0 2) Write to scsidev@1:1.2.0 3) Display OML of media in scsidev@1:1.2.0 4) Exit Your choice: 4 -
Type 4 to exit.
-
Type the following to restart the MediaAgent services.
[root@servername]# commvault <instance_name> -
From the CommCell Console, navigate to Storage Resources | Libraries | <library name> | Media by Location | Media in Library.
-
Right-click the media that you tested, and then click Unload Media.
MM0009: I/O errors occur with HP drives
I/O errors occur on HP drives on servers that have the follow operating systems installed:
-
Windows Server 2003
-
Windows Server 2003 R2
-
Windows Server 2008
-
Windows Server 2008 R2
Note
If you use an HP library, make sure that you made all of the HP and Windows setting adjustments when you upgrade the MediaAgent's operating system.
Error code 13:20
 Failed to send the start data transfer control message to the tail.
In addition, you might get error code 40:64.
The following message appears in the JobManager.log file:
Set pending cause [Error occurred in Library [HP ???xxxx Series],Drive Name [HP Ultrium x-SCSI_x],Barcode [],Path [\\.\Tapex] [Please check whether the correct version of drivers has been installed for this device. Please check whether the SCSI Bus is terminated properly.] For more help, please call your vendor's support hotline.If you perform a read test with the TapeToolGui, you might receive the following errors:
Error writing to tape. Error = 1117, Error String = The request could not be performed because of an I/O device error.Error reading from the tape. Error = 1117, Error String = The request could not be performed because of an I/O device error.For more information, see Performing a Read Test with TapeToolGui Utility.
Resolution
Contact HP support and request the following articles:
Hung, Wei Jung Shih, "HP Insight Management and RSM disabling", July 2008.
"HP StorageWorks Ultrium Tape Drives - Failing Backups when Connected to LSI SCSI HBA and Using Storport Driver Versions Later than 5.2.3790.3959", HP Support document.
Consult the following Microsoft Knowledge Base articles:
-
"The DeviceType registry entry value is truncated when the Microsoft Storport driver is installed on a computer that is running Windows Server 2008 or Windows Vista", http://support.microsoft.com/kb/953390
-
"The storport.sys driver leaks nonpaged pool memory when volumes are scanned, mounted, or dismounted in Windows Server 2008 and Windows Vista", http://support.microsoft.com/kb/968675
-
"An updated Storport storage driver is available for Windows Server 2003", https://www.microsoft.com/en-us/download/details.aspx?id=6529
-
"Stop error on a computer that is running Windows Server 2008 R2, Windows Server 2008, Windows Vista or Windows 7 when the operating system uses a virtual storport miniport driver to save a dump file or a hibernation file: '0x000000D1'", http://support.microsoft.com/kb/2320550
-
"A hotfix rollup that improves Windows Vista and Windows Server 2008 compatibility with Advanced Format disks", http://support.microsoft.com/kb/2553708
MM0010: Error Code 32:406 All device streams configured to this Storage Policy including their multiplexing factor are in use
For more information, see KB Article MM0010.
MM0018: Mount error occurs on Fujitsu ETERNUS CS High End Device after media migration
Symptom
The Mount command fails when a Prefetch command has not completed for a Fujitsu ETERNUS CS High End device that is configured as a virtual library. The job status might change to Pending with an error similar to the following:
Move,Error = Failed to send SCSI commandResolution
-
Make sure that the firmware on the Fujitsu ETERNUS CS High End device is version 6.0a or later.
-
Make sure that the version of the Commvault software is version 10 SP3B or later.
-
For each MediaAgent that controls the Fujitsu ETERNUS CS High End device, enable the bETERNUSMigrationCheck setting.
-
From the CommCell Browser, expand to Storage Resources | MediaAgents.
-
Right-click the appropriate MediaAgent, and then click Properties.
-
Click the Additional Settings tab.
-
Click Add.
The Add Additional Settings dialog box appears.
-
In the Name box, type bETERNUSMigrationCheck.
The Category and Type details fill automatically.
-
In the Value box, type 1.
-
Click OK.
-
Click OK.
-
MM0020: Command line does not return to the prompt during an export operation
Symptom
When the qmedia export qcommand is run, the command line takes a long time to return to the prompt, or the command line seems to become unresponsive.
Cause
The command line returns to the prompt only after the export operation is complete and the media has been removed from the library. When a large number of media are exported, the export operation can take a long time to complete.
Resolution
-
On the ribbon in the CommCell Console, click the Storage tab, and then click Media Management.
The Media Management Configuration dialog box appears.
-
On the Service Configuration tab, set the Allow export request to succeed without waiting for media being removed from library option to 1.
-
Click OK.
The next time you run a qmedia export operation, the command line returns to the prompt after you run the qcommand. However, the export operation might still take time to complete.
Export Media Process Timed Out with "No response from Media Manager service. Server=[Server_Name]" Error
Symptom
The "No response from Media Manager service. Server=[Server_Name]" message is displayed on the event viewer when the export media process is timed out after waiting for a long time to complete.
Cause
The export media operation is deemed complete when the media is removed from the IE port. When a large number of media are exported, the export operation can take a long time to complete and therefore the process is timed out.
Resolution
-
On the ribbon in the CommCell Console, click the Storage tab, and then click Media Management.
-
On the Service Configuration tab, set the Allow export request to succeed without waiting for media being removed from library option to 1.
-
Click OK.
The next time you run an export media operation, the job will complete once the media is moved to the IE port.
MM0022: Barcode labels are no longer valid
Symptom
Barcode labels that were valid previously are no longer valid. The following error occurs when the media is read or when you attempt to discover the media:
Error code 62:92
 Failure during update operation on CommServe Database.
The following messages might appear in the Event Viewer:
Error code 63:107
 Please make sure that all media in the library have valid readable barcodes.
Error code 63:180:
Please check if the media has a valid barcode.The following appears in the MediaManager.log file:
addMedia() - Barcode [OV2100_S20A] contains Invalid Characters. It should contain Alpha-Numeric Characters Only. Error: [1301].
 The UPDATE statement conflicted with the FOREIGN KEY constraint "FK__MMS2Slot__MediaI__46B27FE2". The conflict occurred in database "CommServ", table "dbo.MMMedia", column 'MediaId'.
 The statement has been terminated.
 MLMLibInfo::autoDiscoverMedia() - :MLMLibInfo.cpp:6249: Failed to do auto discovery of New Media on Library 25 due to error 289, string
Cause
The barcode label contains characters that are no longer supported by Commvault software.
Resolution
You must change the media label so that it conforms to the Label Design Code 39 Standard.
The Code 39 standard supports:
-
the uppercase letters A through Z (no lowercase letters)
-
the numbers 0 through 9
-
the seven special characters ( - . $ / + % * )
Note
The special characters (* $) are reserved characters and should not be used as part of the actual customer barcode label.
Additional Information
For more details about barcode standards, see:
Automated Tape Library Barcode Label Technical Brief. http://docs.oracle.com/cd/E24306_02/en/TT0006D/TT0006D.pdf
MM0021: Error Code 25:31 Tape Volume Block Size Encountered is Different from This Product's Standard
For more information, see KB Article MM0021.
MM0023: Error Code 32:23 Failed to Mount Media
For more information, see KB Article MM0023.
MM0037: Error Code 62:90: Failure During Delete Operation on CommServe Database
For more information, see KB Article MM0037.
MM0050: No Library Controller is Active
For more information, see KB Article MM0050.
MM0052: Library is Marked Offline After Turning Off then On
For more information, see KB Article MM0052.