File Level Analytics Report Details

File Level Analytics Report displays a list of all files on either the selected clients, agents, backup sets, or subclients and the selected MediaAgent, or the specified backup job at the current time. Information for the selected clients, agents, backup sets, or subclients includes files that were included in the latest backup cycle. Information for the specified job ID includes all files that were backed up during the job.

This option enables collection of information about files, volumes, and directories within the subclient being backed up.

When to Use This Report

You can use the File Level Analytics Report to review all files on a client. This report is useful if you need to know:

  • All objects that were backed up.

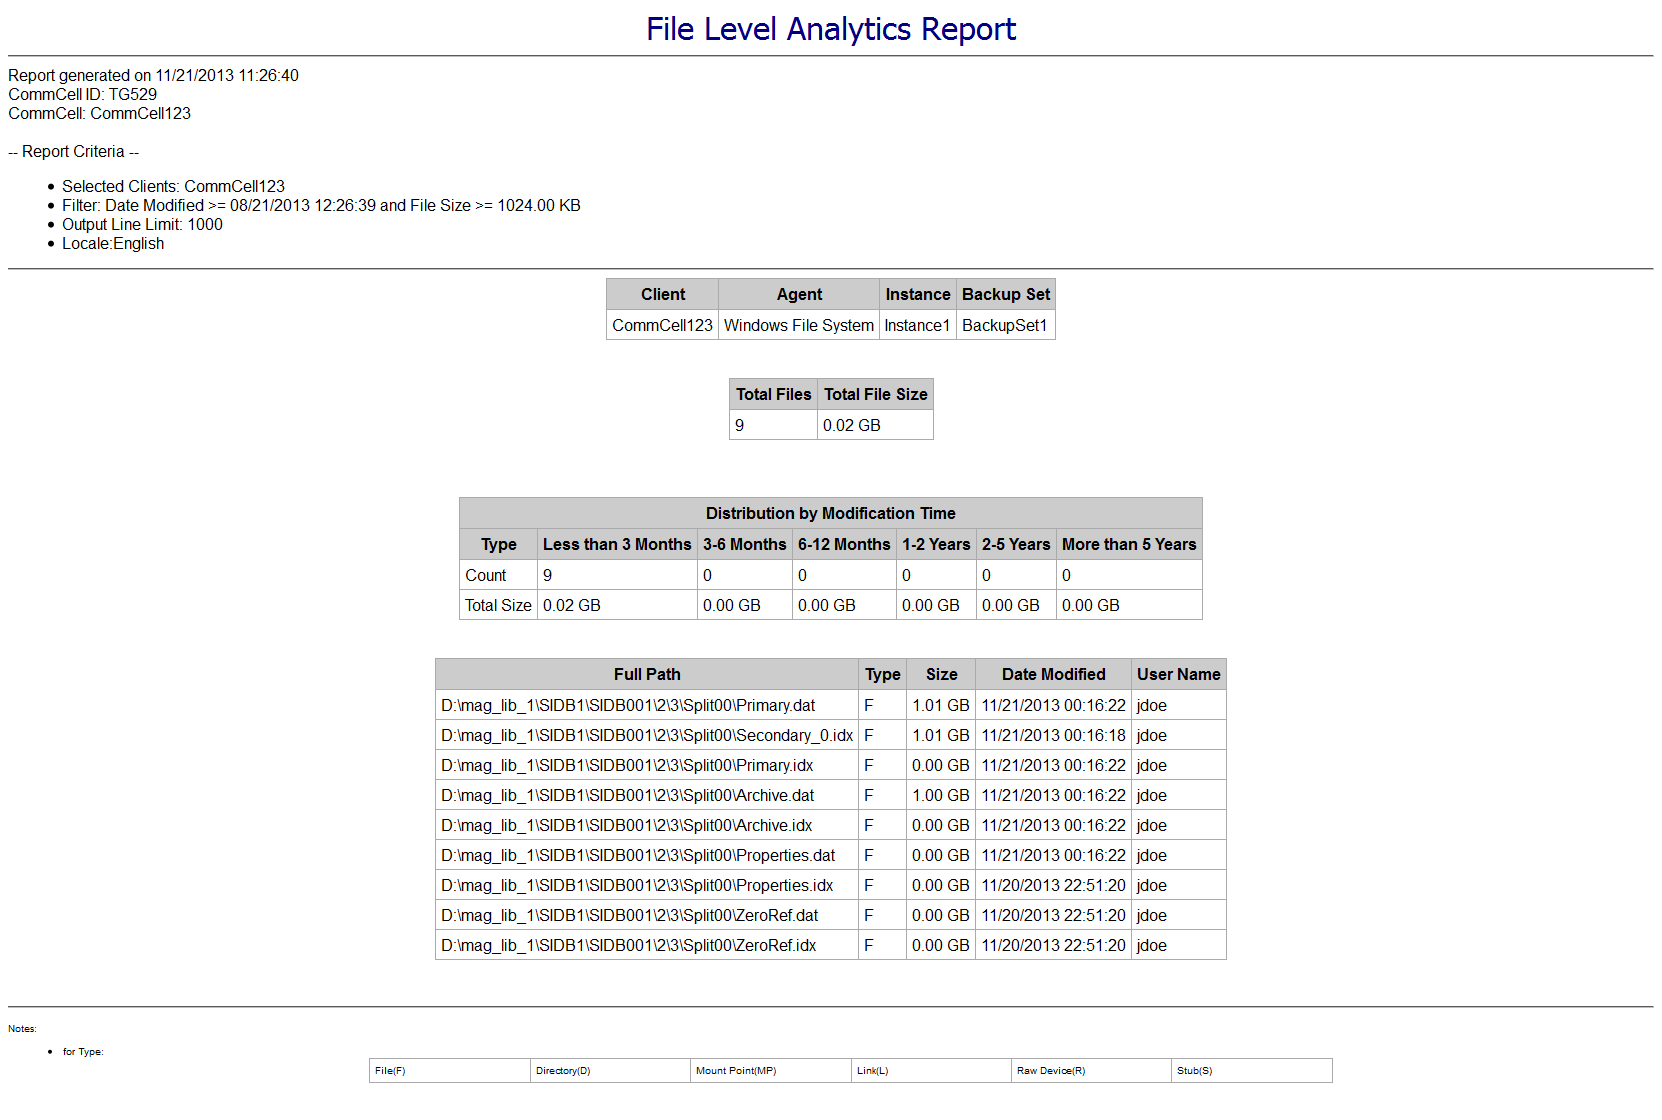
  • Files that were modified at a certain time and have a specific size. You can predict the Archive Size by using the Modification Time and File Size filters.

    The results of this report can help in determining the values that must be specified while configuring the Archiving Rules using OnePass for Windows File System.

  • All the files that are backed up by a specific job or the latest backup cycle of a subclient.

  • List of files based on their modified times.

  • List of files based on their access times.

What this Report Contains

This report presents the data in the following sections:

Sections

Description

Summary

This table provides information about files on the any of the following CommCell entities that match the filter criteria. For more information about filter criteria, see Filters.

  • Client

  • Agent

  • Backup Set

  • Subclient

    Client Information displayed in the table includes:

  • Total number of files in the last backup on the selected CommCell entity.

  • Total size of all files in the last backup on the selected CommCell entity.

Details

This table provides information about each file on the Client. The information that appears in this table depends on the filter criteria that you configure and the columns that you select on the Output tab. Information displayed in the table can include:

  • The name and location of each file.

  • The size of each file.

  • The time at which the file was last modified.

  • The name of each file.

  • The time at which the file was last accessed.

  • The time at which the file was created.

  • The name of the primary user of the file.

  • The name of the primary user group of the file.

Distribution by Modification Time

This table provides information about all files on the selected client. Information is grouped into age categories based on the file's last modified time.

  • Number of files in each age category.

  • dTotal size of files in each age category.

How to Generate the Report

You can generate the default version of any CommCell Report on demand in the CommCell Console.

Before You Begin

  • In order to generate this report, the MediaAgents must be installed with the same software version as the CommServe.

  • The data used to generate this report must be indexed. Data that has not been indexed will not be included in the report. For more information, see Indexing - Overview.

  • Your CommCell user account must be assigned to a role that has the Report Management permission.

  • To view report data for an entity, your CommCell user account must have an association with that entity.

    For more information on users, permissions, and associations, see User Administration and Security - Overview.

Procedure

  1. In the CommCell Console, select the Reports tab, click Other Reports > File Level Analytics.

  2. In the Report Selection dialog box, click Run.

    The report appears in your default Web browser.

    Note

    You must select Allow Blocked Content in your browser window to see the count of files.

Scheduling the Report

  1. On the CommCell Console menu bar, select the Reports tab, and then click the button for the report that you want to schedule.

  2. In the Report Selection dialog box, click Schedule.

  3. In the Schedule Name box, enter a name for the schedule.

  4. Select the interval at which you want the report to run: One Time, Daily, Weekly, Monthly, or Yearly.

  5. Specify the exact times and days that you want the report to run.

  6. Click OK.

Customizations that You Can Perform with This Report

You can further customize the report by using the tabs that are available in the Report Selection dialog box. The following table describes the available report options for this report.

Options

Description

General

On this tab, you can select the backup set, subclient, and MediaAgent for which information is included in the report, or enter a job ID.

MediaAgents and Client computers must be at the same version as the CommServe in order to generate this report.

You can select one of the following options for report generation:

  • Clients, agents, backup sets, and subclients for which to report the data

    OR

    Job ID for which to generate the report

  • MediaAgent associated with selected client.

    Note

    If you do not select a MediaAgent, then the MediaAgent used by the last backup will be used. You cannot select a MediaAgent if you selected job ID option to run this report.

Filters

On this tab, you can configure filters that determine the information that appears in the report.

Default options on this tab include the following:

  • File Name allows you to select a particular file type or extension to appear in the report. When you set this option, only those file types that you select appear in the report.

    You can enter file types or extensions in a custom pattern.

    For example:

    • *.doc

    • *.*

    • data*.*

    • Multiple file extensions can be specified using “OR” operator, for example: *.docx OR data*

    Alternatively you can double-click a file category or extension available in the File Categories and Extensions column to include in the report.

  • When you set the Date Modified option, only files that were last modified during the specified time appear in the report.

    This can be used to filter files modified on specific day or days. You can use this filter to include files based on its modification time such as files modified:

    • Today

    • Yesterday

    • This Week

    • This Month

    • This Year

    • Last Week

    • Last Month

    • Last Year

    Alternatively, you may also specify greater than or equal to, or lesser than or equal to, and then enter the number of years, months, and/or days.

  • When you set the File Size option, only files that match the size criteria appear in the report.

    Select greater than or equal to, or lesser than or equal to, and then enter a file size.

  • When you set the Date Accessed option, only files that were last accessed during the specified time appear in the report.

    This can be used to filter files accessed by a user on specific day or days. You can use this filter to include files based on its access time such as files modified:

    • Today

    • Yesterday

    • This Week

    • This Month

    • This Year

    • Last Week

    • Last Month

    • Last Year

    Alternatively, you may also specify greater than or equal to, or lesser than or equal to, and then enter the number of years, months, and/or days.

  • When you select Date Created, only files that were created during the specified time appear in the report.

    This can be used to filter files created on specific day or days. You can use this filter to include files based on its creation time such as files modified:

    • Today

    • Yesterday

    • This Week

    • This Month

    • This Year

    • Last Week

    • Last Month

    • Last Year

    Alternatively, you can also specify greater than or equal to, or lesser than or equal to, and then enter the number of years, months, and/or days.

  • When you select the User Name option, only files that belong to the specified user or users appear in the report.

    Select CONTAINS or NOT CONTAINS, and then enter a user name or names.

    User name must be specified in the following format:

    • localhost/administrator
  • When you select the Group Name option, only files that belong to the specified user group or groups appear in the report.

    Select CONTAINS or NOT CONTAINS, and then enter the name of a user group or groups.

    User name must be specified in the following format:

    • localhost/administrator
  • When you select the Folder Path option, only files that appear in the specified folder path appear in the report.

  • When you select from one of the File FilterOptions, the selected filters are applied to the results of the report.

    Select one or both the filter options:

    • Include folders

      Selecting this option will include folders in the report output.

    • Include deleted files

      Selecting this option will include deleted files satisfying the filters selected for the report to appear in the report output.

Output

You can set the report output to appear in one of several formats and save it to a variety of locations. To make Access Time and Creation Time appear in the report, you must set the Date Accessed and Date Created columns to appear in the report on the Output tab. Set any of the following options:

  • In the Output Fields section, you can select additional columns to include in the details table. You may also choose not to include a column in the output field, though that column was used in report output generation. For example:

    You may select File Size greater than 1MB in the Filters tab but not include File Size column in the Output tab.

  • Generate the report in one of the following formats:

    • HTML

    • Text separated by commas or tabs.

  • Enter the number of File/Folder rows to display in each report page.

    To specify the number of rows that appear on each page of the report, enter a number in the available limit box.

    You may alternatively select All or None for the File/Folder rows limit.

  • Specify the unit of measurement in which to display amounts.

  • Sort the report output by the available columns in ascending or descending order. This can be useful if you want the results to appear in a certain order for a specified column within the report.

    For example:

    You can sort the report output to display all files with File Size column (attribute) in Descending order which may be useful to eventually filter out files taking up more space on disk so that data aging operations may be scheduled to free up disk space.

  • Choose the language in which the report output generates.

  • Enter a location to save the report in one of these locations:

    • On your local computer

    • On a shared network drive

    • An FTP location to which you can upload.

      dIt is recommended that you schedule this report, rather than running the report on demand. For instructions, see Scheduling the Report.

Sample Reports

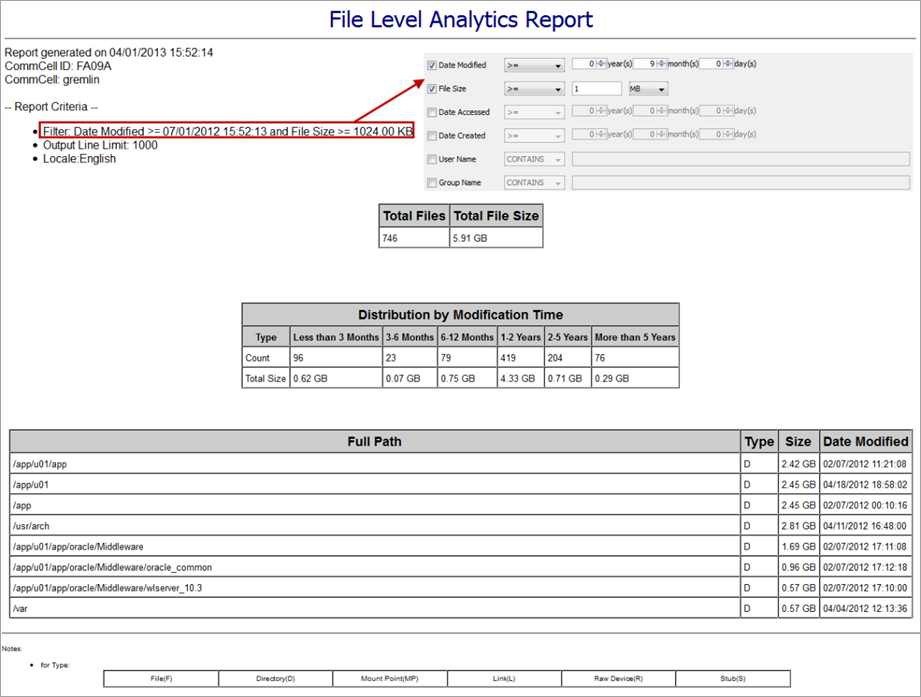
Multiple Clients with Large Files

View the space consumed by large files on multiple clients:

  • On the General tab, select multiple clients.

  • On the Filters tab, select File Size and then enter >= 1 MB.

  • On the Output tab, under Output Fields, verify that Size appears in the Selected list.

multiple_clients

Files Eligible for Archiving

Identify files that are eligible for archiving:

  • On the Filters tab, select Date Modified, and then enter > = 9 months.

  • On the Filters tab, select File Size , and then enter > = 1 MB.

  • On the Output tab, under Output Fields, verify that Size and Date Modified appear in the Selected list.

The results of this report can help in determining the values that must be specified while configuring the Archiving Rules.

archive_prediction

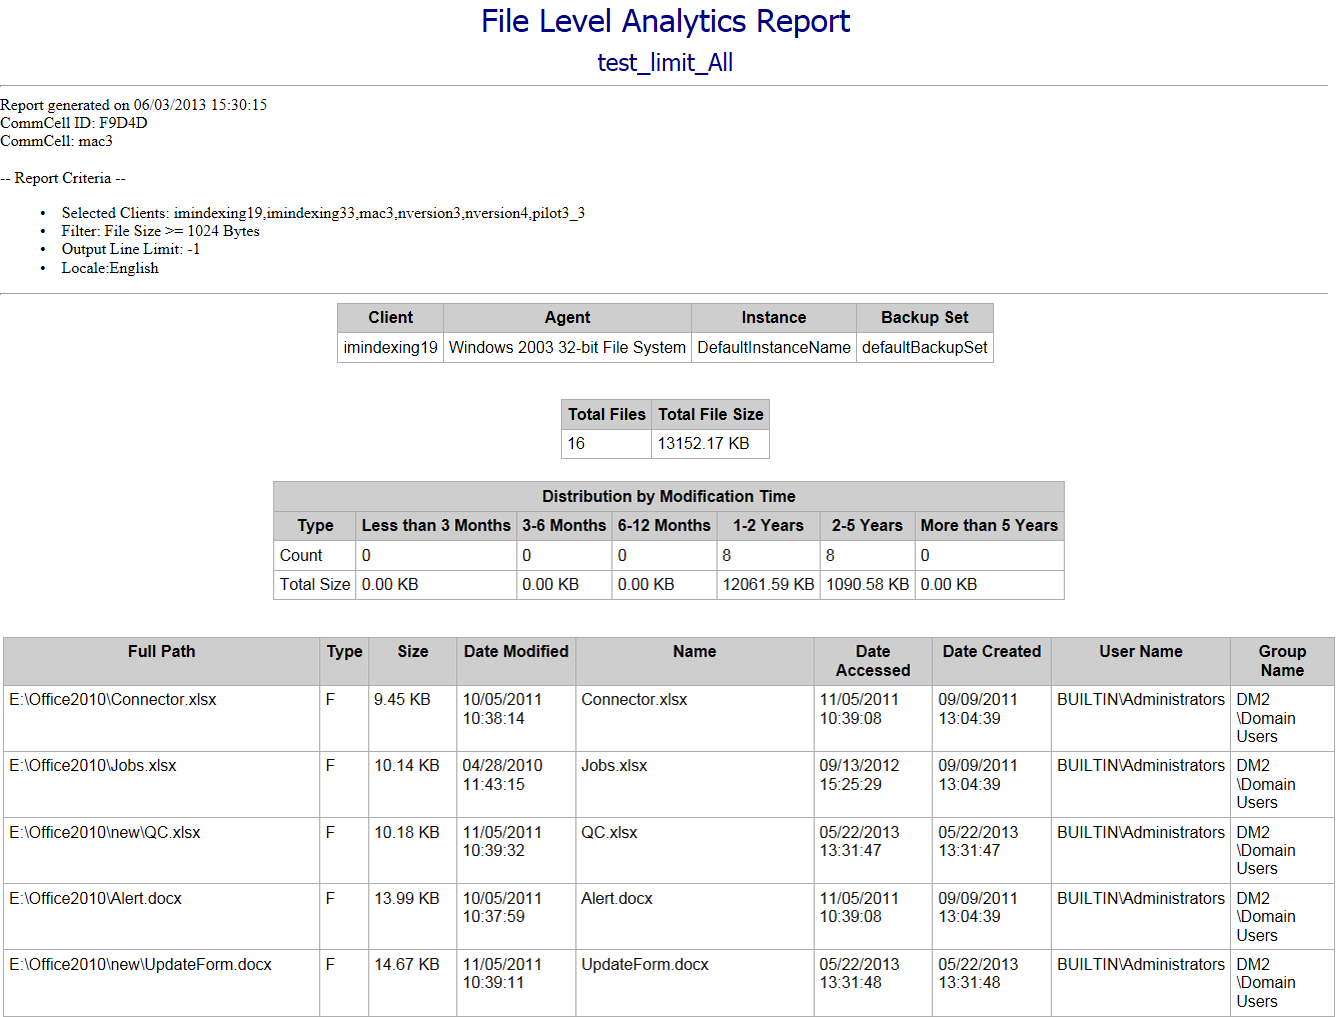
Users with the Largest Backups

Identify users with the largest backup jobs:

  • On the Filters tab, select File Size, and then enter >= 1 MB.

  • On the Output tab, under Output Fields, verify that Size appears in the Selected list.

  • On the Output tab, under Output Fields, add User Name to the Selected list.

file_size_only2

Loading...