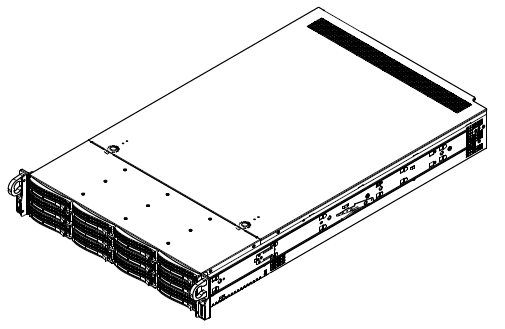
Install the HS4300 chassis into a rack unit with the rails provided. There are a variety of rack units on the market, which may mean the assembly procedure will differ slightly. Refer to the installation instructions that came with the specific rack you are using.
Note
This rail will fit a rack between 26" and 33.5" deep.
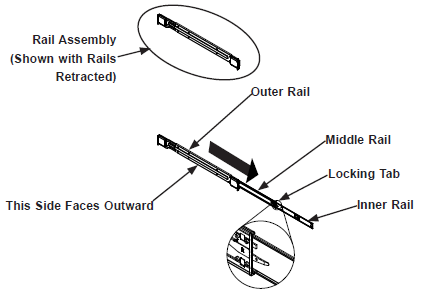
Identifying the Sections of the Rack Rails
The chassis package includes two rail assemblies in the rack mounting kit. Each assembly consists of three sections: an inner chassis rail which secures directly to the chassis, an outer rail that secures to the rack, and a middle rail which extends from the outer rail. These assemblies are specifically designed for the left and right side of the chassis.
Locking Tabs
Each inner rail has a locking tab. This tab locks the chassis into place when installed and pushed fully into the rack. These tabs also lock the chassis in place when fully extended from the rack. This prevents the server from coming completely out of the rack when the chassis is pulled out for servicing.
Note
Slide rail mounted equipment is not to be used as a shelf or a workspace.
Warning
Do not pick up the server with the front handles. They are designed to pull the system from a rack only.
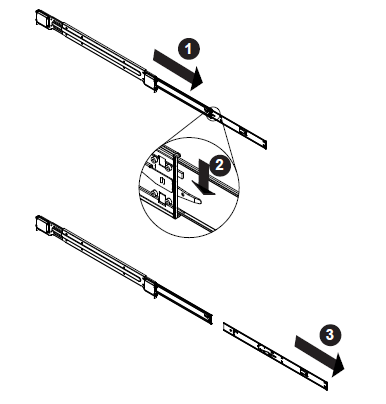
Releasing the Inner Rail
Each inner rail has a locking latch. This latch prevents the server from coming completely out of the rack when the chassis is pulled out for servicing.
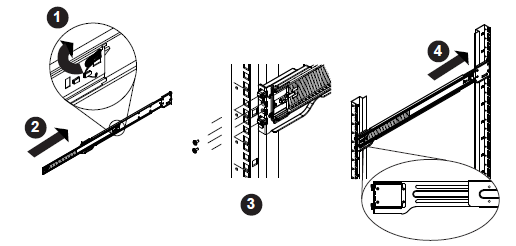
To mount the rail onto the chassis, first release the inner rail from the outer rails.
Releasing inner rail from the outer rails:
-
Pull the inner rail out of the outer rail until it is fully extended as illustrated below.
-
Press the locking tab down to release the inner rail.
-
Pull the inner rail all the way out.
-
Repeat for the other outer rail.
Installing the Inner Rails On the Chassis
-
Identify the left and right inner rails. They are labeled.
-
Place the inner rail firmly against the side of the chassis, aligning the hooks on the side of the chassis with the holes in the inner rail.
-
Slide the inner rail forward toward the front of the chassis until the quick release bracket snaps into place, securing the rail to the chassis.
-
Optionally, you can further secure the inner rail to the chassis with a screw.
-
Repeat for the other inner rail.

Installing the Outer Rails On the Rack
-
Press upward on the locking tab at the rear end of the middle rail.
-
Push the middle rail back into the outer rail.
-
Hang the hooks on the front of the outer rail onto the square holes on the front of the rack. If desired, use screws to secure the outer rails to the rack.
-
Pull out the rear of the outer rail, adjusting the length until it just fits within the posts of the rack.
-
Hang the hooks of the rear section of the outer rail onto the square holes on the rear of the rack. Take care that the proper holes are used so the rails are level. If desired, use screws to secure the rear of the outer rail to the rear of the rack.
-
Repeat for the other outer rail.
Note
Figure is for illustrative purposes only. Always install servers to the bottom of a rack first.
Warning
Stability hazard. The rack stabilizing mechanism must be in place, or the rack must be bolted to the floor before you slide the unit out for servicing. Failure to stabilize the rack can cause the rack to tip over
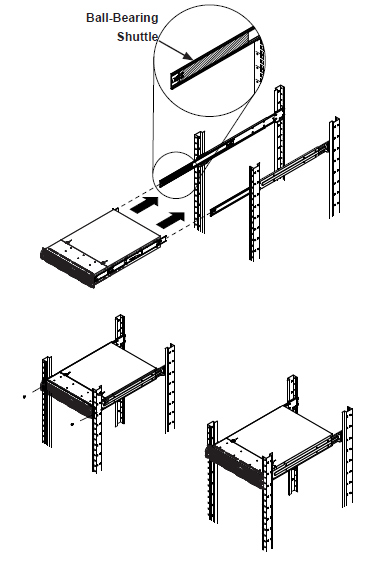
Sliding the Chassis On the Rack Rails
Warning
Mounting the system into the rack requires at least two people to support the chassis during installation. Please follow safety recommendations printed on the rails.
-
Extend the outer rails as illustrated above.
-
Align the inner rails of the chassis with the outer rails on the rack.
-
Slide the inner rails into the outer rails, keeping the pressure even on both sides. When the chassis has been pushed completely into the rack, it should click into the locked position.
-
Optional screws may be used to hold the front of the chassis to the rack.
Note
The figure above is for illustrative purposes only. Always install servers to the bottom of the rack first.
Caution
Do not pick up the server with the front handles. They are designed to pull the system from a rack only.
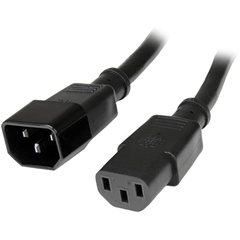
Cabling the Power Supplies
Each node has redundant power supplies which can be connected to 2 independent power sources.
The supplied cables will fit the power receptacles in a typical enclosure. Alternate power cables may be needed if the enclosure does not support C13 connections. Each node should be connected to 2 power sources.
-
Connect the first power supply (PSU) of each node to the first power source in the enclosure rack.
-
Connect the second power supply (PSU) of each node to the second power source in the enclosure rack.
The power cables provided with each node are compatible with 115 VAC or 250 VAC.