The following sections provide information on some of the troubleshooting scenarios related to backup:
Backup
-
Symptom
Backup fails.
Solution
The subclient content might have remote scripts with one or more blank lines at the top.
Ensure that you delete the blank lines at the top of any remote scripts.
-
Symptom
Backup hangs indefinitely.
Solution
Ensure that there are no stale NFS mounts on the server included in the backup.
If there are stale NFS mounts on the server, backups hang indefinitely. This can be avoided by ensuring that the NFS mount points are available for backups.
If the backups hang frequently because of this issue, mount the NFS share using the soft,timeo=10 option.
-
LNX0001: Linux file system backups fail with Error Code [19:599] "Loss of control process ifind_scan.exe..."
Symptom
Linux file system backups fail during FileScan phase with the following error:
Error Code: [19:599]
 Description: Loss of control process ifind_scan.exe. Possible causes:
 1. The control process has unexpectedly died. Check DR. Watson log or core file.
 2. The communication to the control process machine (server name) might have gone down due to network errors.
 3. If the machine (server name) is a cluster, it may have failed over.
 4. The machine (server name) may have rebooted.
Beyond the four causes listed in the Error Code message, the following additional issues are frequent reasons why this error is generated:
-
Stale NFS mounts.
-
SELinux is running but a SELinux policy module has not yet been created.
-
Hung Commvault processes.
-
Low disk space for the Job Results directory.
-
The Linux client is running RHEL/CentOS 3.x which is not a supported operating system version.
Resolution
-
Stale NFS mounts:
Run the 'mount' or 'df' command. If the prompt is not returned, the server has stale network mounts which need to be resolved by the System Administrator. Once the mount is fixed and the 'mount' or 'df' command returns the list of mounts AND the prompt, the FileScan process will also succeed.
From the command prompt, run the following commands:
mountor
dfIf the prompt is not returned, the server has stale network mounts which need to be resolved by the System Administrator. Once the mount is fixed and the mount or the df command returns the list of mounts AND the prompt, the FileScan process will also succeed.
-
SELinux is running but a SELinux policy module has not yet been created:
Manually run the ifind_scan command using the following steps:
-
Source the cvprofile which is located in the Commvault Base directory.
. /opt/commvault/Base/cvprofileNote the dot space before /opt
Also source the galaxy_vm which is located in the Commvault home directory.
. /opt/commvault/galaxy_vmNote the dot space before /opt)
-
Change to the iDataAgent directory in the Commvault home directory.
cd /opt/commvault/iDataAgent -
Run the ifind_scan command.
./ifind_scan -getmnt -allNormal output should report a list of file systems on the Linux server. However, if you receive an error stating Permission Denied i.e.,
./ifind_scan: error while loading shared libraries: /opt/commvault/Base/libSnooper.so: cannot restore segment prot after reloc: Permission deniedYou may have SELinux enabled and will need to create an SELinux policy as mentioned in the Miscellaneous section here.
To determine if SELinux is enabled or disabled, run the sestatus command (the full path may be /usr/sbin/sestatus).
-
-
Hung Commvault processes:
Stop the Commvault processes and check for hung processes by using the ps command. If there are still Commvault processes running, use the kill command to kill such processes. Restart the Commvault processes.
commvault stopps -eaf | grep commvaultps -eaf | grep galaxykill -9 ###where ### is the Process ID of the hung process to be killed.
commvault start -
Low disk space for the JobResults directory:
The JobResults directory location can be found by running the command
commvault statusThe path will be shown, as such, in this example:
Job Results Directory = /opt/commvault/iDataAgent/jobResultsRun the Linux operating system command df or df -h and ensure that the file system that the JobResults directory resides in has a minimum of 500MB of free space.
-
The Linux client is running RHEL/CentOS 3.x which is not a supported operating system version:
-
Refer List of Deprecated Platforms and Applications.
To install a deprecated platform, navigate to the Installation Package or mount the path and then run the following command:
./cvpkgadd -allow-newer-commserve -
Update the RHEL/CentOS 3.x to a supported version listed in Linux - System Requirements.
-
-
-
UFS0007: "Unable to locate GPFS binary path" during backup
Symptom
GPFS file system backups fail with the following error:
Error Code: [17:78]
 Description: Unable to locate GPFS binary path at [/usr/lpp/mmfs/bin/]. Please add the path of GPFS binary in 'sGpfsBin' variable in Additional Settings of GUI and resubmit the Job. Source: gpfs5, Process: FileScan
Cause
The GPFS file system scan fails if the GPFS binaries are not installed in the default location on the client or if the path is not exported properly.
Resolution
Follow these steps to specify the path to the GPFS binaries using the sGpfsBin additional setting.
-
From the CommCell Browser, expand Client Computers.
-
Right-click the Client, and then click Properties.
-
In the Client Computer Properties dialog box, click Advanced.
-
In the Advanced Client Computer Properties dialog box, on the Additional Settings tab, click Add.
-
In the Add Additional Settings on Unix Client dialog box, specify the path to the GPFS binaries:
-
In the Name box, type sGpfsBin. The Category and Type details are automatically populated.
Click Lookup and search for the additional setting using the Find box.
-
In the Value box, type the path to the GPFS binaries.
For example: /usr/lpp/mmfs/bin
-
Click OK.
-
-
Click OK to close the Advanced Client Properties dialog box and the Client Computer Properties dialog box.
-
-
UFS0002: Error registering job with the Communications Service
Symptom
-
Backup fails with these error messages under the main error code 19:857.
19:210"Error registering job with the Communications Service." -
Additional error messages seen from Events tab in the Backup Job Details window.
17:2"File system scan Failed" -
Filescan.log file on the client will show this error:
Failed to translate "servername" to an IP address. Host ignored. Find::impersonateUser()() - No user id found from the registry [VMName = ... ]. Trying getting it from the CS ::GetSubclientDir() - The Subclient directory is [d:\Program Files\Commvault Systems\Galaxy\iDataAgent\JobResults\CV_JobResults\iDataAgent\FileSystemAgent] GetCommServerName() - CS name is [...] Overriding CommServer name [server name] with registry value [registry server name] JM Client CVBkpJobClient::init(): Initializing job object with token [...]. CVJobCtrlClient::registerJob() CVD replied with a non-zero error code [1] for the job registration message. Error = [Failed to get host name for client [...] for job [...]] Init() - Error registering JOB with the Communications Service for JobID [...] Init() - registerJob failed. Returning failure Could not initialize job control. BKP CALLED COMPLETE (PHASE Status::FAIL), ... . Token [...] -
JobManager.log file on the CommServe will show this error:
Scheduler Set pending cause [Failed to get host name for client [...] for job [...]]::Client [...] Application [FileScan] Message Id [318767961] RCID [0] ReservationId [0]. Level [0] flags [0] id [0] overwrite [0] append [0] CustId[0]. Scheduler Ignored pending cause [Insufficient information to start the job. Possibly mismatched version with CommServe or corrupted install.]::Client [...] Application [FileScan] Message Id [285212706] RCID [0] Reservation Id [0]. Level [0] flags [0] id [0] overwrite [0] append [0] CustId[0]. Scheduler Phase [Failed] message received from [...] Module [FileScan] Token [...] restartPhase [0] AppManager JMAppMgr::getValidateArchiveIndexPhase() failed. Returning false JobSvr Obj Phase [4-Scan] for Backup Job Failed. Backup will continue with phase [Scan]. -
From the logs these additional error codes are part of the message:
In the Filescan.log file on the client
30:98 Failed to initialize Job Control.Error message variations based on Agent:
7:28 Could not initialize job control object.39:37 Could not initialize job object.In the JobManager.log file on the CommServe
17:34 Insufficient information to start the job. Possibly mismatched version with CommServe or corrupted install.Error message variations based on Agent/ MediaAgent/ or CommServe involved:
19:1033 Failed to get the host name.19:104 Failed to get the target MediaAgent name for job [].
19:1102 Failed to get the MediaAgent name. Please verify that the MediaAgent version is compatible with the client version.
19:249 Failed to get the CommServe host name from the platform information. -
For a restore job, you may receive this error in the clrestore.log file:
23:84 Restore: Wrong parameters for the job. Possibly mismatched version with CommServe or corrupted install. -
When testing connectivity to the client computer with issues make sure to test name resolution in the following communications paths:
-
CommServe to Client, and from Client to CommServe
-
CommServe to MediaAgent, and from MediaAgent to CommServe
-
Client to MediaAgent ,and from MediaAgent to Client
The error is caused by DNS name resolutions not functioning properly in all directions. DNS or equivalent Lookup and Reverse Lookup must be functioning.
Local Windows Server Resolver Cache on each computer in the environment must be checked and Hosts files must be reviewed.
-
Resolution
Check the configuration in the CommCell Console for the CommServe, MediaAgent and the Client with issues. Different phases of the backup or restore operations require reviewing different communications paths. Also, check the registry entries on the CommServe, MediaAgent and the Client.
The example below will cover the CommServe and the client computers.
-
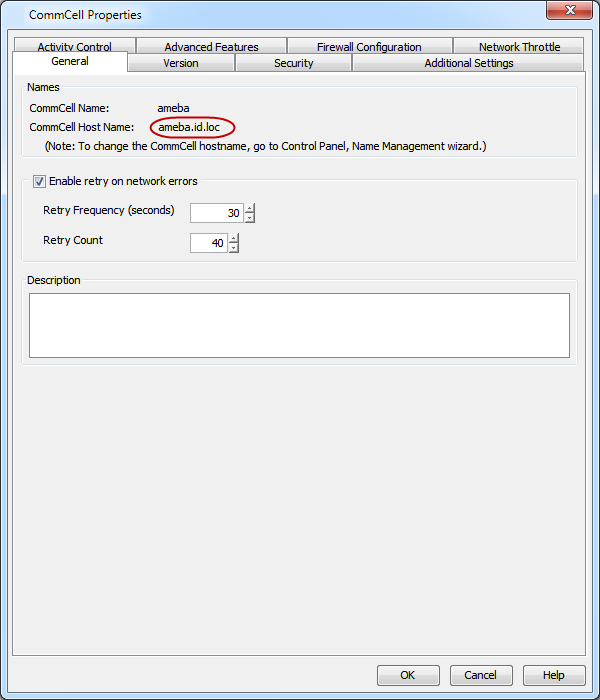
From the CommCell Browser, right click the CommServe and click Properties. Check the CommCell Host Name.
-
From the CommCell Browser, right click the Client computer and click Properties. Check the host name and CommServe host name.
-
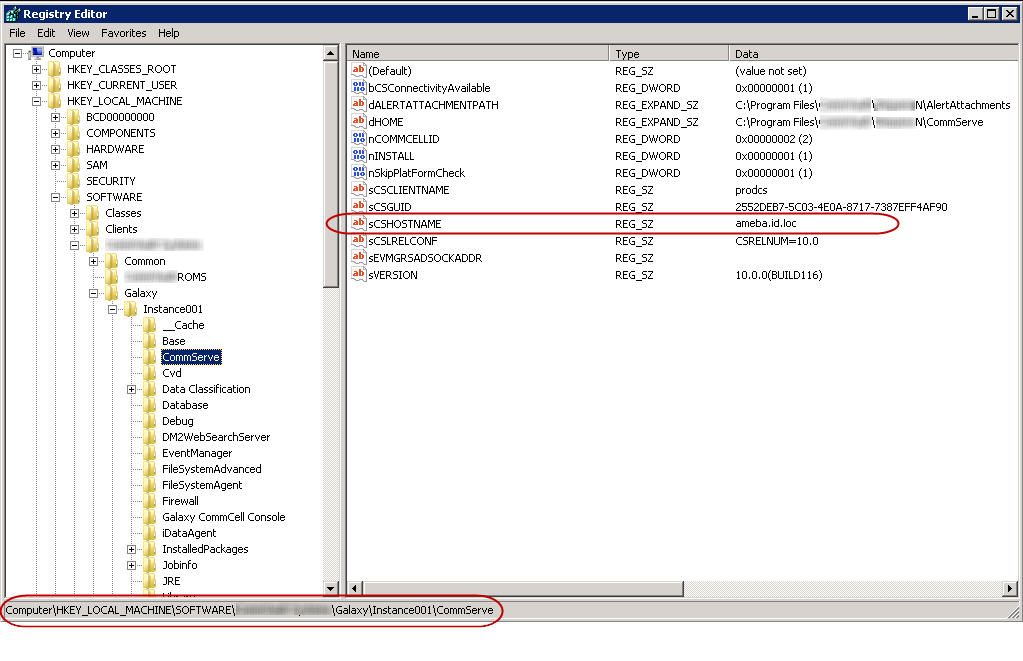
The registry on the CommServe (CS) will have two locations that show the CS Host Name when it also has a Client (CL) installed.
For the CommServe Name used by the Clients other then the CommServe Client the registry entry for sCSHOSTNAME is located under \HKLM\Software\Commvault Systems\Galaxy\Instance001\CommServe
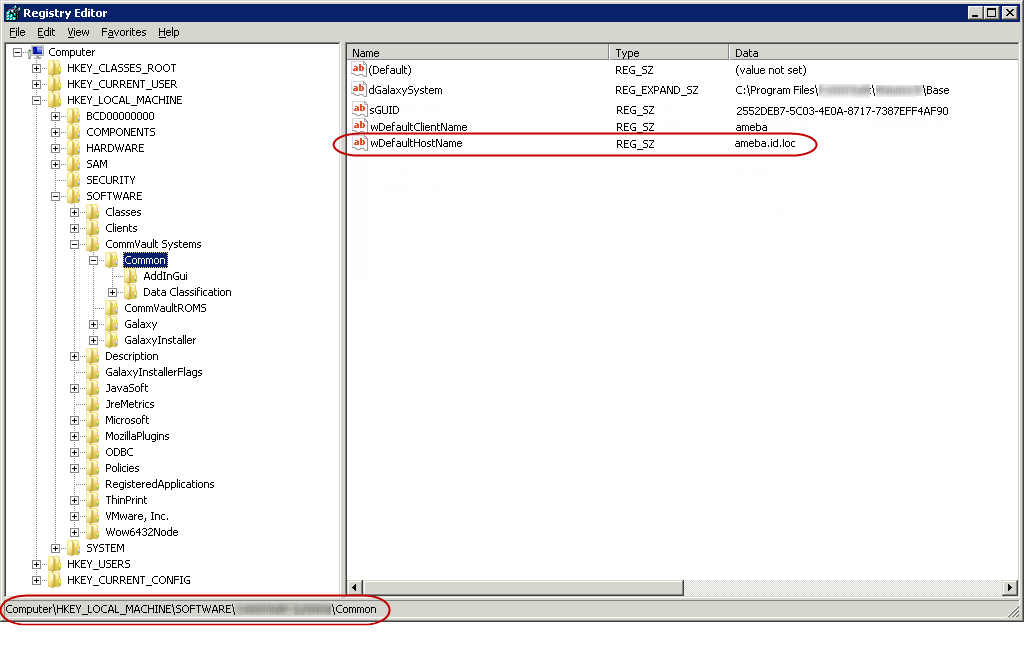
For the CommServe with a Client (CL) File System Agent installed, the name is hosted at this registry location.
Registry entry for wDefaultHostName is located under \HKLM\Software\Commvault Systems\Common
-
Now to get the information for the MediaAgent (MA) or the Client (CL), locate the MA or CL in the CommCell Browser window, right click, and then click Properties. On the General tab, the host name and the CommServe host name will be displayed.
-
Now once the MediaAgent (MA) and/ or Client (CL) CommCell information is confirmed, go to the MA and/or CL and review the registry entries for the Name.
-
For UNIX/ Linux based MA or CL, running the commvault status command will display the CommServe (CS) name as it appears in the /etc/CommvaultRegistry/Galaxy/Instance001/CommServe folder. The .properties file at this location contains the setting.
[root@lx5 ~]# commvault status
-
-
Now that the CommServe Hostname and the Host Name are confirmed, first confirm DNS supports Lookup and Reverse Lookup for the names. If this is correct and communication works in all directions based on ping, ping -a and nslookup, retry the backup or restore operation.
-
If this does not resolve the issue then review the Name Management documentation to get the names matching in the environment.
-
If this does not resolve the issue then move to first using IP addresses between the CS, MA and CL instead of names.
-
If this fails to resolve the issue then use host file entries to populate the Resolver cache with the name translations.
Enter in this format
<IP Address> <Short Name> <FQDName>
Confirm the issue is resolved by running a backup or restore job and checking the Filescan.log, JobManager.log and clRestore.log files.
-
-
-
Priority of Commvault Processes
By default, Commvault processes run at default priority on the client computers. If there are available CPU cycles, then Commvault processes will use the available CPU for backup and restore operations. If the CPU is being used by other application or system processes, Commvault processes will not preempt them. In such cases, if you want to give higher priority to other application or system processes, which are running at the default priority, you can modify the priority of the Commvault process using the following steps:
-
From the CommCell Browser, navigate to Client Computers.
-
Right-click the <Client> and click Properties.
-
lick Advanced and then click Additional Settings tab.
-
Click Add.
-
In the Name field, type dNICEVALUE.
The Category and Type fields are populated automatically.
-
In the Value field, type the appropriate value.
For example, 15.
-
Click OK.
Note
Restart the services on the client computer after configuring this additional setting.
-
Completed with one or more errors
By default the backup jobs from Linux File System iDataAgent complete without any error messages.
In the Scan phase files that cannot be accessed will be populated in scan_failures.cvf, in the following scenarios:
-
Stat failed.
-
If a file is deleted or renamed.
-
Unable to open a directory during scan
To view the "Completed w/ one or more errors" message in the Job History in the Scan phase, follow the steps given below:
-
From the CommCell Browser, navigate to Client Computers.
-
Right-click the <Client> and click Properties.
-
Click Advanced and then click Additional Settings tab.
-
Click Add.
-
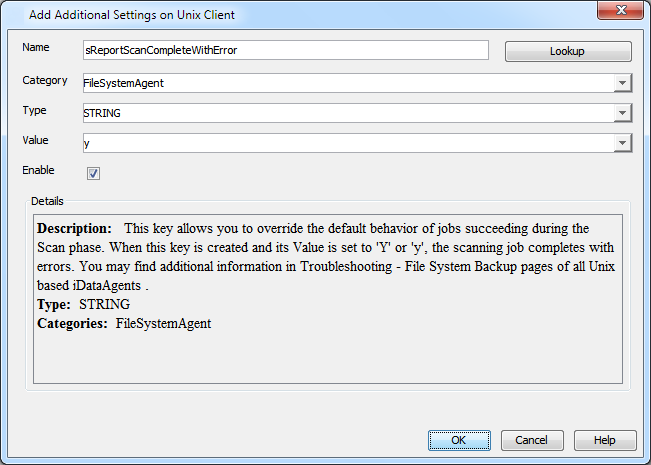
In the Name field, type sReportScanCompleteWithError.
The Category and Type fields are populated automatically.
-
In the Value field, type y or Y to enable the error message display or n or N to disable the error message display..
-
Click OK.
During backups the jobs will be marked partial success and reported into Failures.cvf, in the following scenarios:
-
Stat failure on a backup file (moved/accessed, etc).
-
Unable to open a directory.
-
Error to get the file attributes.
-
If File is locked.
-
Path is a symbolic link and you are unable to read the symbolic link path.
-
Critical error while reading extended attributes or ACLs of the file or directory.
-
Size of the extended attributes or ACLs buffer exceeded the backup buffer size (default pipeline buffer size is 63kb).
To view the "Completed w/ one or more errors" message in the Job History after a backup, follow the steps given below:
-
From the CommCell Browser, navigate to Client Computers.
-
Right-click the <Client> and click Properties.
-
Click Advanced and then click Additional Settings tab.
-
Click Add.
-
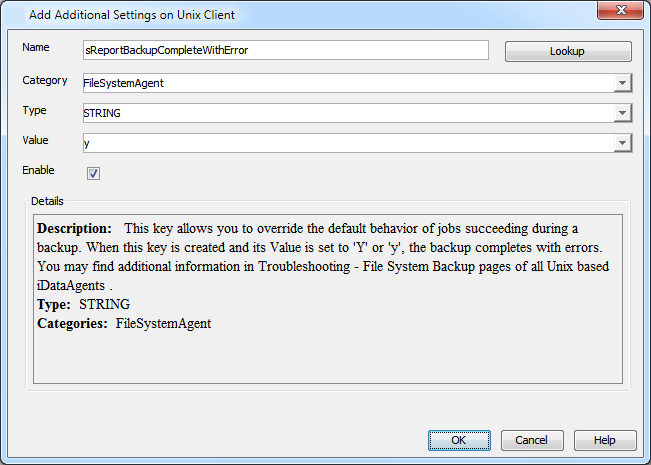
In the Name field, type sReportBackupCompleteWithError.
The Category and Type fields are populated automatically.
-
In the Value field, type y or Y to enable the error message display or n or N to disable the error message display..
-
Click OK.
Troubleshooting Performance Issues
If you are experiencing performance issues during backup, you can troubleshoot them by enabling logging of performance details in the log files. These performance counters contain information that help in resolving the performance related issues during backups.
The performance counters printed in the log files include:
|
FileRead |
Average time spent in system call to read the file. |
|
CheckFileHole |
Average time spent to verify if buffer read from the disk is a hole. |
|
Close File |
Average time spent in system call to close the file. |
|
AllocBuffer |
Average time spent waiting for the network buffer. |
|
WriteBuffer |
Average time spent in sending the network buffer to the network. |
|
Disk Read |
Average speed of reading from the disk. |
|
Write |
Average speed of writing to the network. |
-
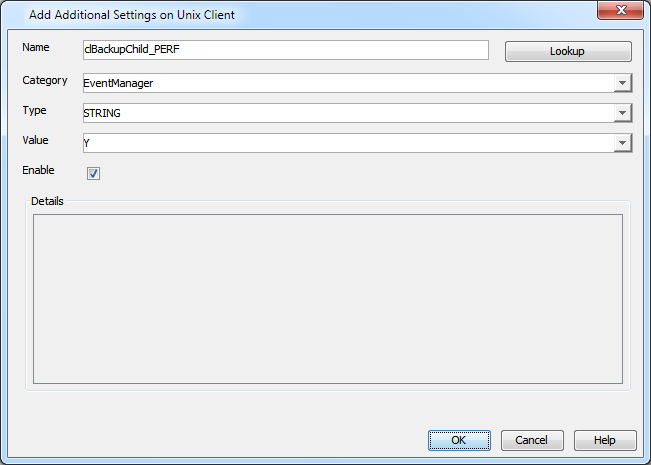
Displaying Performance Details of a Backup Job
Procedure
-
From the CommCell Browser, navigate to Client Computers.
-
Right-click the <Client> and click Properties.
-
Click Advanced and then click Additional Settings tab.
-
Click Add.
-
In the Name field, type clBackupChild_PERF.
The Category and Type fields are populated automatically.
-
In the Value field, type Y.
-
Click OK.
-
-
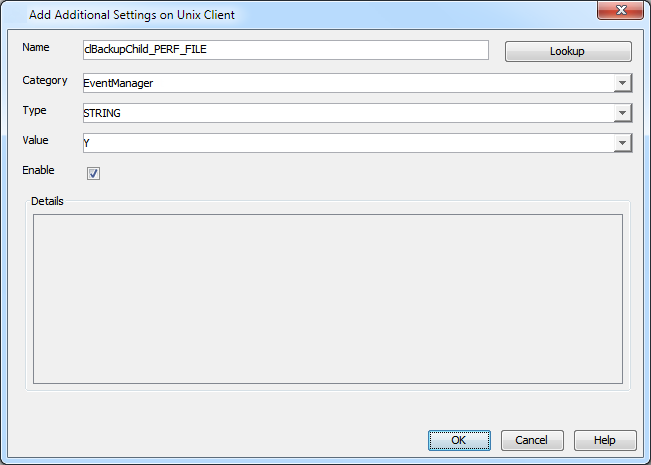
Displaying Performance Details for Each File in a Backup Job
In addition to viewing the performance details for a backup job, you can also view the performance details of each file in the backup job. Note that the file names are not printed in the log.
Procedure
-
From the CommCell Browser, navigate to Client Computers.
-
Right-click the <Client> and click Properties.
-
Click Advanced and then click Additional Settings tab.
-
Click Add.
-
In the Name field, type clBackupChild_PERF_FILE.
The Category and Type fields are populated automatically.
-
In the Value field, type Y.
-
Click OK.
Note
This additional setting should be used together with the clBackupChild_PERF additional setting.
-
Scan
-
SCAN0002: Slow scan during file system backup with multiple large volumes
-
WFS0005: Error Code 17:11 File system scan failed - there is nothing to backup
-
WFS0008: File System scan failed - There is nothing to backup
Cause
Synthetic full backup fails with the error message File System scan failed - There is nothing to backup, if the Check for deleted stubs option was enabled in the Advanced Backup options dialog box.
Solution
Make sure that Check for deleted stubs is cleared when initiating a synthetic full backup, by following these steps:
-
From the CommCell Browser, navigate to Client Computers > client > File System > defaultBackupSet.
-
Right click the subclient and point to Backup.
-
In the Backup Options for Subclient dialog box, select Synthetic Full.
-
Click Advanced and make sure that the Check for deleted stubs option is cleared.
UFS0004: File system exclusion or inclusion on subclients
Symptom #1:
The following Error Code would be received if a mount (file system) type was not defined.
- Error Code 6:30:
Failed to open file [...].First review the FileScan.log file and look for the following sections related to the JOB ID. The default log location for UNIX/Linux type operating systems is /var/log/commvault/Log_Files. If the log files are not located in the default location, review the .properties file located at /etc/CommvaultRegistry/Galaxy/Instance00X/EventManager .properties.
The FileScan.log file log cut below shows the file systems skipped by default for Linux operating system.
PID Thread Date Time JobID
24940 58572840 01/05 01:00:57 53548 Will skip all file systems of type :nfs:isofs:openpromfs:smbfs:devfs:procfs:nsspool:sysfs:floppy:lofs:tmpfs:proc:ctfs:
24940 58572840 01/05 01:00:57 53548 Will backup submounts if any under skipped file
Resolution #1:
Log cut from the FileScan.log file before file system type exclusion.
24940 58572840 01/05 01:01:05 53548 Find::GetFsType() - add fstype '1314342483' for '/var/opt/path/nclmnt' to cache (st_dev:20)
24940 58572840 01/05 01:01:05 53548 Find::exec() - 1 items processed, 0 added
In this example, /var/opt/path/nclmnt has an unrecognizable file system type 1314342483
To add the exclusion for the magic number file system type, check the FileScan.log and determine the fstype that the mount is associated with, it is 1314342483 for /var/opt/path/nclmnt.
24940 58572840 01/05 01:01:05 53548 Find::GetFsType() - add fstype '1314342483' for '/var/opt/path/nclmnt' to cache (st_dev:20) 24940 58572840 01/05 01:01:05 53548 Find::exec() - 1 items processed, 0 added -
Since the magic number 1314342483 is not defined, it cannot be opened for scan during backups causing the Failed to Open ... error.
Use the following steps to add this file system type to the existing exclusion list:
-
From the CommCell Browser, navigate to Client Computers.
-
Right-click the <Client>, and then click Properties.
-
Click Advanced and then click Additional Settings tab.
-
Click Add.
-
In the Name box, type ignoreFStype.
The Category and Type fields are populated automatically.
-
In the Value box, type :1314342483:autofs:cdrom:nfs3:lofs:tmpfs:proc:ctfs:namefs:.
-
Click OK.
Symptom #2:
The following log cut from the FileScan.log file lists the default exclusions for Linux operating system. Other operating systems have different defaults.
PID Thread Date Time JobID
19919 a8ea5700 07/26 08:17:21 347057 Will skip all file systems of type :nfs:isofs:openpromfs:smbfs:devfs:procfs:nsspool:sysfs:floppy:lofs:tmpfs:proc:ctfs:
Later in the log the following may be seen:
19919 a8ea5700 07/26 08:17:23 347057 Find::GetFsType() - add fstype 'nfs' for '/net/server1/vol/unx_v03' to cache (st_dev:33)
19919 a8ea5700 07/26 08:17:23 347057 Scanning directory /net/server1/vol/unx_v03
19919 a8ea5700 07/26 08:17:23 347057 Find::DecideIfNewMountPoint() - Adding new collect file for /net/server1/vol/unx_v03
19919 a8ea5700 07/26 08:17:23 347057 GetArchiveIDByMountPath() - path:/net/server1/vol/unx_v03 bSnapBackup:0 mProxyHostMapper:14622464 : ArchiveID is -1
19919 a8ea5700 07/26 08:17:23 347057 Find::DecideIfNewMountPoint() - Adding new collect file for /net/server1/vol/unx_v03/models
19919 a8ea5700 07/26 08:17:23 347057 GetArchiveIDByMountPath() - path:/net/server1/vol/unx_v03/models bSnapBackup:0 mProxyHostMapper:14622464 : ArchiveID is -1
19919 a8ea5700 07/26 08:17:24 347057 FULL BACKUP '/net/server1/vol/unx_v03/models/.snapshot/nightly.0' recursionTime set to 0, retcode set to 2
19919 a8ea5700 07/26 08:17:24 347057 FULL BACKUP '/net/server1/vol/unx_v03/.snapshot/nightly.0' recursionTime set to 0, retcode set to 2
19919 a8ea5700 07/26 08:17:24 347057 Find::GetFsType() - add fstype '391' for '/net/server1/vol/unx_v01' to cache (st_dev:23)
19919 a8ea5700 07/26 08:17:24 347057 Scanning directory /net/server1/vol/unx_v01
19919 a8ea5700 07/26 08:17:24 347057 FULL BACKUP '/net/server1/vol/unx_v01' recursionTime set to 0, retcode set to 2
19919 a8ea5700 07/26 08:17:24 347057 Find::GetFsType() - add fstype '391' for '/net/server1/vol/unx_v01/ow' to cache (st_dev:35)
19919 a8ea5700 07/26 08:17:24 347057 Find::GetFsType() - add fstype 'nfs' for '/net/server1/vol/unx_v01/ow/R2003_Backups' to cache (st_dev:36)
19919 a8ea5700 07/26 08:17:24 347057 Find::DecisionMatrixSaysSkip() - Skipping /net/server1/vol/unx_v01/ow/R2003_Backups
19919 a8ea5700 07/26 08:17:24 347057 Find::DecisionMatrixSaysSkip() - Skipping /net/server1/vol/unx_v01/ow/R2003_Backups
19919 a8ea5700 07/26 08:17:24 347057 Find::DecisionMatrixSaysSkip() - Skipping /net/server1/vol/unx_v01/ow/All_EH
19919 a8ea5700 07/26 08:17:24 347057 Find::DecisionMatrixSaysSkip() - Skipping /net/server1/vol/unx_v01/ow/BV
19919 a8ea5700 07/26 08:17:24 347057 Find::DecisionMatrixSaysSkip() - Skipping /net/server1/vol/unx_v01/ow/sac
19919 a8ea5700 07/26 08:17:24 347057 Find::DecisionMatrixSaysSkip() - Skipping /net/server1/vol/unx_v01/ow/eel
19919 a8ea5700 07/26 08:17:24 347057 Find::DecisionMatrixSaysSkip() - Skipping /net/server1/vol/unx_v01/ow/lab
19919 a8ea5700 07/26 08:17:24 347057 Find::DecisionMatrixSaysSkip() - Skipping /net/server1/vol/unx_v01/ow/sjl
19919 a8ea5700 07/26 08:17:24 347057 Find::DecisionMatrixSaysSkip() - Skipping /net/server1/vol/unx_v01/ow/sjh
19919 a8ea5700 07/26 08:17:24 347057 Find::DecisionMatrixSaysSkip() - Skipping /net/server1/vol/unx_v01/ow/ven
19919 a8ea5700 07/26 08:17:24 347057 Find::DecisionMatrixSaysSkip() - Skipping /net/server1/vol/unx_v01/ow/ESOZ
19919 a8ea5700 07/26 08:17:24 347057 Find::DecisionMatrixSaysSkip() - Skipping /net/server1/vol/unx_v01/ow/EXP
19919 a8ea5700 07/26 08:17:24 347057 Find::DecisionMatrixSaysSkip() - Skipping /net/server1/vol/unx_v01/ow/GAS
Note that in the above log cuts, the magic number 391 is being presented as an NFS mount for this client where normally it is an autofs file system type.
Resolution #2:
To remove the exclusion of the NFS file system type, check the FileScan.log file and determine the fstype that the mount is associated with, it is 391 for /net/server1/vol/unx_v01/ow, which is the magic number for autofs but for this client this is being presented as an nfs file system mount.
19919 a8ea5700 07/26 08:17:24 347057 Find::GetFsType() - add fstype '391' for '/net/server1/vol/unx_v01/ow' to cache (st_dev:35)
19919 a8ea5700 07/26 08:17:24 347057 Find::GetFsType() - add fstype 'nfs' for '/net/server1/vol/unx_v01/ow/R2003_Backups' to cache (st_dev:36)
19919 a8ea5700 07/26 08:17:24 347057 Find::DecisionMatrixSaysSkip() - Skipping /net/server1/vol/unx_v01/ow/R2003_Backups
19919 a8ea5700 07/26 08:17:24 347057 Find::DecisionMatrixSaysSkip() - Skipping /net/server1/vol/unx_v01/ow/R2003_Backups
19919 a8ea5700 07/26 08:17:24 347057 Find::DecisionMatrixSaysSkip() - Skipping /net/server1/vol/unx_v01/ow/All_EH
Since NFS is an excluded file system type by default for backups, use the following steps to include it:
-
From the CommCell Browser, navigate to Client Computers.
-
Right-click the <Client>, and then click Properties.
-
Click Advanced and then click Additional Settings tab.
-
Click Add.
-
In the Name box, type ignoreFStype.
The Category and Type fields are populated automatically.
-
In the Value box, type :autofs:cdrom:lofs:tmpfs:proc:ctfs:namefs:.
Note that the NFS file system type is left out of the re-created default exclusions. Now the NFS mounts will be scanned and backed up.
-
Click OK.
Refer Configuring Backups for Automatically Skipped File Systems for more information.
Installation
During installation ensure that the CommServe is accessible before entering the CommServe Host Name; otherwise the installation will fail.
-
LNX0002: Event Manager Client (EvMgrC) Failed to Start on a Linux Computer
Applies to upgraded clients or clients from previous Commvault versions.
-
LNX0003: Commvault services fail to come up after upgrading the client from SuSE Linux Enterprise Server 11 SP2 to SuSE Linux Enterprise Server 11 SP3 version
Symptom
Commvault services fail to come up with the following error after upgrading the client from SuSE Linux Enterprise Server 11 SP2 to SuSE Linux Enterprise Server 11 SP3 version:
bkp-hpx2:/var/log/commvault/Log_Files # commvault start
 chmod: missing operand after `a+w'
 Try `chmod --help' for more information.
 Cleaning up /opt/commvault/Base/Temp ...
 FATAL: Module cdr not found.
 *** Failed to load Data Protection Suite FSF driver ...
 bkp-hpx2:/var/log/commvault/Log_Files #
Cause
The archiver driver is not supported on SuSE Linux Enterprise Server 11 SP3 version because of which services fail to come up.
Resolution
You can re-install Commvault to fix the issue but you need to run a full backup again which might not be feasible in some cases. To continue running incremental and synthetic full backups after re-installing Commvault, use the following steps:
-
Compress the Job Results directory in a .tar file.
-
Re-install the required Commvault components on the client computer. (See Deployment - UNIX/Linux File System Agent for step-by-step instructions.)
-
Copy the .tar file containing the compressed Job Results directory to the newly created Job Results directory.
-
Restart Commvault services on the client. (See Controlling Services On UNIX for step-by-step instructions.)
-
-
UFS0001: "Unable to find PDKSH" error during installation of UNIX based iDataAgents
Symptom
During installation of Unix-based agents, the following error is generated:
Unable to find pdksh-v5.2.14-27The version numbers following pdksh may vary.
Resolution
This error can be caused by one of the following conditions:
-
DVD/ISO needs to be mounted with executable permissions.
-
Executable permissions where not retained when copying the installation files from the CD/DVD media to hard drive.
-
One or more files are missing from your installation path, or the installation disk copied may be an outdated version.
-
One or more files may have become corrupt during the unzipping process if either WinZip or 7-Zip is used.
-
The root profile has some aliases set that may conflict with the Galaxy install scripts.
-
The OS is not supported in the current version.
Verify DVD/ISO Mount Permissions:
Run the mount command to verify that the DVD/ISO is not mounted with noexec privileges.
If mounted as noexec, remount it with exec privileges.
mount -o remount,execi.e., in the below example the ISO is mounted with noexec privileges (A bad interpreter error may also be reported, when running cvpkgadd). Correct this by remounting with exec privileges.
# mount
/Commvault_900_UnixLinuxMac_DVD3_01222012.iso on /mnt/CV9.0-ISO type iso9660 (rw,noexec,loop=/dev/loop0)
# mount -o remount,exec /mnt/CV9.0-ISO
# mount
/mnt/imac/Galaxy/Commvault_900_UnixLinuxMac_DVD3_01222012.iso on /mnt/CV9.0-ISO type iso9660 (rw,loop=/dev/loop0)
Verify Permissions:
First, navigate to your installation path and verify the execute permissions are set to 755 (recursively). If they are not set properly, use the command below to correct the permissions. The installation path used below will differ in your environment.
# cd /mnt/software/galaxy# chmod -R 755 *Verify Installation Files:
If your execute permissions are set properly and you are still experiencing errors, please verify that all required installation files are present, and the disk being used is the latest version. Ensure that all files from the original installation medium have been transferred.
WinZip & 7Zip Issues:
Do not use WinZip or 7-Zip to untar the files downloaded as these applications may cause the following issues. It is recommended to use WinRAR.
-
The untar process will DOS-ify the package scripts
-
The path structure may be lost and the files will be copied to top folder level
Note: The first untar problem might be avoided by using these settings in WinZip but will not guarantee the second issue will not happen.
If WinZip was used in transferring the original installation medium, ensure that the CF/LF option is not checked. From WinZip, select Options | Configuration | Miscellaneous, and ensure the TAR file smart CR/LF conversion check box is unchecked.
Also, if the UNIX/ Linux iDataAgent (package) installation stalls then this is a sure sign the untar process corrupted the files and scripts.
Root Profile Issues:
Run the alias command to determine what (if any) aliases are set. Either unalias each alias, or temporarily move your shell environment setup file to a .orig extension, run a shell command, then run cvpkgadd to begin the installation. Once the installation is complete, move your original environment file back.
For example:
# alias dir=lsf exit='edtlog;exit' functions='typeset -f' hash='alias -t -' ls='ls -lisa' stop='kill -STOP'-
Either unset each alias (view your Unix manual page for unalias options)
# unalias -aOr
# unalias dir exit functions hash ls stop # alias (there will be no aliases for this current shell environment) # ./cvpkgadd -
To temporarily move your shell environment file:
 # mv /.kshrc /.kshrc.orig
# ksh
# ./cvpkgadd
[install completes]
# mv /.kshrc.orig /.kshrc
Operating System Support:
To verify if the operating system is supported in the version you are running, please refer to the following pages:
-
-
UFS0003: Configuring GxClusterPlugin for Veritas Cluster Server (VCS) Cluster
Symptom
The Commvault software for a Veritas Cluster has special requirements that are covered during the installation and upgrade procedures.
The procedure below is only a workaround when the online documentation was not followed and the re-install of the iDataAgent(s) is not possible.
This example covers the workaround installation of cv_vcs_notify and the configuration of a Veritas Cluster Server (VCS) Application resource to automatically manage cvclusternotify for service group failover.
Note: Throughout this example, it is assumed that the Commvault software is installed in /opt/commvault directory and the name of the Commvault instance is Instance001.
Example of a failed VCS install/upgrade delivered this error message and log excerpts:
-
Error Code 18:39 (Oracle Agent Specific)
Establishing connection to Client services failed. Make sure this product's Services are running on the client [] and check network connectivity between client and CommServe. -
Error Code 19:599
Loss of control process . Possible causes: 1. The control process has unexpectedly died. Check Dr Watson log or core file. 2. The communication to the control process machine might have gone down due to network errors. 3. If the machine is a cluster, it may have failed over. 4. The machine may have rebooted. -
From the JobManager.log file, you would see entries similar to:
7644 d123f6c0 06/11 10:20:58 --- ::main() - Arguments [-inst Instance001 -cn servername -start -fs ]
 7644 d123f6c0 06/11 10:20:58 --- ::main() - ------------------------------------------------------------------------
 7644 d123f6c0 06/11 10:20:58 --- ::main() - ------------ Running Startup Procedure ------------
 7644 d123f6c0 06/11 10:20:58 --- ::main() - ------------------------------------------------------------------------
 7644 d123f6c0 06/11 10:20:58 --- ::RunStartupScript() - Sent
 startup message to local CVD nodename
Line 2006: 7976 1f58 06/11 10:20:20 480450 Scheduler Set pending cause [The job is pending because: The remote end has closed network connection unexpectedly]::Client [...] Application [CVD] Message Id [1375731870] RCID [0] ReservationId [0]. Level [0] flags [0] id [0] overwrite [0] append [0] CustId[1375731841]. Line 2007: 7976 1798 06/11 10:21:38 480450 Control -- TERMINATE -- (killing processes -- [IsAlive] operation) Line 2008: 7976 1798 06/11 10:21:38 480450 Control Registration Status [Registered] Line 2009: 7976 119c 06/11 10:21:39 480450 Servant Control Response [Control Failed] received from [NodeFQDN] Line 2010: 7976 1798 06/11 10:21:39 480450 Control CVD Response [CTRLFAILED] Line 2011: 7976 1798 06/11 10:21:39 480450 Service -> ABNORMALLY TERMINATED JOB [480450:4:1] <-- Detected as part of a [IsAlive] operation. Line 2011: 7976 1798 06/11 10:21:39 480450 Service -> ABNORMALLY TERMINATED JOB [480450:4:1] <-- Detected as part of a [IsAlive] operation. Line 2012: 7976 155c 06/11 10:21:39 480450 Scheduler Ignored pending cause [Loss of control process SrvOraAgent.exe. Possible causes: 1. The control process has unexpectedly died. Check Dr Watson log or core file. 2. The communication to the control process machine serverFQDN might have gone down due to network errors. 3. If the machine serverFQDN is a cluster, it may have failed over. 4. The machine serverFQDN may have rebooted.]::Client [...] Application [JobManager] Message Id [318767703] RCID [0] Reservation Id [0]. Level [0] flags [0] id [0] overwrite [0] append [0] CustId[0]. Line 2013: 7976 994 06/11 10:21:39 480450 Scheduler Phase [Failed] message received from [Job Manager] Module [JobManager] Token [480450:4:1] restartPhase [0]
Resolution
The procedure below is only a workaround when the online documentation was not followed and the re-install of the iDataAgent(s) is not possible.
Installation:
The cv_vcs_notify script exists in the Commvault installation in its raw form. It must be made into a real script before it may be used. This must be done on all nodes in the cluster.
-
Go to /opt/commvault/Base and copy cv_vcs_notify.raw to cv_vcs_notify
# cd /opt/commvault/Base # cp -p cv_vcs_notify.raw cv_vcs_notify # chmod a+x cv_vcs_notify -
Using a text editor, add the following lines to the top of cv_vcs_notify
#!/opt/commvault/ksh
 GALDIR="/opt/commvault"
 BASE_DIR="/opt/commvault/Base"
 Instance_Name="Instance001"
Configure VCS Application:
For this section, replace ServiceGroup with the name of your VCS cluster service group, ClientName with the name of the corresponding virtual cluster client on the CommServe, and Node_n with the name of the cluster node.
-
As the root user, add a new VCS resource to the cluster service group. In this example, the name of the resource is GxClusterPlugin_ServiceGroup
 # haconf -makerw
 # hares -add GxClusterPlugin_ServiceGroup Application ServiceGroup
-
Convert the StartProgram attribute to a local attribute and specify the command to run when the resource is started for each cluster node.
 # hares -local GxClusterPlugin_ServiceGroup StartProgram
 # hares -modify GxClusterPlugin_ServiceGroup StartProgram "/opt/commvault/Base/cv_vcs_notify -svcgrp ClientName -start" -sys Node_1
 # hares -modify GxClusterPlugin_ServiceGroup StartProgram "/opt/commvault/Base/cv_vcs_notify -svcgrp ClientName -start" -sys Node_2
-
Convert the StopProgram attribute to a local attribute and specify the command to run when the resource is stopped for each cluster node.
 # hares -local GxClusterPlugin_ServiceGroup StopProgram
 # hares -modify GxClusterPlugin_ServiceGroup StopProgram "/opt/commvault/Base/cv_vcs_notify -svcgrp ClientName -shutdown" -sys Node_1
 # hares -modify GxClusterPlugin_ServiceGroup StopProgram "/opt/commvault/Base/cv_vcs_notify -svcgrp ClientName -shutdown" -sys Node_2
-
Convert the CleanProgram attribute to a local attribute and specify the command to run when the resource is cleaned for each cluster node.
 # hares -local GxClusterPlugin_ServiceGroup CleanProgram
 # hares -modify GxClusterPlugin_ServiceGroup CleanProgram "/opt/commvault/Base/cv_vcs_notify -svcgrp ClientName -shutdown" -sys Node_1
 # hares -modify GxClusterPlugin_ServiceGroup CleanProgram "/opt/commvault/Base/cv_vcs_notify -svcgrp ClientName -shutdown" -sys Node_2
-
Convert the MonitorProgram attribute to a local attribute and specify the command to run when the resource is cleaned for each cluster node.
 # hares -local GxClusterPlugin_ServiceGroup MonitorProgram
 # hares -modify GxClusterPlugin_ServiceGroup MonitorProgram "/opt/commvault/Base/cv_vcs_notify -svcgrp ClientName -monitor /opt/commvault/Base/tmpfile_ServiceGroup" -sys Node_1
 # hares -modify GxClusterPlugin_ServiceGroup MonitorProgram "/opt/commvault/Base/cv_vcs_notify -svcgrp ClientName -monitor /opt/commvault/Base/tmpfile_ServiceGroup" -sys Node_2
-
Link the cluster resource to the Service Group's IP and (optionally) Mount resources. This is required as cvclusternotify will wait until the Service Group's shared IP resource is online before exiting.
 # hares -link GxClusterPlugin_ServiceGroupServiceGroup_IP
 # hares -link GxClusterPlugin_ServiceGroupServiceGroup_Mount
-
Enable the cluster resource.
# hares -modify GxClusterPlugin_ServiceGroup Enabled 1
-
Verify that the resource is probed on all cluster nodes without any problems. Repeat the configuration steps above for each service group that is backing up to Commvault, then update the VCS configuration and make it read-only.
# haconf -dump -makero
-
-
UFS0005: After an authentication failed error if a MediaAgent or a client cannot communicate with CommServe it will disable itself immediately
Symptom:
During Backup:
- Error Code19:1327
Attempt start error: [...]- Error Code 9:90
Authentication failed for host [...]. Network password does not match.- Error Code 40:52
Failed to contact CommServe Services from the MediaAgent[...] during the start of the Data Transfer operation. Please check the network connectivity from this MediaAgent to the CommServe and make sure services are running on the CommServe.
- Error Code 22:30
Could not establish connection to [...] on attempt [...].- Error Code 19:1131
Waiting for the services on the client [...] to come online.- Error Code 19:1597
Failed to start phase [...] on [...] due to network error [...]. Will attempt to restart. Please check if this product's services are running on the remote host.- Error Code 7:77
Unable to run [...] on the client. [CVSession::authenticateClient]:Remote system [FQDNservername]. Failed authentication returned from server.- Error Code 7:102
Unable to run [...] on the client.- Error Code 7:111
Unable to run [...] on the client. [...]Error Code 9:36 [...]:Remote system [...]. Could not get the password from platform information or the database - authentication failed.Error Code 9:37 [...]:Remote system [...]. Could not find the client password in the database - authentication failed.Error Code 9:38 [...]:Remote system [...]. Failed authentication returned from server.Error Code 9:39 [...]:Remote system [...]. Failed authentication returned from client.Error Code 9:40 [...]:Remote system [...]. Unexpected message type received [...=...] - authentication failed.Error Code 9:41 [...]:Remote system [...]. Could not encrypt challenge string when connecting - authentication failed.Error Code 9:42 [...]:Remote system [...]. Password received from client did not match the database password for that client - authentication failed.Error Code 9:89 Authentication failed for host [...]. Could not find the client entry in database.Error Code 9:90 Authentication failed for host [...]. Network password does not match.Error Code 9:91 CVSession Authentication failed for host [...]. Password is not available on the host.During Restore:
- Error Code 23:98
Seek failure happenedAdditional Log Cuts:
- From the JobManager.log file on the CommServe:
6956 2764 07/23 16:00:21 53303 Servant [---- SCHEDULED BACKUP REQUEST ----], taskid [84] Clnt[...] AppType[Windows File System][33] BkpSet[defaultBackupSet] SubClnt[default] BkpLevel[Incremental][2] 6956 27dc 07/23 16:00:24 53303 Scheduler Phase [4-Scan] could not start on [CLFQDNservername] due to Network Failure- From the CVD.log file on the Client:
8000 1f64 07/25 13:14:33 ### Unable to resolve remote host_Disabled_CSFQDNServerName to any IP family: [1][11001][No such host is known.]
 8000 1f64 07/25 13:14:33 ### ** CVSsession::attach(ulPortArg):
 - RemoteHost=_Disabled_CSFQDNServerName. - RemoteProcess=. Port =65535,65535
 - getConnection() failed. Error=900004b.
 8000 1f64 07/25 13:14:33 ### ** CVSession::getClientPassword ():
 - RemoteHost=_Disabled_CSFQDNServerName.
 - RemoteProcess=JobMgr.exe.
 - commServerAttach (ePlatformTypeMember) failed. Error=900004b.
 8000 1f64 07/25 13:14:33 ### ** CVSession::replyAttach (PlatformType)
 - RemoteHost=CSFQDNServerName.
 - RemoteProcess=JobMgr.exe.
 - authenticateServer failed. Error=9000024.
Resolution:
If the nChatterFlag additional setting is set to 1, normal Communication and Connection testing will work properly but communication between MediaAgent or Client and the CommServe will continue to fail.
NOTE: The core issue is the MediaAgent or Client realized it was getting nowhere trying to talk (authenticate) to the CS and stops talking by setting the nChatterFlag and other additional settings. The cause of this type of behavior is outlined above but may also be caused by transient or extended CVD communication issues between elements of the CommCell and the CommServe.
To fix the issue, check the additional settings on the CommCell Components affected.
On Windows:
-
Check the nChatterFlag additional setting.
-
From the CommCell Browser, navigate to Client Computers.
-
Right-click the <Client> or <MediaAgent>, and then click Properties.
-
Click Advanced and then click Additional Settings tab.
-
Click Add.
-
In the Name box, type nChatterFlag.
-
The Category and Type fields are populated automatically.
-
In the Value box, type 0.
This enables communication to the CommServe.
-
Click OK.
-
-
Check the sCSHOSTNAME additional setting.
-
From the CommCell Browser, navigate to Client Computers.
-
Right-click the <Client> or <MediaAgent>, and then click Properties.
-
Click Advanced and then click Additional Settings tab.
-
Click Add.
-
In the Name box, type sCSHOSTNAME.
-
The Category and Type fields are populated automatically.
-
In the Value box, if the current string value has _Disabled_ appended at the front of the string value, remove it to allow communication to the CommServe.
-
Click OK.
-
-
If there is a firewall between the MediaAgent or Client and the CommServe, check the nDISABLE_CVFWD additional setting.
-
From the CommCell Browser, navigate to Client Computers.
-
Right-click the <Client> or <MediaAgent>, and then click Properties.
-
Click Advanced and then click Additional Settings tab.
-
Click Add.
-
In the Name box, type nDISABLE_CVFWD.
-
The Category and Type fields are populated automatically.
-
In the Value box, type 0.
This enables controlled connection to the CommServe.
-
Click OK.
-
-
Use the SCM utility to restart Commvault services.
On UNIX:
It is recommended to stop Commvault services on the MediaAgent(s) and/or Client(s) before modifying additional settings.
-
Check the nChatterFlag additional setting.
-
From the CommCell Browser, navigate to Client Computers.
-
Right-click the <Client> or <MediaAgent>, and then click Properties.
-
Click Advanced and then click Additional Settings tab.
-
Click Add.
-
In the Name box, type nChatterFlag.
-
The Category and Type fields are populated automatically.
-
In the Value box, type 0.
This enables communication to the CommServe.
-
Click OK.
-
-
Check the sCSHOSTNAME additional setting.
-
From the CommCell Browser, navigate to Client Computers.
-
Right-click the <Client> or <MediaAgent>, and then click Properties.
-
Click Advanced and then click Additional Settings tab.
-
Click Add.
-
In the Name box, type sCSHOSTNAME.
-
The Category and Type fields are populated automatically.
-
In the Value box, if the current string value has _Disabled_ appended at the front of the string value, remove it to allow communication to the CommServe.
-
Click OK.
-
-
If there is a firewall between the MediaAgent or Client and the CommServe, check the nDISABLE_CVFWD additional setting.
-
From the CommCell Browser, navigate to Client Computers.
-
Right-click the <Client> or <MediaAgent>, and then click Properties.
-
Click Advanced and then click Additional Settings tab.
-
Click Add.
-
In the Name box, type nDISABLE_CVFWD.
-
The Category and Type fields are populated automatically.
-
In the Value box, type 0.
This enables controlled connection to the CommServe.
-
Click OK.
-
-
Restart Commvault services.
-
Test Backups and Restores to confirm data protection has been restored.
Special Case Scenario:
This resolution does not work if the pNET password on the MediaAgent or Client and the entry in the CommServe database do not match.
-
Check the CVD.log on the MediaAgent or Client for these entries:
3756 d98 04/25 16:17:23 ### [ClientSessionWrapper::connectToCS] Error connecting to svc [AppManager network access] on CS. [150994982-[CVSession::authenticateClient]:Remote system [servernameFQDN]. Failed authentication returned from server.] 3756 d98 04/25 16:17:23 ### ClientInterfaceNet::lookup() - [ClientSessionWrapper::connectToCS] Error connecting to svc [AppManager network access] on CS. [150994982-[CVSession::authenticateClient]:Remote system [servernameFQDN]. Failed authentication returned from server.] 3756 d98 04/25 16:17:23 ### ::UpdateClientInfo() - Failed to do the client lookup for CLHostName 3756 d98 04/25 16:17:23 ### ::UpdateClientInfo() - Session connect failed with error code 150994982 - [CVSession::authenticateClient]:Remote system [servernameFQDN]. Failed authentication returned from server., Generic error 150995034 3756 d98 04/25 16:17:23 ### ::UpdateClientInfo() - Setting nChaterFlag to 1 to stop all communications 3756 d98 04/25 16:17:23 ### ::UpdateClientInfo() - Setting nDISABLE_CVFWD to 1 to stop all communications 3756 d98 04/25 16:17:23 ### ::UpdateClientInfo() - CS Host Name set to _Disabled_servernameFQDN to avoid any contact from this client to CS -
Check for a matching entry with same Date/Time stamp in the CVD.log file on the CommServe:
4532 92c 04/25 15:08:33 ### EvSANVolMgr::DiscoverFLRSupportedApps() - CVSession::attach() to [ipaddress*CLHostName*8400*8402] returned error 9000026
 4532 92c 04/25 15:08:33 ### ::sendResponse() - FAILED [Failed to connect to remote host [ipaddress*CLHostName*8400*8402].]
 3196 bc0 04/25 16:17:23 ### [CVD ] ** CVD_CVSESSION_ERROR: RemoteHost=ipaddress? Error replying to attach on socket: 900002a=[CVSession::authenticateServer]:Remote system [ipaddress]. Password received from client did not match the database password for that client - authentication failed.
-
Symptom
Error while loading shared libraries.
Solution
On Linux clients, the below error appears when we run any process or service:
<process name>: error while loading shared libraries: <lib>.so: cannot enable executable stack as shared object requires: Permission deniedFor example,
#./ifind_scan -getmnt -all
 ./ifind_scan: error while loading shared libraries: libCvOnTap.so: cannot enable executable stack as shared object requires: Permission denied
As a workaround, do the following steps:
-
Check if ASL (Atomic Secured Linux) is configured on client.
#uname –r
 2.6.32.59-17.art.i686.PAE
.art indicates that ASL is configured on the client.
-
Check for the presence of the below logs in /var/log/messages file.
May 24 22:01:08 rhel6 kernel: Aborting core May 24 22:01:08 rhel6 kernel: PAX: execution attempt in: <anonymous mapping>, bfc46000-bfc5b000 bffeb000 May 24 22:01:08 rhel6 kernel: PAX: terminating task: /usr/libexec/paxtest/mprotstack(mprotstack):13201, uid/euid: 0/0, PC: bfc5acf4, SP: bfc5acdc May 24 22:01:08 rhel6 kernel: PAX: bytes at PC: c3 1a a3 ae 2b ac 9f ae f4 0f 9f ae 00 00 00 00 f4 0f 9f ae -
Run the following command.
chpax –ps ../iDataAgent/<process/service>
E.g.:
#chpax –ps /opt/commvault/iDataAgent/ifind_scan
-