Configuring IntelliSnap Backup for the Client
-
From the CommCell Browser, expand Client Computers | client.
-
Right-click the client, and then select Properties.
The Client Computer Properties dialog box appears.
-
Click Advanced.
The Advanced Client Properties dialog box appears.
-
Select the Enable IntelliSnap check box to enable IntelliSnap backup for the client, and then click OK.
-
Click OK.
Configuring a Subclient
-
From the CommCell Browser, expand Client Computers | client | Notes Database | instance.
-
Right-click the default subclient, and then click Properties.
The Subclient Properties dialog box appears.
-
Click the Storage Device tab, and then select the appropriate storage policy from the Storage Policy list.
-
Click the IntelliSnap Operations tab, and then select the IntelliSnap check box.
-
From the Available Snap Engines list, select the engine that matches your snapshot type. For a list of available engines for your array, see Snapshot Engine.
-
Click the Content tab, and then select a database from the Database List.
-
Click OK.
Creating User-Defined Subclients
By default, all databases are automatically assigned to the default subclient. However, you can divide databases across one or more user-defined subclients to leverage your backups efficiently.
-
From the CommCell Browser, right-click the Notes Database agent on the source client, and click All Tasks | New Subclient.
-
Enter a name in the Subclient Name field.
-
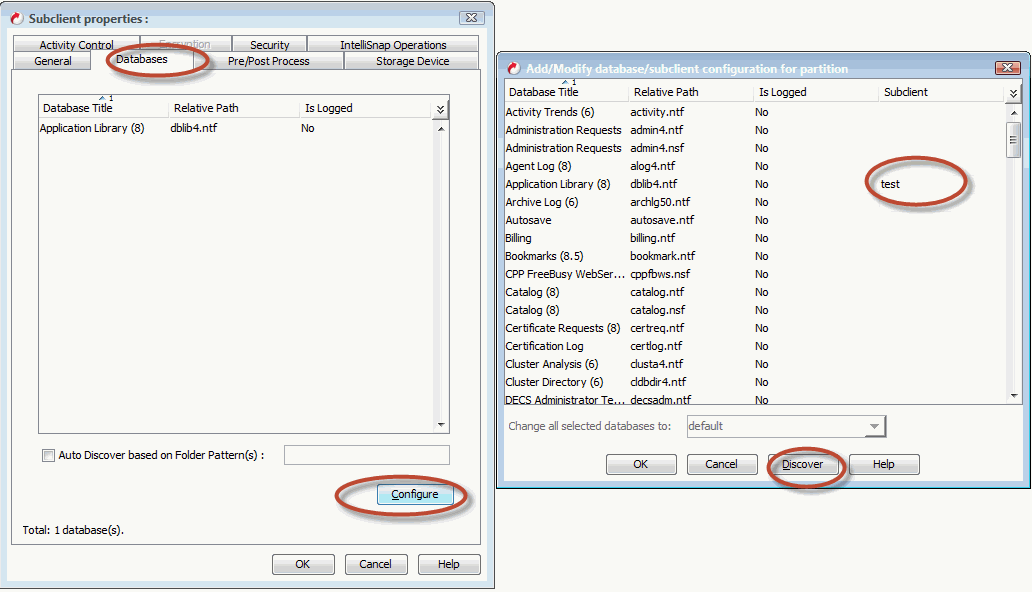
Click the Databases tab.
-
Click Configure.
-
In the Add/Modify Databases/subclient configuration for partition dialog box click the Discover button.
-
Select the discovered database and click the Subclient list to assign the database to the subclient.
-
Click OK.
-
Click the Storage Device tab and select a Storage Policy from the available list.
-
Click OK.
Adding IBM Domino Partition
During installation of the IBM Domino iDataAgent, all the Domino Sever partitions are detected and configured. However, if you have multiple partitions, you may add any of the detected partitions to the system during the install or add them manually later. When adding or installing partitions, the system establishes a default configuration which for Notes Database consists of a default subclient and a transaction logs subclient for the partition.
Follow the steps given below to manually add IBM Domino partition:
-
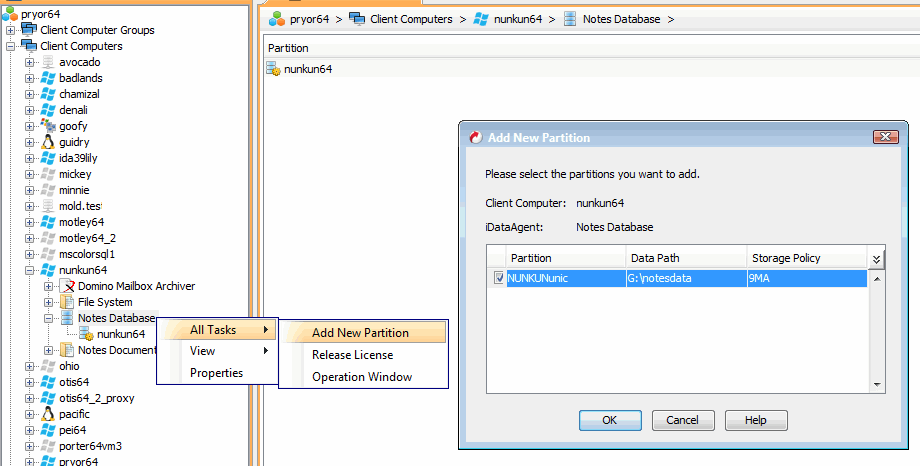
From the CommCell Browser, navigate to Client Computers | <Client>| Notes Database.
-
Right-click the Notes Database, point at All Tasks and then click Add New Partition.
The system discovers all new partitions, and displays them in the Add New Partition dialog box.
-
Select the check box located to the left of the partition name to add the partition.
-
Click Ok.
-
Select the appropriate Backup Schedule Option:
-
To disregard backup schedules, click the Do Not Schedule radio button and click OK.
-
To link the new partition with a pre-defined policy, click the Associate to Schedule Policy radio button, choose from the list, and click OK to exit the screen.
-
To establish a backup schedule for the new partition, click the Schedule radio button, and click OK.
-
Configuring Folder Based Auto Discovery
Auto discovery can be set by specifying the folder patterns. Based on the folder patterns specified, the databases are discovered. You can apply regular expressions or wildcards patterns to filter folders and enable data protection for specific folder types.
For example you may want:
-
To include all the databases in a folder, enter a single asterisk (*) at the end of the folder path: mail\NotesVolume1\*
-
To include all the databases in all the sub-folders, enter two asterisks (**) at the end of the folder path: mail\NotesVolume2\**
-
To add multiple regular expressions, separate each expression with a semi-colon (;):mail\NotesVolume1\*;mail\NotesVolume2\*
-
Follow the steps given below to set auto discovery of databases:
-
From the CommCell Browser, navigate to Client Computers | <Client>| Notes Database | Partition.
-
Right-click the subclient to which you want to add databases, and then click Properties.
-
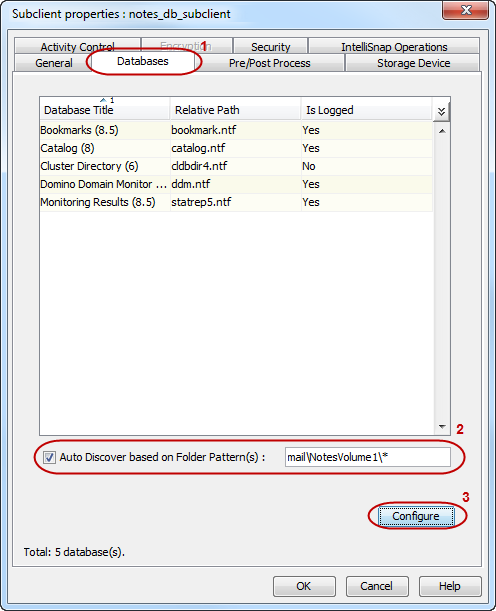
Click the Databases tab.
-
Select the Auto Discover Based on Folder Pattern(s) checkbox.
-
Enter a folder pattern in regular expressions to discover databases that you want to include in the subclient.
-
Click Configure.
-
In the Add/Modify Databases/subclient configuration for partition dialog box click the Discover button.
-
Select the discovered database and click the Subclient list to assign the database to the subclient.
-
Click Ok.
-
Click Ok to complete the configuration.
Modifying an Agent or Subclient
There are several configurable properties available for your agent that can be modified from the agent or subclient level as per need.
The following table describes the properties that can configured from the agent and subclient levels.
|
Option |
Description |
Related Topics |
|
Change Storage Policies |
You can modify the storage policies in any of the following situations:
You can change the storage policies from the subclient level.
|
Refer to Storage Policies. |
|
Rename a Subclient |
You can rename a subclient:
|
|
|
Data Transfer Options |
You can configure the available resources for transferring data secured by data protection operations from the subclient level. This includes the following:
You can configure the data transfer options.
|
Refer to Data Compression and Network Bandwidth Throttling. |
|
View Data Paths |
You can view the data paths associated with the primary storage policy copy of the selected storage policy or incremental storage policy. You can also modify the data paths including their priority from the subclient level.
|
|
|
Configure a Subclient for Pre and Post Processing of Data Protection |
You can add, modify or view Pre-processes and Post-processes for the subclient. These are batch files or shell scripts that you can run before or after certain job phases.
|
Refer to Pre-processes and Post-processes. |
|
Configure Activity Control |
You can enable backup and restore operations from the agent and subclient level. However, you can enable restore operations only from the agent level.
|
Refer to Activity Control. |
|
Configure User Security |
You can configure user security from the agent or subclient level. You can perform the following functions:
|
Refer to User Administration and Security. |
|
Enable and Disable Data Encryption |
When you configure encryption at the client level, it is configured automatically for all the subclients associated with all the agents installed on that client. If you want to disable or change the encryption at the subclient level, follow the steps given below:
|
Refer to Data Encryption. |
|
View Software Version |
At the client level, the Version tab of the Properties dialog box displays the software version of the component.
|
|
|
CommCell Configuration Report |
The CommCell Configuration Report provides the properties of the CommServe, MediaAgents, clients, agents, subclients, and storage policies within the CommCell based on the selected filter criteria.
|
Refer to CommCell Configuration. |
Deleting an Agent or Subclient
The following sections describe the steps involved in deleting an agent or subclient.
When you delete an instance or backupset, the associated data is logically deleted and you can no longer access the corresponding data from CommCell Console for recovery purposes.
For information on how to recover data if you accidentally delete an entity, see Recovering Data Associated with Deleted Clients and Storage Policies.
Deleting an Agent
You need to uninstall or DeConfigure the agent software from the client computer before deleting from CommCell Browser. After you delete the client software, you can either leave the corresponding data intact for appropriate action or you can remove the data immediately. If you choose to remove the data immediately, you must delete the agent from the CommCell Browser. If you delete the agent, all of the agent's data is irretrievably lost.
-
You cannot delete an agent while operations for that agent are running.
-
From the CommCell Browser, navigate to Client Computers | <Client>.
-
Right-click the <Agent>, and then click Delete.
-
A confirmation message is displayed with the following message:
This operation will permanently delete the data backed up from this level and it cannot be restored.
-
Click OK to continue with the deletion operation or click No to abort the deletion.
Deleting a Subclient
Consider the following before deleting a subclient:
-
You cannot delete a default subclient.
-
Schedules associated with the subclient are also automatically deleted.
Procedure
-
From the CommCell Browser, navigate to Client Computers > virtualization_client > agent > backup_set.
-
Right-click the subclient that you want to delete, and then click Delete.
-
A confirmation message is displayed, asking if you want to delete the subclient.
Click No to cancel the deletion and retain the subclient, or click Yes to continue the deletion.