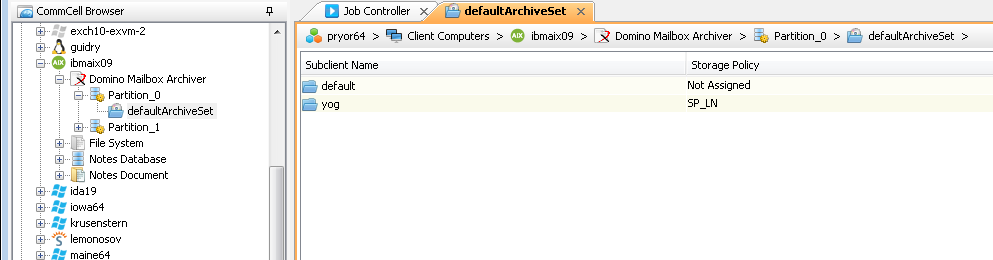
Understanding the CommCell Console
The Domino Mailbox Archiver uses the following logical entities to manage archive and recovery operations from the CommCell Console.
Agent
Defines the Domino to be archived.
Partition
Defines an instance of the agent.
Archive Set
Facilitates automatic discovery of mailboxes.
Subclient
Defines the mailboxes to be archived.
Configuring Operation Modes
The Domino Mailbox Archiver Agents provides three modes which further direct how archive and recovery operations behave for each subclient. These modes can be selected using the General tab of the Subclient Properties dialog box and should be configured prior to running the first archive operation.
Note
It is recommended that you do not switch a subclient from one mode to another after the first archive operation is performed, as this may return unexpected results during data recovery operations.
If you wish to perform operations for the same subclient content using different modes, it is recommended that you:
-
Create separate backup sets that will be devoted exclusively to one operation mode
-
Create a subclient in each backup set with the desired operation mode selected
-
Define the appropriate content for each subclient, ensuring no other backup sets contain subclients with the same content and operation mode defined
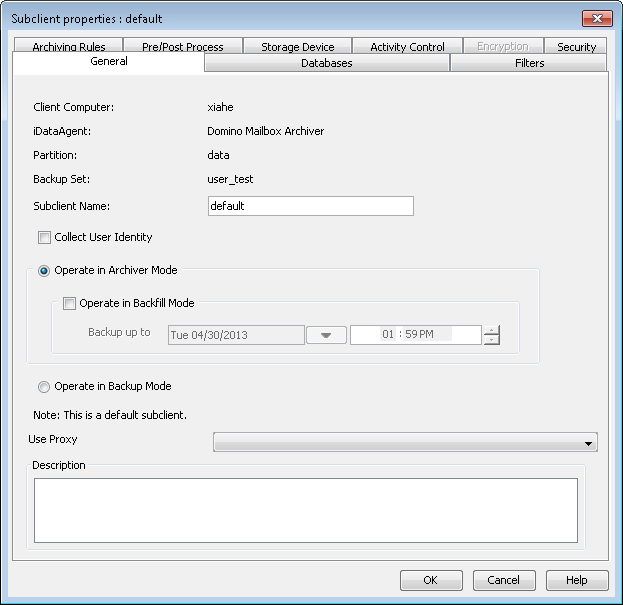
Archiver Mode
This mode is selected by default for all subclients. Domino Mailbox Archiver Agent will perform archive operations based on the rules established in the Archive Rules tab of the Subclient Properties dialog box.
-
From the CommCell Browser, navigate to Client Computers | <Client> | Archive Set.
-
Right-click the Subclient, and then click Properties.
-
Select the Operate in Archiver Mode tab.
-
Click OK.
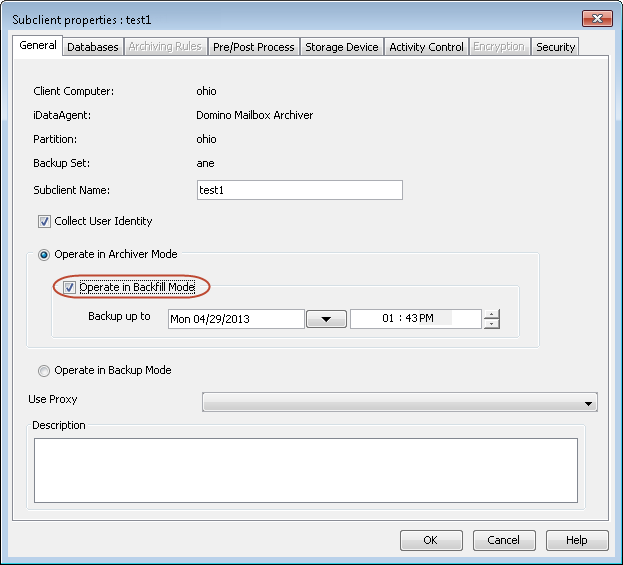
Backfill Mode
This mode further refines the Archiver Mode option and is designed for compliance archiving operations only.
When selected, this mode allows you to back up and populate the content index with messages that were sent and/or delivered before the point-in-time at which archives of the journaling mailbox begin. This is useful if you are newly using the Domino Mailbox Archiver Agent for compliance archiving and want to ensure all messages that predate the defining of the journal mailbox are archived along with the journal mailbox content. The Archive Rules tab of the Subclient Properties dialog box is disabled and the archive operation runs as a full backup with no stubbing phase.
Note
You cannot discover a journal mailbox. To protect the emails in the database, on the Database tab, go to Content, and then click Add Mailbox to enter the journal mailbox name.
Follow these steps to select the Backfill mode:
-
From the CommCell Browser, navigate to Client Computers | <Client> | Archive Set.
-
Right-click the Subclient, and then click Properties.
-
Select the Operate in Backfill Mode tab.
-
Click OK.
Once the initial archive has occurred using this mode and you are ready to begin using the journaling mailbox for further archive operations, you must perform the following steps:
-
Define the journal mailbox as the content for the subclient. Note that the journaling mailbox should be configured as Unmanaged and Non-filtered in the Domino.
-
Unselect this mode in the General tab of the Subclient Properties dialog box.
-
Select the Do Not Create Stub option in the Archive Rules | Stub Rule tab of the Subclient Properties dialog box.
This mode only needs to be used once, as all subsequent archives will be conducted through the journaling mailbox. Using this mode more than once for the same subclient may return unexpected results (such as duplicate data) during data recovery operations.
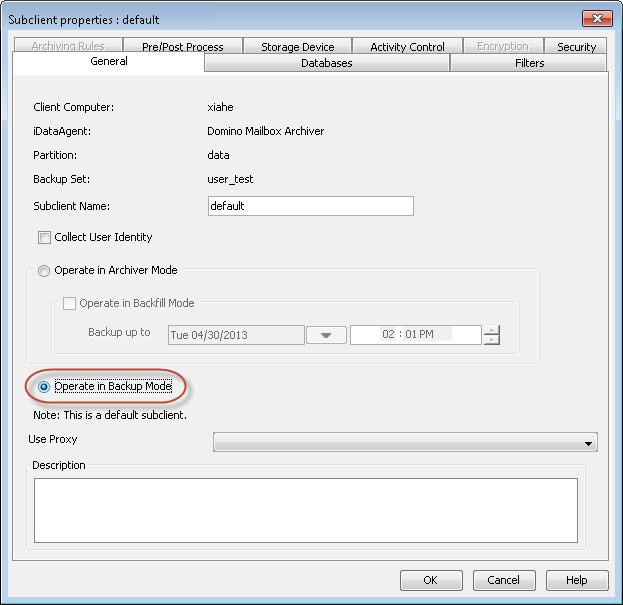
Backup Mode
This mode is designed for content indexing purposes only. It allows full, incremental, differential, or synthetic full backups of mailbox databases using the Domino Mailbox Archiver Agent. The Archive Rules tab of the Subclient Properties dialog box is disabled, archive operations run with no stubbing phase, and all mailbox data (with the exception of design documents) is backed up in a similar fashion to the Notes Document iDataAgent.
For Backup Mode, follow the steps:
-
From the CommCell Browser, navigate to Client Computers | <Client> | Archive Set.
-
Right-click the Subclient, and then click Properties.
-
Select the Operate in Backup Mode tab.
-
Click OK.
Data backed up using Backup Mode will be retained according to the Archiver Days Retention criteria. Regular Days/Cycles Retention criteria will not be honored.
See Data Aging for more information on retention criteria.
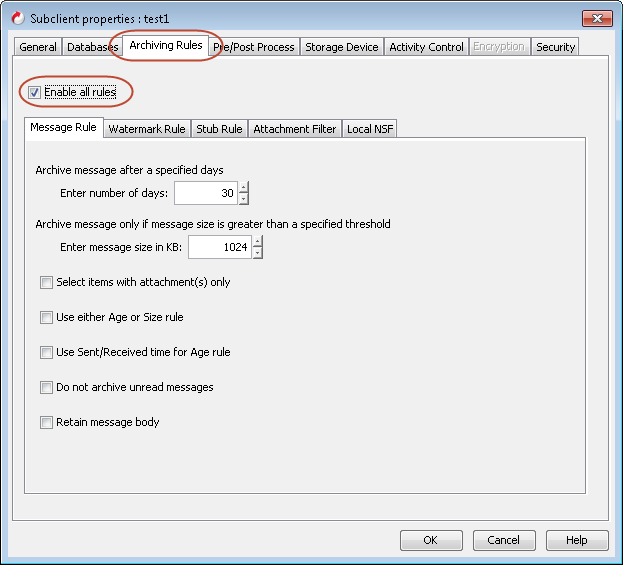
Configuring Archiving Rules
Archiving rules specify the criteria for the type of data to be archived. Messages that meet this criteria are rendered available for archiving if they satisfy any or all the archiving rules.
Based on Message Properties
You can set rules to archive messages based on the messages properties. All the messages matching with this criteria will be archived.
-
From the CommCell Browser, navigate to Client Computers | <Client> | Archive Set.
-
Right-click the Subclient, and then click Properties.
-
Select the Archiving Rules tab.
-
Select the Enable all rules check box.
-
In the Archive message after specified days box, type or select the number of days old that a message must be in order for the message to be archived.
-
In the Archive message only if size is greater than box, type or select the size a message must be of in order for the message to be archived
-
You can select one or more from the following options:
-
Select the Select items with attachment only check box to archive the messages that have attachments.
-
Select Use either Age or Size rule check box check box to archive if either the Age or Size of the message/item matches the respective rule.
-
Select the Use Sent/Received time for Age rule check box.
-
Select the Do not archive unread messages check box.
-
Select the Retain Message Body check box if you do not want the body of the message to be removed during the stubbing process.
-
-
Click OK.
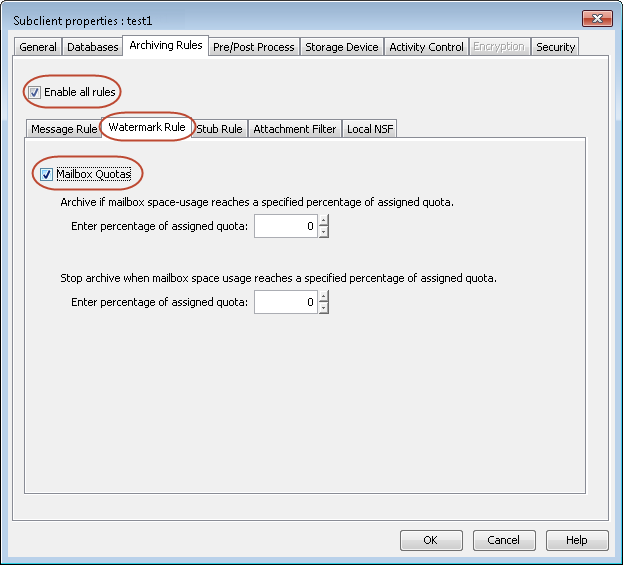
Based on Mailbox Space Quota
You can set rules to archive based on a specified amount of used disk space on the database which hosts this mailbox. You can also establish a mailbox quota rule, which will archive messages when the mailbox has exceeded the specified threshold.
-
From the CommCell Browser, navigate to Client Computers | <Client> | Archive Set.
-
Right-click the Subclient, and then click Properties.
-
Select the Archiving Rules tab.
-
Select the Enable all rules check box.
-
Click the Watermark Rule tab.
-
Select the Mailbox Quotas check box.
-
In the Archive if size of mailbox reaches box, type or select the mailbox size high watermark value.
-
In the Stop archive when mailbox reaches box, type or select the mailbox size low watermark value.
-
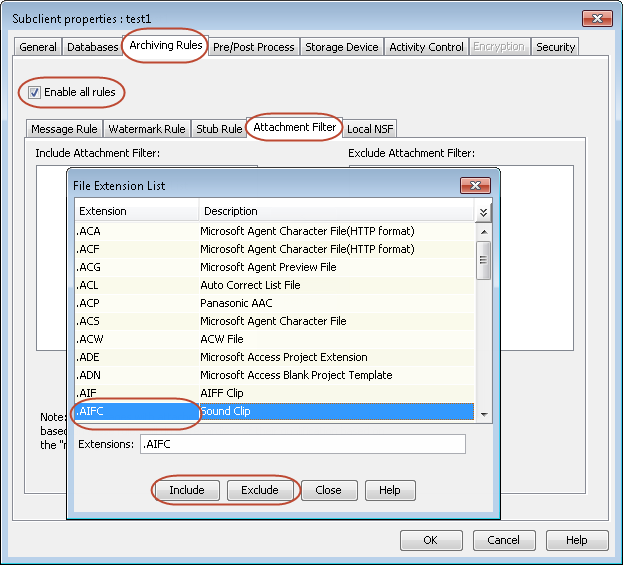
Based on Attachments
You can set rules to archive based on a specified amount of used disk space on the database which hosts this mailbox. You can also establish a mailbox quota rule, which will archive messages when the mailbox has exceeded the specified threshold.
-
From the CommCell Browser, navigate to Client Computers | <Client> | Archive Set.
-
Right-click the Subclient, and then click Properties.
-
Select the Archiving Rules tab.
-
Select the Enable all rules check box.
-
Select the Attachment Filter tab.
-
Click Include or Exclude to include or exclude file extensions on the list.
-
Click Close.
-
Click OK.
Configuring Retention Rules for Stubs
You can specify rules to archive messages based on stub properties. All the messages that match the criteria that you specify are archived.
-
From the CommCell Browser, expand Client Computers > client > Archive Set.
-
Right-click a subclient, and then click Properties.
The Subclient Properties dialog box appears.
-
On the Archiving Rules tab, select the Enable all rules check box.
-
To allow stubs to exist in a mailbox or a public folder until the media retention time has passed and data aging has run, on the Stub Rule tab, click Preserve stubs until the media has been pruned.
-
To set the number of days after which to prune stubs, in the Prune stub only after box, type or select the number of days.
-
If you do not want to create a stub after archiving, select the Do not create stub check box.
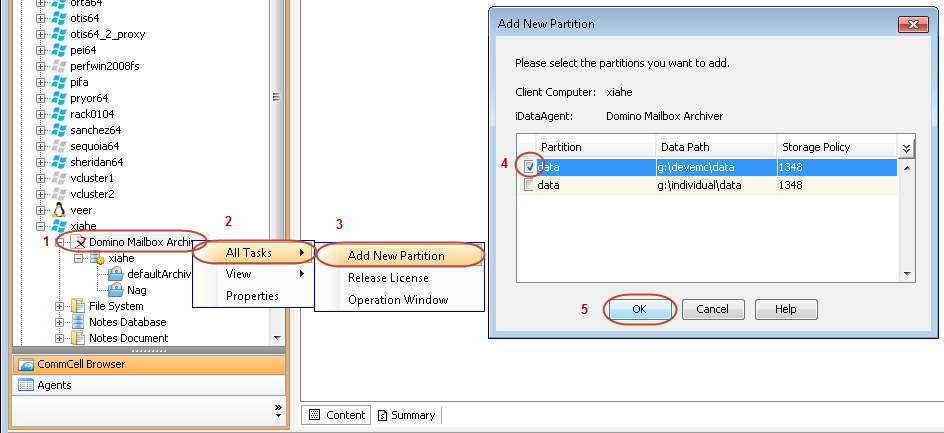
Configuring Domino Partition
On Windows
For Windows, available partitions will be automatically shown. To add partitions, follow these steps:
-
From the CommCell Browser, navigate to Client Computers | <Client> |Domino Mailbox Archiver.
-
Right-click the Domino Mailbox Archiver, and then click All Tasks | Add New Partition.
The Add New Partition dialog box appears.
-
Under the Partition column, select the partition to add and click OK.
-
Click OK.
On UNIX
Use the following steps to add partitions:
-
From the CommCell Browser, navigate to Client Computers | <Client> | Domino Mailbox Archiver.
-
Right-click the Domino Mailbox Archiver and click All Tasks | Add New Partition.
The Add New Partition dialog box appears.
-
Type a name for the new partition in the Partition Name box.
-
Enter the path for Domino Data Directory.
-
Type the Domino user name, select a storage policy, and then click OK.
-
In the Backup Schedule dialog box, select one of the options for scheduling.
-
Click OK.
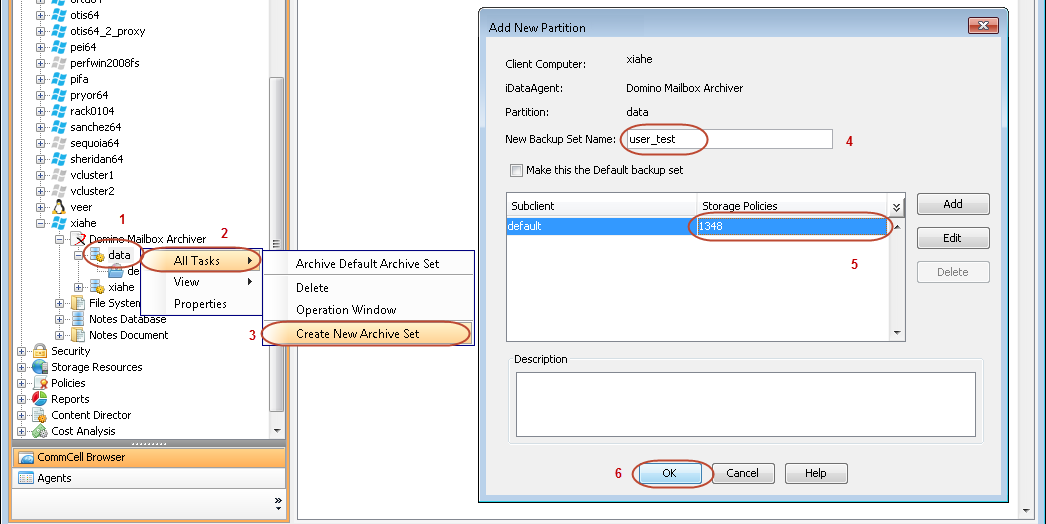
Configuring User Defined Archive Set
User defined archive sets allows for content to be specified as an external input at the time of initiating an archiving operation. To configure a user define archive set, follow the steps below:
-
From the CommCell Browser, navigate to Client Computers | <Client> | Partition.
-
Right-click the Partition, and then click All Tasks | Add New Archive Set.
-
Type a name in the New Backup Set Name box.
-
Under the Storage Policies column, select a storage policy.
-
Click OK.
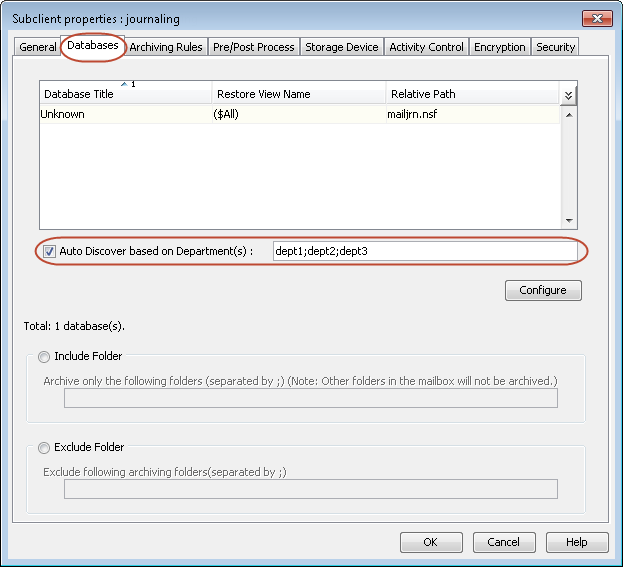
Configuring Department-Based Auto Discovery
Configuring department-based auto discovery associates a subclient to all the mailboxes that belong to a particular department. This association saves time and effort by automatically assigning new mailboxes to a subclient based on department names.
To configure department-based auto discovery, first configure the Notes Domino Directory by changing the person document to reflect the assigned departments. Then, configure the Commvault software by associating the required departments to the subclient.
-
Configure the Notes Domino Directory:
-
From the Domino Administrator, select the server that stores the Domino Directory to modify.
-
Edit the person document to assign a department to the user.
-
From the People and Groups tab, select People from the left navigation pane.
-
Double-click the Person document for the user you want to modify.
-
On the Work tab, click Department.
-
-
-
Configure the Commvault CommCell:
-
From the CommCell Browser, expand Client Computers | Client | Archive Set.
-
Right-click the Subclient, and then click Properties.
-
On the Databases tab, select the Auto Discover based on Department(s) check box.
-
Provide department names.
In case of multiple department names, separate the departments with semicolon (;).
-
Click OK.
-
-
Run an archive backup job.
All user mailboxes with the specified department names are assigned to the subclient.
Note
For the default subclient, filters take precedence over department. For example, if a mailbox matches the department name and it is part of filters, that mailbox will not be added to the subclient.
Department names are case sensitive.
Activating NSF File Archiving on a User-Defined Subclient
To specify the archiving of NSF files and enable this subclient of the Domino Mailbox Archiver Agent, first create the local NSF folders and database and then associate them to the local NSF location.
Creating the NSF Folders and Database
Click to browse for the root folder where all the NSF directories are located, then:
-
Create a new folder, e.g., “localnsf” under the domino data path.
-
Create a subfolder of "localnsf" named exactly the same as the user name.
-
Create a new database in the subfolder created in step 2.
Note
We recommended you to use the same database template, preferably the mail template, for all the NSF files.
Associate Folders to the Local NSF location
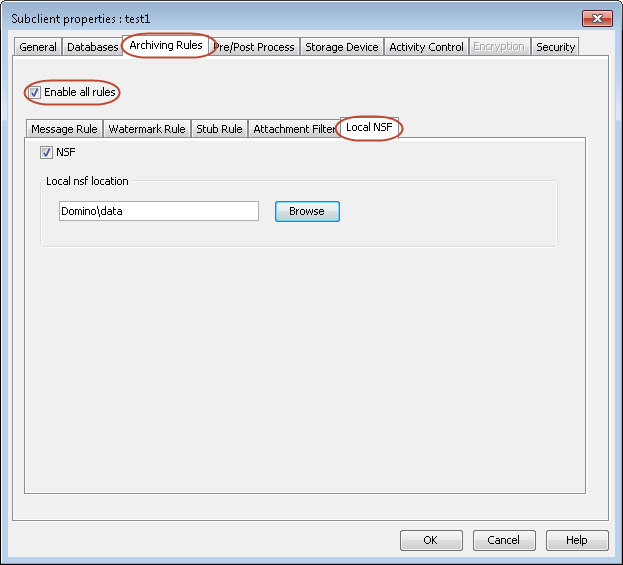
Follow the steps below to activate archiving for .nsf files on a subclient.
-
In the CommCell Browser, expand Client Computers | <Client Name> | Domino Mailbox Archiver | <Partition Name> | <Archive Set Name>.
-
In the Archive Set tab, right-click the name of a user-defined subclient, and then click Properties.
-
In the Subclient Properties dialog box, click the Archiving Rules tab, and then click the Local NSF sub-tab.
-
Select NSF.
-
In the Browse box, enter the location of the folder that contains all of the user mailbox folders where NSF directories reside.
You must specify full path of the folder that contains all user mailbox folders so that all NSF directories are included in the archiving process.
-
Click OK.
Note: Local NSF files cannot be archived when using a proxy client.
Archiving Specific Messages from Mailboxes
To archive messages of specific mailboxes (including subfolders), follow the steps:
Note
A folder selected for inclusion automatically includes all the subfolders within that folder.
-
From the CommCell Browser, navigate to Client Computers | <Client> | Archive Set.
-
Right-click the Subclient, and then click Properties.
-
Click the Databases tab.
-
Click Include Folder and type the folder name as it appears in the Restore View Name list. Multiple folders can be included, each separated by a comma or semicolon.
-
Click OK.
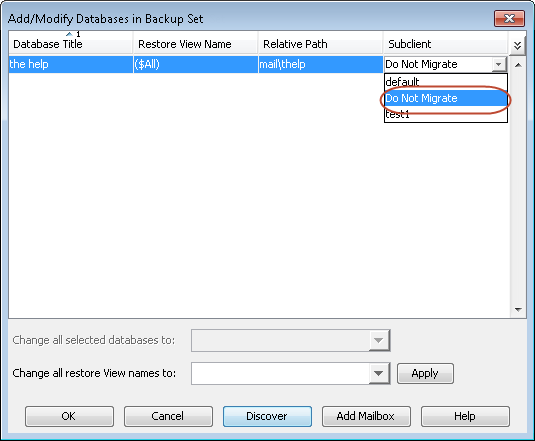
Excluding Specific Mailboxes from Archiving
By default, the system creates a Do Not Archive subclient. You can assign mailboxes to this subclient so that they will not be archived.
-
From the CommCell Browser, navigate to Client Computers | <Client> | Archive Set.
-
Right-click the Subclient, and then click Properties.
-
Click the Databases tab.
-
Click Configure.
-
Click Discover to reveal all mailboxes.
-
Under the Subclient column, select Do Not Migrate.
Alternatively, you can click the desired mailbox, and select Do Not Migrate from the Change all selected mailboxes to box.
-
Click OK.
-
Click OK.
Excluding Specific Documents from Archiving
To exclude documents based on their type (e.g. memo, appointment, task). Once a document is excluded by this key, it should not be archived.
-
From the CommCell Browser, navigate to Client Computers.
-
Right-click <Client> and then click Properties.
-
Click Advanced.
-
Select Additional Settings tab.
-
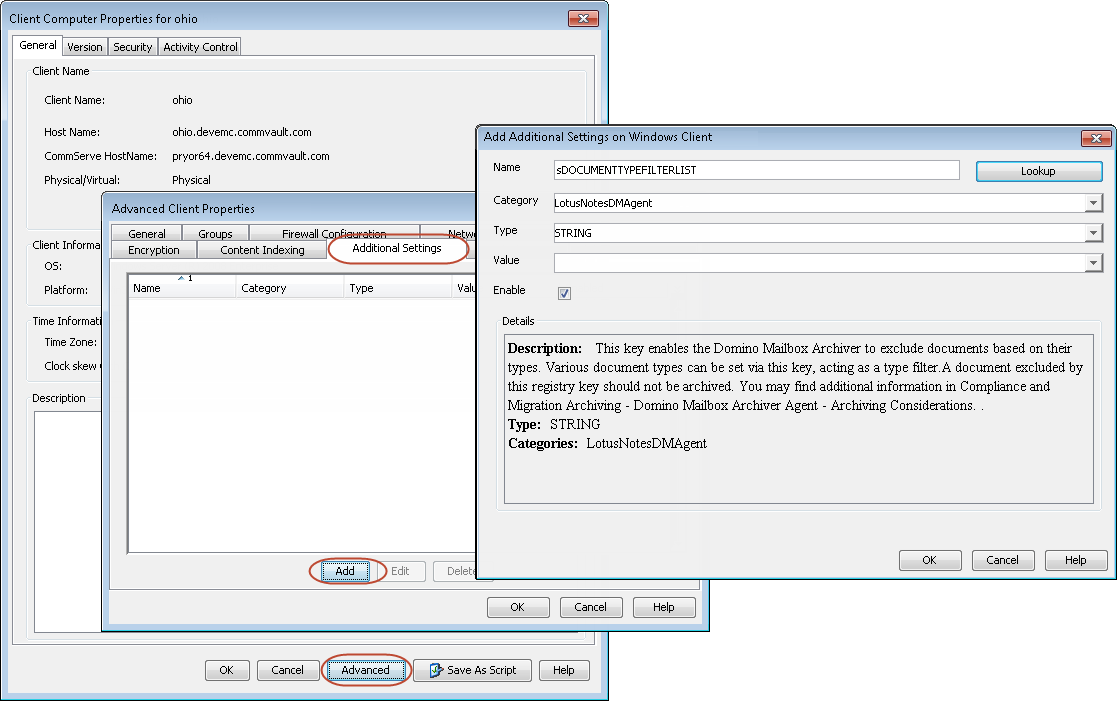
Click Add.
-
In the Name box, type sDOCUMENTTYPEFILTERLIST. The Category and Type details will be automatically populated.
Alternatively, you can click Lookup and search for the additional setting using the Find box.
-
In the Value box, type the list for exclusion such as Memo, Appointment, Task, and so on. Use semicolon to type multiple values.
-
Click OK.
Excluding Files and Paths from Archiving
Use filters to exclude certain files and paths from your archive operation. These files and paths are not required for a successful archive operation and are not integral to the operation of the system or application. Filters minimize protected storage and prevents unnecessary folders (such as, junk and spam) from being archived.
You can use regular expressions to filter files or folders. For more information, see Content, Filters, and Regular Expressions.
Follow the steps given below to exclude files and paths from archiving using filters:
-
From the CommCell Browser, navigate to Client Computers | <Client> | Notes Document | <Partition> | defaultArchiveSet
-
Right-click the default subclient, and then click Properties.
-
From the Subclient Properties dialog box, click the Filters tab.
-
Click Browse, and then select the file, folder, or directory that you want to exclude from archive operations. Click Add.
Alternatively, click Add, and then type the path to files and folders that you want to exclude from archive operations. Click OK.
-
Click OK.
Notes:
-
You can use filters only on a default subclient. Filters cannot be used on user-defined subclients.
-
Do not run manual discovery on a default subclient if you have configured filters on it. Else, filters will not work.
-
A filter pattern (or database name) should not already be associated with any other subclient. If you associate a database to any subclient, and then provide the same database name as a filter pattern, the filter will not be honored.
Configuring Recovery of Multiple Files from Stubs
Stub recall history can be turned on with following the steps:
-
From the CommCell Browser, navigate to Client Computers.
-
Right-click <Client> and then click Properties.
-
Click Advanced.
-
Select Additional Settings tab.
-
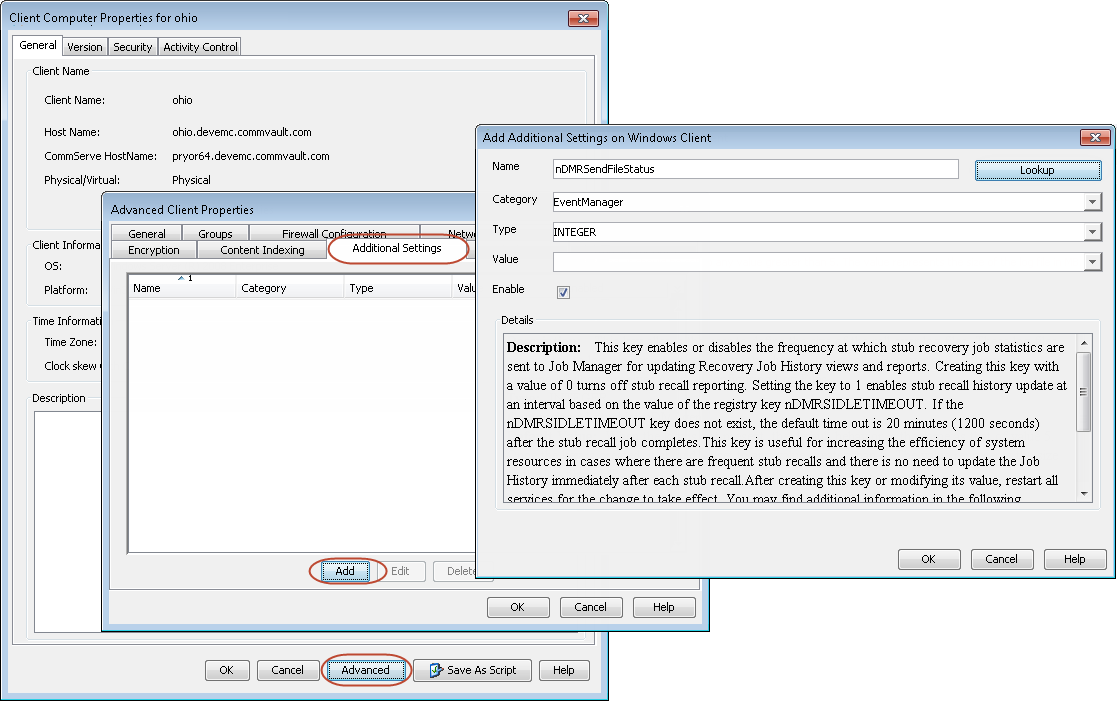
Click Add.
-
In the Name box, type nDMRSendFileStatus. The Category and Type details will be automatically populated.
Alternatively, you can click Lookup and search for the additional setting using the Find box.
-
In the Value box, type 1.
-
Click OK.
Configuring Log Files
During persistent recovery job log files are created. These log files contain details of all the stubs that were recovered and can be viewed at any point of time. By default 5 log files are created of 5 MB each. Every time a log file reaches 5 MB worth of data a new file is created. The newly created log file will have "_n" appended to the original file name with cvlnDMHook.log_1 being the latest rolled log file. In order to increase the size of each log file and also the number of log files that can be created follow the steps given below:
Windows
-
From the CommCell Browser, navigate to Client Computers.
-
Right-click <Client> and then click Properties.
-
Click Advanced.
-
Select Additional Settings tab.
-
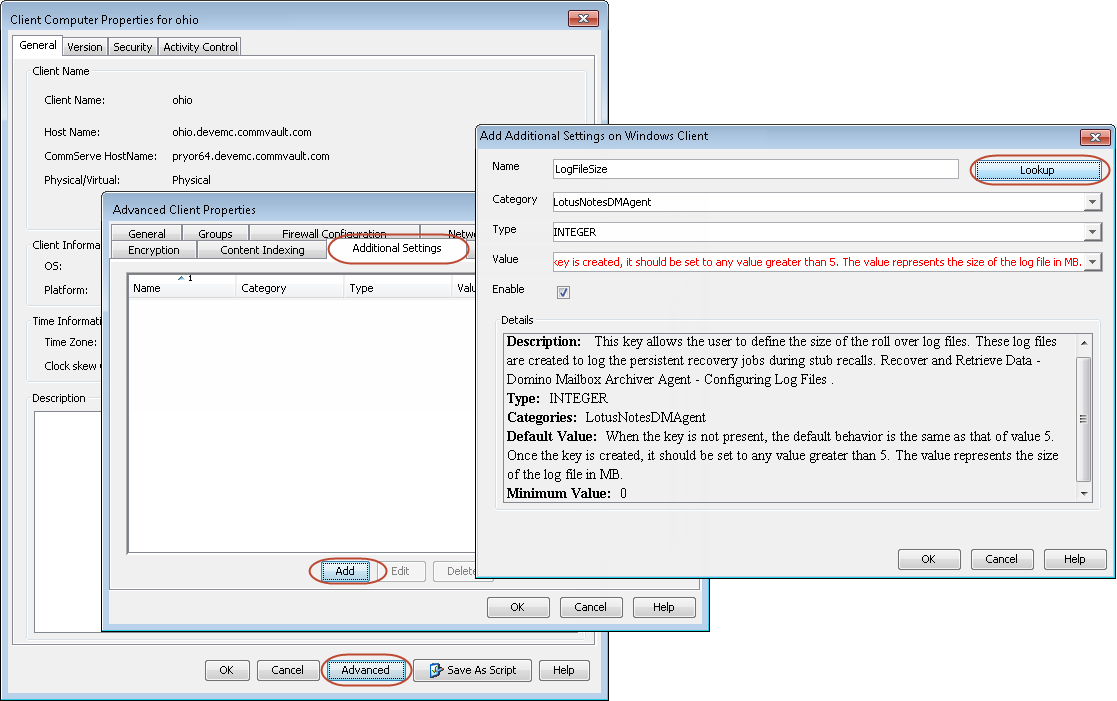
Click Add.
-
In the Name box, type LogFileSize. The Category and Type details will be automatically populated.
Alternatively, you can click Lookup and search for the additional setting using the Find box.
-
In the Value box, type a value greater than 5.
-
Click OK.
-
Click Add.
-
In the Name box, type NumLogFiles. The Category and Type details will be automatically populated.
Alternatively, you can click Lookup and search for the additional setting using the Find box.
-
In the Value box, type a value greater than 5.
-
Click OK.
-
Click OK.
UNIX
Users on Unix platform can increase the size of each log file and also the number of log files by adding the following to the notes.ini file:
CvLogFileSize=n
CvNumLogFiles=n
Where n is any numeric value greater than 5.
Configuring Persistent Pipeline
To change the default value of how long the persistent pipeline will stay open during idle periods of a recovery operation, use the following steps:
-
From the CommCell Browser, navigate to Client Computers.
-
Right-click <Client> and then click Properties.
-
Click Advanced.
-
Select Additional Settings tab.
-
Click Add.
-
In the Name box, type nDMRSIDLETIMEOUT. The Category and Type details will be automatically populated.
Alternatively, you can click Lookup and search for the additional setting using the Find box.
-
In the Value box, type a value such as 43200.
-
Click OK.
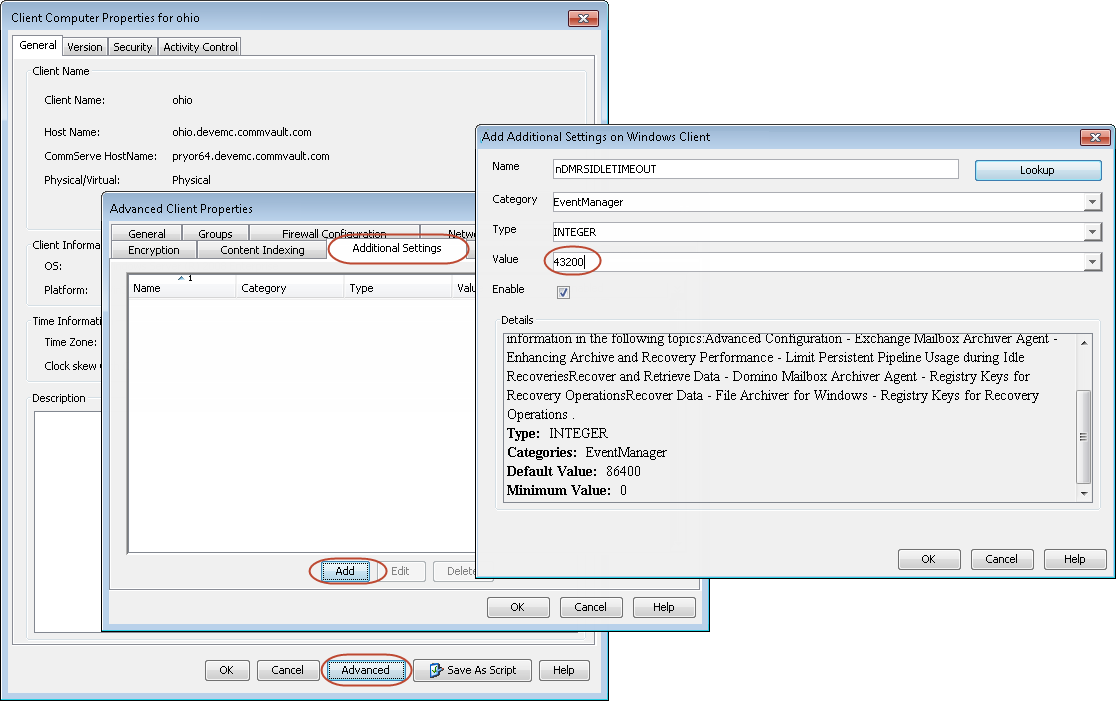
The pipeline stays persistent for 24 hours (86400 seconds) by default.
To ensure the additional setting settings take effect, it is recommended that you restart the CommVault Client Manager Service (ClMgrS).
Configuring Discovery of Replicated Database
By default, the Domino Mailbox Archiver Agent only discovers databases native to the Domino from which discovery takes place. Any replicated databases will thus need to be added manually to the subclient. Follow the steps:
-
From the CommCell Browser, navigate to Client Computers.
-
Right-click <Client> and then click Properties.
-
Click Advanced.
-
Select Additional Settings tab.
-
Click Add.
-
In the Name box, type sSCANADDITIONALDIRECTORIES. The Category and Type details will be automatically populated.
-
In the Value box, type the name of the directories relative to Domino data directory. For example, Folder1.
-
Click OK.
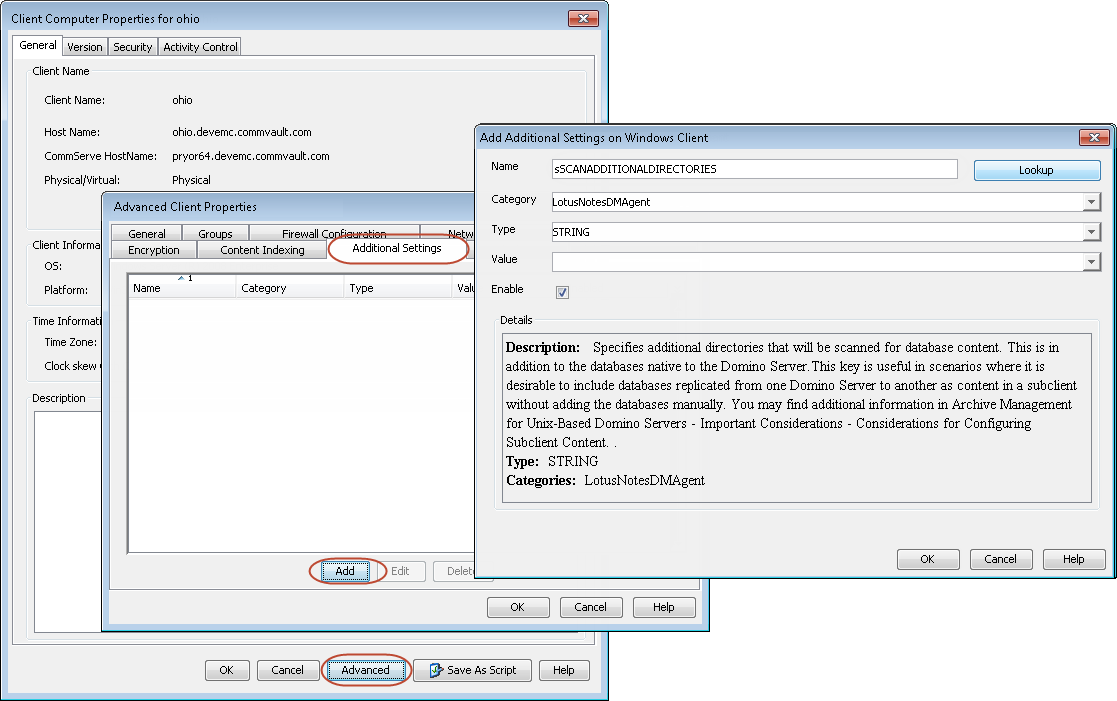
Domino Mailbox Archiver Agent will scan any directories specified in the additional setting and automatically assign any databases contained within those directories to the subclient.
Modifying an Agent, an Archive Set, or a Subclient
There are several configurable properties available for your agent that can be modified from the agent, archive set or subclient level as per your need.
The following table describes the properties that can be configured from the agent, Archive Set and subclient levels.
|
Option |
Description |
Related Topics |
|
Rename Archive Set and Subclient |
You can rename an Archive Set and subclient: Renaming Archive Sets:
|
|
|
Change Storage Policies |
You can modify the storage policies in any of the following situations:
|
Refer to Storage Policies. |
|
Data Transfer Options |
You can configure the available resources for transferring data secured by data protection operations from the subclient level. This includes the following:
|
Refer to Data Compression and Network Bandwidth Throttling. |
|
View Data Paths |
You can view the data paths associated with the primary storage policy copy of the selected storage policy or incremental storage policy. You can also modify the data paths including their priority from the subclient level.
|
|
|
Configure a Subclient for Pre and Post Processing of Data Protection |
You can add, modify or view Pre-processes and Post-processes for the subclient. These are batch files or shell scripts that you can run before or after certain job phases.
|
Refer to Pre-processes and Post-processes. |
|
Configure Activity Control |
You can enable backup and restore operations from the agent and subclient level. However, you can enable restore operations only from the agent level.
|
Refer to Activity Control. |
|
Configure User Security |
You can configure user security from the agent or subclient level. You can perform the following functions:
|
Refer to User Administration and Security. |
|
Enable and Disable Data Encryption |
When you configure encryption at the client level, it is configured automatically for all the subclients associated with all the agents installed on that client. If you want to disable or change the encryption at the subclient level, follow the steps given below:
|
Refer to Data Encryption. |
|
View Software Version |
At the client level, the Version tab of the Properties dialog box displays the software version of the component.
|
|
|
CommCell Configuration Report |
The CommCell Configuration Report provides the properties of the CommServe, MediaAgents, clients, agents, subclients, and storage policies within the CommCell based on the selected filter criteria.
|
Refer to CommCell Configuration. |
Deleting an Agent, an Archive Set or a Subclient
The following sections describe the steps involved in deleting an agent, Backup Set or subclient.
When you delete an Archive set or subclient, the associated data is logically deleted and you can no longer access the corresponding data from CommCell Console for recovery purposes.
For information on how to recover data if you accidentally delete an entity, see Recovering Data Associated with Deleted Clients and Storage Policies.
Deleting an Agent
You need to uninstall or de-configure the agent software from the client computer before deleting from CommCell Browser. After you delete the client software, you can either leave the corresponding data intact for appropriate action or you can remove the data immediately. If you choose to remove the data immediately, you must delete the agent from the CommCell Browser. If you delete the agent, all of the agent's data is irretrievably lost.
-
You cannot delete an agent while operations for that agent are running.
-
From the CommCell Browser, navigate to Client Computers | <Client>.
-
Right-click the <Agent>, and then click Delete.
-
A confirmation message is displayed with the following message:
This operation will permanently delete the data backed up from this level and it cannot be restored.
-
Click OK to continue with the deletion operation, or click No to abort the deletion.
Deleting an Archive Set
Consider the following before deleting an Archive Set:
-
You cannot delete a default Archive Set.
-
Schedules associated with the Archive Set are also automatically deleted.
-
From the CommCell Browser, navigate to Client Computers | <Client> | <Domino Mailbox Archiver>.
-
Right-click the <Archive Set>, Point to All Tasks, and then click Delete.
-
A confirmation message is displayed, asking if you want to delete the Archive Set.
Click No to cancel the deletion and retain the Archive, or click Yes to continue the deletion.
Deleting a Subclient
Consider the following before deleting a subclient:
-
You cannot delete a default subclient.
-
Schedules associated with the subclient are also automatically deleted.
-
From the CommCell Browser, navigate to Client Computers | <Client> | <Domino Mailbox Archiver>|<Archive Set>.
-
Right-click the <subclient> that you want to delete, and then click Delete.
-
A confirmation message is displayed, asking if you want to delete the subclient.
Click No to cancel the deletion and retain the subclient, or click Yes to continue the deletion.