View Status of Data Verification Job
Once a data verification operation is run, you can view the data verification status of the jobs. The following table describes the data verification status that is displayed in the Data Verification Status column:
|
Status |
When Displayed |
|---|---|
|
Not Picked |
A job has not been picked for a data verification operation. |
|
Picked for Verification |
A job has been picked for a data verification operation. |
|
Successful |
A data verification operation ran and successfully verified this job. |
|
Failed |
A data verification operation ran and failed to verify this job. |
|
Partial |
A data verification operation ran and has not yet completed verifying this job. |
-
From the CommCell Browser, expand Policies | Storage Policies | <Storage Policy>
-
Right-click the appropriate storage policy copy for which you verified the data, point to View and then click Jobs.
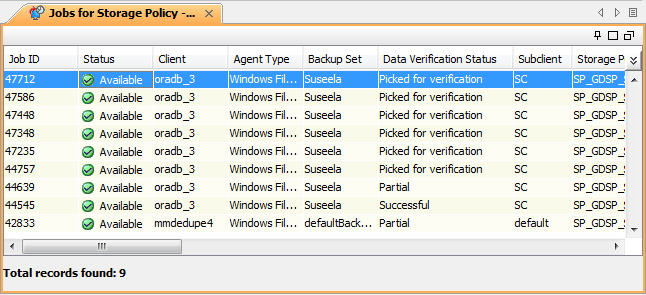
Once a data verification operation is run, the status of the data verification, the date and time of the operation is displayed in the Data Verification Status and Last Verified On column.
If this copy has already been configured for data verification, then individual backups do not have to be selected on the copy.
Pick a Job for Data Verification
You can select individual or multiple jobs to be verified during a data verification operation from the Jobs for Storage Policy Copy window. You can verify jobs on all types of storage policies. The example below is for an iDataAgent Backup storage policy.
-
From the CommCell Browser, expand Policies | Storage Policies | <Storage Policy>
-
Right click the <Storage Policy Copy> from the right pane for which you want to verify the jobs, point to View and then click Jobs.
-
From the Job Filter for Storage Policy dialog box, select the necessary options.
-
Click OK.
-
From the Jobs for Storage Policy Copy windows, right-click a job, then click Pick for Data Verification.
To select multiple jobs, hold down the Ctrl key and click on each job that you want to select.
-
If you then decide that you do not want this job to be verified during a data verification operation, right-click the job and click Do Not Verify Data.
-
Once a job is picked, its status in the Data Verification Status column is displayed as Picked for Verification.
Manage Data Verification Operation
Use the following steps to start a data verification operation.
Tip
During the first phase of data verification operation, data pruning is disabled. However, if a data verification job and a data aging job run at the same time, then the data verification job might complete with chunk errors.
To avoid this problem, schedule data aging operations and data verification operations to run at different times. For example, the data aging job is by default scheduled to run every day at 12:00 pm. You can schedule the data verification operations to run at 5:00 AM every day.
-
From the CommCell Browser, expand Policies | Storage Policies | <Storage Policy>
-
Right-click the appropriate storage policy for which you want to verify the data, point to All Tasks and then click Run Data Verification.
-
From the Data Verification dialog box, select the following:
-
From the Select Source MediaAgent list, select MediaAgent.
-
In Copy Selection area, by default All Copies option is selected.
Click Select A Copy option to select a particular copy from the list.
Note
Inactive copies are not visible in this list. To run data verification on inactive copies, you must make them active before running the data verification operation.
-
From the No of Streams to be used in parallel area, by default Allow Maximum option is selected to use maximum number of data streams during data verification.
Select the Number Of Streams option and specify value in the list box to select the number of data streams.
-
Under Jobs to Verify, by default Newly available option is selected to verify newly available jobs.
Click appropriate options to select specific jobs to verify.
-
-
Click the Job Initiation tab.
By default Immediate option is selected run the job immediately.
You can also schedule the data verification job to run automatically at a later time:
-
Click the Job Initiation tab.
-
Click Configure button.
-
In the Schedule Name box, type a name for the schedule.
-
Select options as required from the Schedule Details box.
-
Click OK to schedule data verification job.
-
-
Click OK.
Perform Data Verification Operation for Jobs Residing on Specific Media
Use the following steps to perform data verification operation for the jobs that are residing on specific media.
-
From the CommCell Browser, expand Policies | Storage Policies | <Storage Policy>
-
Right-click the appropriate storage policy for which you want to verify the data, point to All Tasks and then click Run Data Verification.
-
In the Data Verification dialog box, click Advanced button.
-
In Copy Selection area, by default All Copies option is selected.
Click Select A Copy option to select a particular copy from the list.
Note
Inactive copies are not visible in this list. To run data verification on inactive copies, you must make them active before running the data verification operation.
-
In the Advanced Data verification Options dialog box, perform the following:
-
By default, All Picked Jobs is selected.
-
Click Only Following Media.
The list of media (i.e., tape or disk) to the storage policy will be displayed under Available Media. For media residing in a disk library, it will be listed with the mount location.
Note
If you have selected a specific storage policy copy in step 4, then the media associated to selected storage policy copy will be listed under Available Media.
-
Under Available Media, select a media and click Add > button to add the media in the Selected Media.
To add multiple media, hold down the Ctrl key and click on each media that you want to select and then click Add >.
-
Click OK.
-
-
Click OK to close Data Verification for <Storage Policy> dialog box.
-
You can track the progress of the job from the Job Controller window of the CommCell Console.
All the jobs that are residing on a selected media will be verified.
Data Verification Considerations for NAS Clients
Verification for data backed up to a library attached to a file server is not supported unless the file server is a NetApp file server.
NetApp File Servers
In addition to verifying data which has been backed up to MediaAgent-attached media, data backed up to a library attached to a NetApp file server can be validated for recovery.
For data verification of backups to tapes that are attached to a NetApp file server, the following additional settings can be added on the MediaAgent running the data verification operation:
-
sSaveFileHistory: If turned on, all files in the backup will be written to the DataVerf log as they are encountered in the backup image.
Note that this can be a large amount of data. If you choose to turn this option on, increase the log file size.
-
sVerifyHeaderOnly: If turned on, the data verification operation will not run through the entire backup image. Instead, it will only process the dump header of the backup.
-
sDATAVERIFICATION_DESTINATIONDIR: If turned on, data verification can be performed for Read-Only volumes when a writable location is specified on the file server. This is useful if backing up a Snap mirror destination volume to a tape drive on the file server.
For more information on creating the additional setting, see Add or Modify an Additional Setting.
Audit Trail
Operations performed with this feature are recorded in the Audit Trail. See Audit Trail for more information.
Related Reports
Data Verification Job Summary Report
The Data Verification Job Summary Report displays information about data validation jobs that ran in the CommCell during a specified period of time. This report is useful if you need to know:
-
A list of all the storage policy copies whose data was checked for validity for auxiliary copy and data recovery operations
-
The user who set up the job
-
The start, end, and elapsed time of the job, including the time zone information
-
The failure reasons, if applicable
-
The type of retention rules that are defined for the active, failed, completed jobs, as well as those configured with Grace Days
For comprehensive information on this report refer to Data Verification Job Summary Report.
-
From the CommCell Console menu bar, click the Reports tab.
-
Click Configuration icon.
-
Under Reports, navigate to Jobs and click Jobs Summary.
-
Select Administrative Jobs and then select Data Verification.
-
Click Run.
Related Alerts
You can generate a 'Data Verification' alert for multiple conditions. Refer to Data Verification for a list of Available Alerts.
Refer to Alerts and Notifications for comprehensive information on setting up Alerts.