For libraries that support the Multipathing Failover feature, it is important to properly configure the libraries inCommvault software.
Before you Begin
-
Libraries that support the Multipathing Failover feature should be licensed and configured per the hardware vendor guidelines within the library partition. This is done through the interface provided by the hardware vendor.
Note
-
For Linux or HyperScale X MediaAgents, native inbox drivers st, sg, and ch will be in use.
-
This feature requires specific hardware vendor drivers for Windows MediaAgents.
-
-
All components in the environment should meet the hardware vendor support standards for this feature. This includes the following:
-
Fabric switches
-
FC HBAs
-
Tape library
-
-
OS driver levels and firmware levels of FC HBAs, and library and drives should be of supported revisions.
-
Fabric ports on the switch side should be administered correctly for host and tape. Switch ports that the LTO tape drives are connected to should be configured for NON-DFE support where necessary. This effects all LTO Generations 7 through current across all library hardware platforms for this feature.
-
On switches where NON-DFE cannot be set according to the documentation described in NON-DFE support, drive ports see an accumulation of fillword errors. In such situations, Fillword Mode 3 is recommended. Fillword Mode 3 is also recommended for switch ports where Host HBA ports are connected.
-
Configure the following settings:
-
DoFailoverDrivePool (value: 1)
-
nDisabledDriveDetectIntervalMin (value: 60)
-
Set the SCSI/SAN device scan interval to 1 hour. For more details, see Enabling Automatic Update of SCSI ID During Live Operations.
-
Enable the Use Native device driver for data transfer for tape media option. For more details, see Enabling Native Driver Communication to Tape Devices.
-
-
Proper zoning is required for this feature to work as expected. This feature was designed to allow support of dual fabrics between MediaAgents and the library. All failover functionality is controlled between library firmware, drive sled firmware, OS, OS driver, and Commvault software. All failover activity should be masked from the ISV.
Examples for Zoning
Following is an example for a library with two dual port drives per MediaAgent:
-
Single dual port HBAs:
HBA Port1 --> Drive1 Port1 and Drive2 Port1HBA Port2 --> Drive 1 Port2 and Drive2 Port2or
-
Two dual/single port HBAs:
HBA1 Port1 --> Drive1 Port1 and Drive2 Port1HBA2 Port1 --> Drive1 Port2 and Drive2 Port2 -
Make sure that the library is idle/ready with no media in the tape drives.
Note
Tape and disk FC should never be zoned to the same HBA port.
Procedure
-
On the ribbon in the CommCell Console, click the Storage tab, and then click Expert Storage Configuration.
-
Under Available MediaAgents, select the MediaAgents that are attached to the library and on which the library needs to be configured and then click Add >>.
-
Click OK.
Note
To configure any shared library, make sure that you select all of the MediaAgents that share the library.
-
Click OK to continue.
-
Right-click Libraries, and then click Detect/Configure Devices.
The Detect Library dialog box appears.
-
Use the default options, and then click OK.
-
When the detection process is completed, the log file appears. Note the log file contents, and then click Close.
-
A message appears that tells you to right-click the device that you want to configure. Click OK.
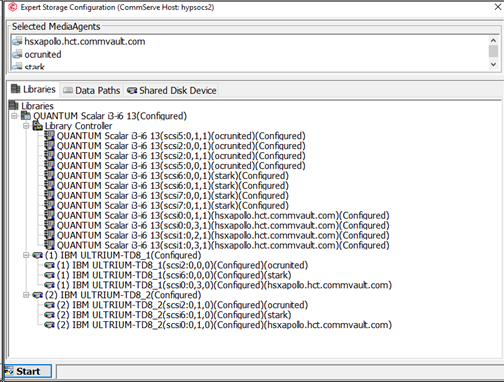
The Expert Storage Configuration dialog box should display one library instance with multiple library controller paths, and primary and alternate paths of each drive within this instance.

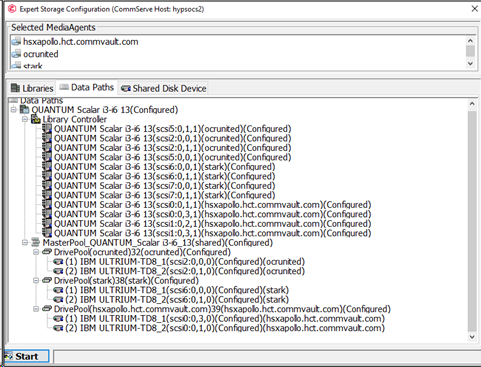
From the Data Paths tab, you would see two DrivePools for each MediaAgent.

The above image displays an HyperScale X 2.3 Linux MediaAgent and two Linux <MEDIAAGENTS> with a multipathing partition of one physical medium changer and two dual port tape drives.
Note that while using the example of a multipathing partition with one physical medium changer and two tape drives with dual fabric ports, the OS will see four medium changers (Control Path enabled on both drives) and four tape drives. Commvault ScanScsiTool output will display four library instances (one for each medium changer path) and four tape drive instances (two for each drive). This is the direct result of both FC ports on each drive having an active-active behavior in conjunction with proper zoning. Each library instance and drive instance will have the same serial number. As shown in the example, there will be two tape drive instances with identical serial numbers for each physical drive.
-
Right-click the library, and then click Properties.
The Library Properties dialog box appears.
-
In the Alias box, enter a descriptive name for the library.
This name appears for the library in the CommCell Browser. We recommend that you give each library a descriptive name to make system administration easier.
-
Click OK.
-
Configure the library.
Note
Configure the primary DrivePool (usually, the lower SCSI BUS number) for each MediaAgent and all available library controller paths.
-
From the Expert Storage Configuration dialog box, right-click the library that you want to configure, and then click Configure.
-
In the Configuration dialog box that appears, select Library and all drives.
-
Click Yes for sighted library.
-
The Discover Media Options dialog box appears.
-
If the library does not have a barcode reader, select the correct media type that is available in the library.
-
If the library has a barcode reader, do either of the following:
To discover the media in the library automatically, select the default media type, and then click Yes.
To discover the media manually, click No.
-
-
Make sure that media is discovered before you use the library for a data protection operation.
The status of the library changes to Configured in the Expert Storage Configuration dialog box.
The Libraries tab provides the physical view of the devices (library and drives).
The Data Paths tab provides a logical view of the data path used to access the devices (library, master drive pool, drive pool, and drive).
-
In the Expert Storage Configuration dialog box, make sure that the Auto Configure DDS DrivePool check box is cleared.
-
Set the library for SCSI3 reservation.
-
Change the inactivity setting in Unmount Media from the drive from 20 minutes (default) to 30 minutes.
-