You can add or remove clients and agents from cluster group clients. For information on uninstalling components from a cluster, see Uninstalling Commvault Packages from Cluster Group Clients.
Managing Clients in the Cluster Group Client
The following sections describe the steps to add or remove physical computers in the cluster group client.
Add a New Client
-
Install the software on the new physical computer.
For example, to install the Windows File System iDataAgent, follow the steps described in Getting Started - Windows File System Deployment.
-
From the CommCell Browser, navigate to Client Computers | <Cluster Group Client>.
-
Right-click the <Cluster Group Client>and select Properties.
-
On the Client Computer Properties dialog box, click Advanced.
-
On the Advanced Client Properties dialog box, click the Cluster Group Configuration tab.
-
Select the client computer from the Available list and click Add > to move the client to the Selected list.
Note: New Agents will be available for selection from the Agents tab.
-
Click OK.
-
Click OK on the Information dialog box.

The client is successfully updated with the cluster group configuration.
Remove a Client (Deconfigure a Client)
-
From the CommCell Browser, navigate to Client Computers | <Cluster Group Client>.
-
Right-click the <Cluster Group Client>and select Properties.
-
On the Client Computer Properties dialog box, click Advanced.
-
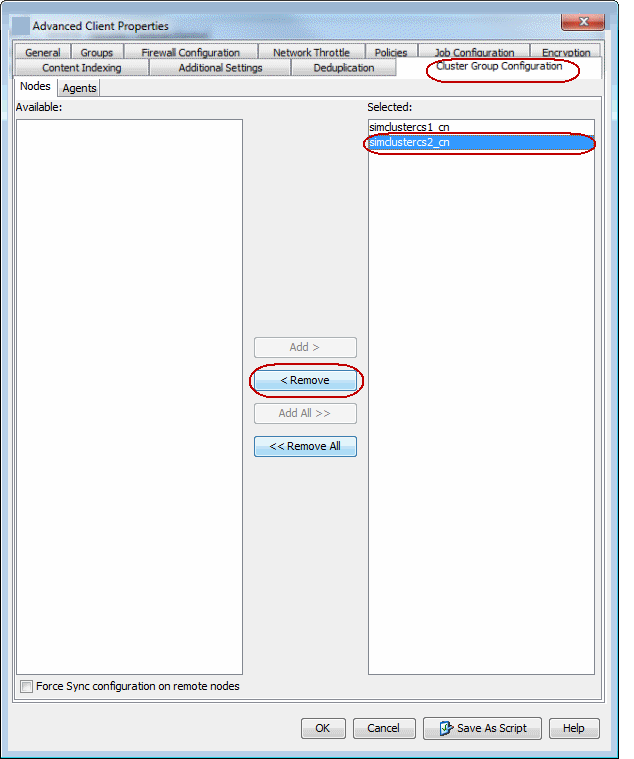
On the Advanced Client Properties dialog box, click the Cluster Group Configuration tab.
-
Select the client computer from the Selected list and click < Remove.
-
Click OK.
-
Click OK on the Information dialog box.
The client is successfully deconfigured from the cluster group.
-
Optional: To delete the deconfigured client, right-click the client and then click All Tasks > Delete.
-
In the Confirmation box, click Yes to delete the deconfigured client computer.
Managing Agents in the Cluster Group Client
The following sections describe the steps to add or remove Agents in the cluster group client.
Add an Agent
Use the following steps to add an agent that is already installed on the physical computer:
-
From the CommCell Browser, navigate to Client Computers | <Cluster Group Client>.
-
Right-click the <Cluster Group Client>and select Properties.
-
On the Client Computer Properties dialog box, click Advanced.
-
On the Advanced Client Properties dialog box, click the Cluster Group Configuration tab.
-
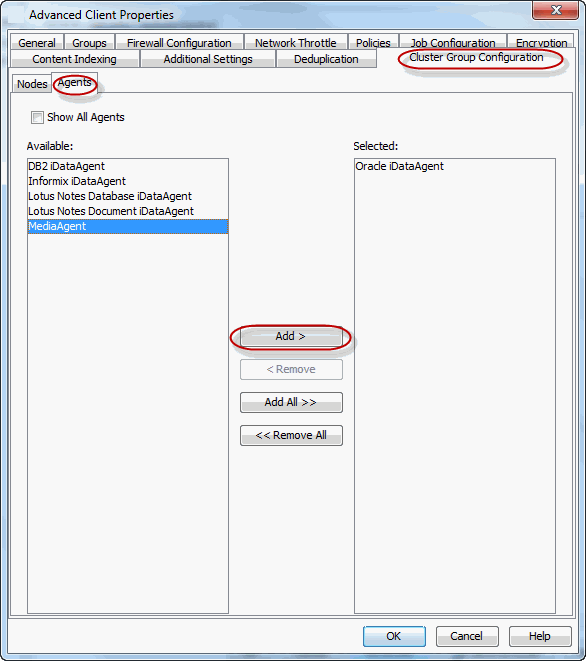
Click the Agents tab.
-
Select an Agent from the Available list and click Add > to move the Agent to the Selected list.
-
Click OK.
-
Click OK on the Information dialog box.
Add an Agent that is not Installed on a Physical Node
To add an Agent to the cluster group client, you need to install the Agent on a physical computer associated with the cluster client. Use the steps below to accomplish this operation.
-
Install the Agent software on the physical computers.
-
From the CommCell Browser, navigate to Client Computers | <Cluster Group Client>.
-
Right-click the <Cluster Group Client>and select Properties.
-
On the Client Computer Properties dialog box, click Advanced.
-
On the Advanced Client Properties dialog box, click the Cluster Group Configuration tab.
-
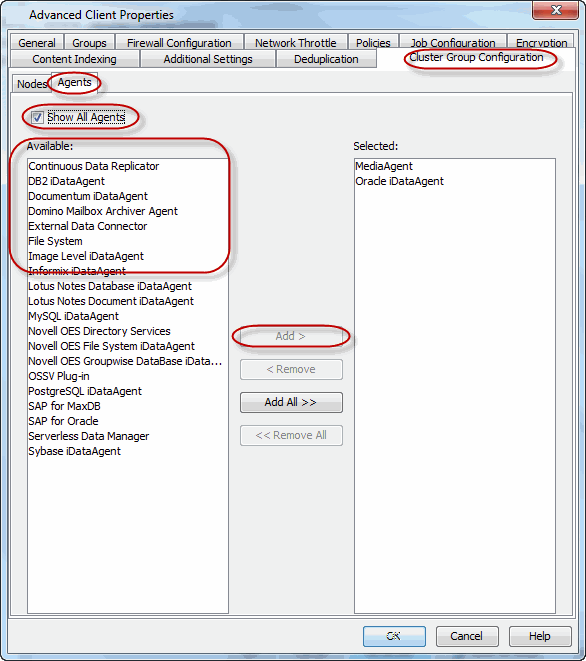
Click the Agents tab.
-
Select the Agent you installed in Step 1 from the Available list and click Add > to move it to the Selected list.
-
Click OK.
-
Click OK on the Information dialog box.
The new Agent in the cluster group is ready for backup and restore operations.
Remove an Agent
-
From the CommCell Browser, navigate to Client Computers | <Cluster Group Client>.
-
Right-click the <Cluster Group Client>and select Properties.
-
On the Client Computer Properties dialog box, click Advanced.
-
On the Advanced Client Properties dialog box, click the Cluster Group Configuration tab.
-
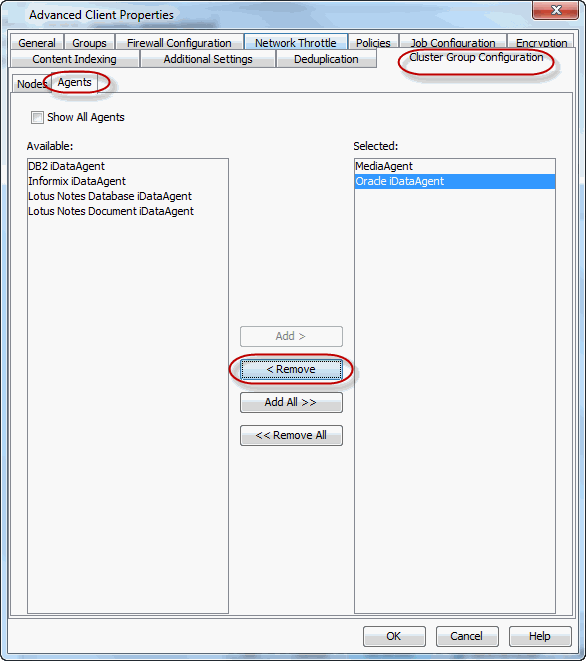
Click the Cluster Group Configuration tab and then click the Agents tab.
-
Select an Agent from the Selected list and click < Remove.
-
Click OK.
-
Click OK on the Information dialog box.
Command Line Operations
You can add, configure and deconfigure a cluster group client from the command line. This is useful in the following scenarios:
-
You can reuse the scripts to configure new cluster groups by replacing the appropriate attribute values in the script.
-
Additional physical computers and Agents can be added to an existing cluster group client.
Create a Cluster Group
The following sections describe the steps to create a cluster group client.
Generating Command Line Script to Create Cluster Group Client
In order to create a cluster group client from the command line, you need to select the required options from the CommCell Console and save it as a script file. This script can be modified as required and then executed from the command line using the 'qoperation execute' command.
Follow the steps given below to generate the script:
-
From the CommCell Browser, right-click the Client Computers node and click New Client | Clustered Server | <Windows/Unix> Cluster.
-
In the Configure Client dialog box, complete the following steps:
-
In the Client Name box, enter a name for the cluster group client
-
In the Host Name box, enter the host name of the computer that will host your cluster group client in the Host Name box.
-
Click Next.
-
-
In the Summary dialog box, click Save as Script.
In the Save as Script dialog box, complete the following steps:
-
From the Client list, select the client computer where you want to save the script.
-
In the File Path box, enter the location where you want to save the script, or click Browse and navigate to the location.
-
By default, the user account that you used to log on to CommCell Console is used to perform the operation. However, if the user account does not have the sufficient privileges, click Use a different user account to enter the username and password for the account.
-
Click OK.
The script will be saved as a .xml file and a .bat file is created.
If a file with the same name already exists in the specified location, the .xml file will be created with a timestamp. However, the .bat file will overwrite the existing file.
Creating the Cluster Group Client
-
Log on to the client computer where the XML file was saved during the Save as Script operation.
-
From the command prompt, navigate to Software_Installation_Directory/Base and run the following command:
qlogin -cs commserve_host_name -u user_name
-
Execute the XML file using the qoperation execute command.
qoperation execute -af XML_File_Location
-
To configure the cluster group client using the command line, see Configure a Cluster Group.
To reuse the XML file, provide a valid value for the following parameters in the XML file:
|
Parameter |
Description |
|---|---|
|
clientType |
Cluster type. Valid values are
|
|
clientName |
Name of the cluster group client. |
|
hostName |
Name of the cluster group client host. This can be a fully qualified domain name or IP address. |
Configure a Cluster Group
The following sections describe the steps to configure a cluster group client once it is created.
Generating Command Line Script to Configure Cluster Group Client
In order to configure a cluster group client from the command line, you need to select the required options from the CommCell Console and save it as a script file. This script can be modified as required and then executed from the command line using the 'qoperation execute' command.
Follow the steps given below to generate the script:
-
From the CommCell Browser, navigate to Client Computers | <Cluster Group Client>.
-
Right-click the <Cluster Group Client>and select Properties.
-
In the Client Computer Properties dialog box, click Advanced.
-
In the Advanced Client Properties dialog box, click the Cluster Group Configuration tab, and select the physical computer and agents that you want to include in the cluster group client.
-
Click the Job Configuration tab, specify the path in the Job Results Directory box, and then click OK.
-
In the Client Computer Properties dialog box, click Save as Script.
In the Save as Script dialog box, complete the following steps:
-
From the Client list, select the client computer where you want to save the script.
-
In the File Path box, enter the location where you want to save the script, or click Browse and navigate to the location.
-
By default, the user account that you used to log on to CommCell Console is used to perform the operation. However, if the user account does not have the sufficient privileges, click Use a different user account to enter the username and password for the account.
-
Click OK.
The script will be saved as a .xml file and a .bat file is created.
If a file with the same name already exists in the specified location, the .xml file will be created with a timestamp. However, the .bat file will overwrite the existing file.
Configuring Cluster Group Client Properties
-
Log on to the client computer where the XML file was saved during the Save as Script operation.
-
From Command prompt, navigate to Software_Installation_Directory/Base and run the following command:
qlogin -cs commserve_host_name -u user_name
-
Execute the XML file using the qoperation execute command.
qoperation execute -af XML_File_Location
-
Log out from the CommServe using the qlogout command.
qlogout [-cs <commserve_host_name>] [-all] [-tf <tokenfile>] [-tk <token>] [-h]
To reuse the XML file, provide a valid value for the following parameters in the XML file:
|
Parameter |
Description |
|---|---|
|
<client> node |
|
|
clientName |
Name of the cluster group client. |
|
CommCellName |
Name of the CommCell computer. |
|
hostName |
Name of the cluster group client host. This can be a fully qualified domain name or IP address. |
|
path |
Path to the Job Results directory. |
|
<clusterClientProperties> node |
|
|
configureClusterClient |
Option to enable the cluster group configuration. The value for this option must be 'true'. Valid values are true/false. |
|
clientName |
Name of the client computer to be associated with the cluster group. |
|
ComponentName |
Name of the Agent to be associated with the cluster group. |
|
osType |
Operating system running on the associated Agent. For example, MediaAgent is the associated component and Windows is the operating system. |
|
forceSyncConfigOnRemoteNodes |
If the CommServe is unable to update a client computer with the cluster configuration, this option creates an update request for the client in the CommServe database. Valid values are true/false. |
Deconfigure a Cluster Group
Use the following steps to deconfigure a cluster group. If you are using a Veritas cluster, follow the steps described in the "Deconfiguring a Veritas Cluster Group" section on this page to deconfigure a Veritas cluster group.
-
Download the deconfigure_cluster_group_template.xml file and save it on the computer from where the command will be executed.
-
From Command prompt, navigate to Software_Installation_Directory/Base and run the following command:
qlogin -cs commserve_host_name -u user_name
-
Execute the saved .xml script using qoperation execute command.
qoperation execute -af XML_File_Location -clientName client_name
-
Logout from the CommServe using the qlogout command.
qlogout [-cs <commserve_host_name>] [-all] [-tf <tokenfile>] [-tk <token>] [-h]
Deconfiguring a Veritas Cluster Group
Use the following steps to deconfigure a Veritas cluster group:
-
Download the deconfigure_vcs_cluster_group_template.xml file and save it on the computer from where the command will be executed.
-
From the Command prompt, navigate to Software_Installation_Directory/Base and run the following command:
qlogin -cs commserve_host_name -u user_name
-
Execute the saved .xml script using qoperation execute command.
qoperation execute -af XML_File_Location -entity/clientName client_name -clientEntity/clientName client_name -clusterGroupAssociationOperationType "CLEAR"
-
Logout from the CommServe using the qlogout command.
qlogout [-cs <commserve_host_name>] [-all] [-tf <tokenfile>] [-tk <token>] [-h]