Configure a Stand-Alone Drive
The following procedure describes the steps involved in configuring a stand-alone drive attached to a MediaAgent.
Required Capability: See Capabilities and Permitted Actions
To Configure a Stand-Alone Drive
-
Detect the devices for the MediaAgent to which the stand-alone drive you wish to configure is attached. Detect the devices as described in Device Detection.
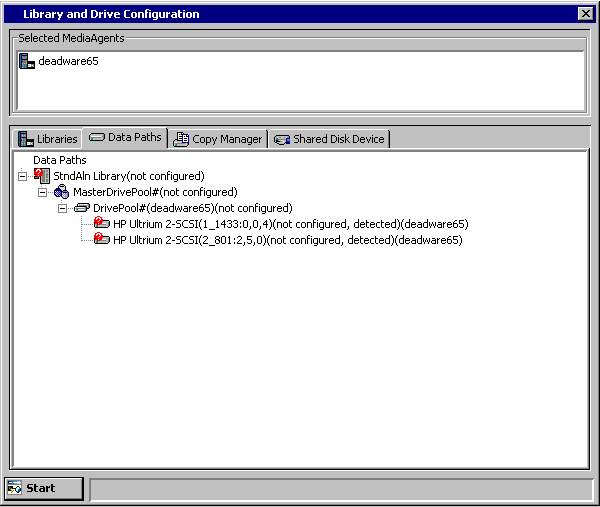
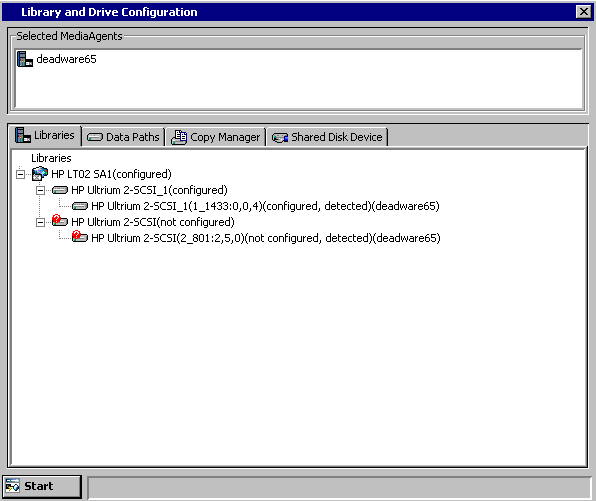
All the devices attached to the selected MediaAgent are displayed in the Expert Storage Configuration window.
-
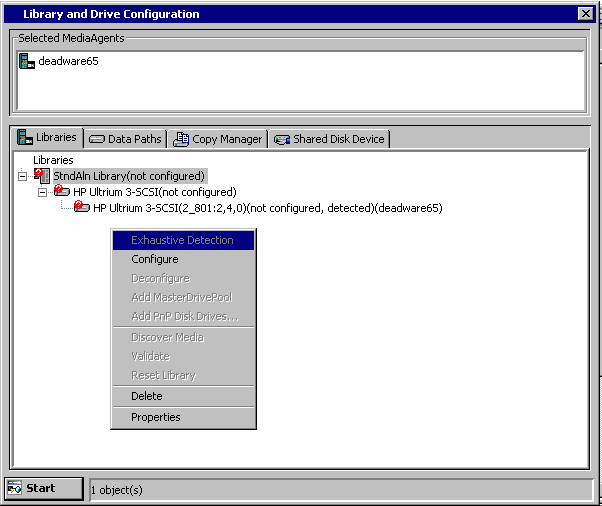
If you want to modify library properties, right-click the library and select Properties.
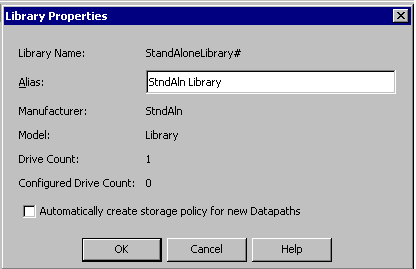
You can change the following properties:
Alias - The name of the library. This name is displayed in the CommCell Browser for the library.
We strongly recommend that you provide appropriate labels or aliases for each stand-alone drive . This will help you identify the proper drive when you are prompted to insert media into a drive.
When you are satisfied with your changes, click OK.
Note
-
The system displays this prompt only if a library is not configured. Subsequently the Expert Storage Configuration window displays a blank screen.
-
If a library is already configured, this prompt is not displayed. Subsequently the detected devices are displayed with detection status detect success in the Expert Storage Configuration window.
-
We recommend that you give each library a descriptive name as its Alias, for easier system administration. For stand-alone drives, we strongly recommend that you physically label each drive using the library name shown in the configuration window. This will help you identify the proper drive when you are prompted to insert a cartridge into a drive.
Note
-
-
When you are satisfied with your changes, click OK.
-
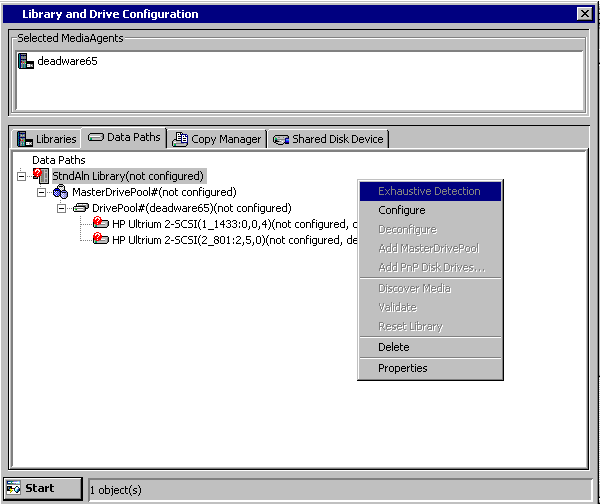
In the Expert Storage Configuration window, right-click the library that you want to configure, and then click Configure.
-
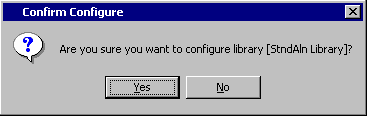
A prompt appears, asking if you are sure that you want to configure the library. Click Yes to continue with the configuration.
-
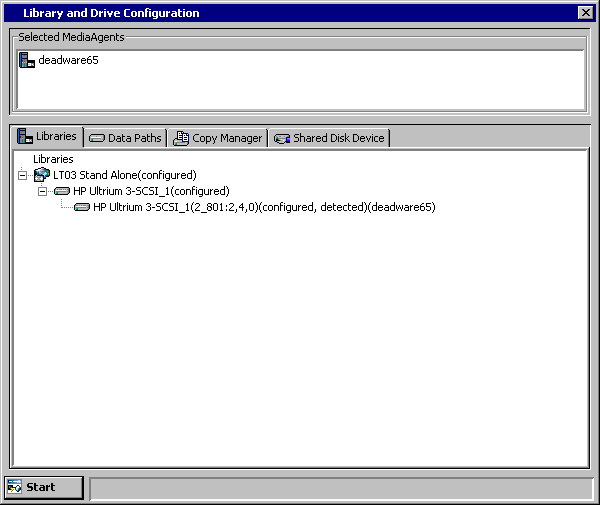
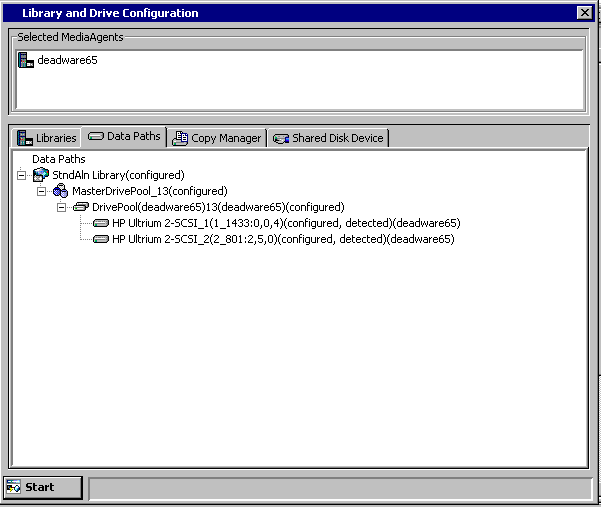
The status of the library changes to configured.
Configure Multiple Stand-Alone Drives into a Drive Pool
The following procedure describes the steps involved in configuring multiple stand-alone drives with the same drive type attached to a MediaAgent. For an overview of this operation, see Drive Pooling Stand-Alone Drives.
Required Capability: See Capabilities and Permitted Actions
To Configure Multiple Stand-Alone Drives into a Drive Pool
-
Detect the devices for the MediaAgent to which the stand-alone drive you wish to configure is attached. Detect the devices as described in Device Detection.All the devices attached to the selected MediaAgent are displayed in the Expert Storage Configuration window.
-
If you want to modify library properties, right-click the library and then click Properties.
You can change the following properties:
Alias - The name of the library. This name is displayed in the CommCell Browser for the library.
We strongly recommend that you provide appropriate labels or aliases for each stand-alone drive . This will help you identify the proper drive when you are prompted to insert media into a drive.
When you are satisfied with your changes, click OK.
We recommend that you give each library a descriptive name as its Alias, for easier system administration. For stand-alone drives, we strongly recommend that you physically label each drive using the library name shown in the configuration window. This will help you identify the proper drive when you are prompted to insert a cartridge into a drive.
-
In the Expert Storage Configuration window, right-click the library that you want to configure, and then click Configure.
Locate the library that you want to configure. If the library was never configured, the library and drive identifiers end in a # sign (i.e., Library#). If the library was configured and then deconfigured, the library and drive names are retained (e.g., Library2).
-
Click Yes to continue with the configuration.
-
The status of the library changes to configured.
Drive Pooling Stand-Alone Drives That Were Previously Configured as Separate Stand-Alone Drives
The following procedure describes the steps involved in re-configuring multiple stand-alone drives in a drive pool. Note that the stand-alone drives must be of the same drive type and attached to the same MediaAgent. For an overview of this operation, see Drive Pooling Stand-Alone Drives.
Required Capability: See Capabilities and Permitted Actions
To Configure Multiple Stand-Alone Drives into a Drive Pool
-
Log on to CommCell Console.
-
On the ribbon in the CommCell Console, click the Storage tab, and then click Expert Storage Configuration.
-
Under Available MediaAgents, select the MediaAgent (s) that are attached to the library and on which the library needs to be configured and then click Add >>.
Click OK.
-
To configure any shared library, make sure you select all the MediaAgents that share the library.
-
If a device has already been configured for the MediaAgent, the system displays the device in the Expert Storage Configuration window.
-
For cluster, select the cluster server as the MediaAgent.
-
-
Click OK to continue.
-
The system displays this prompt only if a library is not configured. Subsequently the Expert Storage Configuration window displays a blank screen.
-
If a library is already configured, this prompt is not displayed. Subsequently the detected devices are displayed with detection status detect success in the Expert Storage Configuration window.
-
-
All the stand-alone drives that are currently configured will be displayed in the Expert Storage Configuration window.

-
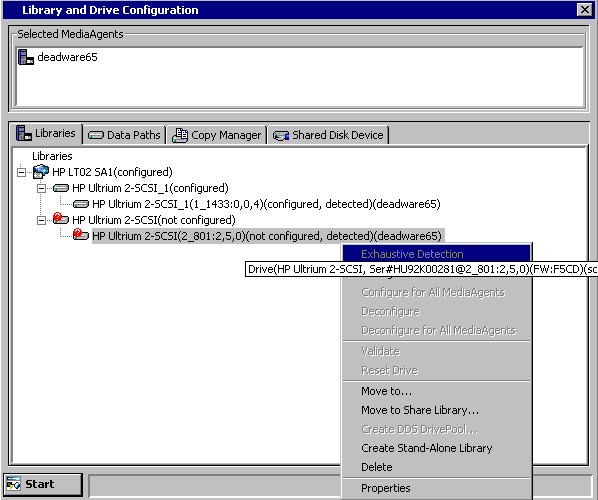
Deconfigure all the libraries, except one library associated with any of the stand-alone drives.
-
Click Yes in the Confirm Deconfigure prompt which appears when you deconfigure the library.
-
If necessary, repeat this step to deconfigure all the libraries that will be used to create the drive pool - except one stand-alone library, as mentioned above.
-
The deconfigured library will be displayed with the not configured status.

-
-
Delete the deconfigured drive. Detect the devices as described in Device Detection.
-
Configure the drive that was detected.
-
Click Yes in the Confirm Configure prompt which appears when you configure the drive.
-
If necessary, repeat this step to configure all the drives that were detected.
-
The drives are configured and displayed with the configured status.
-
-
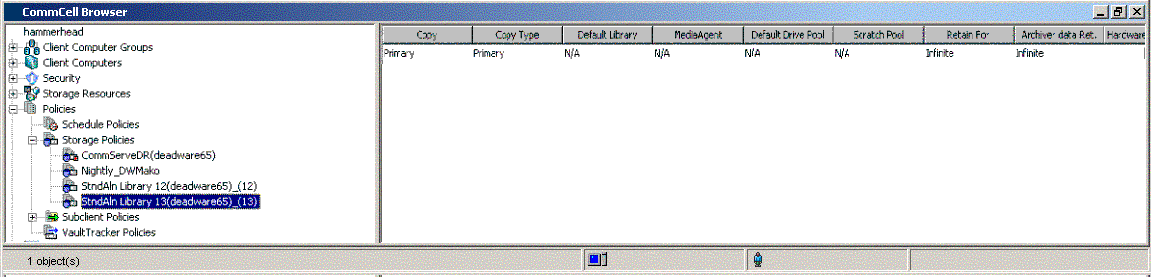
From the CommCell Browser, locate the Storage Policy associated with the deconfigured drives. In the right-pane of the CommCell Browser, right-click the primary copy and then click Properties.
-
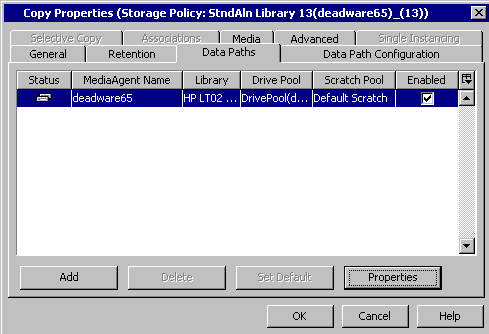
From the Data Path tab of the Copy Properties dialog box, add the data path associated with the library in which the drive is currently drive pooled as the alternate data path. (See Add a Data Path to a Storage Policy Copy for step-by-step instructions.)
-
If necessary, repeat this step to add the data path in all the storage policies associated with the drives that were deconfigured.
-
Configure a Stand-Alone Drive Shared across a SAN (DDS)
The following procedure describes the steps involved in configuring a Stand-Alone drive that is shared across a SAN with DDS.
Before You Begin
Check the following before you configure the library in the SAN environment:
-
Hardware is configured according to the conventions detailed in Hardware Configuration Guidelines - Libraries Attached to a SAN.
-
MediaAgent software is installed on every computer that is connected to the SAN, and that will access the library. The MediaAgent software can be installed on the computers in any order; the installation sequence does not affect the library configuration.
-
This feature requires a Feature License to be available in the CommServe® Server.
For general information about licenses, see the Commvault Licensing Program Guide. Also, Applying a License in the CommCell Console provides step-by-step instructions on how to view and apply licenses.
To Configure a Stand-Alone Drive across a SAN (DDS)
-
Log on to CommCell Console.
-
On the ribbon in the CommCell Console, click the Storage tab, and then click Expert Storage Configuration.
-
Under Available MediaAgents, select the names of all the MediaAgents that will share the stand-alone drive and then click Add >>.
Click OK.
-
Click OK to continue.
-
Detect the devices. Use Device Detection as required.
-
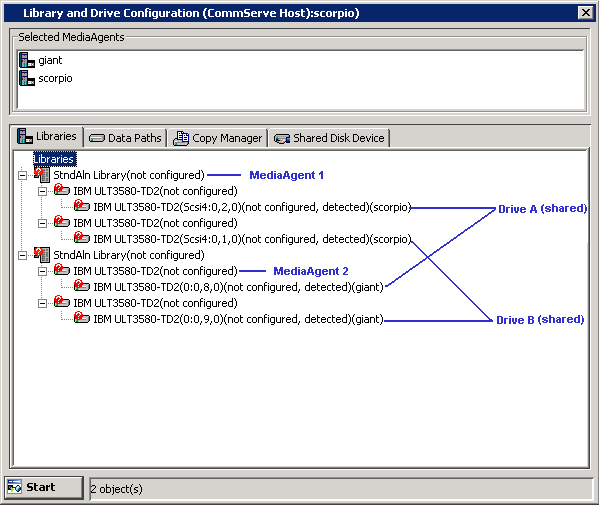
The stand-alone drives connected to the selected MediaAgents across the SAN will be displayed in the Expert Storage Configuration window.
Note
If you have MediaAgent 1 and MediaAgent 2 sharing Drive A and Drive B, then the drives should appear twice, once associated with MediaAgent 1 and once associated with MediaAgent 2.
The sample image represents a similar configuration.
-
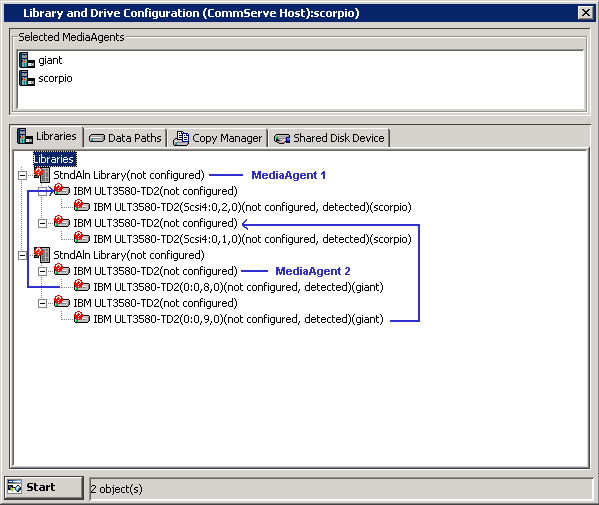
The drives from the stand-alone libraries must be grouped together.
Drag the Drive A associated MediaAgent 2 and drop it together with the Drive A associated with MediaAgent 1 (into the other stand-alone library). Similarly, drag and drop Drive B.
The sample image illustrates the drag and drop.
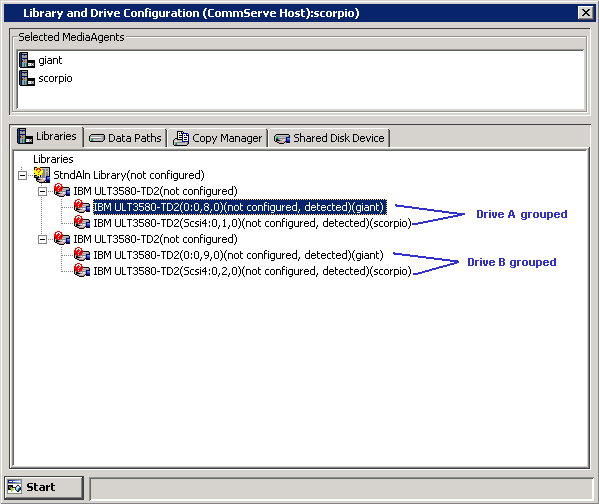
-
After moving the drives, the standalone library the drives under the standalone library should look similar to the sample image.
-
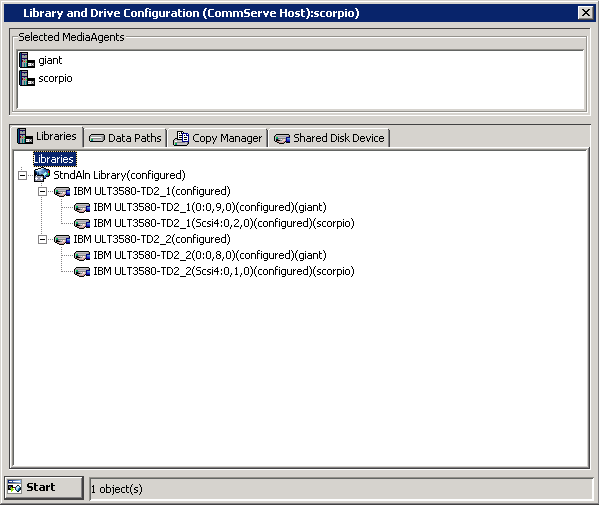
Configure the library as described in Configuring Devices.
-
The library is configured and displayed with the configured, detect success status in the Expert Storage Configuration window.
-
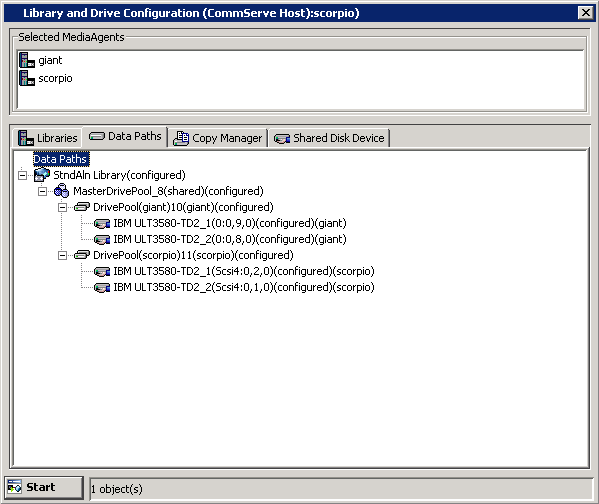
The Library tab provides the physical view of the devices (library and drives).
The Data Paths tab provides a logical view of the data path used to access the devices - library, master drive pool, drive pool, drive.