Overview
A stand-alone library is a one-drive storage unit with no media storage capability, no media changer, and no barcode reader.
Notes
-
As stand-alone drives do not have the facility to store used media, it is your responsibility to label and store all used media in a secure and accessible location.
-
Stand-alone drives are not supported on virtual machines.
Removable Disk Drives are also configured as a stand-alone library.
All the features described in following sections apply to both stand-alone drives and removable disk drives unless otherwise stated.
Configuring Stand-Alone Drives
Single Library Configuration
The stand-alone drive is physically attached to the MediaAgent that controls the library as represented in the following illustration:
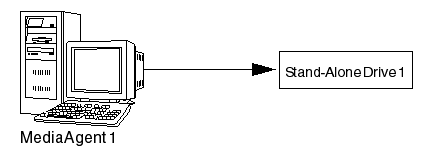
Configure a Stand-Alone Drive provides step-by-step instructions on how to configure such a library.
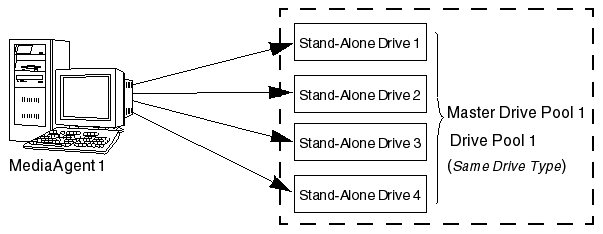
Drive Pooling Stand-Alone Drives
Several stand-alone drives with the same drive type are attached to a MediaAgent. These stand-alone drives can be pooled together as a Drive Pool. This is represented in the following illustration:
Drive pooling offers the following advantages:
-
Automatic Tape spanning for large data protection operations
When performing large data protection operations, the operation will automatically span to another media in another drive when the currently active media is full, without any manual user intervention.
-
Facility to perform multi-streamed data protection jobs
Multiple streams provide the means to parallelize an operation and thus improve the rate at which data can be written to or retrieved from the storage media. As each stream requires a drive and a storage media, drive pooling provides the facility to run multi-streamed data protection operations.
Configure Multiple Stand-Alone Drives into a Drive Pool provides step-by-step instructions on how to configure several stand-alone drives into a drive pool.
Drive Pooling Stand-Alone Drives That Were Previously Configured as Separate Stand-Alone Drives provides step-by-step instructions on how to re-configure existing stand-alone drives (that are not drive pooled) into a drive pool.
Media Labeling in Stand-Alone Drives
Automatic Labeling Schemes
Facility to automate the process of labeling media (On Media Label - OML) associated with stand-alone drives is provided. Several Label Options are provided to suit the labeling conventions used in your organization.
Care must be exercised while generating the labeling scheme to ensure that each media label is unique. If the specified labeling scheme is not unique, and if duplicate labels are found, the system automatically appends a media ID to make it unique.
The following list provides some examples of labeling schemes:
-
If a separate media is used for each day of the week and if every month a new set of media is used, the following labeling format can be used:
<DAY>_<DATE>
This would generate a label as follows on each of the media associated with each day of the week, the first time the media is used in the library:
Monday_Sep 22 2004, Tuesday_Sep 23 2004, etc.
The <DAY> would make the label easily identifiable, and the <DATE> in addition to providing the month in the label, also makes the label unique.
-
If the media must be identified based on the stand-alone drive in which the media is used, the following labeling format can be used:
<DRIVE><NUMBERSTART>
This would generate the following labels:
BRANCH A 1 (assuming that the drive is named as Branch A)
If stand-alone drives are pooled together the drive pool name can be used instead of the drive name.
Setting Up Automatic Labeling Schemes
-
Specify the labeling scheme for a stand-alone drive, from the appropriate Library Properties (Media) tab. (See Create Automatic Labeling Schemes for step-by-step instructions.)
-
The labels are stamped whenever non-stamped media is found when the system checks the media in the drive to update the media information. See Detecting Media Changes in Stand-Alone Drives for more information.
-
When you introduce a media into the stand-alone drive, you can wait until the system checks for the media in the drive to automatically label them using the labeling scheme (as explained above) or you can manually stamp the media using either the established labeling scheme or a new label for the media. (See Add Media Identifiers (Stamp Media) for step-by-step instructions.
Manual Stamping of Media
If the automatic labeling scheme is not established the stamp media operation can be used to pre-label stand-alone tapes, so that it can be introduced as a spare at any time.
We recommend that you affix an external label on the media, with the same unique identifier. This will help you to properly manage the media associated with stand-alone drives
Once stamped, the media can be used in any CommCell that contains a stand-alone drive if the option to overwrite media When it is from a different CommCell is enabled from the Media tab of the Library Properties dialog box.
Media that are not stamped (either automatically or manually) will be displayed as Unidentified Media. Data write operations will use the media, but will create a default system generated OML for the media using the media creation date and time. For example, StdAln_Wed Nov 10 2004 19:52:38_3.
Media from another CommCell will also be displayed as Unidentified Media. Such media will be overwritten only when the Overwrite Media - When it is from a different CommCell option is enabled in the associated Library Properties (Media) dialog box.
Media Operations in Stand-Alone Drives
Stand-alone libraries do not have an initial list of spare media. The system prompts you to insert a new media whenever it is required. If you have not created the On Media Label using the Automatic Labeling Scheme or the Manual Stamp Media operation, the system creates a default OML for the media, the first time you perform a write operation on the media. Subsequently, if necessary, you can provide your own label for the media at any time. The On Media Label is used to correctly identify the media during subsequent media operations.
When you perform a data write operation using a stand-alone drive:
-
If the correct media is available in the drive, the data protection operation will continue.
-
If there is no usable media in the drive at the time the job runs, the system would create a temporary dummy media for reservation purposes, and remove it as the actual media becomes available.
-
If a new media is inserted, the previously active media is marked as Appendable and if a label is not found in the new media, the system writes a default OML and continues with the operation.
-
If a recycled media is inserted the previously active media will be marked as Appendable and the data protection operation will continue.
-
If a media inserted is associated with a different storage policy/copy/stream than that of the current job, you will be prompted to insert the active media or a new or appendable media in the stand-alone drive. The data protection operation will not continue until the correct or new/appendable media is inserted.
-
If no media is inserted in the drive, a pop-up window prompts for the required/new media. The pop-up window will be refreshed every three minutes, until the required media is inserted.
Note
If an operator is not available to insert the required media, we recommend that you avoid scheduling jobs that use different storage policies for a stand-alone drive. If you want to schedule jobs for a stand-alone drive, make sure that all of the jobs use the same storage policy. If a scheduled job uses a different storage policy from the one to which the media in the drive belongs, the job cannot start until someone removes that media and inserts another. This may defeat the purpose of scheduling the job.
-
If a spare media is not available, and if another media is available in the stand-alone drive, the system will overwrite the media if it is from the same storage policy and if the Overwrite Media if Media Last Written to in (n) Days/Hours option is enabled in the Library Properties dialog box associated with the stand-alone drive. This option also allows you to specify the time (in days or hours) after which the media can be over written. This ensures that data protection operations complete successfully, when a spare media or media marked as Appendable is not available in the drive. Note, that this option is only applicable for data protection operations, and does not apply for Synthetic Full, Auxiliary Copy and ER backup operations.
Note
Care must be exercised while enabling this option, as the system will age (prune) and overwrite the data available in the media, if the data is found to be from the same storage policy from which the job is initiated.
-
The system will automatically unload the media from the drive when a different media is required when the Overwrite Media in drive if Media Not Written to in (n) Days/Hours option is enabled is enabled in the Library Properties dialog box associated with the stand-alone drive.
(If the stand-alone drive supports the automatic ejection of the media from the drive, the media will also be ejected.)
If this option is not selected, the system will not unload the media from the drive and will overwrite the media (when a job is initiated) if the Overwrite Media in drive if Media Not Written to in (n) Days/Hours option is enabled, after the time specified in this option. (See Enable (or Disable) Unloading of Media from a Stand-alone Drive when Different Media is Requiredfor step-by-step instructions.)
All media available in a stand-alone drive are displayed in the CommCell Browser under the Exported Media pool. Assigned media will be displayed in the Assigned Media pool, bad media will be displayed under Retired Media and recycled media in the Default Scratch Pool.
The system will not unmount the media from the drive once the operation on the media is completed. The media will be displayed in the CommCell Console as mounted in the drive. You can however, unmount the media from the drive after data protection, data recovery and Auxiliary copy operations by enabling the Unmount Media from the drive after (n) Minutes/Hours of inactivity option in the Media Usage tab of the Library Properties dialog box. (See Modify the Unmount Time for Inactive Media in the Drive for step-by-step instructions.)
Pop-Up Messages in Stand-Alone Drives
Pop-up messages are displayed for stand-alone drives when a wrong media or no media is available in the drive. These messages are displayed in the following computers:
-
MediaAgent computer to which the stand-alone drive is attached
-
All machines that have the CommCell Console (stand-alone application) open, when the option Show Media related Pop up Message in CommCell Console is enabled in the Media tab of the Library Properties dialog box.
See Enable (or Disable) Media Related Pop-Ups in the CommCell Console for step-by-step instructions.
For example, on the MediaAgent machine, if the stand-alone version of the CommCell Console is open, you will see two pop-up messages. You can click the OK button in any one of these messages. However, only a response on the MediaAgent computer will take effect. If however, you do not respond to the message, the message is displayed for three minutes and after three minutes the message is automatically refreshed.
Note
If you click the Cancel option in the pop-up message for media request from a data protection or data recovery operation, the mount operation for the media will fail and the job will go to pending or may fail depending on the Job Restart options established in the Advanced tab of the Job Management dialog box. (See Preempting Jobs for more information.)
Detecting Media Changes in Stand-Alone Drives
When the media in a stand-alone drive is removed or changed, the corresponding media information in the CommCell Console can be updated as follows:
-
Set up the Automatic Checking of Media in Stand-Alone Drives. This option can be established from the Drive tab of the Library Properties dialog box. (See Setup Automatic Checking of Media for step-by-step instructions.) When established this option automatically checks the media in the stand-alone drive and updates the information in the CommCell Console. This option also provides the facility to establish, how often this check must be performed to update the information. It is recommended that this option be enabled with frequent updates, so that the media information in the CommCell Console is up-to-date.
-
Perform a Verify Media Operation. To manually verify the media in the drive perform a Verify Media Operation. This will immediately update the media information in the CommCell Console.
If the Automatic check for media option is not established and if a verify media operation is not performed, the system checks the media when a read/write operation is initiated in the drive.
Cleaning Stand-Alone Drives
The following section applies only to stand-alone drives and is not applicable for removable disk drives.
You must manually clean the stand-alone drives, whenever necessary. The Clean Drive option is not provided for stand-alone drives. However, after manually cleaning the stand-alone drives, you must mark the drive as cleaned using the Mark Drive Cleaned option. This will reset the counters that keep track of the number of events that have occurred since the drive was cleaned. For more information on marking a drive as cleaned, see Mark Drive Cleaned.
GridStor and Stand-Alone Drives
Stand-alone drives can be used to configure Alternate Data Paths (GridStor). Typical scenario in which this feature is useful is when a production site is backed up and restored to a DR site regularly using a stand-alone drive.
License Requirements
-
This feature requires a Feature License to be available in the CommServe® Server.
For general information about licenses, see the Commvault Licensing Program Guide. Also, Applying a License in the CommCell Console provides step-by-step instructions on how to view and apply licenses.