To add a Hedvig Storage Proxy with a DNS resolvable virtual hostname and dynamic private VIP allocation, you enter the deployment environment and follow a series of prompts.
Procedure
-
Set up the storage proxies, as described in Setting Up Hedvig Storage Proxies.
-
Start a
tmuxsession.tmux -
Enter the Hedvig deployment environment.
/opt/hedvig/bin/hv_deploy -
Login to the cluster:
login_to_cluster <cluster_name>
-
Enter:
add_cvms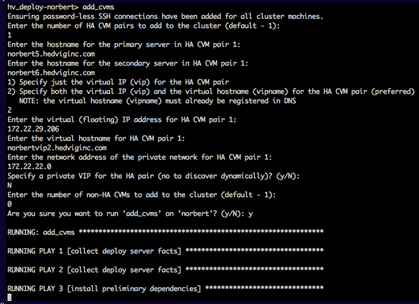
-
Respond to the prompts. (Only those prompts requiring additional explanation are listed here.)
1) Specify just the virtual IP (vip) for the HA CVM pair2) Specify both the virtual IP (vip) and the virtual hostname (vipname) for the HA CVM pair (preferred)If the DNS is available, and the virtual hostname is resolvable, enter 2. Otherwise, enter 1 – to specify only the VIP address.
Enter the network address of the private network for HA CVM pair 1:Enter the network address of the private network configured on the ESXi host for the storage proxies.
Specify a private VIP for the HA pair (no to discover dynamically)? (y/N):Enter y to specify a VIP address on the private network.
Enter N (or just press enter, since it is the default) for the deployment process to automatically assign an unused IP in the provided private network address.Enter the number of non-HA CVMs to add to the cluster (default - 1):For S3 object storage, use only non-HA storage proxies.